Forum Discussion
LangsRV2
Apr 26, 2013Explorer
Siding repaired!!!
I have decided that RV siding is not my favorite thing to work with. I would much rather have taken off all the siding instead of working around it. However the trim holding the siding was screwed into the trailer BEFORE the slide was installed making it impossible to unscrew it unless the slide is removed from the trailer, requiring heavy equipment and know how. So we had to work with the siding how it was.
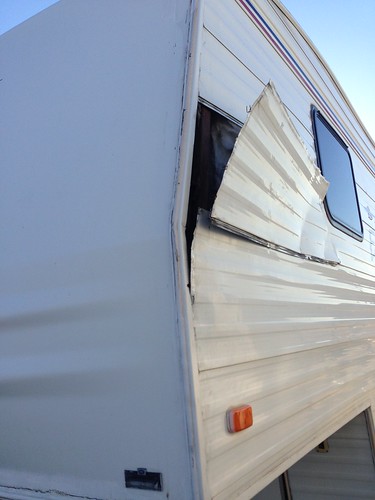
One piece of siding was badly mangled when we purchased the trailer. It had come loose when the previous purchasers got on the freeway the frame of the RV was so rotten that the staples just pulled loose. Additionally several screw holes were added when the dealer tried to secure it for use for our trip home. Replacement was the only option.
See our previous post here for our frustration in buying the wrong size. After a second trip to the RV store we could only get the right sized piece in a light gray color instead of white. Kind of stuck between a rock and a hard place we decided to just go ahead and use the gray. Spending hours driving the other direction in hopes the other store would have it just wasn't a good option with more rain coming.
The before photo. This is what it looked like when we bought it before we tore it apart.

First we cut out the curve and front edge angle. The new piece was left about 6 inches longer than the original for an overlap.

Cut off the locking channel off the siding on the trailer to match the overhang of the new piece. Very difficult in the corner, not the straightest line in the world but it works and it will be covered up anyway.

Cut a notch in the new piece to tuck into the old piece

Peeled back the rest of the siding as best we could. Ended up creasing it a little in a few places. It's just so easy to damage. Started at the top and worked down. We went back as far as we could but there is still a bit of space without staples, maybe the distance between 1-2 studs. We just couldn't get the gun in there without damaging the siding any more. If it becomes a problem down the road we will have to either screw through the siding from the outside or take the RV somewhere and have the side removed and all the siding reset.
The factory used 3/8 crown 3/4 leg staples to attach the siding but after going to 4 stores looking for the staples with no luck we gave up and decided to use what we had. So we used 1/4 crown 3/4 inch leg staples to attach siding.

Finished! The gray siding is hardly noticeable with all that duct tape, maybe we will just leave it.
I have decided that RV siding is not my favorite thing to work with. I would much rather have taken off all the siding instead of working around it. However the trim holding the siding was screwed into the trailer BEFORE the slide was installed making it impossible to unscrew it unless the slide is removed from the trailer, requiring heavy equipment and know how. So we had to work with the siding how it was.
One piece of siding was badly mangled when we purchased the trailer. It had come loose when the previous purchasers got on the freeway the frame of the RV was so rotten that the staples just pulled loose. Additionally several screw holes were added when the dealer tried to secure it for use for our trip home. Replacement was the only option.
See our previous post here for our frustration in buying the wrong size. After a second trip to the RV store we could only get the right sized piece in a light gray color instead of white. Kind of stuck between a rock and a hard place we decided to just go ahead and use the gray. Spending hours driving the other direction in hopes the other store would have it just wasn't a good option with more rain coming.
The before photo. This is what it looked like when we bought it before we tore it apart.
First we cut out the curve and front edge angle. The new piece was left about 6 inches longer than the original for an overlap.
Cut off the locking channel off the siding on the trailer to match the overhang of the new piece. Very difficult in the corner, not the straightest line in the world but it works and it will be covered up anyway.
Cut a notch in the new piece to tuck into the old piece
Peeled back the rest of the siding as best we could. Ended up creasing it a little in a few places. It's just so easy to damage. Started at the top and worked down. We went back as far as we could but there is still a bit of space without staples, maybe the distance between 1-2 studs. We just couldn't get the gun in there without damaging the siding any more. If it becomes a problem down the road we will have to either screw through the siding from the outside or take the RV somewhere and have the side removed and all the siding reset.
The factory used 3/8 crown 3/4 leg staples to attach the siding but after going to 4 stores looking for the staples with no luck we gave up and decided to use what we had. So we used 1/4 crown 3/4 inch leg staples to attach siding.
Finished! The gray siding is hardly noticeable with all that duct tape, maybe we will just leave it.
About DIY Maintenance
RV projects you can tackle on your own with a few friendly pointers.4,410 PostsLatest Activity: Jun 16, 2026