Forum Discussion
JoeChiOhki
Jul 30, 2017Explorer II
Sunday, July 9, 2017
Rebuilding “Ms. Merry”, the Amerigo–Completing the Cabover, Part 1
Poor Ms. merry, she’s sat waiting patiently for almost a year before I got the gang back together again.
She’s even had to suffer through the indignity of her Cabover Escape Hatch giving way under a snow load in January and it not being noticed for quite some time, leaving us alot of clean-up work to repair the damage to the brand new inside.
We’ll have a picture soon of Ms. Merry’s better than new escape hatch and her nifty-new Winnegard Batwing antenna (Just as soon as we clear the two inches of fir needles off the rest of poor Merry’s roof).
When we stopped last year on Ms. Merry, we’d just gotten the brand new ceiling in, and were insulating the cabover walls and trying to cut the plywood to close in the side walls.


We’d gotten the insulation down pat, but we’d made a miserable mess of trying to make new cabover sidewalls, attempting to reuse the old wall paneling to trace out the new panels, but they would never line up properly.
Finally, Mrs. Dawn said, “Why don’t you just staple some cardboard on the wall and make a template of what you need and then trace that out on the wood instead?”
The Milwaukee brothers and I looked at each other and had to scratch our heads to ponder why that idea hadn’t come to us in the first place. Good thing we’ve got Mrs. Dawn to keep us blunderheads from wasting anymore expensive wood!
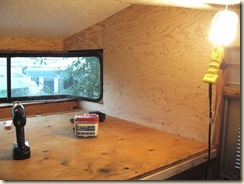
Sure enough, we made a perfectly fitting template on our first try and it worked so well that it even fit on both sides!


In case you’re wondering, the floor is just sitting in place, the wall panel goes all the way down to the cabover floor frame.
A quick zip with Mr. Router, and we’ve got side windows again .
.


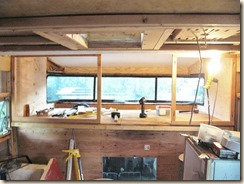
We liked how it was looking so much, we decided we wanted to show you how the frames for the inside cabover wall looked sitting in place .
.

You can kind of guess where the opening to the cabover will be . Some cross pieces to support the cabinets in the kitchen and where the TV cabinet in the cabover still need to be added, but it’s coming together
  .
.
Rebuilding “Ms. Merry”, the Amerigo–Completing the Cabover, Part 1
Poor Ms. merry, she’s sat waiting patiently for almost a year before I got the gang back together again.
She’s even had to suffer through the indignity of her Cabover Escape Hatch giving way under a snow load in January and it not being noticed for quite some time, leaving us alot of clean-up work to repair the damage to the brand new inside.
We’ll have a picture soon of Ms. Merry’s better than new escape hatch and her nifty-new Winnegard Batwing antenna (Just as soon as we clear the two inches of fir needles off the rest of poor Merry’s roof).
When we stopped last year on Ms. Merry, we’d just gotten the brand new ceiling in, and were insulating the cabover walls and trying to cut the plywood to close in the side walls.
We’d gotten the insulation down pat, but we’d made a miserable mess of trying to make new cabover sidewalls, attempting to reuse the old wall paneling to trace out the new panels, but they would never line up properly.
Finally, Mrs. Dawn said, “Why don’t you just staple some cardboard on the wall and make a template of what you need and then trace that out on the wood instead?”
The Milwaukee brothers and I looked at each other and had to scratch our heads to ponder why that idea hadn’t come to us in the first place. Good thing we’ve got Mrs. Dawn to keep us blunderheads from wasting anymore expensive wood!
Sure enough, we made a perfectly fitting template on our first try and it worked so well that it even fit on both sides!
In case you’re wondering, the floor is just sitting in place, the wall panel goes all the way down to the cabover floor frame.
A quick zip with Mr. Router, and we’ve got side windows again
We liked how it was looking so much, we decided we wanted to show you how the frames for the inside cabover wall looked sitting in place
You can kind of guess where the opening to the cabover will be
About Travel Trailer Group
44,056 PostsLatest Activity: May 04, 2014