- Good Sam Community
- Everything RV
- RV Tips & Tricks
- Reese WD head clarification
- Subscribe to RSS Feed
- Mark Topic as New
- Mark Topic as Read
- Float this Topic for Current User
- Bookmark
- Subscribe
- Mute
- Printer Friendly Page
Reese WD head clarification
- Mark as New
- Bookmark
- Subscribe
- Mute
- Subscribe to RSS Feed
- Permalink
- Report Inappropriate Content
Jun-11-2014 12:14 PM
It was purchased in 2010 may but wether it was made in that era is unknown. It came with 1200/12000 bars
I'm trying to distinguish which hitch head I have and what the weight
ratings are on for it.
My trailer has a 1200 pound dry weight and is a toy hauler so when
loaded down hitch weight decreases a max of about 200 pounds so I have
picked 1500 pound trunnion bars to get the job done. I'm wondering if the head will work with them and be rated to support them.
I have done a lot of searching online for info on the head and have
found that is a HP head/3 piece weld (not cast) but not sure on which weight rating. (No sticker on it anymore) now I have seen pictures of identical heads with 1200,12000 as max and alsopictures with the sticker showing 1700,17000 max.
Main reason is I want to be safe and I want the hitch to be effective
Also with my gold dual cams I'm wondering which ones I might have?
With the dual cam system the 26002 retails for about $200 and the
26025 retails for about $450
Mainly I'm wondering here why the huge price difference from
retailers?(225%) is there a difference in quality?
From what I read online the 26002 originally gold and then changed to
silver. And once it changed to silver the 26025 was released in gold.
Kind of wondering which one of the gold ones I actually have?
Thanks for any help
Steve
- Mark as New
- Bookmark
- Subscribe
- Mute
- Subscribe to RSS Feed
- Permalink
- Report Inappropriate Content
Jul-01-2014 08:08 AM
first thing is you said max turn of 77 degrees or so, i can go plus of 90 degrees turning forwards with my truck without hitting trailer. i took a few pictures just to show you below. now is this going to be a problem with the wd setup? also my driveway is super sloped and curves with slopes. how does the wd work with steep incline changes, im talking downhill then uphill creating a giant "U" and dont forget to throw the sharp turn in there? will i risk breaking the hitch?


i tried to mount the dual sway and snap ups, symmetrically to ball center, dont know if this is proper but made sense to me for either side of the frame to be "torqued" on in the same spots.
i tried to get the chains installed as vertical as possible pretty much touching the LP tanks. oh well should work.


dual cam brackets got pretty flush to bottom of frame with 2 washers per bolt thanks for the recommendation


in this picture you can see the u-bolt it has some give and seems as if there was more pressure down on the bar it would pull out seems a little mickey mouse again to me, is this proper or should it be changed?

one more question is this the way the dual cam should seat i took the hanger chain off to get a better picture, seems as center as i can make it?

im going to be off to a flat parking lot here in a few hours, the one i found was alright but not perfect and had a bit of a side incline, im hoping i can find better, it seems its very hard to find perfectly level parking lots these days. i guess i have to adjust head tilt, and get my heights today see if its even going to work.

thanks for your help, steve
- Mark as New
- Bookmark
- Subscribe
- Mute
- Subscribe to RSS Feed
- Permalink
- Report Inappropriate Content
Jun-30-2014 09:16 PM
Steve6l wrote:
I figure I have a good handle on the information you have given to me.
Realistically I can setup the cam and hanger brackets in my driveway and then go to a flat parking lot to dial in the adjustment afterwards?
Yes, this can happen this way and most times does.
Without the wd bars on of course on the way there.
It is OK to put the bars on even if the cams are not dead on dialed in. It is better to run with the WD bars on to gain the WD effect. However the anti sway will not be as effective since it is not yet dialed in. Just take your time and no hi speed travel. I myself eye ball it the best I can in my drive way and then go over the school parking lot to tweak the DC in dead on. It is a slow trip and no drama. Good luck
- Mark as New
- Bookmark
- Subscribe
- Mute
- Subscribe to RSS Feed
- Permalink
- Report Inappropriate Content
Jun-30-2014 09:58 AM
Realistically I can setup the cam and hanger brackets in my driveway and then go to a flat parking lot to dial in the adjustment afterwards? Without the wd bars on of course on the way there.
- Mark as New
- Bookmark
- Subscribe
- Mute
- Subscribe to RSS Feed
- Permalink
- Report Inappropriate Content
Jun-30-2014 09:44 AM
Steve6l wrote:
One more thing on your setup with the jack/hand/jack stand in your picture it's not level like it will be in the reviever of the truck, yes I can use a jack stand and have it on a 30 degree angle or so you are showing off horizontal plane, will this not effect the placement of the snap up and dual cam mounts vs perfectly horizontal plane more so how it's mounted in the truck?
The "dry" test fit is only to confirm the cam arm frame plate is mounted in the "general" right league. This dry test fit is "not" the final location of the cam arm. And yes, the shank is pointing down as it is not loaded up like when it is in the truck.
Once the rig is step and under full load and hitched, you adjust the WD on the truck by the head tilt and this then determines the bend/flex/angle in the WD bar. That flex, head angle and number of chain links under tension creates the final location of the cam arm. You then use all the cam arm adjustement as needed to tweak the cam arm to be dead centered on the V of the WD bar.
Point is, you have adjustment range to allow this. Most DC mounting screw up's occur when the frame plates where drilled in the wrong location to start with, unhitched. Then the user goes to try and adjust the cam arm to only run out of adjustment and cannot get there. They are off by up to 3/4" to 1" off. Meaning big time screw up. One size fits all does not work. Check twice, drill once.
NOTE: When you get to the end of tweaks, you have to drive/track the truck ands trailer a good 100 feet straight then then get out and look to see if the cam is dead on the V in the WD bar. Tweak as needed. Can yak more on this if needed
- Mark as New
- Bookmark
- Subscribe
- Mute
- Subscribe to RSS Feed
- Permalink
- Report Inappropriate Content
Jun-29-2014 08:44 PM
Bags may be in the future and needed with my varrying tounge weights, but we can touch on that if the time comes...
Make the front come up 1/8" to 1/4" check ill aim fr just shy of 1/4" and ill get back to you with scale weights
One more thing on your setup with the jack/hand/jack stand in your picture it's not level like it will be in the reviever of the truck, yes I can use a jack stand and have it on a 30 degree angle or so you are showing off horizontal plane, will this not effect the placement of the snap up and dual cam mounts vs perfectly horizontal plane more so how it's mounted in the truck?
- Mark as New
- Bookmark
- Subscribe
- Mute
- Subscribe to RSS Feed
- Permalink
- Report Inappropriate Content
Jun-29-2014 12:14 PM
I forgot to mention one tip since a WD hitch is new to you.
Your have 1,700# WD bars, these are beasts and as such you have to hitch and unhitch in this manner or you may get hurt with the piping flying out of the snap up on you.
Get yourself a 6" block of wood to go under the tongue jack and carry it with the camper all the time.
To hitch up:
1. Start with 6" wood block under tongue jack.
2. Jack up camper enough to allow ball to be backed under.
3. Hitch up and lock/close the ball coupler. Must lock/close the coupler
4. With the ball coupler locked/closed, jack up the back of the truck and the camper. Yes jack them both way up. Don't worry the truck is not coming off the ground. Need to go up a good 4 to 6" maybe more
5. Then put the WD bars on. Hook up the chains to the snap up's on the 7 links like I stated earlier.
6. IF the pipe has to be used to pullup hard, STOP, and jack up the truck and camper more.
7. Then try again. If you jack high enough you can flip up by hand and pin in place.
8. Then let the jack down and it loads up the spring bars nice and safe.
You really do not want to snap up with the pipe and even attempt to pull up a lot of load. If that pipe fly's out of your hand, it will hurt. Even using the above method always stand to the side of the pipe.
1A. To unhitch, do the same process of jacking up up the truck and camper to unload the WD bars.
2A. Tap the chains before ever undoing the snap up clip. If they are still banjo tight, jack up some more.
3A. USE the pipe to undo the snap up even if the chains have just let a little loose from banjo tight.
4A. Unless the chain is flopping by hand, use the pipe to control the snap up while undoing the snap up and do not undo it ever under full load.
Good luck
John
- Mark as New
- Bookmark
- Subscribe
- Mute
- Subscribe to RSS Feed
- Permalink
- Report Inappropriate Content
Jun-29-2014 12:03 PM
Fisherguy wrote:
You should consider air bags to keep the arse up and might wanna put them on before setting up the hitch.
Hi Fish,
In Steve's case, he was trying to tow a 1,400# TW camper with no WD. Just on the ball. And he has an aux fuel tank in the truck bed as well. Did know if you saw that or not.
I know mine will not do well under those conditions. 1 ton truck or not, it will squat... It's Ford thing...LOL
Once he gets the WD hitch setup correctly he will see a large improvement. Then if he has a lot of changing truck bed loads, the air bags can help accommodate verses resetting the hitch. Like guys who haul 2 quads in the truck bed one trip and then not the next trip.
Thanks
John
- Mark as New
- Bookmark
- Subscribe
- Mute
- Subscribe to RSS Feed
- Permalink
- Report Inappropriate Content
Jun-29-2014 09:26 AM
John knows these hitches, he helped me out with mine.
You should consider air bags to keep the arse up and might wanna put them on before setting up the hitch.
2007 Komfort 274TS, 480 watts solar, Trimetric 2025RV, PD9280, Honda EU2000i, Xantrex SW600
2019 Timber Ridge 24RLS, 600 watts solar, 3-100Ah Lithiums, 12volt Norcold Fridge
- Mark as New
- Bookmark
- Subscribe
- Mute
- Subscribe to RSS Feed
- Permalink
- Report Inappropriate Content
Jun-29-2014 09:03 AM
And yes me and tires do not get along very well.
John ill have just a couple more clarifying questions for you in a little bit here
- Mark as New
- Bookmark
- Subscribe
- Mute
- Subscribe to RSS Feed
- Permalink
- Report Inappropriate Content
Jun-29-2014 08:29 AM
Is your truck leveled? The front end raised? If so that's why it looks like it's squatting so much. My truck is leveled too, need airbags to hold the rear up but they need to be inflated before setting up your hitch.
(Your tires look like they need replacing too.)
2007 Komfort 274TS, 480 watts solar, Trimetric 2025RV, PD9280, Honda EU2000i, Xantrex SW600
2019 Timber Ridge 24RLS, 600 watts solar, 3-100Ah Lithiums, 12volt Norcold Fridge
- Mark as New
- Bookmark
- Subscribe
- Mute
- Subscribe to RSS Feed
- Permalink
- Report Inappropriate Content
Jun-29-2014 08:07 AM
Steve6l wrote:
hey john,
great to hear from you. im going to be taking the trailer on monday to an unsuspecting level parking lot hopefully to install the hitch properly. Good.
in your pictures you use a jack to dummy install your dual cam and snap ups its going to be hard for me to find my jacks in the middle of a move can i just use my truck? I only used the floor jack to hold shank to take a picture.... just hook it up and hold the shank, or a jack stand, block of wood. You are using this just to make sure the DC is in the correct place for you trailer frame. The Reese 1 size fits all instructions doe not always work on every camper made.
from what i gathered from what you said, follow instructions from reese for measurements for the most part. the one thing i guess you said to do differently was to have the 'yoke' in the middle, does that mean to have the same amount of threads on both sides? Yes, but the yoke threads in the middle to start with. This allows lot of adjustment in both directions. All Reese WD bars are not the same length which shifts the location of the DC. While this is a small shift, the number of chain links you setup for also changes the position. If you have the right number of links for "your" setup, then being in the middle of the yoke allows lots of adjustment. When you put the hitch under load the cam adjustment will need to be adjusted as the WD bar flexed requiring it.
hard to put a torque wrench on the yoke how tight do you make the retaining nuts? You do not need to torque the cam nuts. Reese does not tell you too any way as there is no prevision to simply get a torque wreck in there. And they do not have to be dead tight for the size of the nut they are. If you tighten them by feel to a 120 to 150 ft lb they will not come loose.
for the dual cam frame plate, you are saying to use the measurements they give me but if my snap ups wont work with my V-nose configuration to make sure i disregard reese recommendations for distance and just mount where chain will be vertical and yoke is perfectly centre and the cam sits perfectly when the hitch is straight in the highest most point in the curve on the bars ? does the yoke work better when perfectly centre? Correct. The Reese instructions for the cam only get you in the ball park. That is why I suggest to mock up the setup before drilling. The instructions work perfect on some campers and not so good on other. So yes. tweak the yoke to be centered before drilling. The actual DC and the anti sway works the same in any location as long you do not run out of yoke adjustment. Once you run out of adjustment then the DC does not work well as it is not centered.
top of trailer ball, 1 inch lower then hitch ball... check 1" even 1.5" is OK. Just much less than 1" odds are high will not give you what you need.
7 links under tension and adjust head tilt until truck front drops exact same as rear? fender height to ground from unhooked to hooked up? any reason for 7 links just your personal experience preference?
The 7 links under load comes from the 6" A frame, ball coupler on top, the 1" hi rise tow ball, 1,700# WD bars and your Tongue weight. And yes this is from experience as it allows on "your" setup to give the correct clearance between the DC yoke and the WD bar in a turn to not bind. This is all setup dependent. These 7 links will not work on a TT with a different setup or lighter WD bars. Guys with 8" tall frame need to use more links but again it depends on if the ball coupler is on top of the bottom of the frame. Guys with 5" or 4" frames they have a min limit of 5 links as binding will happen then and they cannot go 7 links as the camper is lower to the ground and the cam drag. Reese does not go into all that detail. One size fits all does not always work. .
i took your advice on the carriage bolts, but for the top bolt, i wont be able to use a carriage as there is no square(reese should have made it... whatever), are you saying i should drill and install and see if chain will touch bolt at multiple different angles and if it does take it out? or just leave it out and call it good? another question about the snap up brackets, in the instructions it says to only tighten 1/2 to 3/4 turn no more after hand tight kind of seems a little mickey mouse to me is that actually enough? My suggestion, if you install the 2 carriage bolts, skip the top center one. Reese uses the 1 top center one as they only have to drill 1 bolt. They do not talk about the 2 sq holes in the instructions but will if you ask them on the phone. Or did when I called. The one center bolts can in some case hit the chain and then all you can do it grind the bolt head down.
The 1/2 turn on the set screw, yes I know it sound Micky. The reason is if you start cranking on it, you will spring open the snap up and they will bend it from the get go. If you bolt them on from day 1, and tighten the set screw 1/2 to 3/4 turn, then your good to go. I myself added a jam nut on the set screw. Maybe over kill but I felt better.
for the bracket i just wanted to take the picture so you could see it was bent, ill install properly dont worry.OK good. Just checking as many have mixed this up to the point Reese stopped making the bent angle ones as when it is backwards, you start bending things.
one thing i dont know about is whether or not ill be able to back up without worrying about snapping anything, if i set up correctly will i only have to worry about my truck hitting trailer and nothing bad happen to the hitch? If needed later I can show how this all works if needed. You can back up as tight as you can turn going forward. The difference is backing up you can jack knife easier. You can turn 74 degrees left and 65 degree right before you hit. Set it up right and this becomes a non issue. But there is a point you can break something in a 75 to 77 deg left turn. That is about the time the bumper hits the LP tanks anyway.
thanks so much for your help, hoping to get it perfect first shot
Steve wrote:
7 links under tension and adjust head tilt until truck front drops exact same as rear? fender height to ground from unhooked to hooked up? any reason for 7 links just your personal experience preference?
There is the 2nd part of this statement. The WD settings. What you are describing is real old school and not correct for your truck. You really do not want to compress the front end below unhitched height.
For your F350, SRW's this is my suggestion.
Adjust WD to have the front end slightly lighter then unhitched weight. This is about 120 to 150# lighter. This will be about ~1/8" to 1/4" higher then unhitched fender height.
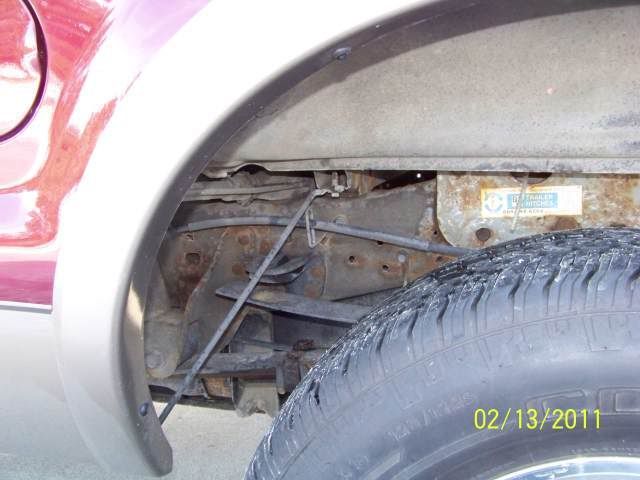
The back of the truck is going to carry weight. That 1 ton truck rear axle is made to carry weight. It has a 7,000# rating, let is carry some. For a more stable ride, having the top rear frame bracket touching the helper spring will help greatly in left to right truck roll. The helper springs act like a roll bar. Your aux fuel tank and the camper tongue weight will put you into this area without much issue. It may be there now.
See mine, the front
The rear
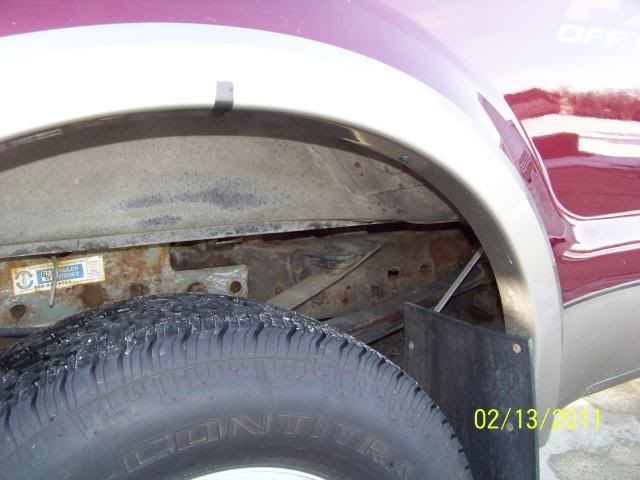
When I shifted more weight to the front, the rear springs where spongy way up in the suspension. When I kissed the helper spring, the entire rig was more stable. There are other reasons for the front being a little less in weight with WD as well. That is a post in itself almost. The new thinking is oversteer can occur if the front is a lot heavier with WD engaged. Basically, in a hard panic turn , the front end bites in so to speak and the trailer pushing the truck can help push you into jack knife. They want the front to slide a little, not bite in.
Be back later. The other guys can help on the WD too.
Good luck
John
- Mark as New
- Bookmark
- Subscribe
- Mute
- Subscribe to RSS Feed
- Permalink
- Report Inappropriate Content
Jun-28-2014 09:58 PM
great to hear from you. im going to be taking the trailer on monday to an unsuspecting level parking lot hopefully to install the hitch properly.
in your pictures you use a jack to dummy install your dual cam and snap ups its going to be hard for me to find my jacks in the middle of a move can i just use my truck?
from what i gathered from what you said, follow instructions from reese for measurements for the most part. the one thing i guess you said to do differently was to have the 'yoke' in the middle, does that mean to have the same amount of threads on both sides?
hard to put a torque wrench on the yoke how tight do you make the retaining nuts?
for the dual cam frame plate, you are saying to use the measurements they give me but if my snap ups wont work with my V-nose configuration to make sure i disregard reese recommendations for distance and just mount where chain will be vertical and yoke is perfectly centre and the cam sits perfectly when the hitch is straight in the highest most point in the curve on the bars ? does the yoke work better when perfectly centre?
top of trailer ball, 1 inch lower then hitch ball... check
7 links under tension and adjust head tilt until truck front drops exact same as rear? fender height to ground from unhooked to hooked up? any reason for 7 links just your personal experience preference?
i took your advice on the carriage bolts, but for the top bolt, i wont be able to use a carriage as there is no square(reese should have made it... whatever), are you saying i should drill and install and see if chain will touch bolt at multiple different angles and if it does take it out? or just leave it out and call it good? another question about the snap up brackets, in the instructions it says to only tighten 1/2 to 3/4 turn no more after hand tight kind of seems a little mickey mouse to me is that actually enough?
for the bracket i just wanted to take the picture so you could see it was bent, ill install properly dont worry.
one thing i dont know about is whether or not ill be able to back up without worrying about snapping anything, if i set up correctly will i only have to worry about my truck hitting trailer and nothing bad happen to the hitch?
thanks so much for your help, hoping to get it perfect first shot
- Mark as New
- Bookmark
- Subscribe
- Mute
- Subscribe to RSS Feed
- Permalink
- Report Inappropriate Content
Jun-28-2014 08:32 PM
New DC instructions
Remember, you have the trunnion bar hitch. The instructions are different for round bar heads and bottom mount couplers. Again, do a dry mock up before drilling the DC on. Drilling in the wrong place has happened more then one wants to know...
The WD hithc by itself, no DC. They are separate instructions.
Reese Trunnion WD hitch
There is a sticky on the Towing forum to help in WD settings. See here
Towing setup sticky
Good luck
- Mark as New
- Bookmark
- Subscribe
- Mute
- Subscribe to RSS Feed
- Permalink
- Report Inappropriate Content
Jun-28-2014 08:12 PM

Accounting for truck squat, it should look like this unhitched with camper level. Ball higher than coupler. Again if your numbers are correct, the 2" hi rise ball can help fix this.
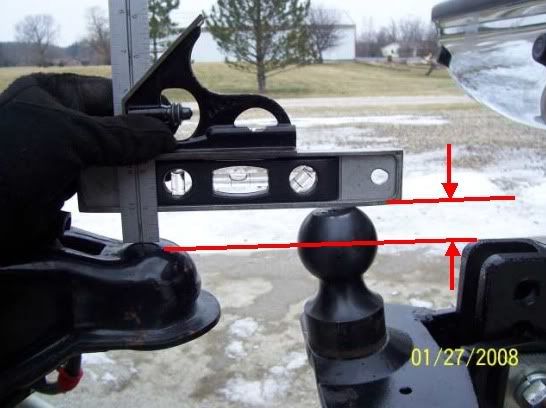
Here is some tips beyond the instructions.
Make sure the DC frame bracket is dead tight to the bottom of the A frame before drilling. Us a C clamp of something to hold it tight before drill. You do not want any air space under there or over time it will start fatiguing the bracket and bolts.
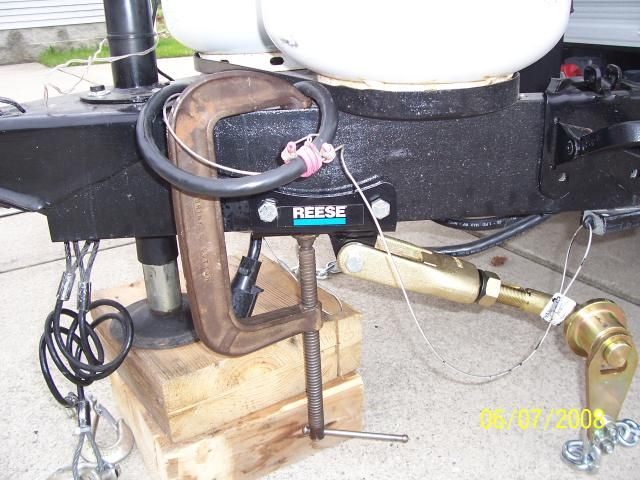
The distance from the ball to the DC, the new instructions are a lot better then the old. Start by using the instruction to locate the brackets, BUT before drilling mock up the setup with the WD bars in place and make sure the cams are in the middle of the yoke adjustments, like this.
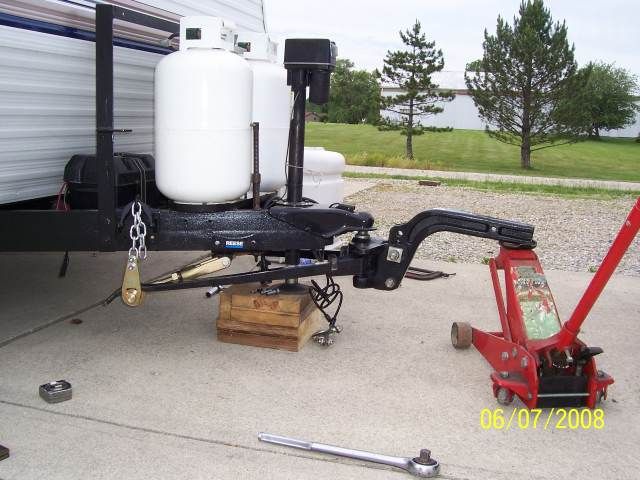
For your camper and your 1,700# WD bars, I suggest you start with 7 chain links under tension. Yours will look like this, 7 chain links from snap up hook to DC chain plate
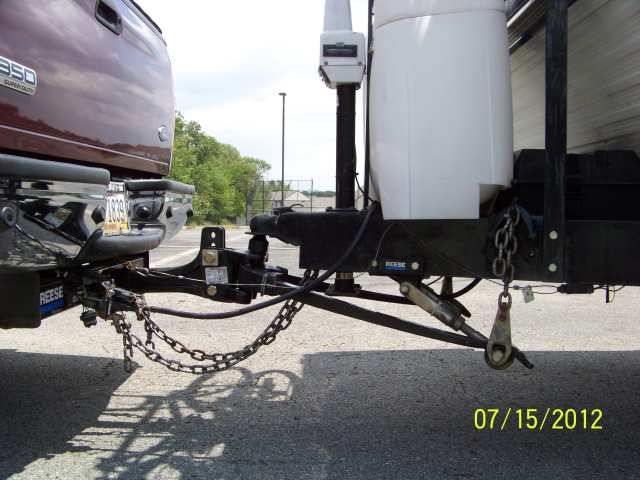
Those 7 links under tension will stay that way for the most part unless you have large varying loads in the camper tongue weight. With the DC, you start with a set number of chain links under tension and then adjust the head tilt to get the weight distribution correct on the truck. Make sure the camper is loaded when making the WD adjustments.
You understand the flat washer shimming and the DC frame plate agasint your square corner channel iron frame. Good.
This DC frame plate is the most newest one they have made. The welded plate on one side and the offset of the yoke mount gives it away.
 There is no issues with this vintage, I'm just point out you have the latest and greatest as made upgraded within approx the last year by Reese.
 Heads up, this chain plate is put on backwards. You need to flip it around.

It needs to be like this when mounted and under load.

This pic has the chain plate correct but was it is showing the gap between the frame which is wrong. I do not have a handy pic with the new bent plate and everything else correct to show.
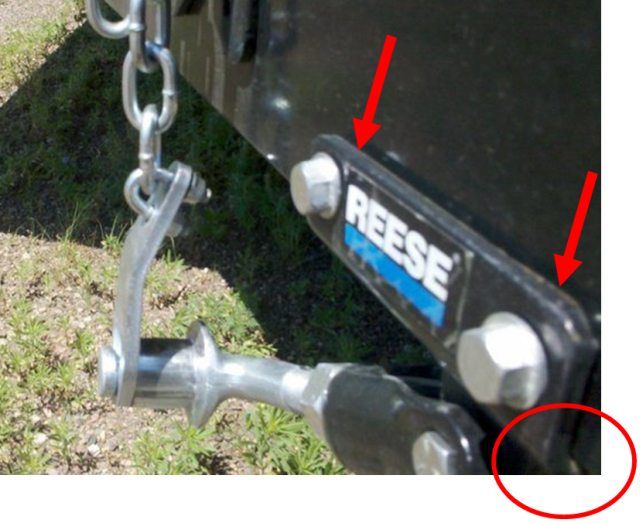
When you have the DC all dialed in perfect, mark the WD bars left and right and always put them back on the same side. The WD bars are forged and the DC is not an exact machining. So the bars & Cams create a wear pattern that will create a perfect match. But only is the WD bar stays on the same side all the time. If you flip flop the WD bars all the time the lengths are different affect the DC setting and the wear pattern is all screwed up starting all over again.
Also the cams will wear metal dust when brand new. This is normal. The wear in and then slow down over time. On real heavy TW's you can use vas-o-line on the cams. Never good grease but vaseoline is OK. I use the vase-o-line on my heavy tongue weight. It helps on the noise and the wear. So you can see, this wear on mine was at 24,000 miles
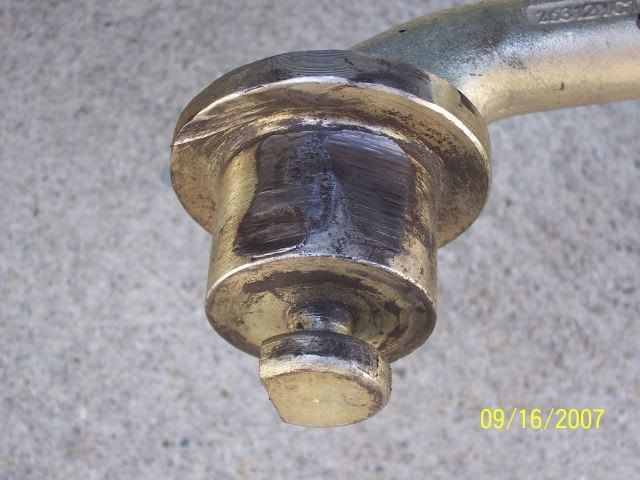
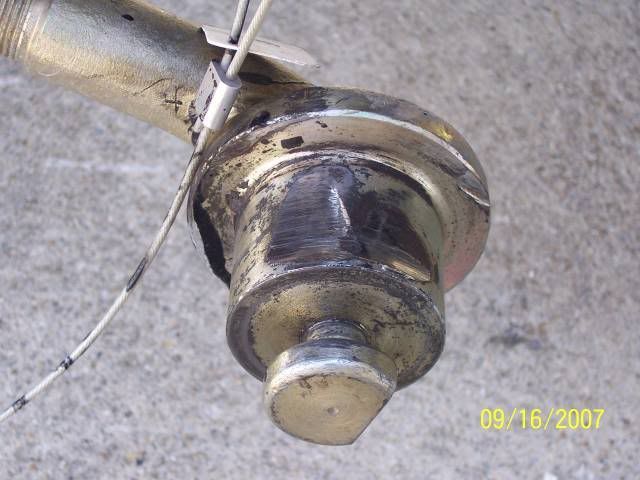
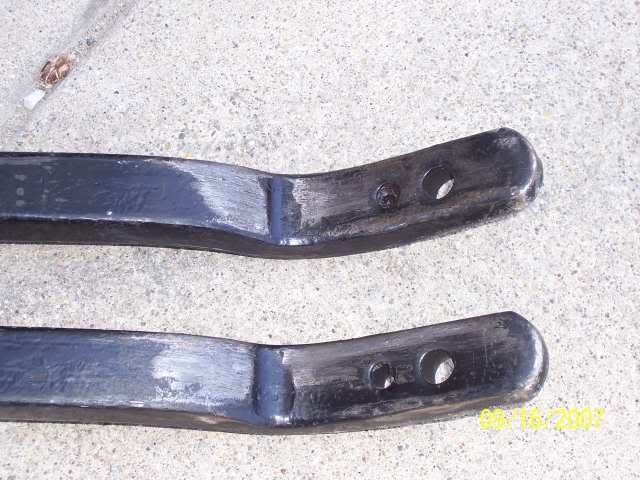
I have now more than doubled that, the wear is a little deeper but not a lot. As you can see, the wear pattern is different on each side. This is OK as long as you do not flip flop the WD bars
You already know about bolting on the snap up's and you have the latest heavy duty snap'up. You have the square hole to use carriage bolts. And I see Reese added the top middle center bolt hole too. The carriage bolts do not bind on the chain as easy, but head up if you use the top center home that the bolt head does not hit the chain.
Good luck
John
- Mark as New
- Bookmark
- Subscribe
- Mute
- Subscribe to RSS Feed
- Permalink
- Report Inappropriate Content
Jun-27-2014 06:00 PM
so for my hitch height it was at 21 1/4" empty and 19 1/4" slip tank full right now it is empty so i took a picture of how it is sitting.
i got about 9 inches out of the ball rise the way i inverted the shank and used the top hole sitting at 30 1/4" empty slip tank
my trailer is far from level, and my driveway even though paved has so many holes and uneven that its to difficult to get correct numbers. right now it sits at 32" when the trailer is level. but driveway slopes down from wheels so im guessing closer to the 30" range where the hitch is at now if not lower. have to find a big empty parking lot somewhere i guess and soon, need to tow on july 2nd about 400 miles and it could be a super windy day. the other problem is having my trailer loaded full of tonnes of my belongings as im moving on june 30th and into the 1st, doesnt give me a lot of time to dial in the hitch.
i attached pics of what i got, looks like i got the new silver style cams, 26002 (still unclear on the difference between them and the 26025 classic style as the classic is $250 more at most places) also they have the bent style brackets.
read through the instructions seemed pretty straight forward. should i be following reese specs for sizing or have you guys found from trial and error different distances and locations for mounting better?
picked up carriage bolts, some extra grade 8 1/2" washers for spacing on dual cam bracket and some 1/2" bolts and hardware if needed.
i want to have the sway cam mounts installed and adjusted perfectly so come july 1st the only thing i might have to adjust is the head angle and height if necessary. i gave the head a bit of tilt towards the rear just as a guess you should be able to see in pics i have play both ways a bit. have a torque wrench that will go to 300# so im good there.
thanks for all y'alls help


