Forum Discussion

sasq40's avatar
sasq40
Explorer
Jun 28, 2017

Advise on root fix

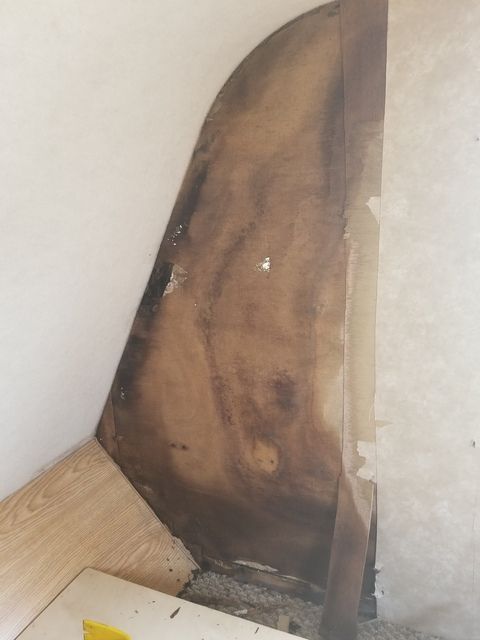
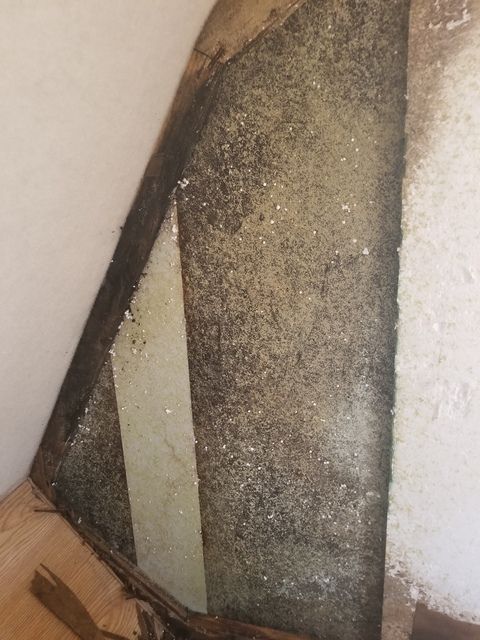
So the fun never ends for me, my new to me camper decided after the ride home to show its true colors! And unfortunately that color is rot! so far it appears to be contained to the front passenger side of the bunk, I'm slowing peeling off stuff but would like help on how to proceed. So far im got the bed out and the carpet along the wall out,the wall ripped out to about the window,doesnt seem like theres rot there.Heres some pics of were the problems beginning

  • Looks like you are doing the right thing. Just keep prying and exploring to find any rot under the adjacent three panels. A mirror and a flashlight might help if you can just pry open a bit without destruction. From what little can now be seen, it doesn't look extremely bad.
  • Anyone know how that front piece is attached? The one that's on a angle you can see on the bottom left corner. I don't see any screws or nails but when I try to pry it attached some how
  • j-d's avatar
    j-d
    Explorer II
    First, Welcome Aboard!

    You don't say, but it looks like the passenger front corner of the cab-over on a Class C. Is that right? Have you found any of the framework yet? If it's framed in Aluminum - You have something to work around. Steel - Maybe, unless it got rusted out. Wood - Still more work ahead.
  • Ok got around taking that front piece. I can't believe how little framing there is is. It's crazy that without that panel glued in it drops like a inch or two! I'm going to add a support piece or 2 in there.
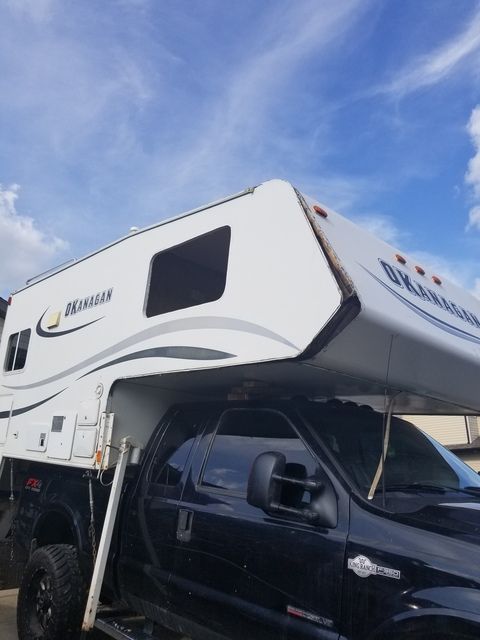
    Also think I found two source of water that looks like ones a d the other is in the nose section were it looks like a rock had hit, when the front started to sag water was pouring out from our recent storms!
  • Looks like the board that hold the siding under the bed is rotten too. It seems like quite a bit more work to get that piece out, and since it's not structural is it necessary? I plan to paint my new pieces with a kiltz anti mold paint so that should stop that from spreading to my new boards, and it's separated from the other wood from the insulation
  • sasq40 wrote:
    Ok got around taking that front piece. I can't believe how little framing there is is. It's crazy that without that panel glued in it drops like a inch or two! I'm going to add a support piece or 2 in there.
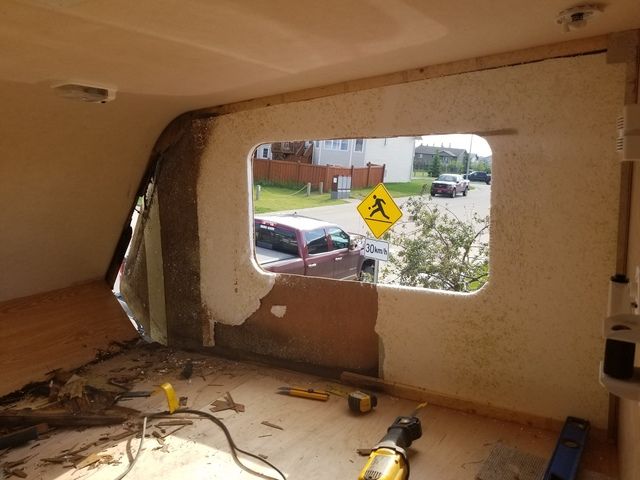
    Also think I found two source of water that looks like ones a d the other is in the nose section were it looks like a rock had hit, when the front started to sag water was pouring out from our recent storms!
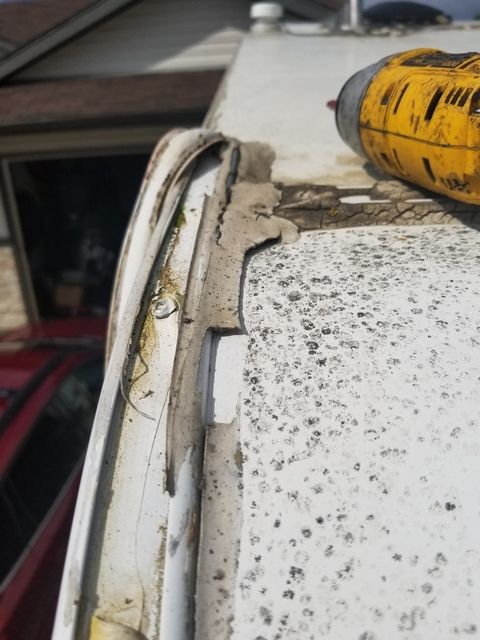

    You IMO encountered what I have been calling for the last 5 to 10 years the real archilles heel of almost all RVs and that is the corner area where the end cap molding meets the trim molding that runs up on the roof and water can pool and sit for days. You last pic really shows the failure of the caulking around that critical area. What I believe happens is the water over time loosens the caulk right at the roof surface like you can see in that last pic and while it might not be visibly noticable the water will get under the caulking and work it's way to the side/end seam and molding screws and it's off the the ROT races so to speak. AFAIK none of the non-marine caulks are meant for sustained submerged use and when subjected to that over time will be guaranteed to leak. Below is a pic of that issue on my trailer and the first of my two steps is guaranteeing that will never happen to my trailer.


    Here is a pic of my final solution and unless one does something like this this issue is IMO almost IMPOSSIBLE to prevent in the vast majority of RVs and if you have avoided it it's only LUCK.


    A key in my solution is that I added like a 1/4 inch thick triangle to form a slope before entombing that entire area with multiple layers of overlapping Eternabond ensuring that molding that runs from the roof down along the side/end sections is completely covered to the point where water will run down the sides/ends. I also ran a small bead of 3M marine 5200 adhesive/sealant to replace the substandard factory caulk in that area as a second defense. This might not be a pretty solution, but is the only way IMO to prevent the type and extent of the damage you have encountered.

    Not trying to come down on you too hard but judging from the cracking of the caulking in that last pic it appears you had indications that something needed to be done and it wasn't which only IMO again hastened your damage.

    Larry
  • Yeah I'm guessing that's why the last owner sold it, when I took it apart there was a few different screws in there leading me to believe and on point that trim was off. Man I hate dishonest people. The wall didn't appear soft when we bought it but the long trip home defiantly stressed the wall and that when it got bad
  • j-d's avatar
    j-d
    Explorer II
    OK, a Slide-In Truck Camper. I love those for Canada and Alaska! Same cab-over as a Class C. I know this is frustrating, and you'll lose a month of RVing fixing it, but so far it doesn't look all that bad. At least from the "We've Seen Worse" standpoint.

    Is the floor (mattress surface) of the cab-over compromised? How does the other front corner look?

    I think you'd best figure out how to get that flat wood-grained piece out, even if you have to make another one. My "Why" for that, is to be able to get a good surgical field in the lower front corner.

    I pray I never have to do this repair, but if I did, thinking this: Make up framing to form essentially a "C" shape that leads forward below the roof, follows the turn to the front slope, makes the sharp bends at the lower front, then continues back, along the cab-over floor. Maybe cut it out of 1" marine plywood, leaving a hole for the window.

    Then strip out the interior paneling and insulation. Glue "furring strips" to the inside of the coach's outer skin to attach paneling to, then re-assemble the outside. After that, insulate with foam insulation board, re-panel, and install the window.

    While you're working, pull the Clearance Lights and make sure they aren't contributing to the leaks.
  • Just a comesurating (sp) post here. All 5 campers I have owned have all leaked in this location. The corner molding is in adaquate, (nbt wide enough on each "leg" ) and or the molding has cut into the rubber roof itself in some, so it was leaking since original assembly. The only saving grace on my current rig is that the internal frame is aluminium and not rusted. It is all repariable and you can improve it while in there. Suggest eternabond over the corner joint, under the corner molding. Also consider under that, proflex pumped into the joint.

About Technical Issues

Having RV issues? Connect with others who have been in your shoes.24,188 PostsLatest Activity: Jan 17, 2025