cancel
Showing results forย 
Search instead forย 
Did you mean:ย 

Lance 1161 Wing Repair

pbrooks101
Explorer
Explorer
Here we go again!!! After having replaced/repaired both wings in my previous Lance 1061, I noticed a piece of molding that "just didn't look right" in my current 2004 1161. Alright, I must confess, I knew that this repair was coming but had been procrastinating to see if I could put it off until AFTER a 3 week trip from New England to Yellowstone NP.... oh well.... Upon returning from our Memorial Weekend trip to the wonderful White Mountains of New Hampshire, I noticed this....


The molding had started to pop off near the back jack on the drivers side. In the picture above I had already taken off the molding that ran along the underside of the wing and up to where it meets the main part of the camper.


That had all started to rot pretty good too....


This is the bottom radius of the wing without the molding. All of the stapled together pressboard is completely gone. It all fell out when I took the molding off.


This is the rear bottom part of the wing. Basically, everything is rotten about 1 foot up and up where the two pieces of molding meet.


This is the radius of the wing partially cleaned up.


Here is the entire wing with most of the rotten sections cleaned up.

I will be taking the Dremel Multi Tool and cleaning up some more of the rotten wood and getting it back in to solid stock. All of the area where the rear jack attaches to is solid as well as the rear tie down in the horizontal section.

I had an EXTREMELY hard time getting the metal channel molding off that joined the filon of the main body and the wing. It came off but not in one piece, as did the filon. When I repaired my previous camper I used new filon that I ordered direct from Lance and will try to do the same thing this time as well. I am also going to use a surface mount molding to cover the filon seam too. While I have everything apart, I am going to take the opportunity to change over my electrical connection. Instead of having a metal box with an access hatch that the 30 amp electrical cord stores in/comes out of, I am going to utilize one of the 30 amp Marinco power jack and retrofit my existing cord with a plug. I know it is one more thing to carry elsewhere, but the original cord has become quite hard and is not easy to coil up when cold...

I will keep a running log of what I am doing and will post as many pictures as I can. Sometime stopping to take pictures in the middle of a project is the last thing on my mind........
2011 Ford F350 Superduty DRW SD
2011 Lance 1191 (picture below shows 2004 1161-will update soon!)
2010 HD Street Glide
2005 Pace-American MC trailer
2010 Jeep Wrangler Unlimited
12 REPLIES 12

pbrooks101
Explorer
Explorer
I put the finishing touches on a couple of nights ago..... Getting ready for a 3 week adventure to Yellowstone National Park, via the I-90 route through SD and the Black Hills, then back through the midwest.... Will be in Grant Village at YNP for 5-6 days over the July 4th holiday.....
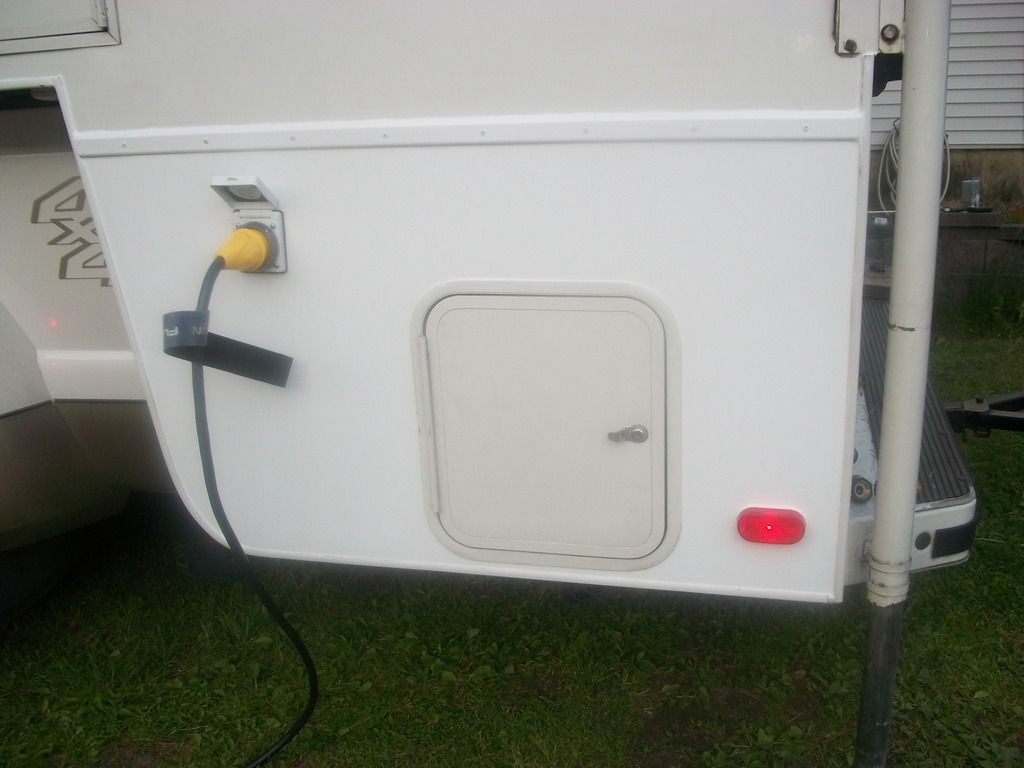


Here is the finished product. I love the Marinco electrical connection.... Much better looking and makes the cord easier to handle... only drawback is cord storage but a sacrifice I'm willing to make. The filon seam molding is labeled as "Roof Seam Transition Molding" on my invoice from Lance. It normally comes 102" in length and I had them cut it in half and ship it with the filon. The rear jack mount to the bumper was originally bent a little so I took this opportunity to straighten it back out while the jack was off. Bolted the jack back on using the existing bolts/washers/nuts.
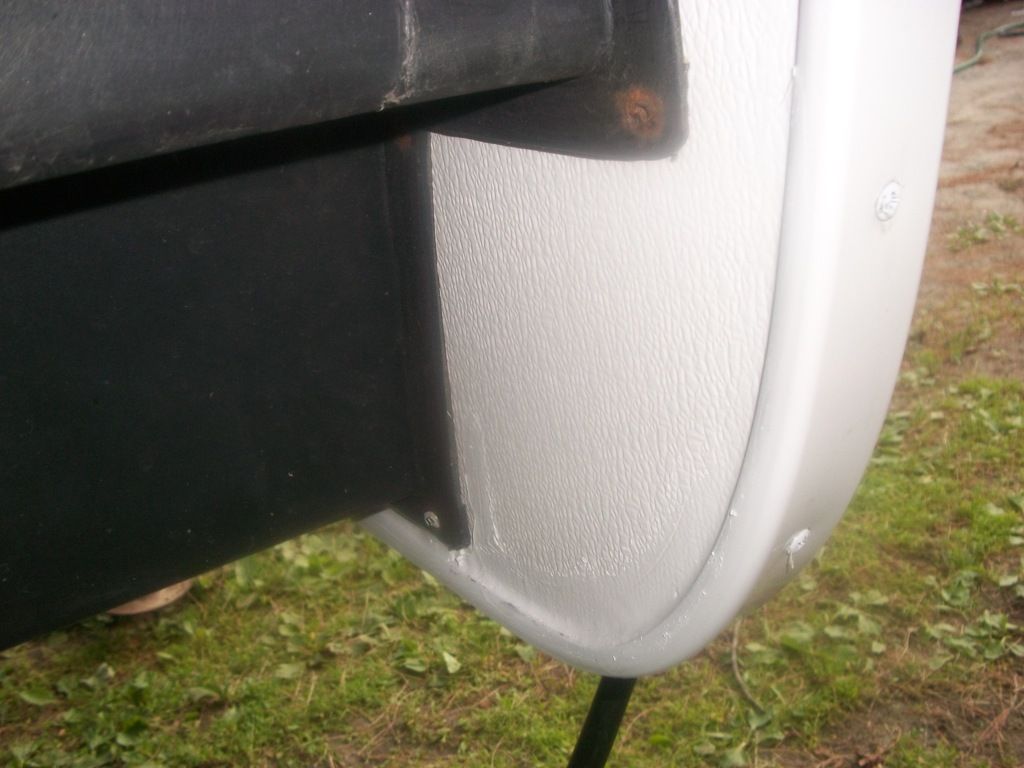


This is the back side of the wing. Between the wing and the black plastic "belly pan" Lance used what I believe was some type of weather strip. I cleaned off the old stuff and used a new weather strip that compressed well. The belly pan was screwed back to the wing (the above picture is missing two screws...... those were added after the picture was taken). The interior seam was heavily caulked. I wasn't too particular about its appearance but it did turn out well.

While I was at it with the caulking gun, I cleaned up the wing on the passengers side near the entry door. There is some rot in there too but not as bad as the drivers side. I'll tackle that when I get back from vacation. For now, I pulled some of the shorter screws out of the molding and replaced them with longer screws so they would grab in to some solid wood and then I re-caulked the molding after removing the old stuff and wiping everything down with 3M Adhesive Remover.... Ready to roll.....
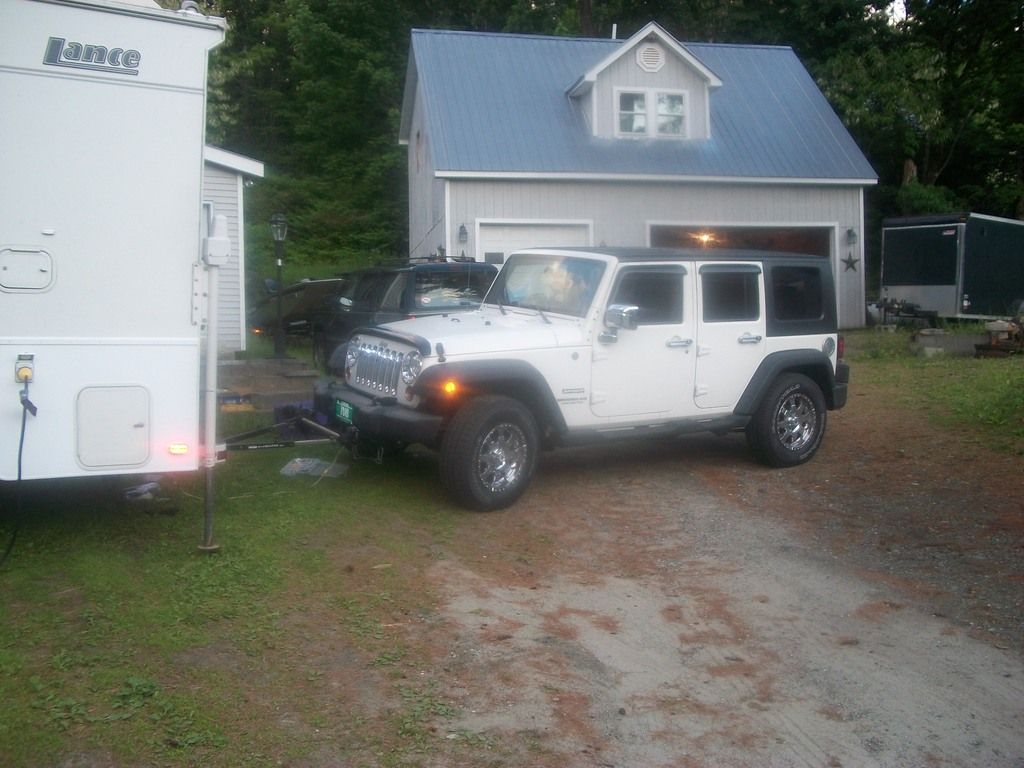


And last but certainly not least..... getting the wiring connected to the dinghy!! For the last few years we have pulled a VW Beetle on a dolly behind us for the adventure drives once we set up camp..... Mixed it up a bit this year and got a new-to-us Jeep Wrangler for that purpose now. Still have the Beetle which is my wife's daily driver....

Well, that's all for now. It was a fun repair project and not terribly hard, with the right tools. As for cost, the biggest cost was from Lance for the filon and the seam molding. The filon was $45.00, molding was $32.00, and the cost to ship it (FedEx 3 day air..... I was in a hurry!) was $58.00. Caulking was $6.00 (1 tube), screws were $8.00 (1 box), Fresh Butyl tape was $13.00 (1 roll - I have enough to do about 25 wing repairs now!!). The Marinco power inlet was about $42.00 with shipping (ordered on Amazon), and the 30 amp twistlock plug with the locking boot was $29.00 from local Camping World. Everything else that I used was either free or "stuff" that I had in the garage and shed, mostly leftover from my previous camper's wing repair jobs. So a grand total of about $233.00 into this project..... As for time, I probably have about 20-24 hours total into the project. My 17 year old son helped quite a bit too as he loves the challenge of the mind....

When I get to the repair on the passengers side, I will log that as well.....

So for now...... West bound for Yellowstone!!!!
2011 Ford F350 Superduty DRW SD
2011 Lance 1191 (picture below shows 2004 1161-will update soon!)
2010 HD Street Glide
2005 Pace-American MC trailer
2010 Jeep Wrangler Unlimited

Greg_B
Explorer
Explorer
Nice job. Thanks again for the write up. I'll be referring back to this thread when I repair mine hopefully yet this summer.

Monkey44, I like the idea of using treated plywood. Were you able to use filon back over the plywood to match back up with the camper?
04 Dodge 1 ton dually, Cummins, auto, quad cab, 4x4, SLT, Sport, Reese Titan V

04 Lance 1161, TV/DVD, high efficiency A/C, Honda EU2000

pbrooks101
Explorer
Explorer
Now that the frame was nearly completed and I have the filon, time to finish up.


I had to cut the marker light wires back a ways to get to wire that wasn't corroded. I added some new wire on to extend them back out. Used heat shrink, crimp on butt connectors for the job.


The filon from Lance came sandwiched between two sheets of 3/4" foam....... hmmmm, repurposed for insulation?.... yep... that worked great. It appears it is the same stuff they use at the factory for just such jobs.

I used Gorilla Glue to adhere the luan-backed filon to the framework. Anyone who has used Gorilla Glue knows that you have to work fast, especially with larger areas. I sprayed the framework with a light misting of water (the glue is water activated) and my son rolled the glue on with a roller just designed for that purpose. I didn't take any picture, unfortunately, as we had to work pretty fast. By the time we got the glue from one end to the other, the first part had started to activate. On with the filon........


Using some clamps and a 3/4" piece of plywood, we clamped/braced the filon in place on the framework and let it set up. I noticed that the plywood had a slight bow in it an wasn't making contact with the entire surface....... we had to enact a very fast "Plan B"....


Using the router with the flush cut bit, I cut out part of the sewer compartment door. I then used clamps around the edge and a modified clamp in the middle. I used staples along the top seam, which will be hidden by the transition molding......


The glue is dry and the clamps are off. A router with a flush cut bit made easy work of the remaining cut out of the sewer compartment as well as the front radius. Once that was done the front radius was sanded down with a belt sander to the final radius.


The filon that I got from Lance was 4' wide as it comes in 4' x 8' sheets. The total distance that I needed was 4' 1/2". I was able to make a 4' piece work as this seam is mostly covered by molding.


This is the same seam with the molding applied. Any remaining gaps will be covered with caulking.


The Marinco plug is all installed and wired.


All of the moldings are back on. I used stainless steel screws that were one size bigger than what was used. All I could find were stainless ones so a quick spray with some white spray paint worked well.

The last things to do are to screw the compartment door back in to place, install the trim where the filon meets, and caulk all seams and molding...... and install a new marker light.


Plugged in and powered up!

The color difference between the new filon and the old is definitely noticeable. I will probably leave it for now and see if it weathers some.

Will post the final project pictures when finished.... hopefully by the weekend.
2011 Ford F350 Superduty DRW SD
2011 Lance 1191 (picture below shows 2004 1161-will update soon!)
2010 HD Street Glide
2005 Pace-American MC trailer
2010 Jeep Wrangler Unlimited

jimh406
Explorer III
Explorer III
The repair is looking good.

'10 Ford F-450, 6.4, 4.30, 4x4, 14,500 GVWR, '06 Host Rainer 950 DS, Torklift Talon tiedowns, Glow Steps, and Fastguns. Bilstein 4600s, Firestone Bags, Toyo M655 Gs, Curt front hitch, Energy Suspension bump stops.

NRA Life Member, CCA Life Member

monkey44
Nomad II
Nomad II
Looks like we had a similar problem. Except someone backed into my driver-side panel in a parking lot. When I removed it, found similar water damage. In fact, the second time water damage - first time was passenger side.

I removed all the panel, insulation, and filon. Bought a 3/4 inch marine plywood, backed it, and now have a solid panel with no interior to rot. I found a near same color, sealed it and painted it with several coats of white exterior paint.

I'm on the road for the moment, but when I return (couple months) will post up photos. As I've read numerous times, Lance and other mfg have a tough time with these panels due to wood rot and water intrusion. SO, I eliminated the problem with solid panels. A new coat of paint each season and a caulking the seams again should keep it nice and fresh.
Monkey44
Cape Cod Ma & Central Fla
Chevy 2500HD 4x4 DC-SB
2008 Lance 845
Back-country camping fanatic

pbrooks101
Explorer
Explorer
Well, the filon finally came in from Lance yesterday. Little snafu with getting the right size but got it and now time to put things back together. I also got the "seam" molding from lance as well. They were able to cut a piece in half and ship it with the filon.

To start with today I wanted to remove the metal electrical cord storage box from the inside of the wing. That was a MISTAKE! I got it but it took over an hour and several bandaids later.....


The screws that were somewhat holding the sides and bottom were easy to get out. I could reach in behind with a stubby phillips screwdriver and take those out. There were three screws along the top, however, that were screwed into the horizontal framing of the main part of the camper (not the wing). I tried the dremel, which loosened them some, a prybar, and some foul language!! None of that worked. I then used some tin snips and cut away some smaller pieces and kept working it back and forth.


This is what it looked like after coming out. Whew!!!

I'm not sure what I really needed to take it out for but it is out of there now.

The next step was to drill the holes for the bolts to go through to the metal "pan".


I didn't have the right size paddle (or spade) bit to countersink just a little for the bolt head so back to the old fashion way..... a bit and brace setup that worked just fine!


Although hard to see, where the FRP on the back side meets, I used a small piece of eternabond tape (about 1/2" wide) to seal the seam. I may end up putting the tape on several other places as well as it WILL NOT come off!!! This is the framework all glued up and ready to be attached to the camper.


While I was in there, I pulled out the city water connection. I am going to change this out as well as the connector is seized up and won't turn. I'll pick one up tomorrow....


All bolted, glued, and screwed... Ready for filon..... The plywood has been attached to the former electrical cord opening. Filon will go over that and then I will drill out for the Marinco 30 amp power inlet.
2011 Ford F350 Superduty DRW SD
2011 Lance 1191 (picture below shows 2004 1161-will update soon!)
2010 HD Street Glide
2005 Pace-American MC trailer
2010 Jeep Wrangler Unlimited

pbrooks101
Explorer
Explorer
Got a call from Lance yesterday and they came through with the filon replacement. Will be shipped out Monday with a shipping time of 5 days (hopefully!) I also was able to get the molding that will cover the filon seam from Lance as well. The Marinco electrical power inlet came in today and I gathered up all of the rest of the "stuff" that I will need to get the filon on when it arrives. I used a strong 3M brand adhesive cleaner to take off all of the old caulking and butyl tape residue and cleaned up the moldings in preparation of putting them back on.

Finally, covered up the area with a scrap piece of luan due to the forecast of RAIN for the next 5-6 days!!

Will be back then....
2011 Ford F350 Superduty DRW SD
2011 Lance 1191 (picture below shows 2004 1161-will update soon!)
2010 HD Street Glide
2005 Pace-American MC trailer
2010 Jeep Wrangler Unlimited

pbrooks101
Explorer
Explorer
Another nice day in Northern Vermont! Rain in the forecast so, as they say in farming - "gotta make hay while the sun shines!"... back at the repair this evening as well....

I got one last piece of the frame work glued and screwed in to place. Had to add a filler piece where one of the carriage bolts goes through to the metal box containing the sewer hookup.

My goal was to get the FRP and sub panel glued on tonight. I was going to use 1/4" luan, glue that to the frame, then glue the FRP to that. My wife thought that I had enough filon left over from our previous repair and I thought that I would use that. Turns out that what I had left over was some 1/8" ceiling panel that I used when I repaired my ceiling from some tree damage......


I had two pieces of this, about 2' x 4'. This is 1/8" luan with a paper glued to it. It is "ceiling panel" that I bought when I repaired the roof/ceiling a couple of years ago. It was in great shape but I didn't want to glue anything to the paper side of it as I just thought that it would simply un-glue the paper if there was a problem..... Well, we made short work of fixing that....


A hair dryer, a sharp chisel, and some patience was all it took to remove the contact paper-like material on the luan.


This is what the sheet looked like once the paper was removed. It actually worked very well and one of the approximately 2' x 4' sheets covered most everything I needed to. I did use a small piece from the other sheet that I had so that I could keep the grain of the luan running in the same direction, but I would have had enough just from one sheet....


I glued the luan to the braced frame and stapled around the edge to secure it with a pneumatic stapler. After drying in the sun, I replaced the little plastic radius pieces in the door opening and then used a flush cut bit in a router with a trim bearing and routed the door opening as well as around the edge. I cut the curved part of the front of the frame on the band saw prior to doing this but only a rough cut. I will finish that later with the belt sander.

Once that was done, I used some leftover FRP adhesive (again, from the previous wing repair...... at this point I have ZERO dollars into this fix....)to attach the FRP to the luan.


This was applied with a 1/8" notched trowel. The bottom part of the FRP is already on. This picture is the small, forward part of the wing. The cinder blocks you see in the background were used to put some weight on the FRP while the adhesive dried.

It appears that I didn't take a picture of the wing with the FRP all trimmed up as well. I will do that tomorrow as it is temporarily on the camper to "set up" overnight.


Here is the door for the sewer compartment just fitted back in place for a test fit. Between the wing and the plastic belly pan there was only a foam-like weather stripping. I am debating replacing it with the same or similar type material or using a butyl tape. I have to see how much butyl tape I have left......


This is the electrical cord storage area. I will be doing away with this and fitting a piece of 3/4" plywood in the opening. I will be drilling a hole and adding one of these....


for power. It means that I will have to carry a cord with me in another storage location. But the small compartment, coupled with the PITA access hatch that never wants to lock right and the fact that the cord, when cold, is very hard to handle, makes me willing to sacrifice some space elsewhere.

I also called Lance Campers again today as I had not heard back from them about the exterior filon.... they are "still working on it".... I trust they will come through. I have had great luck in the past with their parts department... The only issue that I am facing is a time crunch issue. If I do end up getting the filon from Lance, they ship via FedEx Ground.... I'm in Vermont, they are in California.....it's not a short trip. I will have everything done and ready for the filon when it gets here if I have to wait.... There are some other options that are shorter but not necessarily easier. Camper's Inn in New Hampshire has some filon that I could buy, but it is not already backed with 1/8' backing. I would have to used some type of adhesive and apply it to some 1/8" backing (probably luan) myself.

Will wait and see if Lance Campers comes through.

That's all for now.....Happy Camping!
2011 Ford F350 Superduty DRW SD
2011 Lance 1191 (picture below shows 2004 1161-will update soon!)
2010 HD Street Glide
2005 Pace-American MC trailer
2010 Jeep Wrangler Unlimited

pbrooks101
Explorer
Explorer
Not much done this evening. Had some other projects that needed to be done and it was a long day at work! I did get a few more pieces glued and screwed in to place that I had cut last night but darkness fell and I couldn't see exactly where they needed to go. Placed a temporary brace across the front of the frame and test fit the old filon backing. It was off by about 1/8" but I can shim that where needed when I get the new FRP backing ready to go on. Tomorrow I will get the luan and FRP glued up and glued to the frame. Then it will be ready to rough cut the radius. I still haven't heard back from Lance Campers about whether they can ship me the filon I need without having to buy a full 4' x 8' sheet. Last time they were able to send me some "scraps" that were perfect.... lets hope their scrapping adventure pans out this time too!!.....:)

Will be back at it tomorrow night and will get more pictures as the work progresses......
2011 Ford F350 Superduty DRW SD
2011 Lance 1191 (picture below shows 2004 1161-will update soon!)
2010 HD Street Glide
2005 Pace-American MC trailer
2010 Jeep Wrangler Unlimited

pbrooks101
Explorer
Explorer
Thanks Greg B... glad that the pictures and write up will be of some help. When I repaired the wings on my Lance 1061 a few years ago, I found some helpful articles here on RV.net as well. And NRALIFER, I read your whole thread before starting this.... great work and info was helpful..... it's nice to know that others have felt my pain.....:)

So..... back at it again last night. It was a beautiful day here yesterday and the sun beat down on the affected side for most of the day, drying it quite nicely. Upon getting home from work I cleaned the side up some more with the Dremel multi tool. I bought the Dremel back when I did the other wing repair and what a useful tool for this type of a job. I just had to stop by the hardware store and pick up a new blade for it as the one on it was quite dull. New blade installed and it was cutting time......


Here she is with some more of the rotten wood removed and back to good, solid wood, pretty much all the way around. The lower right corner still has a little rot there but it is all dry. I cut it out the best I could and it is maybe only a 1/4" left at best.

In my previous repair I used some scrap mahogany wood that I had acquired somewhere.... I think I bought it at a yard sale for $5.... I had a few pieces left but not enough to do what I wanted. With some thought, I remembered that I had some 3/4" cedar in the shed that was left over from a home remodel project...... back in 1987... seriously! My wife was amazed (frightened?) that I had scrap wood left from 1987!!

I pulled out the cedar and it was solid....


This is a sample of it. Nice and clear and solid....

I commenced to cutting on the chop saw and ripping on the table saw to get some dimensional pieces to make a rough frame. All I had to go by was the filon that was on the back of the wing.


Here is the framework assembled and "glued and screwed" together. I tacked it onto the camper to let the glue dry and to make sure it would dry in the shape that I needed it to. Tomorrow I will screw a temporary board across the front of it to hold everything in place while I install the new backing. I am going to use FRP (Fiberglass Reinforced Panel) or "milkboard", attached to some 1/4" luan. I have some left over from the previous project.


This is the filon that was on the back side. All of the backing pretty much rotted off of it but I will use it as a template to make my new backing. I believe that it was originally on 1/8" luan so I may see if I can find some of that tomorrow instead. I used 1/4" before and it turned out fine.


Also, all of the wood is glued and screwed with pocket screws. Last time I screwed directly through the wood and had some problems with the screw holes in the molding landing right where I had screwed, so any outside edge where molding will be going, I used a Kreg Jig and installed pocket screws.

Today I also called Lance Campers to find out about getting a replacement piece of luan-backed filon, as the original pieced was destroyed coming off. I spoke with a very helpful lady in parts (I think here name was Shelly??) As I had purchased the same product before, she was able to look up what I had ordered last time. Unfortunately, the color of the filon used on my 2004 is either not made or they didn't have any. The color of my filon siding is called "New White" and the current color is "Artic" or "Polar" white. I'm still going to go for it and if the color is way off, I may have it painted before I install it. We will see when it gets here. Lance Campers has been great to deal with for parts... better than my nearest Lance dealer.....

So, for now, the glued up frame is drying in place. Tomorrow I will finish any smaller pieces that still need to be fit, sand it down to get the seams even, and commence to getting the luan/FRP combo glued up to go on the back side.....
2011 Ford F350 Superduty DRW SD
2011 Lance 1191 (picture below shows 2004 1161-will update soon!)
2010 HD Street Glide
2005 Pace-American MC trailer
2010 Jeep Wrangler Unlimited

NRALIFR
Explorer
Explorer
I did that same repair on my 2001 1121 about 2 years ago. Here's a link to the topic I posted with the details if it will help.

LINKY

:):)
2001 Lance 1121 on a 2016 F450 โ€˜Scuse me while I whinge.
And for all you Scooby-Doo and Yosemite Sam typesโ€ฆโ€ฆโ€ฆ..Letโ€™s Go Brandon!!!

Greg_B
Explorer
Explorer
Cool, thanks for sharing. I've been putting off doing the exact same thing to my 1161 for sometime now. Both driver and passenger sides are soft at the bottom and its on my list to repair them this summer.
I'll be following your progress so a big thank you in advance for the photos and the write up.
04 Dodge 1 ton dually, Cummins, auto, quad cab, 4x4, SLT, Sport, Reese Titan V

04 Lance 1161, TV/DVD, high efficiency A/C, Honda EU2000