cancel
Showing results for 
Search instead for 
Did you mean: 

New vent fan??

pmfinnegan2
Explorer
Explorer
Currently in my TT I have one of those 3-4" fans in the vent in my bathroom. I would like to upgrade it to a full sized fantastic fan or create a breeze style vent. Do they make one of those that I can insert into the vent that is currently there so I don't have to replace all the vent set up on the roof and have to re-seal it? If so could you provide me some links to sites that offer what I am looking for? Thanks.
pmfinnegan2
2016 Chevrolet Silverado Double Cab
5.3L Vortec V8, 4X4
2018 Jayco JayFlight 29BHDB
Equal-i-zer Hitch, Prodigy Brake Controller
49 REPLIES 49

BStrummin
Explorer
Explorer
Mine came with risers that go into the four holes, like for mounting the circuit board to a case. I think you could sticky it on there with velcro, as long as it is secure when you turn the dial. Or you could drill some holes in the fan case and mount it to the side using the four holes.

dmullen
Explorer
Explorer
The picture is not accurate. The board does not rest flush against the side of the fan. There is at least a half inch gap.

dmullen
Explorer
Explorer
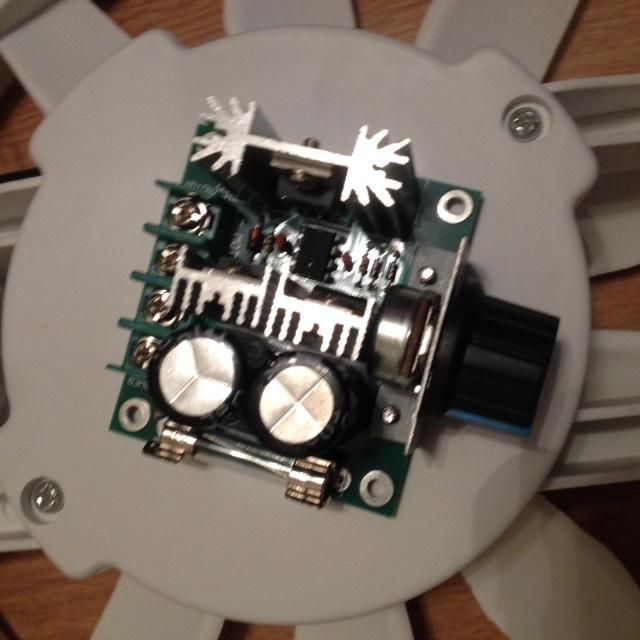
This is what I am working with...I need a way to secure the controller to the inside of the fan. I have already drilled a hole for the knob post to go thru. Would it be alright to use Velcro on the back of the circuit board?

dmullen
Explorer
Explorer
BStrummin wrote:
dmullen - if you are still using the one with the fixed dial, assuming you have enough vertical clearance I'm not clear on your question. Won't the circuit board just be sticking up in the air at 90 degrees to the housing?

Either way you could use double sided tape. It shouldn't hurt the circuit board. The moisture would be a long term damage issue, but you'd need a lot/constant very high humidity. The whole point of the fan is to move the air so I don't think it's a problem.


If I just drill a hole for the knob post to go thru then it will indeed be sticking up at 90 degrees. I wasn't sure this would be very secure so I wanted to attach it with something.

BStrummin
Explorer
Explorer
Darn you RV.net. I just ordered all the parts to do this to my old crappy tiny bathroom fan. Heng retrofit, PWM, AND two gang wall switch! Mine is currently wired with the light on one switch, and it's all but impossible to reach that tiny button on the exhaust fan when you are on the throne. This way you can turn it off/on at your leisure, but then use the PWM dial to preset.

dmullen - if you are still using the one with the fixed dial, assuming you have enough vertical clearance I'm not clear on your question. Won't the circuit board just be sticking up in the air at 90 degrees to the housing?

Either way you could use double sided tape. It shouldn't hurt the circuit board. The moisture would be a long term damage issue, but you'd need a lot/constant very high humidity. The whole point of the fan is to move the air so I don't think it's a problem.

CavemanCharlie
Explorer III
Explorer III
TNGW1500SE wrote:
These should be required in RV bathrooms by law:


What is it? I don't see it on their website.

dmullen
Explorer
Explorer
Tried the setup with a wall wart and it works great. Noise is fine even cranked all the way up. Now to mount everything. I like the idea of drilling a hole and putting the knob screw thru that. From below you would just see the knob.

How should I mount it to the side of the plastic fan housing? I wouldn't think I could stick something over the circuit board like Velcro.

Should I "water proof" it in any way since it is going above the shower?

Bumpyroad
Explorer
Explorer
TNGW1500SE wrote:
These should be required in RV bathrooms by law:


well I don't know "by law" but they are by far the best set up out there. can run in rain, etc. leave open 24/7. no need for auto close sensor, nonsense stuff, etc.
bumpy

TNGW1500SE
Explorer
Explorer
These should be required in RV bathrooms by law:

BStrummin
Explorer
Explorer
dmullen- wire the white (negative) and black (positive) from the fan to the corresponding slots on the PWM - where it says "motor." Then do the same with the power from the rv for the power spots. If you want to bench test it as others are saying you'd need a 12v power source. Find an old wall wart and use that.

Jerry9n
Explorer
Explorer
I put on a pwm controller on my Heng fan. Without bench testing it I got it together and it makes the most annoying singing on any speed but high. Works great if you are not in the trailer. I did not use the controller shown but one off eBay, so I go along with trying it out first. I did find a picture of the one I used:

Jerry9n
2009 23' Cikira Escape EXP
2006 Ford Expedition
Reese Pro Series SC
Tekonsha Primus IQ
HTT Mods

Lynnmor
Explorer
Explorer
Before you mount the controller, bench test it to see that it works correctly and there is no excessive noise created.

If all is well, check if there is room above the fan opposite the current switch. If so, drill a hole there for the knob shaft. As you saw in the photo, I used a PWM with a remote dial.

dmullen
Explorer
Explorer


dmullen
Explorer
Explorer
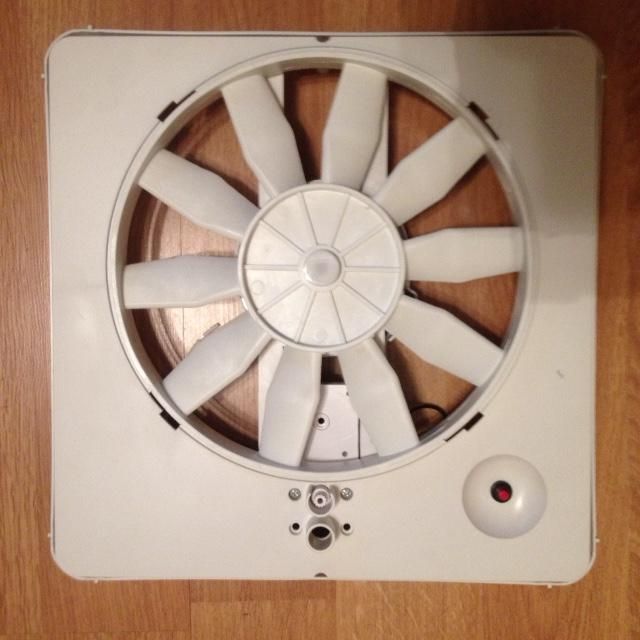
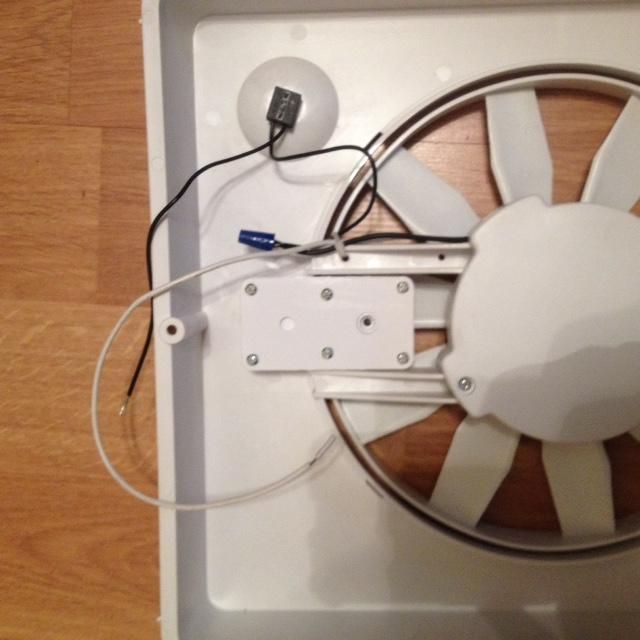
This is what I have to work with. Can you guys walk me thru this? 8-) I'm have no idea how I am supposed to control the speed. Where would I mount the controller?


Lynnmor
Explorer
Explorer
BStrummin wrote:
dmullen - I haven't done this but from the picture posted above it looks like their PWM had a remote dial, while the one you posted does not. That might complicate this a bit. That said the connections look simple - +/- in, +/- to motor. Again in the picture above it looks like they just took the +/- from the trailer, wired into the pwm, then sent power back out to the unit. This would retain the on/off switch, but would add in the knob to adjust speed. The extra whitish wire is for the remote knob.

Does that help?


Yes, it's just that simple. I left the original switch in place as a master on-off. The DPDT switch reverses polarity and thus reverses the motor direction. The speed control knob was factory connected on the eBay model I bought. There are others with the reversing switch also factory connected, but one that I bought caused harmonic noise.