Forum Discussion
WarpedJester
Dec 14, 2020Explorer
Hey everyone,
Back again with another installment of updates on ..umm installments?
I know the first post here was long so im just going to dive right into this quick update. If you want to know all the details then grab a beer and read the first post here.
Moving on… this weekend's work was a lot of fiddly bits, change of plans mid-build (which never bites me in the arse) and a bit of modding. Oh and the obligatory arguing with Dana because I want to do things the hard way and she wants to do things the logical, sensible, and easy way.
Starting off with the changes in plan. Now I realize that some of this may be hard to wrap your head around since I really have not explained the details of the cabinet so I am going to do that here and now. If you are a "TL;DR" kinda person then feel free to skip down to the next section if you like.
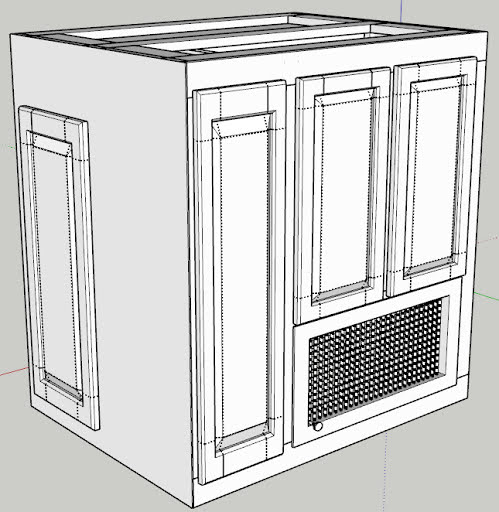
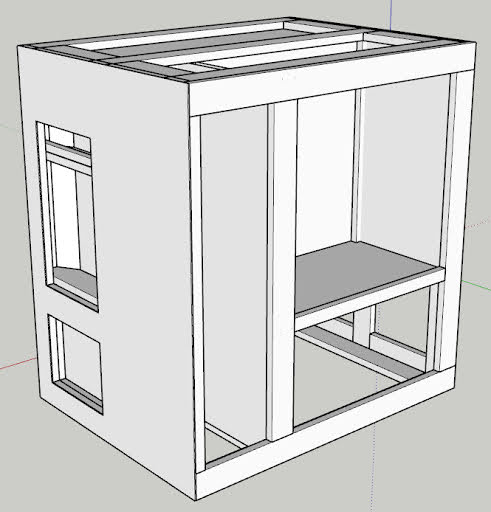
Let's take another look at that cabinet SketchUp and I'll do my best to explain why I designed it the way I did and please bear in mind this is really being built to fit my needs.
This cabinet will be accessible from three side, 2 from inside the RV for "insidy-RV-things" (I just coined that term but I'll put it in open domain so feel free to make it a thing (#IRT! *wink). The back side will be accessed from a storage bay style hatch which is how we will get to most of the solar stuffs.
The Insidy-RV-Things:


So this was the original design. Bottom left is the heater cubby with the front grill for intake. Above that on the left is storage for my garbage and recycling cans. Later when I add the countertop I am going to cut in a access hatch that drops strait into the trash for easy clean up from food prep. The tall cabinet opening on the right is where I am going to build in drawers for silverware and what not. I went this route so that I didn’t have to build a bunch of drawer fronts and catches for each drawer. The one door to hold them, one door to rule them all!.. Ehh hmm sorry.
On the side is the access to system services. The bottom box will have the solar system main cutoff switches, 4 in total so I can cut off the batteries, MPPT, solar panels, and Inverter/charger. The top opening will house the new RV breaker box (with some modification but more on that later) and some "service switches" such as the slides, awning, and generator at the top, all of which will be closed up behind the cabinet door.
The outsidy-things:

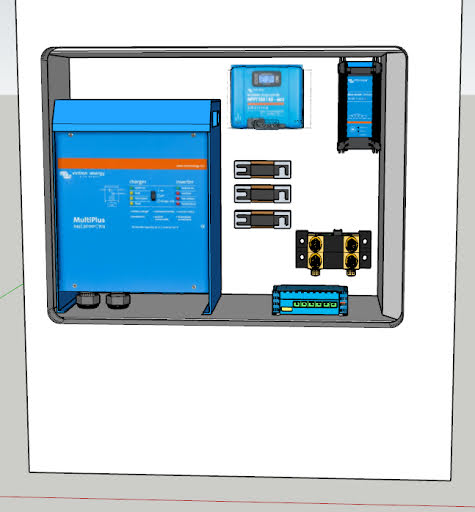
On the outside of the RV, this cabinet more or less lines up with the original access panel for the old fridge but it’s a bit small so I have ordered a larger baggage door and will cut the access hole bigger once it comes in. this is where most of the solar equipment will be homed, save some fuses, shunt and batteries which will go in a storage bay below this build. Yes I know I said I didn’t want to sacrifice storage but turns out you can't have your cake and eat it too (who knew?). At least I'm only eating up one storage bay and not two (that’s a 50% savings for 300% the work!).
The back of the solar area will have a false wall so that I can run wires behind everything and keep things looking all nice and tidy. The back wall of the trash area is removable so I can access said wiring. That leaves me all of an inch between the two walls for all the wires to run through.
TL;DL READERS, this is where you pick up the story…
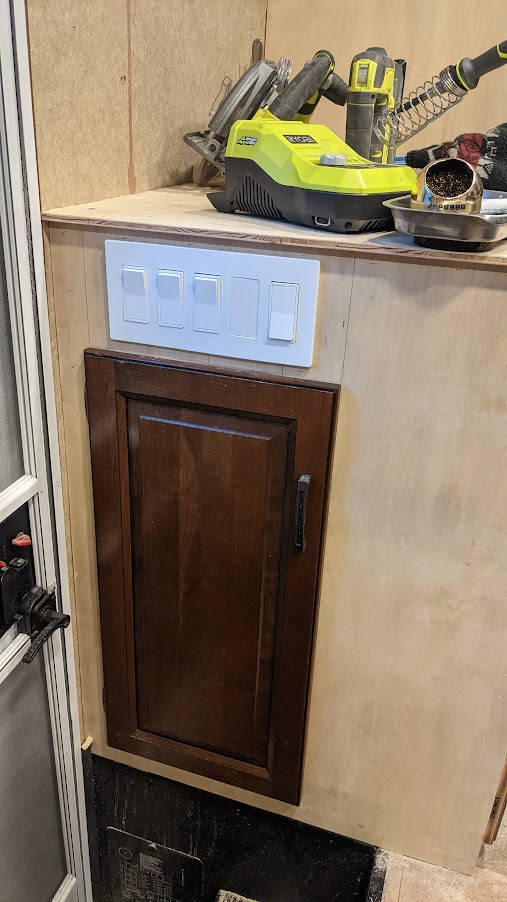
Ok, so now that we are all caught up on the details, lets talk about changes that have been made. To start with I have added a 5-gang light switch panel to the side above the cabinet door.

Now, lets get to OMG out of the way… yes these are your standard AC house switches and yes I am all too aware of the potential failings of this decision. I am going save you time and just say I will be dedicating a post on this topic and save you all from a run-on about it here.
so that was my mid-week quicky project and in full disclosure, the only switch I have wired right now is the right-most one which is for the main room lights.
Come the weekend it was back to Dana's house to dive back in head first. Now Dana being the wonderful and delicate sweetheart she is had noted in a prior week that the side of the cabinet just looked odd with one offset cabinet. Well in her words I believe it was something like "…it looks ugly and I don’t like it.." Like I said, she's pretty soft spoken. Love you Dana!!
In fairness, I thought so too but I did not want to admit it because well what can I do? That's the side of the drawer cabinet. I could stick a false cabinet door on there…. GAHH!! No, no I can't. I CAN NOT STAND fake cabinet fronts of any kind. It drives me nuts. Ok then what can I do? there is all of literally an inch of space behind that wall…. Hmmm… ooooooooOOOOOHHHH….. COVID CABINET!!!

Nobody can claim that I am not using ever last inch of space now!
Moving on… the last major thing we did is mod and install a new fuse panel/beaker box. Then we pulled it back out and modded it because again, I like making life hard

First we cut off the bottom lip of the fuse box so we had more room at the top for the aforementioned "service switches" I then pulled out one half of the 120v breaker strip and fabricobled a rail to mount in PV fuse holders and the lighting breaker. Some elec-chicken out there hates me right now for sure.
Egads! My short update post seems to have gotten away from me.. Ok well the rest of the weekend was spent with fiddly bits like cutting the side cabinet doors down to fit and doing a lot of looking at the solar bay and figuring out how to fit everything. And now I see that the light switches are no longer centered over the cabinet door…. DANA!!!!!!!!!!!
That’s it for this week. Stay tuned for the next installment of "what the hell is this guy thinking. Also keep an eye out for my post on the house switches.
Back again with another installment of updates on ..umm installments?
I know the first post here was long so im just going to dive right into this quick update. If you want to know all the details then grab a beer and read the first post here.
Moving on… this weekend's work was a lot of fiddly bits, change of plans mid-build (which never bites me in the arse) and a bit of modding. Oh and the obligatory arguing with Dana because I want to do things the hard way and she wants to do things the logical, sensible, and easy way.
Starting off with the changes in plan. Now I realize that some of this may be hard to wrap your head around since I really have not explained the details of the cabinet so I am going to do that here and now. If you are a "TL;DR" kinda person then feel free to skip down to the next section if you like.
Let's take another look at that cabinet SketchUp and I'll do my best to explain why I designed it the way I did and please bear in mind this is really being built to fit my needs.
This cabinet will be accessible from three side, 2 from inside the RV for "insidy-RV-things" (I just coined that term but I'll put it in open domain so feel free to make it a thing (#IRT! *wink). The back side will be accessed from a storage bay style hatch which is how we will get to most of the solar stuffs.
The Insidy-RV-Things:
So this was the original design. Bottom left is the heater cubby with the front grill for intake. Above that on the left is storage for my garbage and recycling cans. Later when I add the countertop I am going to cut in a access hatch that drops strait into the trash for easy clean up from food prep. The tall cabinet opening on the right is where I am going to build in drawers for silverware and what not. I went this route so that I didn’t have to build a bunch of drawer fronts and catches for each drawer. The one door to hold them, one door to rule them all!.. Ehh hmm sorry.
On the side is the access to system services. The bottom box will have the solar system main cutoff switches, 4 in total so I can cut off the batteries, MPPT, solar panels, and Inverter/charger. The top opening will house the new RV breaker box (with some modification but more on that later) and some "service switches" such as the slides, awning, and generator at the top, all of which will be closed up behind the cabinet door.
The outsidy-things:
On the outside of the RV, this cabinet more or less lines up with the original access panel for the old fridge but it’s a bit small so I have ordered a larger baggage door and will cut the access hole bigger once it comes in. this is where most of the solar equipment will be homed, save some fuses, shunt and batteries which will go in a storage bay below this build. Yes I know I said I didn’t want to sacrifice storage but turns out you can't have your cake and eat it too (who knew?). At least I'm only eating up one storage bay and not two (that’s a 50% savings for 300% the work!).
The back of the solar area will have a false wall so that I can run wires behind everything and keep things looking all nice and tidy. The back wall of the trash area is removable so I can access said wiring. That leaves me all of an inch between the two walls for all the wires to run through.
TL;DL READERS, this is where you pick up the story…
Ok, so now that we are all caught up on the details, lets talk about changes that have been made. To start with I have added a 5-gang light switch panel to the side above the cabinet door.
Now, lets get to OMG out of the way… yes these are your standard AC house switches and yes I am all too aware of the potential failings of this decision. I am going save you time and just say I will be dedicating a post on this topic and save you all from a run-on about it here.
so that was my mid-week quicky project and in full disclosure, the only switch I have wired right now is the right-most one which is for the main room lights.
Come the weekend it was back to Dana's house to dive back in head first. Now Dana being the wonderful and delicate sweetheart she is had noted in a prior week that the side of the cabinet just looked odd with one offset cabinet. Well in her words I believe it was something like "…it looks ugly and I don’t like it.." Like I said, she's pretty soft spoken. Love you Dana!!
In fairness, I thought so too but I did not want to admit it because well what can I do? That's the side of the drawer cabinet. I could stick a false cabinet door on there…. GAHH!! No, no I can't. I CAN NOT STAND fake cabinet fronts of any kind. It drives me nuts. Ok then what can I do? there is all of literally an inch of space behind that wall…. Hmmm… ooooooooOOOOOHHHH….. COVID CABINET!!!
Nobody can claim that I am not using ever last inch of space now!
Moving on… the last major thing we did is mod and install a new fuse panel/beaker box. Then we pulled it back out and modded it because again, I like making life hard
First we cut off the bottom lip of the fuse box so we had more room at the top for the aforementioned "service switches" I then pulled out one half of the 120v breaker strip and fabricobled a rail to mount in PV fuse holders and the lighting breaker. Some elec-chicken out there hates me right now for sure.
Egads! My short update post seems to have gotten away from me.. Ok well the rest of the weekend was spent with fiddly bits like cutting the side cabinet doors down to fit and doing a lot of looking at the solar bay and figuring out how to fit everything. And now I see that the light switches are no longer centered over the cabinet door…. DANA!!!!!!!!!!!
That’s it for this week. Stay tuned for the next installment of "what the hell is this guy thinking. Also keep an eye out for my post on the house switches.
About DIY Maintenance
RV projects you can tackle on your own with a few friendly pointers.4,399 PostsLatest Activity: Jan 20, 2026