Forum Discussion
DeadeyeLefty
Apr 07, 2012Explorer
Project Glacier continues to creep along...
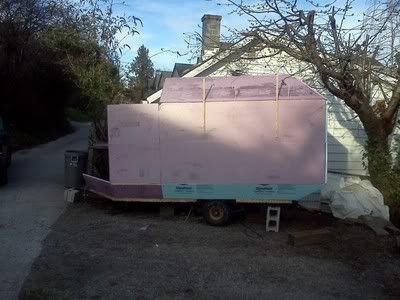
I have a couple fixed back windows from Ranger pickups that I'll be using as skylights in those canted top panels of the walls. The height on those is from 60 -75" off the floor, so the windows will be in one's line of sight while at the galley and you can see the stars at night from the bed. Or the raindrops, as the case may be...:B
I got the curve for the nose mocked up using a batten (though it's a little tough to see in the pic):
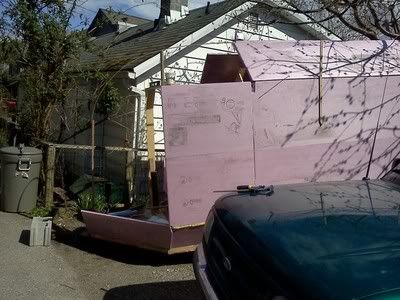
It's just a ball park because the 1" foam won't give me enough room to sand to that curve. If I wanted to maintain that curve, I would do it in at least two stages, since the foam doesn't bend. Alternately, I can kerf the foam to get it to bend and assemble it like an Airstream's nose.
Here's a shot with the roughed-out roof section in place to show what the final cross section will look like. From the floor to the bottom of the roof spars is 75"
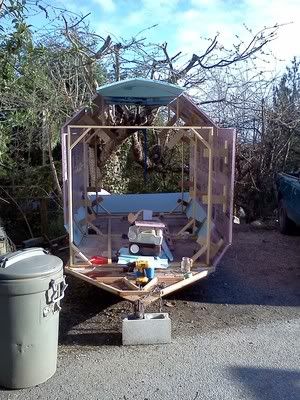
The portapotti is there as a sample for setting up the nose - it will have its own vented compartment (where the drill is) closed off by a bulkhead. I had to make sure I could build the height up to a comfortable 16" sitting height and still have enough sitting headroom under the curve of the nose. It was a bit of an ergonomics balancing act but that's what determined the height of the front wall and the start point of the curve. Carrying the canted walls forward will give me much-needed elbow room in the head. and might provide me enough space for an externally accessed locker for a 10 lb LPG bottle on each side, though I may have to go with horizontal bottles to make it work. My original plan was to transition from angled to vertical walls where the nose begins to narrow.
Next I need to finish the door frame and offer it up so I can fair the plane of the extended side into the plane of the door, which is at the edge of the trailer frame. Then I have to transition back out to the sloped bottom on the nose to match the other side. I tried visualizing it by drawing it out, but the foam is so easy to shape it's easier to just hack at a foam panel until fits where it needs to go. Once the sides are in, I can start cutting the triangular pieces to make up the curve of the nose - that will be done like staves for a barrel, only as a cone rather than a cylinder. The leading edge will be shaped from a block of foam, though I had thought about incorporating a 5' pipe vertically to the front wall to take a 1 5/8 pipe internally for a satellite dish...but a tripod is a much simpler solution...
Once I have the overall shape built in foam, I'll start taking the panels off the frames one by one to glass them. Both sides will be done as single panels from floor to ceiling. The roof cap and back wall are two more panels and the nose will probably be easiest to handle as two pieces like a clam shell. I'll put a layer of 6oz cloth on both the inside and the outside, then remount the panels to the frames. Once the shape is all back together and glued up, I'll tape and fair the seams. Then a final layer of 6oz cloth over the outside, final filling and sanding, then paint.
I'm still easily on track to start glassing mid-May as the temps warm up. I have a trip into the city planned for then, so I'll pick up my fiberglassing stuff from the wholesaler in town where it's about 2/3 the price.
Besides the door frame, I also want to start gusseting the walls and rear panel to make them stiff enough that I can glass them without them distorting out of shape.
I think this is the paint I'm going to use:

It's actually meant as a nonskid deck covering but with a smooth roller should go on as a thick paint. I need to play with it a little more to see if it will stick to vertical surfaces without sagging, but from what I've used so far I think it will work. I put some on a boat deck for a customer who decided to go back to teak decks, so I should be able to get the open gallon can for next to nothing(it's almost full). At the very least, I know it will be great for lining lockers and for doing the floor.
At this point, when I wheel the trailer around it still feels like there's no additional weight on it from when it was just a flat deck, and I'm sure the frames weigh more that the foam does...
I have a couple fixed back windows from Ranger pickups that I'll be using as skylights in those canted top panels of the walls. The height on those is from 60 -75" off the floor, so the windows will be in one's line of sight while at the galley and you can see the stars at night from the bed. Or the raindrops, as the case may be...:B
I got the curve for the nose mocked up using a batten (though it's a little tough to see in the pic):
It's just a ball park because the 1" foam won't give me enough room to sand to that curve. If I wanted to maintain that curve, I would do it in at least two stages, since the foam doesn't bend. Alternately, I can kerf the foam to get it to bend and assemble it like an Airstream's nose.
Here's a shot with the roughed-out roof section in place to show what the final cross section will look like. From the floor to the bottom of the roof spars is 75"
The portapotti is there as a sample for setting up the nose - it will have its own vented compartment (where the drill is) closed off by a bulkhead. I had to make sure I could build the height up to a comfortable 16" sitting height and still have enough sitting headroom under the curve of the nose. It was a bit of an ergonomics balancing act but that's what determined the height of the front wall and the start point of the curve. Carrying the canted walls forward will give me much-needed elbow room in the head. and might provide me enough space for an externally accessed locker for a 10 lb LPG bottle on each side, though I may have to go with horizontal bottles to make it work. My original plan was to transition from angled to vertical walls where the nose begins to narrow.
Next I need to finish the door frame and offer it up so I can fair the plane of the extended side into the plane of the door, which is at the edge of the trailer frame. Then I have to transition back out to the sloped bottom on the nose to match the other side. I tried visualizing it by drawing it out, but the foam is so easy to shape it's easier to just hack at a foam panel until fits where it needs to go. Once the sides are in, I can start cutting the triangular pieces to make up the curve of the nose - that will be done like staves for a barrel, only as a cone rather than a cylinder. The leading edge will be shaped from a block of foam, though I had thought about incorporating a 5' pipe vertically to the front wall to take a 1 5/8 pipe internally for a satellite dish...but a tripod is a much simpler solution...
Once I have the overall shape built in foam, I'll start taking the panels off the frames one by one to glass them. Both sides will be done as single panels from floor to ceiling. The roof cap and back wall are two more panels and the nose will probably be easiest to handle as two pieces like a clam shell. I'll put a layer of 6oz cloth on both the inside and the outside, then remount the panels to the frames. Once the shape is all back together and glued up, I'll tape and fair the seams. Then a final layer of 6oz cloth over the outside, final filling and sanding, then paint.
I'm still easily on track to start glassing mid-May as the temps warm up. I have a trip into the city planned for then, so I'll pick up my fiberglassing stuff from the wholesaler in town where it's about 2/3 the price.
Besides the door frame, I also want to start gusseting the walls and rear panel to make them stiff enough that I can glass them without them distorting out of shape.
I think this is the paint I'm going to use:
It's actually meant as a nonskid deck covering but with a smooth roller should go on as a thick paint. I need to play with it a little more to see if it will stick to vertical surfaces without sagging, but from what I've used so far I think it will work. I put some on a boat deck for a customer who decided to go back to teak decks, so I should be able to get the open gallon can for next to nothing(it's almost full). At the very least, I know it will be great for lining lockers and for doing the floor.
At this point, when I wheel the trailer around it still feels like there's no additional weight on it from when it was just a flat deck, and I'm sure the frames weigh more that the foam does...
About DIY Maintenance
RV projects you can tackle on your own with a few friendly pointers.4,410 PostsLatest Activity: Jan 18, 2025