Carb_Cleaner
Aug 08, 2014Explorer
Timbren SES installed
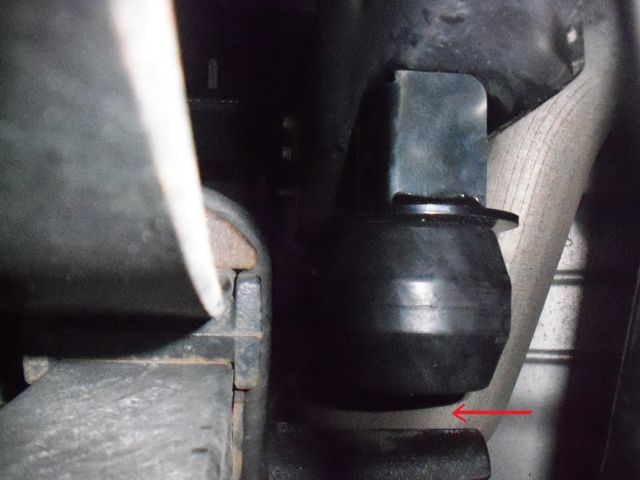
Installed a set of rear Timbren SES (Suspension Enhancement System). I went with the units that are supposed to be for slide-in campers and salt spreaders, part #FRTT350F. I already have upper StableLoads. After reading around, some seem to like the regular duty version, more. It's my understanding that the regular version is longer than the slide-in camper units. I'm guessing the regulars have a softer compression rate. The kit came with one inch spacers, but I did not install them. After installing the fancy rubber baby buggy bumpers, with my truck's bed empty except for the bed mat/bed liner system, I can barely slip the 1" spacer between the Timbren and the axle block on one side (red arrow). The spacer won't slip in on the other side. It appears that the Timbrens would be touching the axle at all times, had I installed the spacers. I'll see what happens when I load the camper and hitch my little trailer to the truck. I'm pretty sure (positive) it's going to squat at least the one inch, leaving the Timbrens in contact full time when loaded. I think.

One thing the instructions don't tell you, the supplied bolt (sans spacer) won't fit through enough to secure the Timbren bracket to the Elastomer spring (I used the bracket's middle hole). I had to temporarily use a separate bolt, washers and nut to pull the supplied 3/8" x 1 1/2" washer into the well of the Elastomer spring. The Elastomer spring is hollow in the center with one end solid that attaches to the bracket. The 1 1/2" washer goes inside the hollow, against the solid end. Kinda like pressing a bearing. After that, the supplied bolt reached far enough to thread on the supplied Nylock nut.
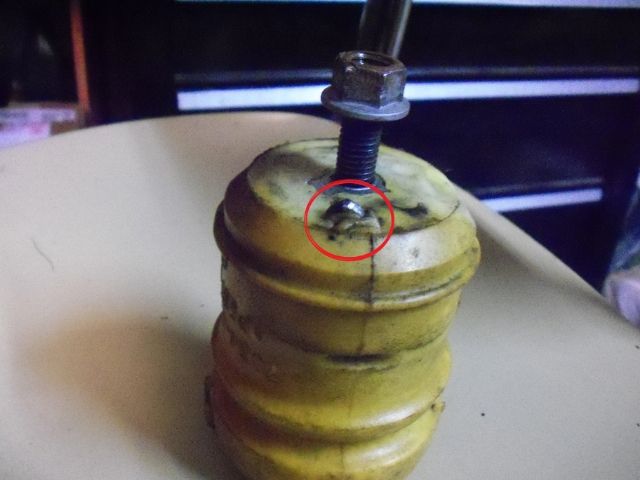
Getting the factory bump-stops off was the toughest part of the install. Be sure to apply upwards pressure on the bump-stop to maintain engagement of the bump-stop's pin into the frame of the truck, preventing it from spinning. Do not allow this pin to get rounded. If you do, a 4" c-clamp will compress the factory bump-stop to the frame, giving it enough gumption to stay stationary while you un-thread the nut. It can be a little tight in there, but trust me. It works. On the second side, I put the c-clamp on before my initial attempt to loosen its nut. Hit the factory nuts with penetrating oil about a beer before you try to loosen them.

'13 F250 4x4 with camper package, 10,000# GVWR. Essentially, a F350 suspension without the extra 2" axle block.

One thing the instructions don't tell you, the supplied bolt (sans spacer) won't fit through enough to secure the Timbren bracket to the Elastomer spring (I used the bracket's middle hole). I had to temporarily use a separate bolt, washers and nut to pull the supplied 3/8" x 1 1/2" washer into the well of the Elastomer spring. The Elastomer spring is hollow in the center with one end solid that attaches to the bracket. The 1 1/2" washer goes inside the hollow, against the solid end. Kinda like pressing a bearing. After that, the supplied bolt reached far enough to thread on the supplied Nylock nut.
Getting the factory bump-stops off was the toughest part of the install. Be sure to apply upwards pressure on the bump-stop to maintain engagement of the bump-stop's pin into the frame of the truck, preventing it from spinning. Do not allow this pin to get rounded. If you do, a 4" c-clamp will compress the factory bump-stop to the frame, giving it enough gumption to stay stationary while you un-thread the nut. It can be a little tight in there, but trust me. It works. On the second side, I put the c-clamp on before my initial attempt to loosen its nut. Hit the factory nuts with penetrating oil about a beer before you try to loosen them.

'13 F250 4x4 with camper package, 10,000# GVWR. Essentially, a F350 suspension without the extra 2" axle block.