Forum Discussion
RoyB
Apr 14, 2016Explorer III
Kuziwk - It is pretty simple to just wire in a converter/charger unit to your existing Power Distribution Panel...
This is what the WFCO 8900 series Power Distribution Panel look like and all you do is connect the 120VAC Breaker to the PD9260C and the three DC OUTPUT wire to the Positive - Negative - GROUND lugs on the 12VDC Side of the Power Distribution Panel.
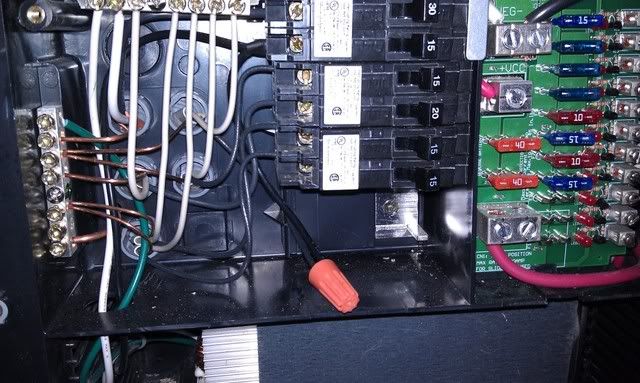
The top large BLACK cable is the NEGATIVE converter cable cable the next lug down is a heavy RED cable connection which is the POSITIVE converter cable connection. The Bottom large RED cable is the Battery cable connection...
So you connect the 120VAC wiring to the PD9260C and the three 12VDC cables to the Power Distribution panel. That is all you have to do. Hopefully the PD9260C will fit in the bottom compartment where you old converter chassis is located...
Here is another view of a WFCO 8900 series Power Distribution Frame with the converter/charger unit in the bottom compartment.
You can see the RED Positive cable and WHITE NEGATIVE cable coming from the converter unit in the bottom compartment. The white in this case connects to the top NEGATIVE lug on the 12VDC side. The RED connects to the middle lug connections. The bottom connection will go to the battery bank. The large WHITE heavy cable on the TOP NEGATIVE goes to the frame ground or NEGATIVE BATTERY connection.

Your power distributionpanel should be very similar to this but I live in the Trailer workld and things sometimes are laid out different than the motorhomes...
There are many items there that needs your 12VDC as you can see from the block diagram I showed above...
My PD9260C came with it own 120VAC Plug cord and I elected to not mount mine inside the Power Distribution Panel but rather get it closer to my battery bank where cable lengths are a big deal for me and OFF-ROAD operations. I plugged my PD9260C directly into a 120VAC Receptacle that was wired into a blank circuit breaker spot. The just connected the 12VDC cable and frame ground and that was all that was necessary to get it working. My problem was the WF8945 converter/charger originally being used would never go into 14.4VDC Charge mode that I needed it to do. Since the WF-8956 Converter/charger is still a working unit I just left it in place. Now I can use either one by flipping the correct 120VAC circuit breaker...
Just make note all those 12VDC items you see in the above block diagram I sent earlier are required to be powered up on 12VDC and it does this from the 12VDC side ATC fuse panels...
I take it you want to replace the old Allanson converter which is a single mode converter/charger unit...
Here is a diagram on how I used the WFCO Power Distribution Center and my battery connections. Might give you some ideas of what I am discussing above here... Of course I am wired here using the WF8945 Converter/charger in the bottom compartment and the PD9260C standone some 10 feet away from the Power Distribution Panel close to my my battery bank switches...

Roy Ken
This is what the WFCO 8900 series Power Distribution Panel look like and all you do is connect the 120VAC Breaker to the PD9260C and the three DC OUTPUT wire to the Positive - Negative - GROUND lugs on the 12VDC Side of the Power Distribution Panel.
The top large BLACK cable is the NEGATIVE converter cable cable the next lug down is a heavy RED cable connection which is the POSITIVE converter cable connection. The Bottom large RED cable is the Battery cable connection...
So you connect the 120VAC wiring to the PD9260C and the three 12VDC cables to the Power Distribution panel. That is all you have to do. Hopefully the PD9260C will fit in the bottom compartment where you old converter chassis is located...
Here is another view of a WFCO 8900 series Power Distribution Frame with the converter/charger unit in the bottom compartment.
You can see the RED Positive cable and WHITE NEGATIVE cable coming from the converter unit in the bottom compartment. The white in this case connects to the top NEGATIVE lug on the 12VDC side. The RED connects to the middle lug connections. The bottom connection will go to the battery bank. The large WHITE heavy cable on the TOP NEGATIVE goes to the frame ground or NEGATIVE BATTERY connection.
Your power distributionpanel should be very similar to this but I live in the Trailer workld and things sometimes are laid out different than the motorhomes...
There are many items there that needs your 12VDC as you can see from the block diagram I showed above...
My PD9260C came with it own 120VAC Plug cord and I elected to not mount mine inside the Power Distribution Panel but rather get it closer to my battery bank where cable lengths are a big deal for me and OFF-ROAD operations. I plugged my PD9260C directly into a 120VAC Receptacle that was wired into a blank circuit breaker spot. The just connected the 12VDC cable and frame ground and that was all that was necessary to get it working. My problem was the WF8945 converter/charger originally being used would never go into 14.4VDC Charge mode that I needed it to do. Since the WF-8956 Converter/charger is still a working unit I just left it in place. Now I can use either one by flipping the correct 120VAC circuit breaker...
Just make note all those 12VDC items you see in the above block diagram I sent earlier are required to be powered up on 12VDC and it does this from the 12VDC side ATC fuse panels...
I take it you want to replace the old Allanson converter which is a single mode converter/charger unit...
Here is a diagram on how I used the WFCO Power Distribution Center and my battery connections. Might give you some ideas of what I am discussing above here... Of course I am wired here using the WF8945 Converter/charger in the bottom compartment and the PD9260C standone some 10 feet away from the Power Distribution Panel close to my my battery bank switches...
Roy Ken
About Motorhome Group
38,778 PostsLatest Activity: Jun 10, 2026