ron_dittmer
Apr 07, 2014Explorer III
Increasing Galley Drawer Storage
I posted this on the Phoenix Cruiser forum for PC owners to consider and thought maybe people of other brand rigs in similar situations, could benefit from this post.
Enjoy!
-----------------------------
Our five small galley base cabinet drawers never met our cooking storage needs, and we rarely utilized our pull-out butcher block counter. We were also annoyed having drawers behind a door. So, after 6 years I built up enough courage to do something about it. We now have plenty of cabinet storage for all cooking needs and more. My wife is "very" happy to have everything in one easy access location where she needs it. This also opened space in other cabinets for other things.
Comparing "Before & After" space, here are the "square inch" totals of drawer bottom surface areas.
Original Five = 837 sq. in.
New Three = 1557 sq. in.
To make a fair comparison, I need to mention the original arraingement suspends the sliding flatware tray providing extra space underneath it. But for us, it was inconvenient limited-use space if you know what I mean.
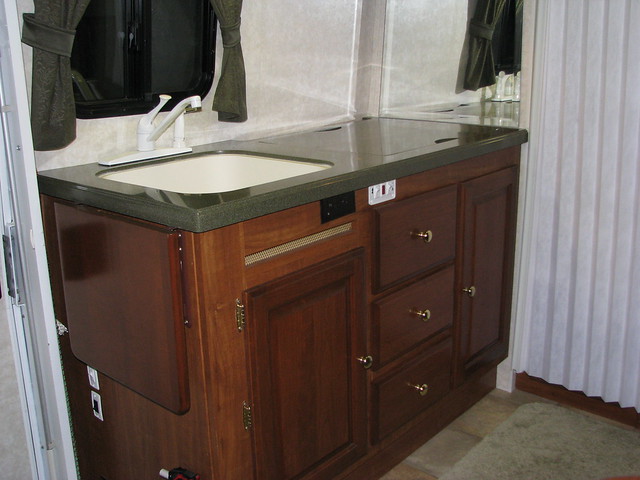
Here is the original cabinet with 5 tiny drawers, 3 in plain sight, 2 drawers and pull-out butcher block counter were behind the right-side cabinet door. PCs made after 2005 or 2006 are made this way. The earlier design is close to it and can be reconfigured in the same manner. Admittedly this original design looks nice.
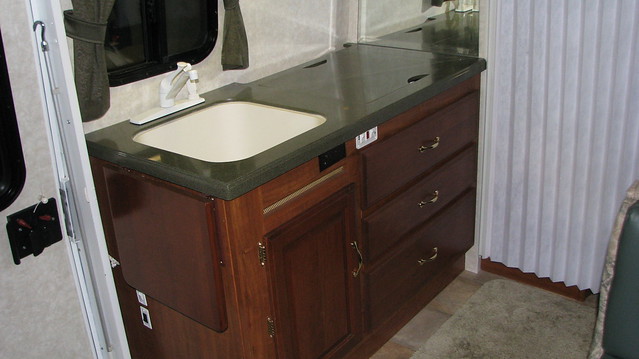
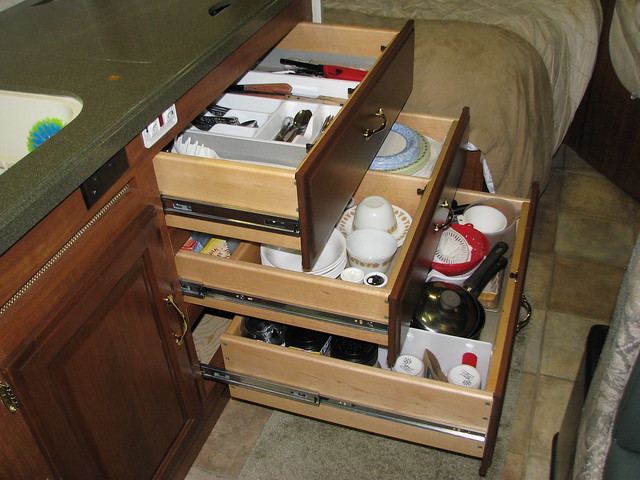
Here is the cabinet afterward with three full width, maximum depth drawers.
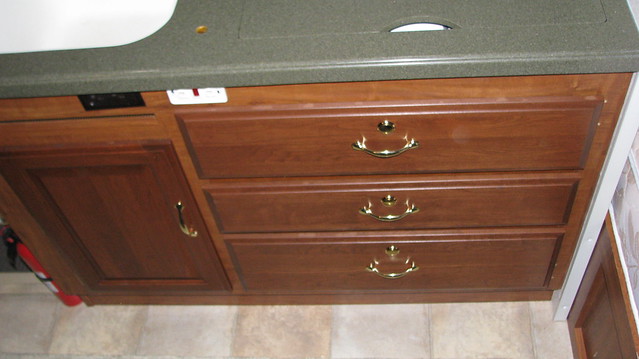
Here are the drawers today. I later learned I needed to add locking latches to keep the drawers closed while in motion.
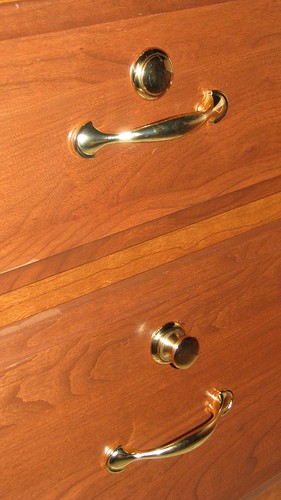
The latches are commonly used on other brand motor homes and easily found for sale on the internet, common in the brushed stainless finish, very rare in the polished brass finish.
When the button is in, the drawer is locked.
When the button is out, the drawer can be opened.
Each drawer also has two magnetic catches to hold it closed even when unlocked, useful when the rig is slanted down and away from the cabinet.
------------------------------------------------------------------------------
Here is a quick run-down on the project. There is so much more than implied. I don't consider this project easy at all. I wouldn't want to do it a second time. If you are seriously considering doing this with your PC, contact me directly.
I first removed the drawers and butcher block to evaluate the situation.
Note the copper gas line in the upper back left side.
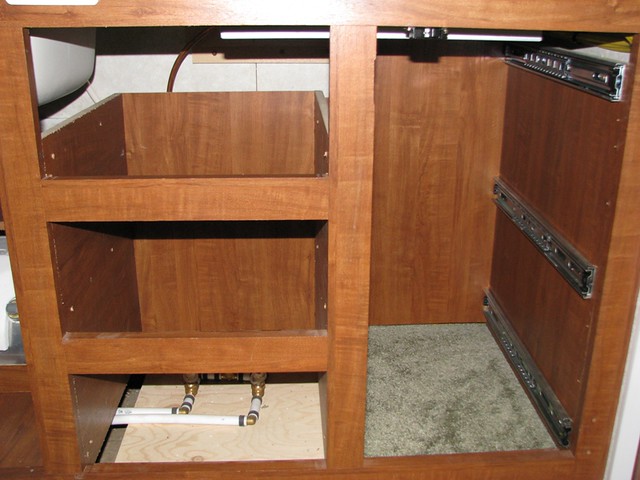
I identified how much space behind the drawers was not utilized.
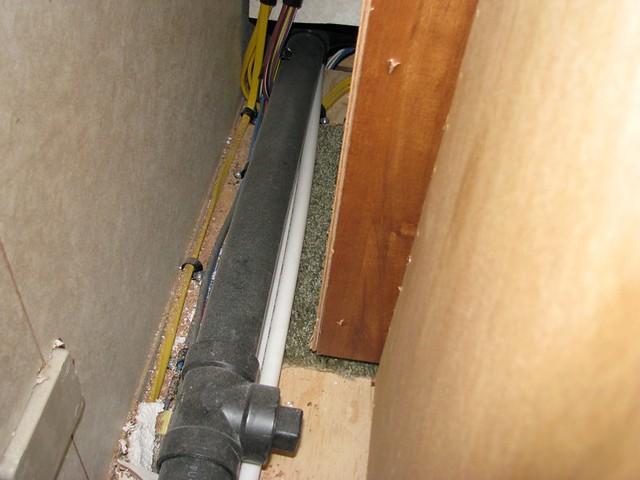
Convinced to continue, I gutted the cabinet interior and removed the front rails & styles.
Here were the obstacles I needed to consider in making the three new drawers as deep as possible.
1) black drain pipe with service cap (relocate it)
2) gas line for stove (relocate it against the back wall)
3) the stove hangs down (work around it)
4) storage pocket for Corian stove & sink covers (work around it)
5) wiring in the way (re-clamp out of the way)
In this picture I had already bent the gas line partially out of the way
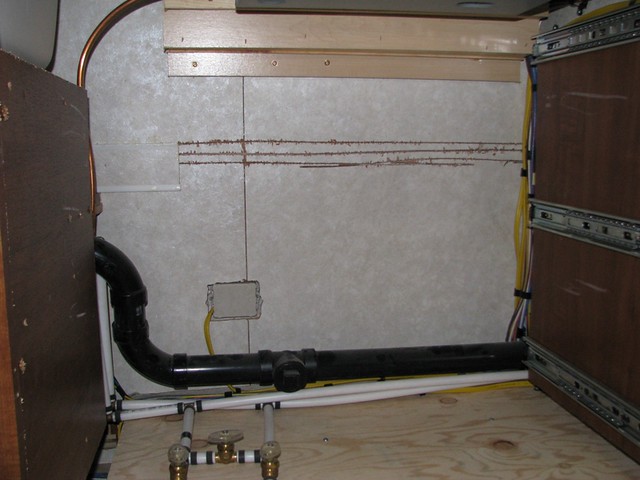
Determining The Height Of The Three New Drawers (Critical & Detailed)
If the top drawer was made low (shallow) as is commonly practiced in houses, the hanging stove would significantly limit usefulness. So I made the opening taller than normal, 6” tall.
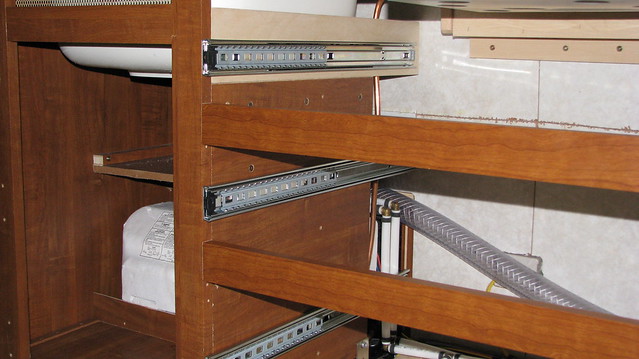
The middle opening is 5” tall to clear a new sink drain flex hose to achieve maximum depth.
The bottom opening is 8” tall which is great for pots and pans. It stops just short of the flex sink drain hose making it a few inches less deep than the middle drawer.
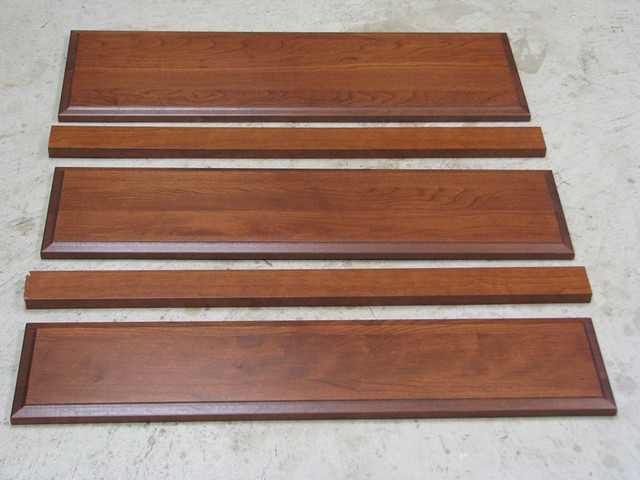
With this all planned out in great detail, I then ordered three new appropriately sized drawer fronts and two new rails from Phoenix USA.
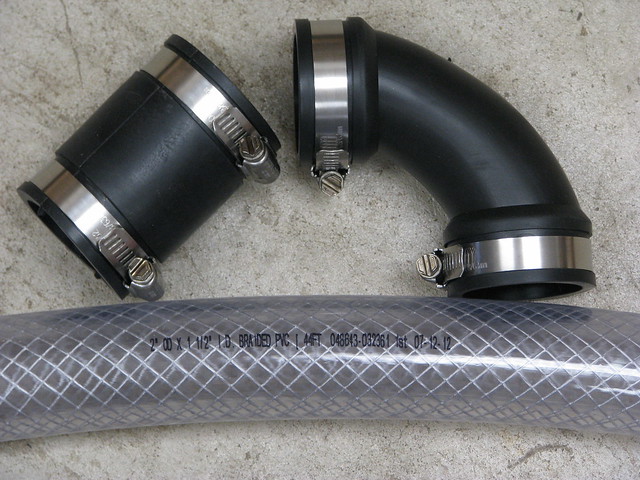
I rerouted the hard black drain pipe using flexible components clamped tight against the back wall to achieve maximum bottom drawer depth. The gas line got nicely bent out of the way. As seen here, the left interior wall was extended upward to mount the top drawer glide higher. Not seen, the rails have 1x2” across their back side to strengthen them.
I bought these parts to reroute the drain. Home Depot was the only place that sold such large diameter 1/4" thick flex hose that works perfectly with this clamp-connecting approach.
Details About Depth
The top drawer clears both the hanging stove and Corian cover pocket by notching the right side and back.
The middle drawer is Full-Depth as there are no obstructions.
The bottom drawer is a few inches short of the back wall to clear the flex drain pipe.
Here are the three different drawer depths. Clearly visible is the top drawer notch work.
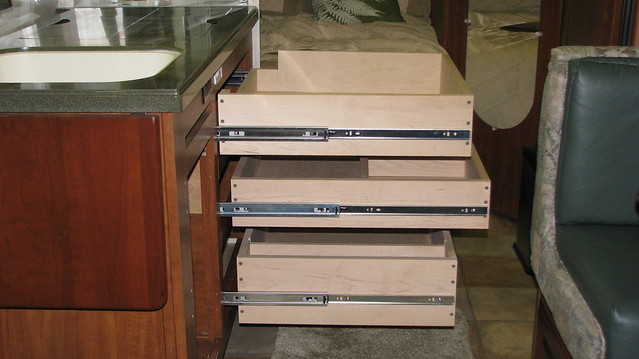
To reduce the sliding of contents while braking hard, we planned some compartments.
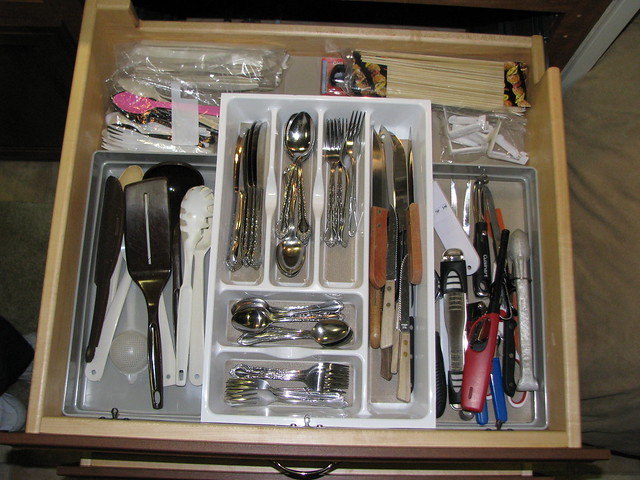
The top drawer is mainly assigned for the original PC utensil tray and related cooking utensils. Trays are held in place using carpet tape.
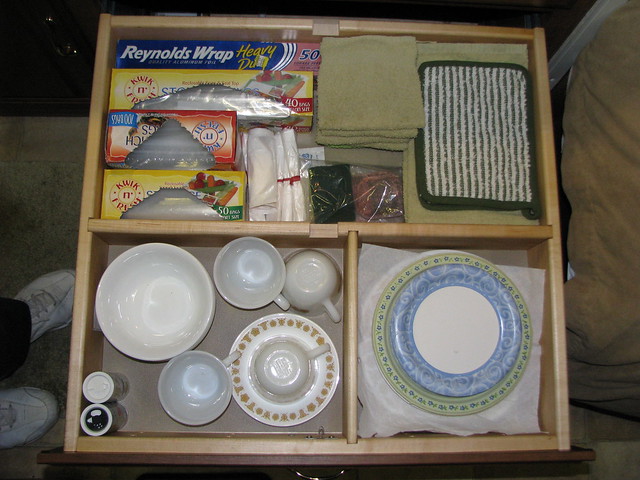
The middle drawer has a compartment for Corelle plates & saucers, another compartment for cups, and a third for miscellaneous.
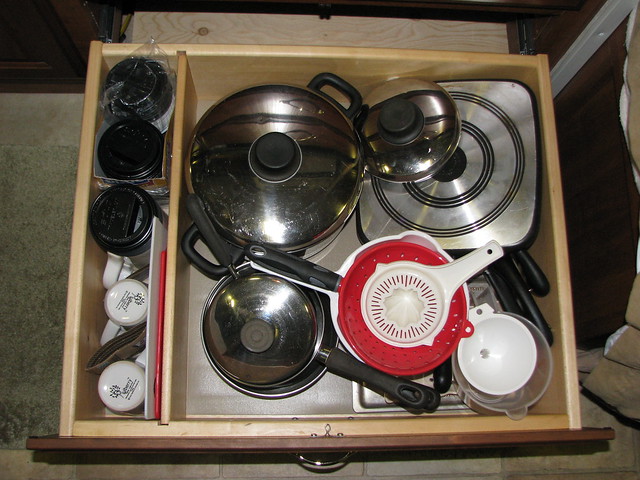
The deep bottom drawer has a compartment (is hardly noticed in the picture) on the left side for tall mugs and cutting boards.
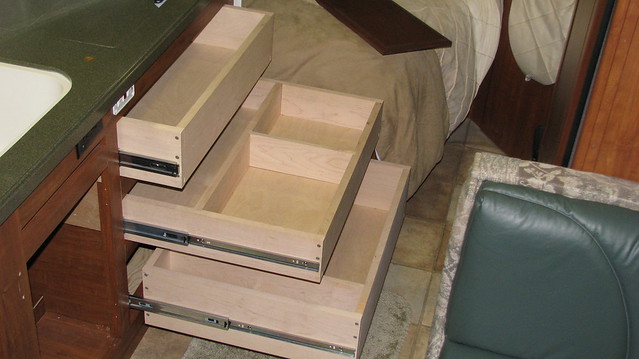
To finish the project, the drawers got their fronts with felt bumper pads. I went with snag-free handles throughout the base cabinet instead of the knobs which occasionally caught our clothing and knee caps.
The final touch were rubber drawer liners to reduce rattling of contents.
Here is what we store in our new drawers. I am sure we will optimize it on our first long trip.
Top Drawer - center tray is the original PC utensil tray
Middle Drawer - Corelle, kitchen linen, & food wrap
Bottom Drawer - pots & pans & misc with tall mugs & cutting boards on the side
Now that everything is 100% complete, it was a good time to determine what I could have done better/smarter. I have no regrets, just thoughts of how I could do it a bit better a second time around.
1) The top drawer could have gotten by with 1" shallower height given just our utencils are stored there. I was concerned the stove might be a fire hazzard to items in the top drawer, but now think I might have been too paranoid.
2) The middle drawer could use that extra inch from the upper drawer. Considering the hanging magnetic catches, an extra inch would allow more flexibility as to what could be stored there.
Enjoy!
-----------------------------
Our five small galley base cabinet drawers never met our cooking storage needs, and we rarely utilized our pull-out butcher block counter. We were also annoyed having drawers behind a door. So, after 6 years I built up enough courage to do something about it. We now have plenty of cabinet storage for all cooking needs and more. My wife is "very" happy to have everything in one easy access location where she needs it. This also opened space in other cabinets for other things.
Comparing "Before & After" space, here are the "square inch" totals of drawer bottom surface areas.
Original Five = 837 sq. in.
New Three = 1557 sq. in.
To make a fair comparison, I need to mention the original arraingement suspends the sliding flatware tray providing extra space underneath it. But for us, it was inconvenient limited-use space if you know what I mean.
Here is the original cabinet with 5 tiny drawers, 3 in plain sight, 2 drawers and pull-out butcher block counter were behind the right-side cabinet door. PCs made after 2005 or 2006 are made this way. The earlier design is close to it and can be reconfigured in the same manner. Admittedly this original design looks nice.

Here is the cabinet afterward with three full width, maximum depth drawers.

Here are the drawers today. I later learned I needed to add locking latches to keep the drawers closed while in motion.

The latches are commonly used on other brand motor homes and easily found for sale on the internet, common in the brushed stainless finish, very rare in the polished brass finish.
When the button is in, the drawer is locked.
When the button is out, the drawer can be opened.
Each drawer also has two magnetic catches to hold it closed even when unlocked, useful when the rig is slanted down and away from the cabinet.

------------------------------------------------------------------------------
Here is a quick run-down on the project. There is so much more than implied. I don't consider this project easy at all. I wouldn't want to do it a second time. If you are seriously considering doing this with your PC, contact me directly.
I first removed the drawers and butcher block to evaluate the situation.
Note the copper gas line in the upper back left side.

I identified how much space behind the drawers was not utilized.

Convinced to continue, I gutted the cabinet interior and removed the front rails & styles.
Here were the obstacles I needed to consider in making the three new drawers as deep as possible.
1) black drain pipe with service cap (relocate it)
2) gas line for stove (relocate it against the back wall)
3) the stove hangs down (work around it)
4) storage pocket for Corian stove & sink covers (work around it)
5) wiring in the way (re-clamp out of the way)
In this picture I had already bent the gas line partially out of the way

Determining The Height Of The Three New Drawers (Critical & Detailed)
If the top drawer was made low (shallow) as is commonly practiced in houses, the hanging stove would significantly limit usefulness. So I made the opening taller than normal, 6” tall.
The middle opening is 5” tall to clear a new sink drain flex hose to achieve maximum depth.
The bottom opening is 8” tall which is great for pots and pans. It stops just short of the flex sink drain hose making it a few inches less deep than the middle drawer.
With this all planned out in great detail, I then ordered three new appropriately sized drawer fronts and two new rails from Phoenix USA.

I rerouted the hard black drain pipe using flexible components clamped tight against the back wall to achieve maximum bottom drawer depth. The gas line got nicely bent out of the way. As seen here, the left interior wall was extended upward to mount the top drawer glide higher. Not seen, the rails have 1x2” across their back side to strengthen them.

I bought these parts to reroute the drain. Home Depot was the only place that sold such large diameter 1/4" thick flex hose that works perfectly with this clamp-connecting approach.

Details About Depth
The top drawer clears both the hanging stove and Corian cover pocket by notching the right side and back.
The middle drawer is Full-Depth as there are no obstructions.
The bottom drawer is a few inches short of the back wall to clear the flex drain pipe.
Here are the three different drawer depths. Clearly visible is the top drawer notch work.

To reduce the sliding of contents while braking hard, we planned some compartments.
The top drawer is mainly assigned for the original PC utensil tray and related cooking utensils. Trays are held in place using carpet tape.
The middle drawer has a compartment for Corelle plates & saucers, another compartment for cups, and a third for miscellaneous.
The deep bottom drawer has a compartment (is hardly noticed in the picture) on the left side for tall mugs and cutting boards.

To finish the project, the drawers got their fronts with felt bumper pads. I went with snag-free handles throughout the base cabinet instead of the knobs which occasionally caught our clothing and knee caps.
The final touch were rubber drawer liners to reduce rattling of contents.
Here is what we store in our new drawers. I am sure we will optimize it on our first long trip.

Top Drawer - center tray is the original PC utensil tray

Middle Drawer - Corelle, kitchen linen, & food wrap

Bottom Drawer - pots & pans & misc with tall mugs & cutting boards on the side

Now that everything is 100% complete, it was a good time to determine what I could have done better/smarter. I have no regrets, just thoughts of how I could do it a bit better a second time around.
1) The top drawer could have gotten by with 1" shallower height given just our utencils are stored there. I was concerned the stove might be a fire hazzard to items in the top drawer, but now think I might have been too paranoid.
2) The middle drawer could use that extra inch from the upper drawer. Considering the hanging magnetic catches, an extra inch would allow more flexibility as to what could be stored there.


