Forum Discussion

grizzzman's avatar
grizzzman
Explorer
Apr 14, 2019

Renogy 20/40 amp DC to DC battery charger (UPDATE)

I just pulled the plug on a 40 amp unit. There Is a coupon for 20% off by giving them your email (the code is WELCOME10) At 179.99 for the 40 amp unit I could not pass it up! Look here
I will be using it as a backup charging source. With my solar, I have not needed an alternate source as of yet, but I believe the day will come.

I set this unit up
as a super jumper? I had an old set of 4 AWG 20-foot real copper leads. I installed new parrot beak clamps and cut them at a 6' mark. I installed the charger. I used a fuse as the on/off switch. I hooked it up to a sulfated battery (voltage was 12.34 and had been set in the garage for 6 months) The "smart" charger went from 14.7 to 13.8 (float) in less than five minutes. So much for the "smart" charger eh? Then I hooked it up to one that was charged a few months ago. (Its voltage was 12.50) ind it worked like it should.
The nice thing is it has Lithium settings. You can set a single voltage from 12.6 to 14.6 (see the manual) It can also be used as a power supply. The unit has dual cooling fans (bad if you are in dusty conditions as I am while camping) So keep that in mind. It is now in a pelican case under the dinette. Oh, there is an error in the manual about setting up some of the Li settings. they are working on correcting. For the price at least for me was worth it.
  • Seems like a good solution to vehicles that only allow mid to high 13v when the house batteries are still depleted. I don't really like the 40 amp limit but 40 amps seeking mid 14's is better than a vehicles voltage regulator saying 13.7v is fine and dandy for those depleted batteries.
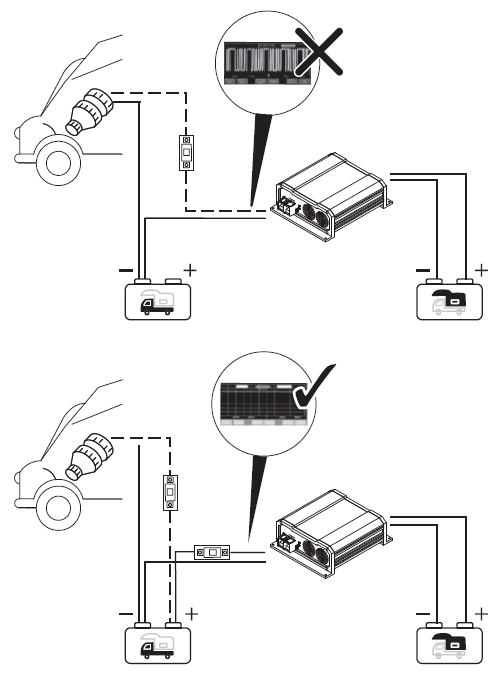
  • The Illustrated wiring diagram shows they want to pull both + and - from engine battery, instead of takng the + right from the alternator.
    The latter is usually a shorter circuit which bypasses the 'just thick enough' stock wiring from alternator to engine battery and without a DC to DC device in the middle, will deliver more voltage and thus more amperage to depleted house batteries.


    This 'just thick enough' stock wiring will now be asked to pass those 40 more amps when the renogy DC to DC charger is seeking 14.7v on a depleted house battery.

    Might want to add more copper in parallel to the 'just thick enough' OEM wiring from alternator (+) stud to engine battery (+), properly fused of course. Also upgrading the ground wire from engine battery to engine block could be considered wise insurance.

    Since it is taking whatever voltage the engine battery is at, and stepping it upto the 14.7, well the renogy unit will not generate as much heat stepping up 13.6 to 14.7 as it would stepping up 13.2 to 13.7v. it might add longevity to the unit to reduce the amount of voltage stepping it has to do by lessing voltage drop on the 'just thick enough' stock alternator to engine battery wiring that the beancounters insisted was adequate.
  • Could you explain better the setting that are needed for the dip switches? I’m running a 100ah lifepo4 in my trailer and I want to install one of these. Could you provide a better diagram than what the instructions have included? It seems you are recommending I upgrade the ground cable- I appreciate that suggestion! I’m using 2 gauge cable with an 80 amp circuit breaker with Anderson connectors at the hitch. I’m having a hard time finding good info on this product. Thanks for any help
  • Learning question...:)

    Newer vehicles
    GM, Ford, Dodge

    What gauge wire is used from the alternator to the batteries?

    How circuitous is the OEM routing between the alternator and starting battery positive battery post?

    Objective: To learn how many negative points in the circuit. How many points of nut and bolt interruptions there are.

    Thank you.

    And there should be heavier cable for the higher output alternators -- like 150 amperes to 270 amperes. Guessing conductor gauge is not the easiest thing a lot is determined by your experience with wiring and electricity :).
  • GBaranski wrote:
    I’m trying to install this coming weekend


    It's simple really. Connect the positive lead to the battery positive do the same to the negative. Put a circuit breaker (or fuse) as close as you can to the positive (at the battery truck side) find a key on signal to turn the unit on. I would suggest you put the charger as close to the RV battery as is practical.
    Good luck with your project!
  • As for the lifepo4 question. Is this a drop in battery?
    What do they recommend? You don't want to leave the charging on for long after it hits the target voltage (say 14.00 volts) as an example my lifepo4 pack says to charge at 50 amps and when the voltage reaches 3.65 per cell to hold voltage and watch for the amps drop to 5 amps then cut charging..05C rate.


  • This is a 30-amp rated (I would trust 20) DC to DC booster from DROK

    It costs $22.00 on AMAZON

    Someone on this forum remarked his used them in parallel successfully. Who was that?

    For $66.00 there's a SAFE 60-amp charge rate. There is a DROPOUT point at which I suspect is in the 10 volt on the supply side range. Moot point.

    When using a booster having an AGM battery on the supply side might be a good idea. These critters need ventilation and they need to be shut off with a key ignition switch connection.

    For the price difference, I'll go my route any time.

About Technical Issues

Having RV issues? Connect with others who have been in your shoes.24,191 PostsLatest Activity: Jan 19, 2025