Cloud_Dancer
Apr 13, 2015Explorer II
UPDATE..with?..More MH leaky roof info, photo & questions
It took me forever to find a waterproof tape that was suitable for part of my troubleshooting procedures (gave up on pressurizing the "box" and applying soapy water).
It turns out that some of the water was coming in at the lap joint that goes all the way around the top side(flat). Newmar did a substandard job on this lap joint. And, some water was coming in at the rear A/C gasket.
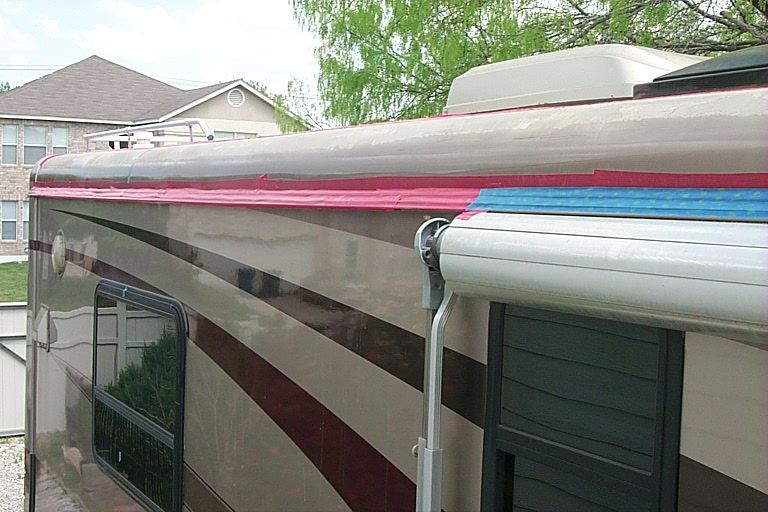
But, the hardest to find was the final place (this one took another forever to find). This was at the, what they call, M73 Insert Gutter Awning Rail. It should've been the first place to look, except that nothing about it told me water was leaking through that area. The way I found it was mostly out of desperation. After several months of taping up the many more-standard locations/places, waiting for rain, and still getting water inside the thin spongy foam layer that is bonded to/above the headliner material, I finally taped all of the insert gutter awning rail. And, we finally got enough rain to convince myself that there no more water coming in. No matter how much I squeegee the headliner, I find not a drop of water.
BTW I won't start on the permanent fix until I get a "dry-weather" forcast.
Hopefully one of the technicians can tell me if the factory lays down/installs putty tape or other sealant behind the M73 insert-gutter-awning rail prior to screwing it down. I don't want to start prying on it until I can find out more about the repair procedure.This is what mine looks like:

This is the access hole after removing the rearward-most surround sound speaker. It's where the water first started dripping:

This is the way I taped all the insert gutter awning rail area:
It turns out that some of the water was coming in at the lap joint that goes all the way around the top side(flat). Newmar did a substandard job on this lap joint. And, some water was coming in at the rear A/C gasket.
But, the hardest to find was the final place (this one took another forever to find). This was at the, what they call, M73 Insert Gutter Awning Rail. It should've been the first place to look, except that nothing about it told me water was leaking through that area. The way I found it was mostly out of desperation. After several months of taping up the many more-standard locations/places, waiting for rain, and still getting water inside the thin spongy foam layer that is bonded to/above the headliner material, I finally taped all of the insert gutter awning rail. And, we finally got enough rain to convince myself that there no more water coming in. No matter how much I squeegee the headliner, I find not a drop of water.
BTW I won't start on the permanent fix until I get a "dry-weather" forcast.
Hopefully one of the technicians can tell me if the factory lays down/installs putty tape or other sealant behind the M73 insert-gutter-awning rail prior to screwing it down. I don't want to start prying on it until I can find out more about the repair procedure.This is what mine looks like:
This is the access hole after removing the rearward-most surround sound speaker. It's where the water first started dripping:
This is the way I taped all the insert gutter awning rail area: