Forum Discussion
imadarling
Jun 11, 2014Explorer
Wow, 12 hours of uninterrupted work on the camper brought me a long way today!
I started the day by fastening the rear skin of the trailer to the new decking. I was a little concerned about the new deck mating up with the existing curved stress bar at the horizontal-vertical transition. I put a healthy helping of butyl tape down to take up any dead space, but I learned later that the new curve of the transition is quite different than the factory bend. Eternabond will be my new friend!
Here's the rear transition section ready for the new TPO membrane:

The corners look like trouble...


With the rear skin prepped, I moved on to covering all of the screw heads with Tyvek tape and covering all of the sheathing seams with wall board joint tape and duct tape. I don't really have a compelling reason why I used Tyvek tape on the screw heads...but I don't have a reason not to. I also ran duct tape along the two sides of the decking to protect the new TPO from abrasion.
Here she is, all ready for her new TPO roof!

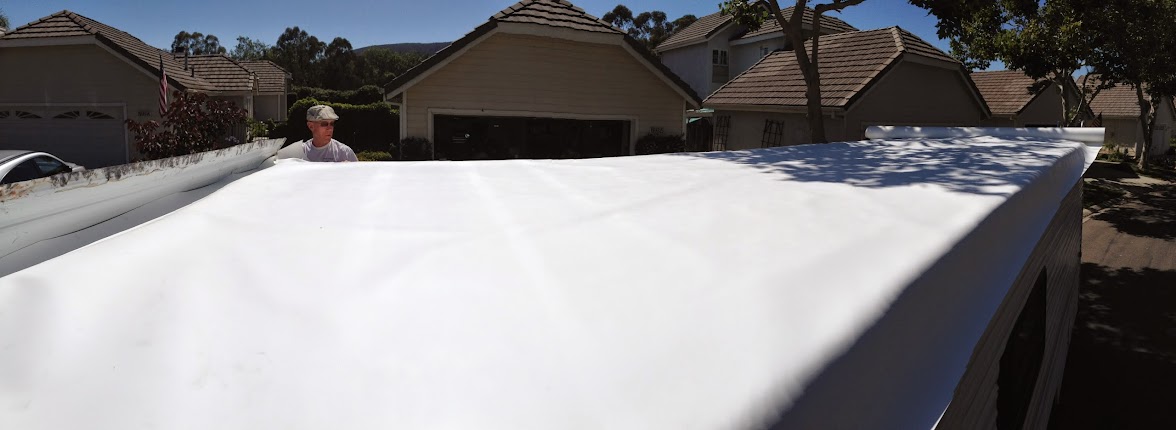
Flash forward to 3 PM. SuperDad to the rescue again! We rolled out the new TPO and talked strategy. The videos all make this part looks so easy, but the truth is that TPO is heavy, clings to the sheathing, and likes to bunch in the corners as you attempt to fold it back on itself. We found our stride and soon we were laying down adhesive. Important note: once the TPO goes down, all the holes in the roof disappear, so you better have a really good mental picture to work from so that you don't step through your new roof!
Dad and I working out our strategy:
We had the TPO down in about an hour's time and we started screwing down the stress bars. The forward and aft straps are no-brainers aside from one major detail: The forward section should be wood substrate, TPO, butyl tape, skin, butyl tape, stress bar from bottom up. The aft section should be wood substrate, skin, butyl tape, TPO, butyl tape, stress bar. This ensures that there is never a path for water to be forced under the TPO while underway in the rain.
With the TPO glued down and secured at the front and back, we pulled the side taut and stapled the TPO in place.

Then, we installed the side stress bars. Finally, I started to work on each of the corners. I was disappointed to find that the new transition was not even close the factory transition and I really struggled to get the side straps secured. I'll probably end up filling the gaps with Dicor lap sealant and wrapping the whole mess in Eternabond. Sigh. I was able to install a few of the roof fixtures before the sun went down. Tomorrow will be the details day...and an over-due dump run.
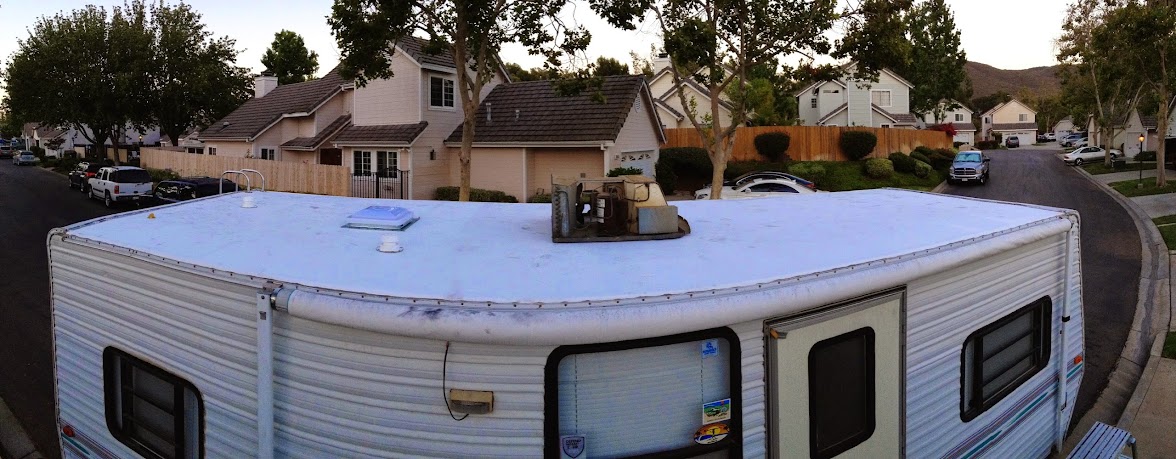
Here's the trailer as it sits this moment:
This project has certainly not been difficult from a technical perspective. I am an avid DIY'er, but I am not particularly skilled in any specific trade and I felt like every step of this project was well within my capabilities. Almost every tool I own was employed in this project, but the most invaluable tools were the compound miter saw, the portable table saw, and my trusty DeWalt 18V drill. For anyone contemplating a roof project, I would say that the only major challenge is time. I took a week of vacation to work this project and I am 3 days ahead of my anticipated schedule.
Until tomorrow.
-Blake!
I started the day by fastening the rear skin of the trailer to the new decking. I was a little concerned about the new deck mating up with the existing curved stress bar at the horizontal-vertical transition. I put a healthy helping of butyl tape down to take up any dead space, but I learned later that the new curve of the transition is quite different than the factory bend. Eternabond will be my new friend!
Here's the rear transition section ready for the new TPO membrane:
The corners look like trouble...
With the rear skin prepped, I moved on to covering all of the screw heads with Tyvek tape and covering all of the sheathing seams with wall board joint tape and duct tape. I don't really have a compelling reason why I used Tyvek tape on the screw heads...but I don't have a reason not to. I also ran duct tape along the two sides of the decking to protect the new TPO from abrasion.
Here she is, all ready for her new TPO roof!
Flash forward to 3 PM. SuperDad to the rescue again! We rolled out the new TPO and talked strategy. The videos all make this part looks so easy, but the truth is that TPO is heavy, clings to the sheathing, and likes to bunch in the corners as you attempt to fold it back on itself. We found our stride and soon we were laying down adhesive. Important note: once the TPO goes down, all the holes in the roof disappear, so you better have a really good mental picture to work from so that you don't step through your new roof!
Dad and I working out our strategy:
We had the TPO down in about an hour's time and we started screwing down the stress bars. The forward and aft straps are no-brainers aside from one major detail: The forward section should be wood substrate, TPO, butyl tape, skin, butyl tape, stress bar from bottom up. The aft section should be wood substrate, skin, butyl tape, TPO, butyl tape, stress bar. This ensures that there is never a path for water to be forced under the TPO while underway in the rain.
With the TPO glued down and secured at the front and back, we pulled the side taut and stapled the TPO in place.
Then, we installed the side stress bars. Finally, I started to work on each of the corners. I was disappointed to find that the new transition was not even close the factory transition and I really struggled to get the side straps secured. I'll probably end up filling the gaps with Dicor lap sealant and wrapping the whole mess in Eternabond. Sigh. I was able to install a few of the roof fixtures before the sun went down. Tomorrow will be the details day...and an over-due dump run.
Here's the trailer as it sits this moment:
This project has certainly not been difficult from a technical perspective. I am an avid DIY'er, but I am not particularly skilled in any specific trade and I felt like every step of this project was well within my capabilities. Almost every tool I own was employed in this project, but the most invaluable tools were the compound miter saw, the portable table saw, and my trusty DeWalt 18V drill. For anyone contemplating a roof project, I would say that the only major challenge is time. I took a week of vacation to work this project and I am 3 days ahead of my anticipated schedule.
Until tomorrow.
-Blake!
About Travel Trailer Group
44,060 PostsLatest Activity: Jul 17, 2025