RAMwoodworks
Apr 24, 2017Explorer
No more Rock-n-Roll !
No, I haven't signed on with Tipper Gore. I just want to relax in my rig and not get seasick when someone else is walking around. I watched several videos and looked at lots of devices and settled on a plan. I needed to brace the frame to the base of the stab jacks.
Seemed so simple I doubted it would work so I fabricated one and installed it. It worked so well I made seven more:
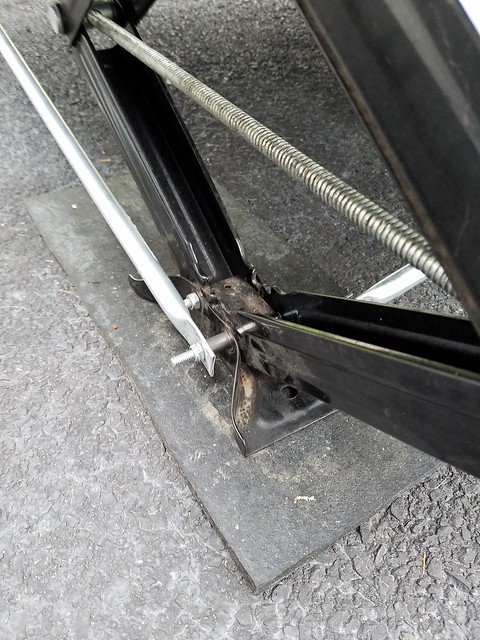
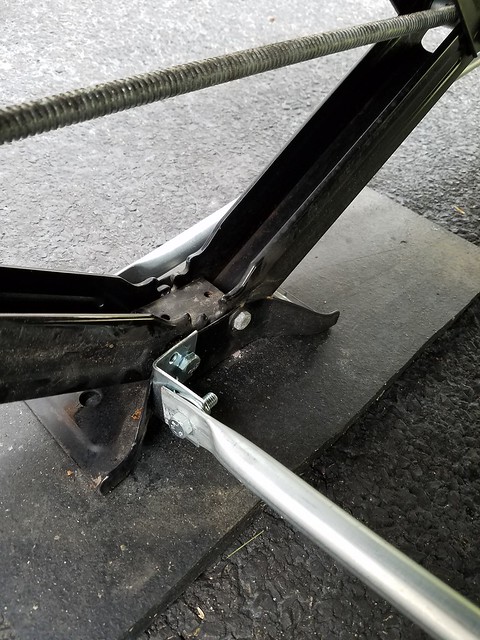
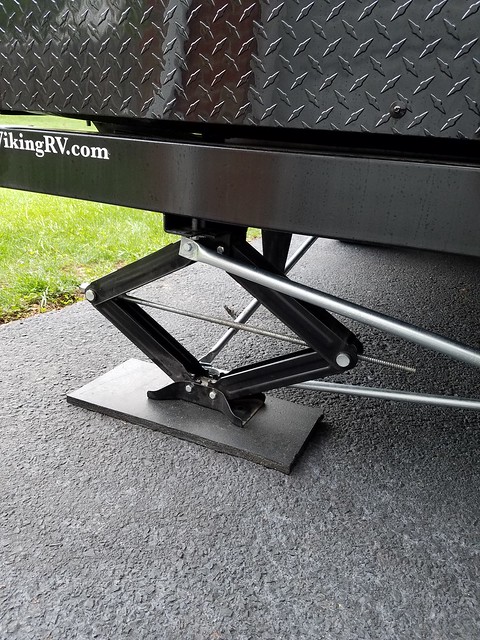
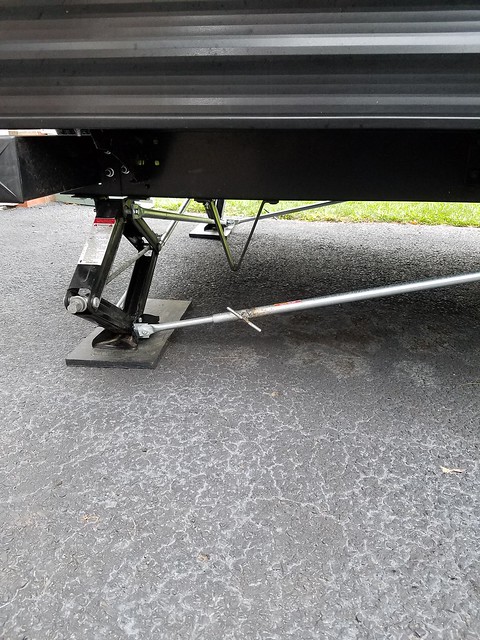
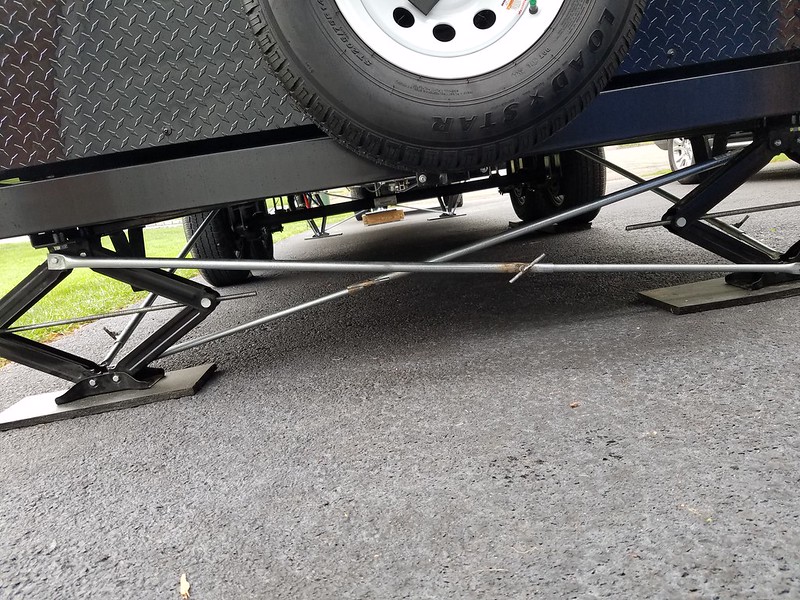
Step one: Take a 5' length of 3/4 electrical conduit and drill a 25/64 hole 2" from the end and weld a 3/8 nut over the hole. Cut about 18" from the other end, hammer it flat and drill a 21/64 hole in it. Repeat 7 more times.
Step two: Take a 5' length of 1/2 electrical conduit and cut about 18" off of it. Pound one end flat and drill a 21/64 hole in it. Repeat 7 more times.
Step three: Raise one stab jack slightly and remove one bolt at the bottom and one at the top. Replace bolt with one about 1 1/2" longer. (I used 5/16x4"). Top bolt gets a 3/4 spacer and the flat end of pipe in step one. Bottom bolt gets an angle bracket on side of jack near axles and the 1/2 conduit along with spacer. Lower jack.
Step four: Do the opposite side same way except feed the 1/2 pipes into the 3/4 pipes. Alternate sides of jacks that pipes are mounted on.
Step five: Mount 4 remaining assemblies to bracket on jack and a point on the frame. I was able to use 2 existing holes and had to drill 2. Watch out for piping and electrical lines!
Step six: Put 3/8x1" bolts into the nuts you welded onto 3/4 pipe and snug up against the 1/2 pipe inside. I went the extra step of welding a T-handle to mine so these would be toolless.
Step seven: Sit back and enjoy the beverage of your choice. I recommend Hangar One over ice.
The spacers are to prevent binding against the jacks when moving up & down. My TT is rock solid and I don't even have my X-Chocks yet.
I can't take credit for this idea but I made 8 of these and installed them in a day including two trips to hardware store. Total cost less than $100.
Original idea?
JT's Strong Arm
Seemed so simple I doubted it would work so I fabricated one and installed it. It worked so well I made seven more:
Step one: Take a 5' length of 3/4 electrical conduit and drill a 25/64 hole 2" from the end and weld a 3/8 nut over the hole. Cut about 18" from the other end, hammer it flat and drill a 21/64 hole in it. Repeat 7 more times.
Step two: Take a 5' length of 1/2 electrical conduit and cut about 18" off of it. Pound one end flat and drill a 21/64 hole in it. Repeat 7 more times.
Step three: Raise one stab jack slightly and remove one bolt at the bottom and one at the top. Replace bolt with one about 1 1/2" longer. (I used 5/16x4"). Top bolt gets a 3/4 spacer and the flat end of pipe in step one. Bottom bolt gets an angle bracket on side of jack near axles and the 1/2 conduit along with spacer. Lower jack.
Step four: Do the opposite side same way except feed the 1/2 pipes into the 3/4 pipes. Alternate sides of jacks that pipes are mounted on.
Step five: Mount 4 remaining assemblies to bracket on jack and a point on the frame. I was able to use 2 existing holes and had to drill 2. Watch out for piping and electrical lines!
Step six: Put 3/8x1" bolts into the nuts you welded onto 3/4 pipe and snug up against the 1/2 pipe inside. I went the extra step of welding a T-handle to mine so these would be toolless.
Step seven: Sit back and enjoy the beverage of your choice. I recommend Hangar One over ice.
The spacers are to prevent binding against the jacks when moving up & down. My TT is rock solid and I don't even have my X-Chocks yet.
I can't take credit for this idea but I made 8 of these and installed them in a day including two trips to hardware store. Total cost less than $100.
Original idea?
JT's Strong Arm