JoeChiOhki
Nov 21, 2015Explorer II
Rebuilding the Amerigo–Just call me the Demolition Man!
Saturday, November 21, 2015
Rebuilding the Amerigo–Just call me the Demolition Man!
Finally, an update!
Been wasting a lot of weekends as of late, mostly sleeping trying to make up for too little sleep during the work week, but finally progress has been made and wonderful discoveries as well .
.
The good news, first.
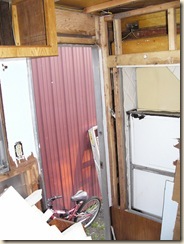
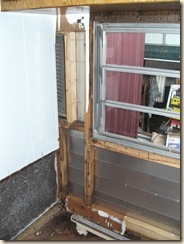
The frame of the camper is in excellent condition. I’ve discovered only a couple spots where water entry has (and still is, but now that I know where it is, I can fix it) occurred, but the only casualty was the ugly as sin ceiling paneling which I had planned to tear out anyway.
The bad, the bloody leak area is over the top of the blasted clamshell bathroom, likely been coming in around the tiny roof vent.
So that means I’m going to have to figure out how to separate the bathroom into its two pieces without damaging it.
Yay….
I had already planned to upgrade the vent opening to a full 14”x14” opening, so I guess this is as good an incentive as any, perhaps now is a good time to look into the new holding tanks, since I’m going to removing the flange for the toilet anyway so I can move the shower.
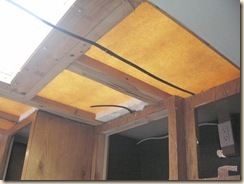
The rear vent is showing signs of leakage as well, but no major damage to the frame. Woods still solid and once it dries I can treat it with Minwax wood hardener to protect it from any future moisture exposure.
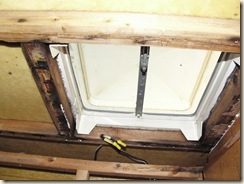
Bottom edge of the wood is damp, but the wood has not rotted, most of the dark areas are bits of the old roof board after it being removed.
The wooden ceiling material is damp all the way across the top of the bathroom and right around the vent, which follows the path that the camper leans at when its parked next to the house.
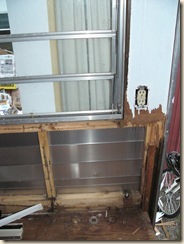
I continued to demolish the ceiling and wall paneling moving forward, finding nothing but good news.
Also realized why my Amerigo has no rear ladder, when so many others I’ve seen do. There’s no plywood under the fiberglass roof. It seems I cannot fail to buy a truck camper with a roof not-designed to walked on.
Good to know, since I plan to attach a Winegard Antenna assembly.


Main beam above the Snap-N-Nap is still solid and I have confirmed that when my unit was built that it was indeed built with glue and screws, as there’s four counter sunk screws holding each one of the 2x2s in place.
No staples on this camper’s frame, just on the inner paneling, most of which is going to wind up in a dumpster.
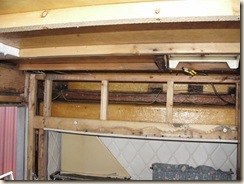

Looks like at one time there was a power vent here, makes installing the Shurflo Comfort-Breeze even easier.

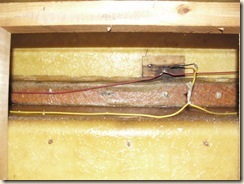
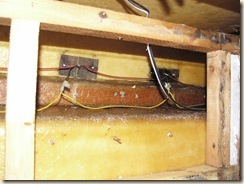
Ah, looks like I did find one potential fib by the last owner, there was in fact at one time an Air Conditioner on this camper. The original wiring for it was cut off and tucked up inside ceiling, I did a test on it and confirmed that the wire is not connected to anything, so there was never any danger, it simply was disconnected and discarded. I’ll likely use the old wire to help pull a new line in.
I can tell by the doubled up roof timbers that where the skylight is where the A/C was. I was surprised to find the skylight is framed in with 2x4s…… Now I’m drawn, do I want to keep the skylight, or restore the factory framing and put my A/C unit back in place there instead of making a new opening?

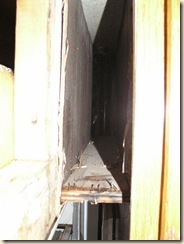
Precusory check on the cabover roof at a primary leak point, no immediate signs of any water penetration, ever..

Cabover’s doubling as temporary storage for loose bits till I finish removing the cabinets so I can carefully remove the wall panels to reuse as templates and to check around the side windows for any leakage signs.
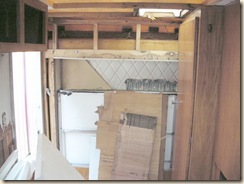
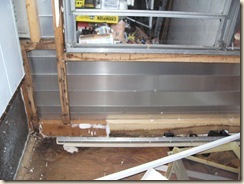
Signs of a past leak and repair. The dark spot on the plywood is an old stain, and is sealed with epoxy and is quite solid. A section of new 2x4 was grafted in by the previous owner most likely. It is solid, but I will buttress a full length of 2x4 on top of it to add some extra structural strength.


With the wall paneling removed, you can see the silly lopsided offset of the fridge compartment as it came from factory.
I’m going to shift the fridge towards the rear enough to make the cabover a full queen, which will in the same move center the fridge underneath the roof vent and to the exterior hatch.
The propane compartment will not move, but I may be able to gain a little storage compartment along side it to use for storing things like baking sheets and what not.
The dinette likely won’t be serving as a bed when the remodel is done, at least not for tall people.
I didn’t notice it until I removed the build up the last owner had done over the old dinette wall that there was a little piece of paneling over a hole cut in the wall from factory.
When I opened up the wall, I discovered the little piece of panel was covering an access to the tie down anchor, which goes clean through the plywood wing and the 2x4 sill board at the bottom of the wall.
A lot better anchor strength than the KIT, whose anchors simply went through the plywood and a 2x4 that was attached to the underside of the wings.


I can tell, sadly, that some water is getting around the points where the running lights connect, so I think I may go the smart route and replace them all, hopefully with a unit I can permanently seal the base to the fiberglass so that there’s no future worry about water penetration.

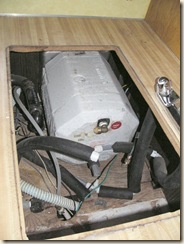
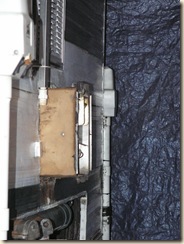
The first sacrifice from the KIT, its nice new Suburban 6 Gallon water heater for the Amerigo’s older Mobile Temp.
I have the new counter top material in storage at a family’s place, as it’s the same thing as what the Formica counter looks like, butcher block. Lumber Liquidators had a wonderful deal on an 8’ x25” deep section of 1 1/4” thick oak unfinished counter, so I decided to upgrade to something slightly better than the particle board and Formica counters that were sagging in the middle.
With the two large openings in the counter top for the range and the sink, going to the solid wood counter won’t contribute enough additional weight to be of much concern.
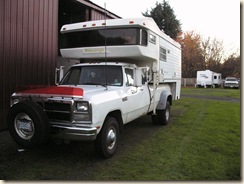
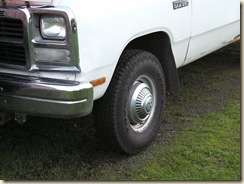

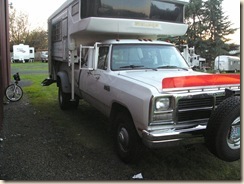
Added another vintage touch to the Express, got a set of cherry Dodge dog-dishes off a 1974 Dodge motorhome out in Ellensburg, WA (seems this project keeps taking me back up to Washington….)
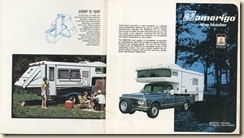
Now, all I need is the grill work off a vintage Dodge Adventurer package truck and I’ll start looking like the Dodge on the Amerigo brochure .
.
(Brochure from Pirate4x4.com, photos belong to SwampFox89@aol.com)

Looks like enough demo for one day.

Rebuilding the Amerigo–Just call me the Demolition Man!
Finally, an update!
Been wasting a lot of weekends as of late, mostly sleeping trying to make up for too little sleep during the work week, but finally progress has been made and wonderful discoveries as well
.The good news, first.
The frame of the camper is in excellent condition. I’ve discovered only a couple spots where water entry has (and still is, but now that I know where it is, I can fix it
) occurred, but the only casualty was the ugly as sin ceiling paneling which I had planned to tear out anyway.The bad, the bloody leak area is over the top of the blasted clamshell bathroom, likely been coming in around the tiny roof vent.
So that means I’m going to have to figure out how to separate the bathroom into its two pieces without damaging it.
Yay….
I had already planned to upgrade the vent opening to a full 14”x14” opening, so I guess this is as good an incentive as any, perhaps now is a good time to look into the new holding tanks, since I’m going to removing the flange for the toilet anyway so I can move the shower.
The rear vent is showing signs of leakage as well, but no major damage to the frame. Woods still solid and once it dries I can treat it with Minwax wood hardener to protect it from any future moisture exposure.


Bottom edge of the wood is damp, but the wood has not rotted, most of the dark areas are bits of the old roof board after it being removed.
The wooden ceiling material is damp all the way across the top of the bathroom and right around the vent, which follows the path that the camper leans at when its parked next to the house.
I continued to demolish the ceiling and wall paneling moving forward, finding nothing but good news.
Also realized why my Amerigo has no rear ladder, when so many others I’ve seen do. There’s no plywood under the fiberglass roof. It seems I cannot fail to buy a truck camper with a roof not-designed to walked on
.Good to know, since I plan to attach a Winegard Antenna assembly.


Main beam above the Snap-N-Nap is still solid and I have confirmed that when my unit was built that it was indeed built with glue and screws, as there’s four counter sunk screws holding each one of the 2x2s in place.
No staples on this camper’s frame, just on the inner paneling, most of which is going to wind up in a dumpster.


Looks like at one time there was a power vent here, makes installing the Shurflo Comfort-Breeze even easier
.
Ah, looks like I did find one potential fib by the last owner, there was in fact at one time an Air Conditioner on this camper. The original wiring for it was cut off and tucked up inside ceiling, I did a test on it and confirmed that the wire is not connected to anything, so there was never any danger, it simply was disconnected and discarded. I’ll likely use the old wire to help pull a new line in.
I can tell by the doubled up roof timbers that where the skylight is where the A/C was. I was surprised to find the skylight is framed in with 2x4s…… Now I’m drawn, do I want to keep the skylight, or restore the factory framing and put my A/C unit back in place there instead of making a new opening?


Precusory check on the cabover roof at a primary leak point, no immediate signs of any water penetration, ever..

Cabover’s doubling as temporary storage for loose bits till I finish removing the cabinets so I can carefully remove the wall panels to reuse as templates and to check around the side windows for any leakage signs.

Signs of a past leak and repair. The dark spot on the plywood is an old stain, and is sealed with epoxy and is quite solid. A section of new 2x4 was grafted in by the previous owner most likely. It is solid, but I will buttress a full length of 2x4 on top of it to add some extra structural strength.


With the wall paneling removed, you can see the silly lopsided offset of the fridge compartment as it came from factory.
I’m going to shift the fridge towards the rear enough to make the cabover a full queen, which will in the same move center the fridge underneath the roof vent and to the exterior hatch.
The propane compartment will not move, but I may be able to gain a little storage compartment along side it to use for storing things like baking sheets and what not.
The dinette likely won’t be serving as a bed when the remodel is done, at least not for tall people.

I didn’t notice it until I removed the build up the last owner had done over the old dinette wall that there was a little piece of paneling over a hole cut in the wall from factory.
When I opened up the wall, I discovered the little piece of panel was covering an access to the tie down anchor, which goes clean through the plywood wing and the 2x4 sill board at the bottom of the wall.
A lot better anchor strength than the KIT, whose anchors simply went through the plywood and a 2x4 that was attached to the underside of the wings.


I can tell, sadly, that some water is getting around the points where the running lights connect, so I think I may go the smart route and replace them all, hopefully with a unit I can permanently seal the base to the fiberglass so that there’s no future worry about water penetration.


The first sacrifice from the KIT, its nice new Suburban 6 Gallon water heater for the Amerigo’s older Mobile Temp.
I have the new counter top material in storage at a family’s place, as it’s the same thing as what the Formica counter looks like, butcher block. Lumber Liquidators had a wonderful deal on an 8’ x25” deep section of 1 1/4” thick oak unfinished counter, so I decided to upgrade to something slightly better than the particle board and Formica counters that were sagging in the middle.
With the two large openings in the counter top for the range and the sink, going to the solid wood counter won’t contribute enough additional weight to be of much concern.


Added another vintage touch to the Express, got a set of cherry Dodge dog-dishes off a 1974 Dodge motorhome out in Ellensburg, WA (seems this project keeps taking me back up to Washington….)
Now, all I need is the grill work off a vintage Dodge Adventurer package truck and I’ll start looking like the Dodge on the Amerigo brochure
. (Brochure from Pirate4x4.com, photos belong to SwampFox89@aol.com)


Looks like enough demo for one day
.