BurbMan
Apr 28, 2015Explorer III
Slide Out Floor Replacement – Rot Repair (long w/pics)
This project started out as replacing the table/chairs in the RV with a U-shaped dinette (see that project here.) Part of the project was pulling up the tatty looking carpet in the slide and replacing with a new floor.
We ordered the Terry with the X-Treme package which was supposed to add more insulation for camping in colder temps. Part of that was using Reflectix foil insulation in place of padding under the carpet in the slide. When I pulled the carpet and insulation up I found this:
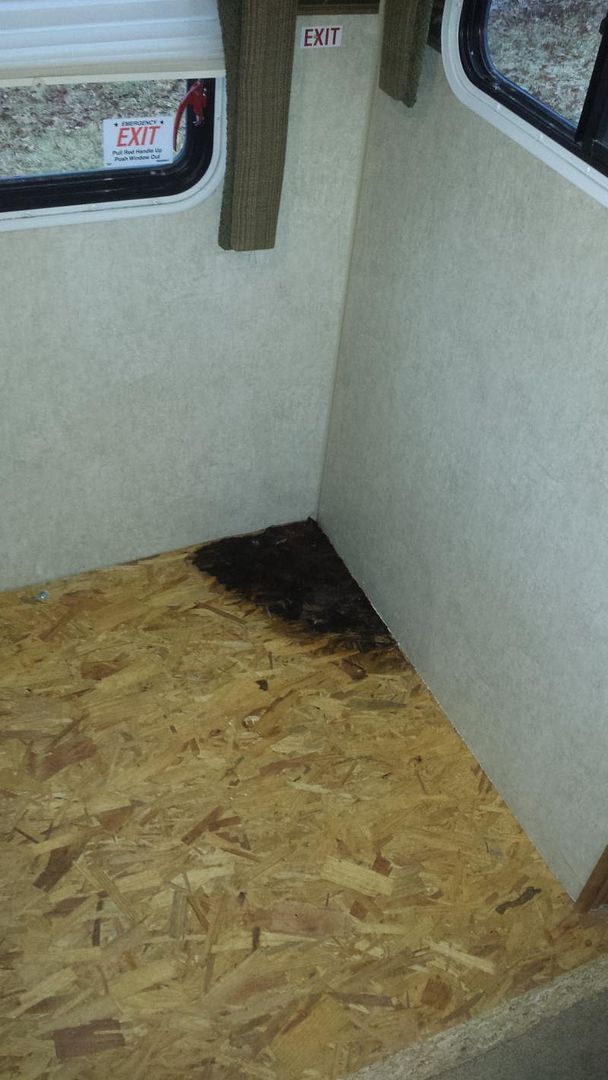


I had a leak somewhere, and it’s obviously been leaking at both corners of the slide for quite a while. I had no clue because the Reflectix trapped the water underneath keeping the carpet bone dry. The corners was heavy in black mold and very soft.
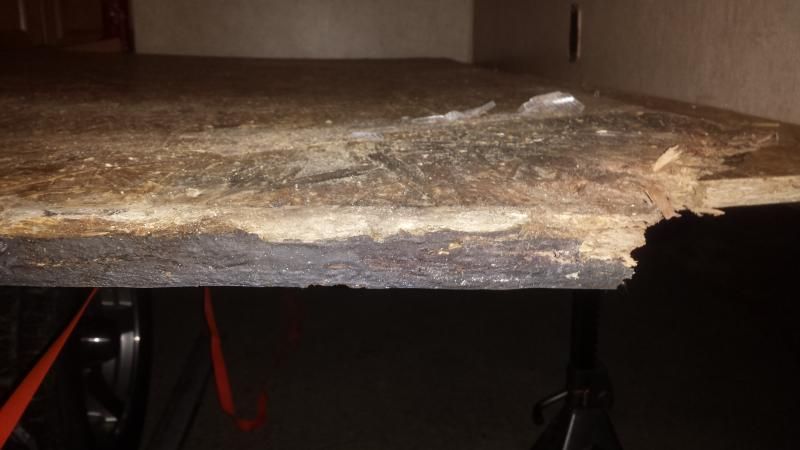
The slide floor is a 1” thick OSB with a smooth coating on the bottom that is supposed to be water resistant. The factory added a 5/16” piece of plywood on the rear portion where the table/chairs were originally located (we swapped the couch and table/chairs location when we first bought the RV because the floorplan worked better that way.) There is no framing under the floor, the only structure is the OSB sheet. I contemplated repairing the floor, but seaming the patch together would be challenging. The floor also had a nice sag to it, so I opted to replace the whole floor.
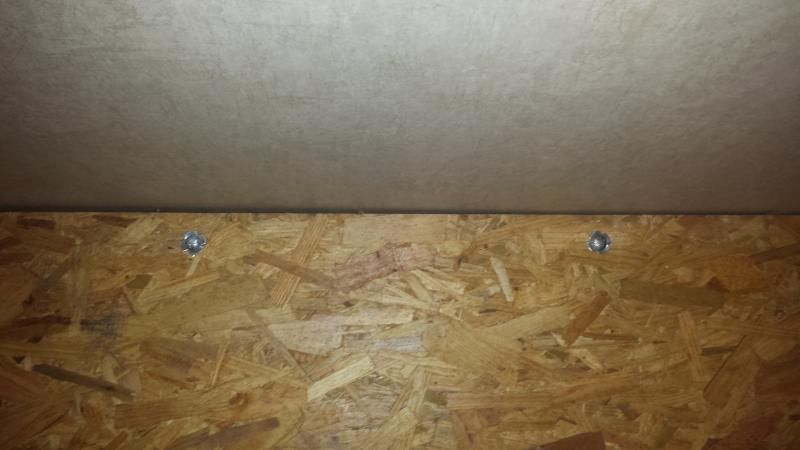
You can see in this pic that the floor is attached to the outer slide wall with carriage bolts that bolt into a piece of angle iron at the end of the slide mechanism. The slide mechanism is attached to the outer slide wall with lag bolts into the wall framing, and the floor bolts to top of it.
The first step was to remove the trim from the inside of the slide edge. I screwed short 4x4 blocks to the front of each side of the slide and used bottle jacks to lift the slide up:


Next was to unbolt the floor from the mechanism at the outside wall. I then used a circular saw to cut the slide floor in half down the middle to make it more manageable. The floor was attached to the side walls of the slide by screws that came down through the sole plate from inside the wall. With the inside of the slide raised about 1” with the jacks, I used a 5 lb sledge to break the floor loose, then a sawzall to cut off the screws left in the walls. With the floor cut in half, I could move it around to keep the heat in and also slide it back into place at night to keep the critters out. Turns out this Feb was not the best time to be working outside….
Here is what the mechanism looks like with the floor out:

Removing the exterior fender skirt:
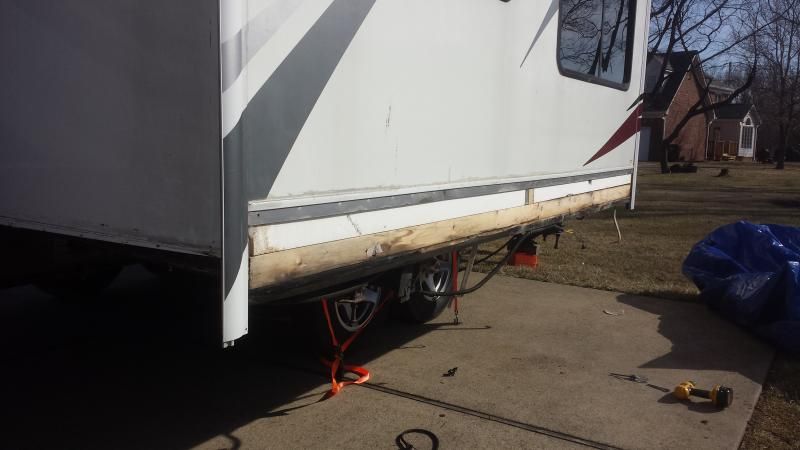
The bottom of the outside slide wall was a 2x4 sole plate (on edge, not like in a S&B construction), and below that was a 2x2 added to create attaching points for fender skirt braces, wire loops, etc. The whole thing was wrapped in Darco.

It was so soft the putty knife went right through it

When I got the Darco off, this is all the water than ran out:

With the fender skirt off the outside, I completely removed the 2x2 and left what was left to dry.

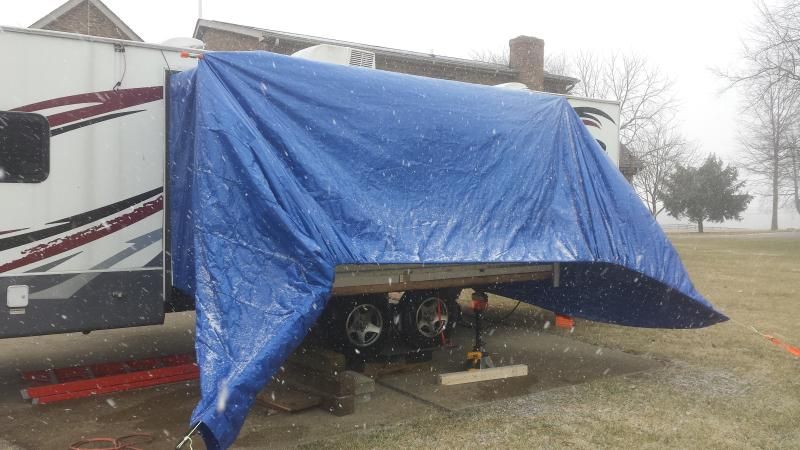
I tarped the slide to keep everything dry. It was like this for almost 2 months and actually worked quite well through several blowing snow storms and rain storms:
Now with that done, I went back inside to finish removing the carpet on the main part of the floor, which revealed more water damage:

There is a steel channel that screws to the underside of the slide floor and seals against a bulb seal on the edge of the main floor when the slide is closed. When the floor rotted, the screws holding the front portion of this steel strip gave out and it no longer sealed when the slide was closed, allowing water into the main floor. Again, the vinyl flooring trapped this water in, hiding the leak and giving the mold a great head start. With the inside of the slide still jacked up, I made up some 2x4’s to go under the edge of the wall to hold it off the main floor:

This allowed me to remove the bottle jacks inside and cut out the rotten floor:
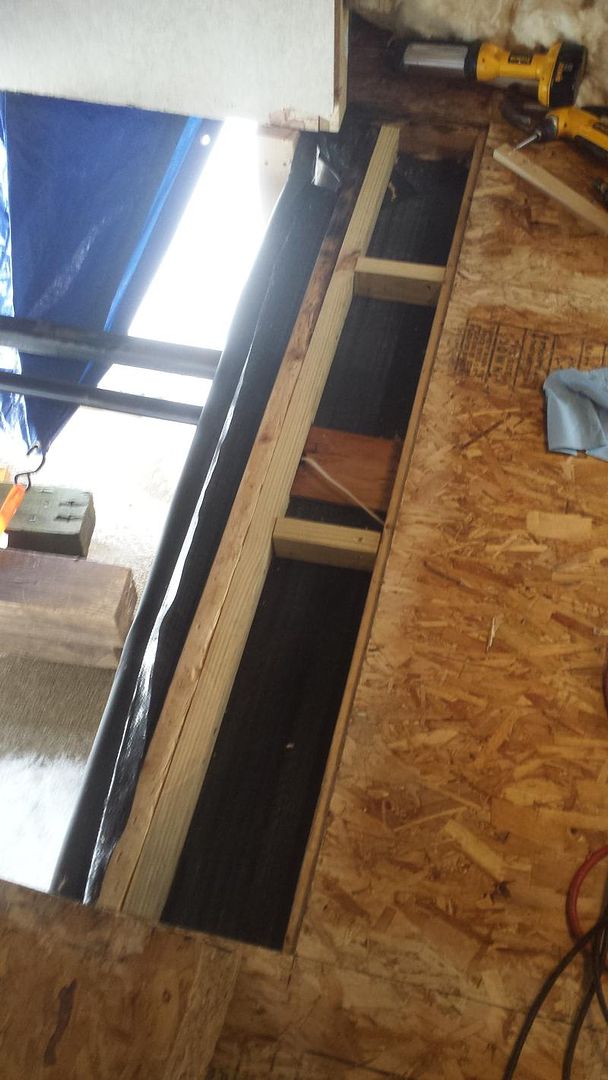
I added some additional 2x3 framing to strengthen the floor and replaced with ¾” plywood. There was a spot just ahead of the slide wall that I couldn’t get to without removing the slide, which I didn’t have the equipment (forklift) to do. So I dug out the rotten wood, dried it out good with a hairdryer, and injected Rot Doctor to stabilize the wood.
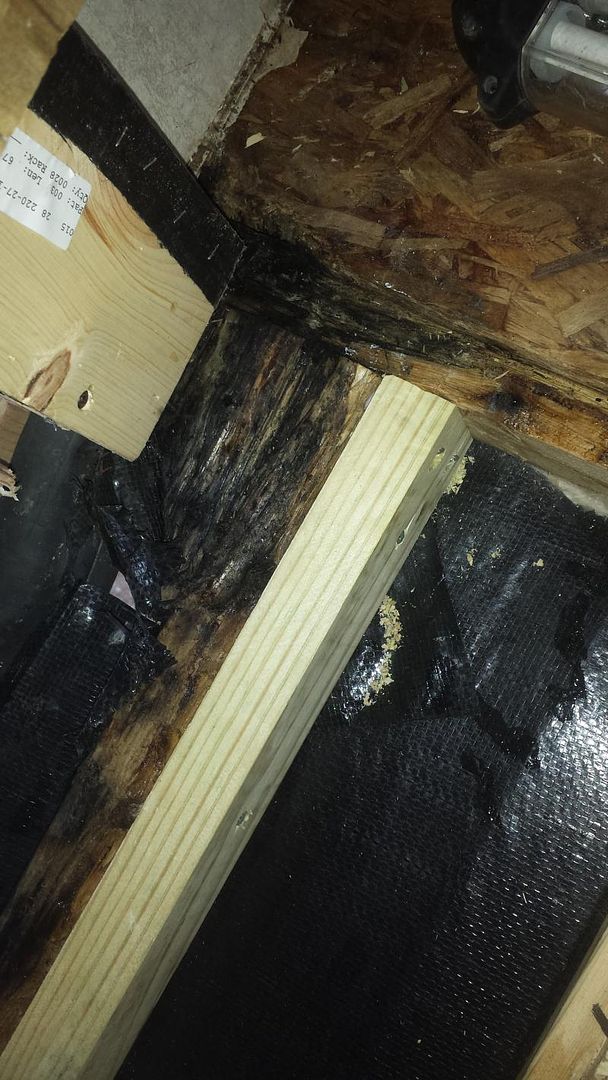

Then I used the repair epoxy from Rot Doctor to fill in the damaged area and sanded smooth.

Process went smooth and the supervisor onsite signed off on the work:

Meanwhile, in the garage I fabricated a new floor:

I got 2 ½” sheets of exterior sanded plywood and laminated then together with waterproof wood glue (Titebond III) and ¾” staples. The slide is about 12’ long so I staggered the seams on the plywood top and bottom. The underside got 4 coats of marine spar varnish to create a smooth surface. As the slide goes in/out, the floor rides on these nylon blocks screwed to the main floor. There are 5 of these blocks screwed to the main floor along the leading edge:

Back to the slide wall, the lag bolts holding the slide mechanism to the outside were rusted and giving way…the bolts were cocked and the slide was dropping relative to the mechanism. The problem was the Darco…water wicked in along every screw and bolt, rusting the fastener and rotting the adjacent wood. The 2x4 framing the bottom wall was solid, but every bolt hole was rotten.

So I needed to disconnect the mechanism from the outer slide wall so I could get the Darco all the way off and repair the bolt holes. I fabricated these adjusters to fit on the top of my HF jackstands:

A square box made from 1 ¼” channel sites on the top of the jackstand, and I welded ¾” rod to that. A ¾” piece of black pipe goes over the threaded rod and allows me to adjust to any height. The top plate has holes so I could screw it up into the slide wall frame to keep it from slipping out.


Nut with 3/8” square tubing welded to it to make it turnable by hand:

I made two of these so I could put one on each end of the outside wall. So with the wall supported with my homemade jacks, I was able to remove the slide mechanism and retract it from the wall;


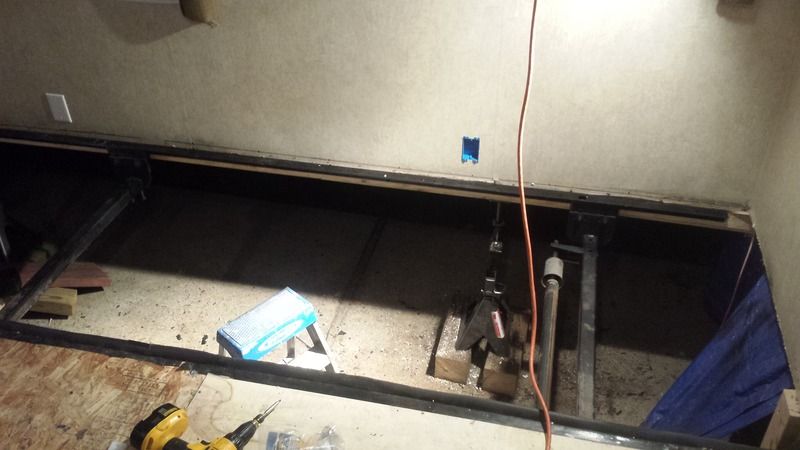
Mechanism retracted all the way and the short stepladder I was using to get in and out of the hole:

I injected Rot Doctor into each of the lag bolt holes and then filled with epoxy, then re-drilled for the new lag bolts. I re-installed a treated piece of 2x2 on the bottom of the slide wall and re-attached the slide mechanism. I was able to use the fine adjustment on my jacks to get the slide at exactly the right height, since the rot had let it drop some.
I did NOT however install new Darco…that was what cause the problem in the first place…instead a got a few cans of Rustoleum Undercoater and sprayed the wood liberally with that, sealing around all the bolt and screw heads to keep water from wicking in. This part of the slide is not normally subjected to the weather, just road spray.


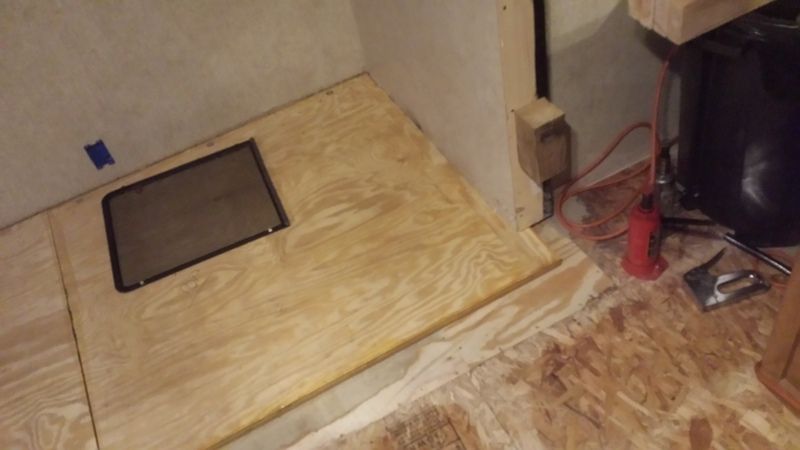
Here is the new floor going in. My neighbor came over and helped me wrestle it in place:

Taking time out to deal with this situation also:

DW is very happy to hear the news that the new floor is in:

I countersunk the carriage bolts on the top of the slide floor and then went over the whole floor with another sheet of ¼” plywood gued and stapled in place, making the total slide floor 1 ¼” thick. The sides are attached with Liquid Nails and screwed from the bottom.
The other critical mod was to add a drip edge to the outside of the side slide walls. When the slide is left open in the rain, water runs down the side walls and wicks around underneath. I cut a thin piece of vinyl from a piece of drywall J-bead and stapled it to the edge of the slide floor before re-attaching the trim.
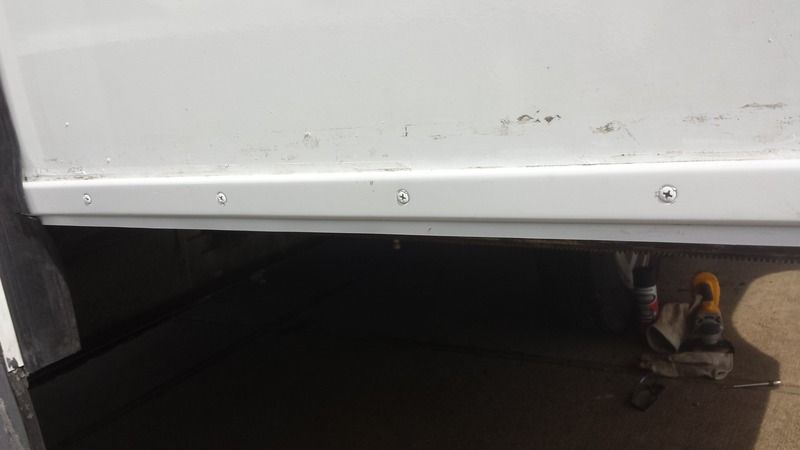
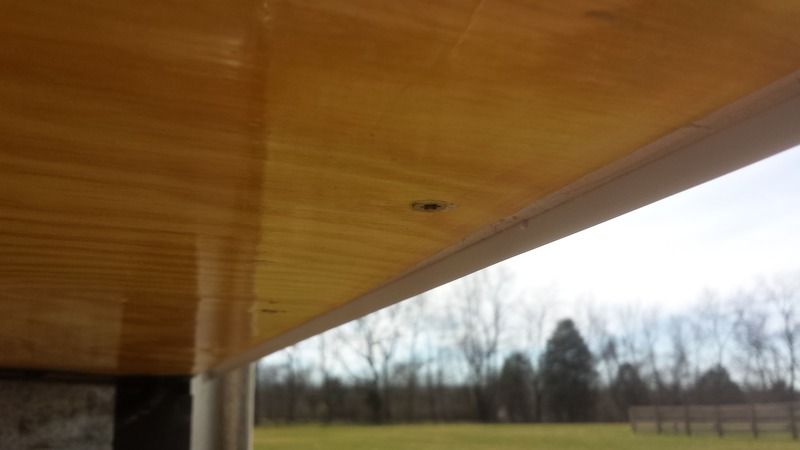
But…sadly the project was not done yet. The vinyl floor in the RV was trashed, it was so cold when I was working that it cracked like a saltine if you tried to lift it up at all. The original slide floor was cut with a bevel to allow for the carpet flap. I left the new floor edge square and installed new flooring on the slide and in the whole RV. I use a stair edge strip on the edge of the slide and also a foam strip to the underside of the slide floor to keep pebbles and other debris rom getting trapped under it:


Finished floor with supervisor once again passing it for inspection:

Finished product with new dinette installed:
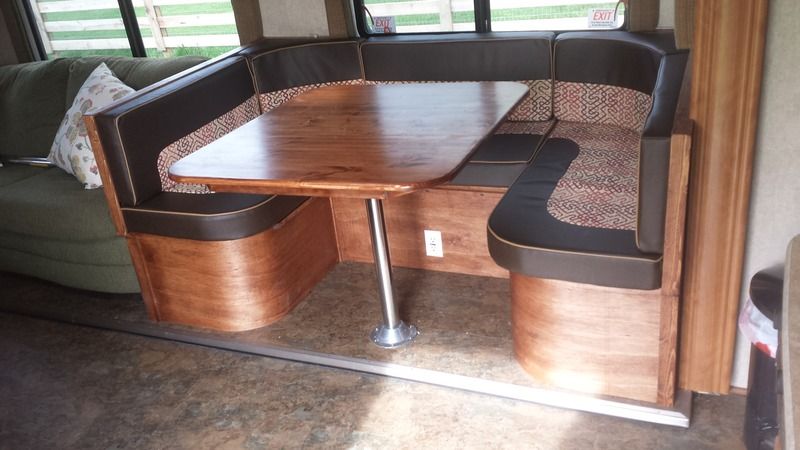
The flooring we chose was the Home Depot Allure product with the stick-together edges. Despite reading bad reviews about it separating in RV use, we decided to give it a try anyway. We needed about 225 sq ft and at $1.79 it was in the budget. We wanted to spend more on the floor, but the unplanned rot repair sucked up a lot of funds….don’t have any more pics but basically stained and installed shoe molding around the cabinets so the floor can float.
Thought I would pass this along in case anybody else is faced with this type of repair.
We ordered the Terry with the X-Treme package which was supposed to add more insulation for camping in colder temps. Part of that was using Reflectix foil insulation in place of padding under the carpet in the slide. When I pulled the carpet and insulation up I found this:


I had a leak somewhere, and it’s obviously been leaking at both corners of the slide for quite a while. I had no clue because the Reflectix trapped the water underneath keeping the carpet bone dry. The corners was heavy in black mold and very soft.
The slide floor is a 1” thick OSB with a smooth coating on the bottom that is supposed to be water resistant. The factory added a 5/16” piece of plywood on the rear portion where the table/chairs were originally located (we swapped the couch and table/chairs location when we first bought the RV because the floorplan worked better that way.) There is no framing under the floor, the only structure is the OSB sheet. I contemplated repairing the floor, but seaming the patch together would be challenging. The floor also had a nice sag to it, so I opted to replace the whole floor.
You can see in this pic that the floor is attached to the outer slide wall with carriage bolts that bolt into a piece of angle iron at the end of the slide mechanism. The slide mechanism is attached to the outer slide wall with lag bolts into the wall framing, and the floor bolts to top of it.

The first step was to remove the trim from the inside of the slide edge. I screwed short 4x4 blocks to the front of each side of the slide and used bottle jacks to lift the slide up:


Next was to unbolt the floor from the mechanism at the outside wall. I then used a circular saw to cut the slide floor in half down the middle to make it more manageable. The floor was attached to the side walls of the slide by screws that came down through the sole plate from inside the wall. With the inside of the slide raised about 1” with the jacks, I used a 5 lb sledge to break the floor loose, then a sawzall to cut off the screws left in the walls. With the floor cut in half, I could move it around to keep the heat in and also slide it back into place at night to keep the critters out. Turns out this Feb was not the best time to be working outside….
Here is what the mechanism looks like with the floor out:

Removing the exterior fender skirt:

The bottom of the outside slide wall was a 2x4 sole plate (on edge, not like in a S&B construction), and below that was a 2x2 added to create attaching points for fender skirt braces, wire loops, etc. The whole thing was wrapped in Darco.

It was so soft the putty knife went right through it

When I got the Darco off, this is all the water than ran out:

With the fender skirt off the outside, I completely removed the 2x2 and left what was left to dry.

I tarped the slide to keep everything dry. It was like this for almost 2 months and actually worked quite well through several blowing snow storms and rain storms:

Now with that done, I went back inside to finish removing the carpet on the main part of the floor, which revealed more water damage:

There is a steel channel that screws to the underside of the slide floor and seals against a bulb seal on the edge of the main floor when the slide is closed. When the floor rotted, the screws holding the front portion of this steel strip gave out and it no longer sealed when the slide was closed, allowing water into the main floor. Again, the vinyl flooring trapped this water in, hiding the leak and giving the mold a great head start. With the inside of the slide still jacked up, I made up some 2x4’s to go under the edge of the wall to hold it off the main floor:

This allowed me to remove the bottle jacks inside and cut out the rotten floor:

I added some additional 2x3 framing to strengthen the floor and replaced with ¾” plywood. There was a spot just ahead of the slide wall that I couldn’t get to without removing the slide, which I didn’t have the equipment (forklift) to do. So I dug out the rotten wood, dried it out good with a hairdryer, and injected Rot Doctor to stabilize the wood.


Then I used the repair epoxy from Rot Doctor to fill in the damaged area and sanded smooth.

Process went smooth and the supervisor onsite signed off on the work:

Meanwhile, in the garage I fabricated a new floor:

I got 2 ½” sheets of exterior sanded plywood and laminated then together with waterproof wood glue (Titebond III) and ¾” staples. The slide is about 12’ long so I staggered the seams on the plywood top and bottom. The underside got 4 coats of marine spar varnish to create a smooth surface. As the slide goes in/out, the floor rides on these nylon blocks screwed to the main floor. There are 5 of these blocks screwed to the main floor along the leading edge:

Back to the slide wall, the lag bolts holding the slide mechanism to the outside were rusted and giving way…the bolts were cocked and the slide was dropping relative to the mechanism. The problem was the Darco…water wicked in along every screw and bolt, rusting the fastener and rotting the adjacent wood. The 2x4 framing the bottom wall was solid, but every bolt hole was rotten.

So I needed to disconnect the mechanism from the outer slide wall so I could get the Darco all the way off and repair the bolt holes. I fabricated these adjusters to fit on the top of my HF jackstands:

A square box made from 1 ¼” channel sites on the top of the jackstand, and I welded ¾” rod to that. A ¾” piece of black pipe goes over the threaded rod and allows me to adjust to any height. The top plate has holes so I could screw it up into the slide wall frame to keep it from slipping out.


Nut with 3/8” square tubing welded to it to make it turnable by hand:

I made two of these so I could put one on each end of the outside wall. So with the wall supported with my homemade jacks, I was able to remove the slide mechanism and retract it from the wall;


Mechanism retracted all the way and the short stepladder I was using to get in and out of the hole:


I injected Rot Doctor into each of the lag bolt holes and then filled with epoxy, then re-drilled for the new lag bolts. I re-installed a treated piece of 2x2 on the bottom of the slide wall and re-attached the slide mechanism. I was able to use the fine adjustment on my jacks to get the slide at exactly the right height, since the rot had let it drop some.
I did NOT however install new Darco…that was what cause the problem in the first place…instead a got a few cans of Rustoleum Undercoater and sprayed the wood liberally with that, sealing around all the bolt and screw heads to keep water from wicking in. This part of the slide is not normally subjected to the weather, just road spray.


Here is the new floor going in. My neighbor came over and helped me wrestle it in place:


Taking time out to deal with this situation also:

DW is very happy to hear the news that the new floor is in:

I countersunk the carriage bolts on the top of the slide floor and then went over the whole floor with another sheet of ¼” plywood gued and stapled in place, making the total slide floor 1 ¼” thick. The sides are attached with Liquid Nails and screwed from the bottom.
The other critical mod was to add a drip edge to the outside of the side slide walls. When the slide is left open in the rain, water runs down the side walls and wicks around underneath. I cut a thin piece of vinyl from a piece of drywall J-bead and stapled it to the edge of the slide floor before re-attaching the trim.


But…sadly the project was not done yet. The vinyl floor in the RV was trashed, it was so cold when I was working that it cracked like a saltine if you tried to lift it up at all. The original slide floor was cut with a bevel to allow for the carpet flap. I left the new floor edge square and installed new flooring on the slide and in the whole RV. I use a stair edge strip on the edge of the slide and also a foam strip to the underside of the slide floor to keep pebbles and other debris rom getting trapped under it:


Finished floor with supervisor once again passing it for inspection:

Finished product with new dinette installed:

The flooring we chose was the Home Depot Allure product with the stick-together edges. Despite reading bad reviews about it separating in RV use, we decided to give it a try anyway. We needed about 225 sq ft and at $1.79 it was in the budget. We wanted to spend more on the floor, but the unplanned rot repair sucked up a lot of funds….don’t have any more pics but basically stained and installed shoe molding around the cabinets so the floor can float.
Thought I would pass this along in case anybody else is faced with this type of repair.

