bobsbbq
Dec 02, 2014Explorer
30 to 50 Amp service upgrade/conversion
Well when we bought our latest 5ver we were pretty happy with the 15K air and the job it did during the summer. And we didn't have too many issues with tripping breakers. However when fall and winter showed up the heating situation was another story.
I found out that heating a much larger trailer was going to require additional heat. Since electricity is included we try to use as much electric heat as we can. And use the furnace for quick warm ups. This is where we started having problems with breakers tripping. We had a 1500 watt heater in the rear and a small heater in the bedroom. This was just not enough heat in the big living area where the kids sleep in bunk beds. So I happened to luck out on a clearance fireplace from PPL for 50.00 and installed it under the TV. I however could not run it on nothing but low and even then it would sometimes trip the breakers.
So I decided to take the challenge and do the upgrade. My RV was a perfect candidate as it had a separate AC and DC distribution panels. The AC panel was located in the hall going up into the bedroom and right above the storage compartment. It had a Square D QO series box but it was only a single pole. I purchased all of the box and breakers etc for 70.00. I went with a Square D Homline 100 amp panel with 6 spaces and 12 circuits.
I knew my biggest challenge was the mounting of the new panel as space was an issue.
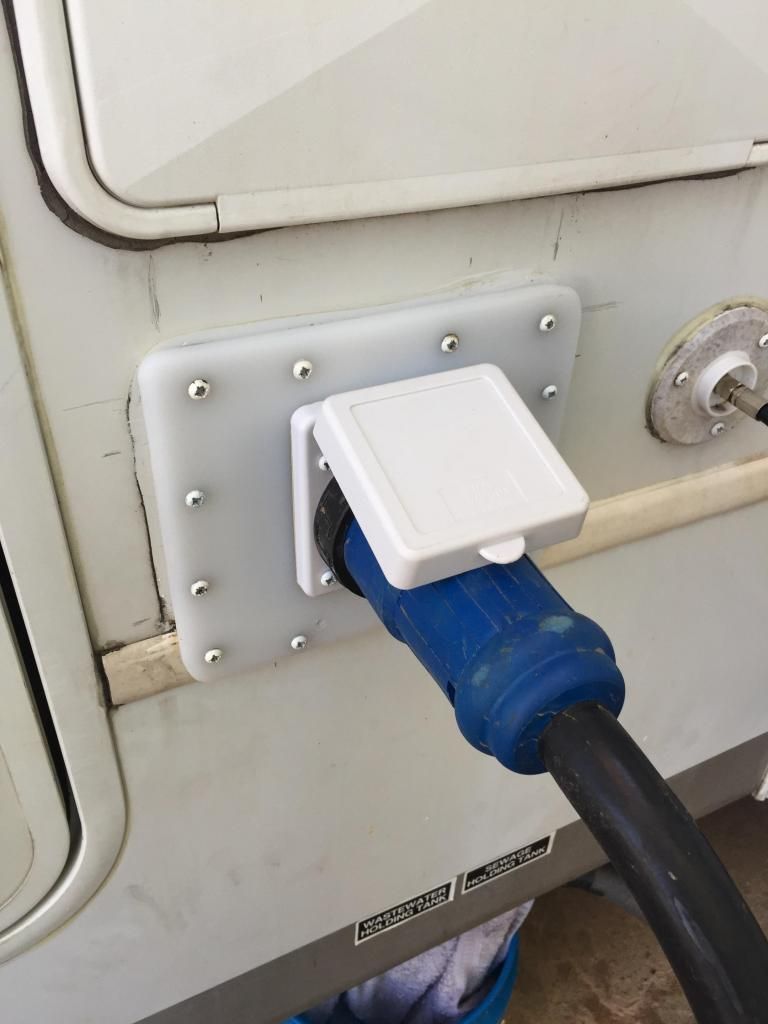
Some things to note, I purchased the SO wire from a local electrical supply for about 20.00 I used 6/4 wire. Another thing is on the side of the trailer where my 30 amp can out, I had a locking cover. When removing this cover I had a large whole left and no way to mount the Marinco style input connector. I used a tip found on a forum and cut out a pice of cutting board to cover the hole and provide a new mounting surface.
I ordered the 50A Marinco style input from EBay for 29.99 and was very happy with the quality. Locally they are 95-130.00
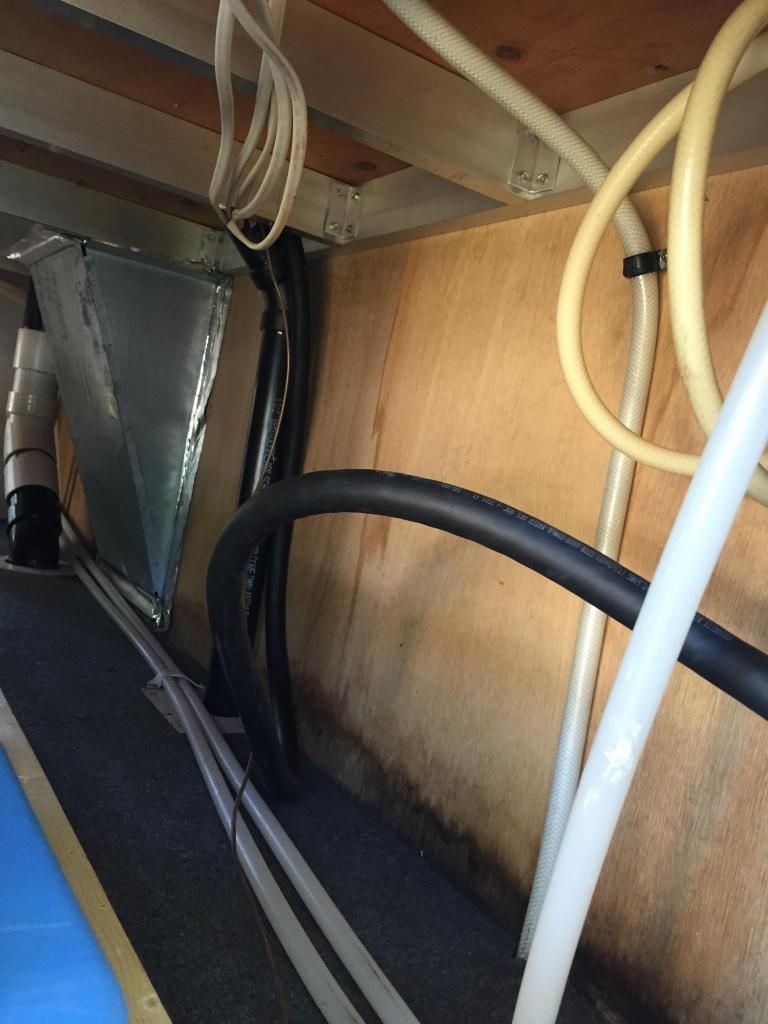
For me it was easy to run the new wire from the input connector to the new panel as this was right next tomy storage compartment. This is without a doubt the hardest part in doing this upgrade.
After removing the old panel and marking the wires we got the new panel installed after som minor modifications. The other thing was the old wires were not long enough to reach inside the new load center, so some splicing was required.
I balanced the load as follows;
Bus1, Main
Bus2, Main
Bus1, Front RV
Bus1, Microwave
Bus2, Rear RV
Bus2, Water heater
Bus1, Fireplace
Bus1, AC
Bus2, Not used
Bus2, Not used
I used 2 15A double breakers and 1 20A double breaker.
I still have room for 2 more circuits.
The one thing I'm not sure of is where the convertor is tied in to. In the future I might relocate it to its own breaker.
All in all it was well worth the money and time. We can now run the 1500 watt fireplace, and the 1500 watt heater in the rear, as well as a heater in the front bedroom.
This upgrade requires knowledge of electrical wiring and should only be done by qualified people.
I hope this might help someone and feel free to contact me if you have any questions.
The old load center

The old load center removed and modifications starting to get enough room to get new load center in.

A view of the storage compartment showing the new cable running up to the new load center

The outside modifications for input connector

New load center installed and working

The Fireplace installed

I found out that heating a much larger trailer was going to require additional heat. Since electricity is included we try to use as much electric heat as we can. And use the furnace for quick warm ups. This is where we started having problems with breakers tripping. We had a 1500 watt heater in the rear and a small heater in the bedroom. This was just not enough heat in the big living area where the kids sleep in bunk beds. So I happened to luck out on a clearance fireplace from PPL for 50.00 and installed it under the TV. I however could not run it on nothing but low and even then it would sometimes trip the breakers.
So I decided to take the challenge and do the upgrade. My RV was a perfect candidate as it had a separate AC and DC distribution panels. The AC panel was located in the hall going up into the bedroom and right above the storage compartment. It had a Square D QO series box but it was only a single pole. I purchased all of the box and breakers etc for 70.00. I went with a Square D Homline 100 amp panel with 6 spaces and 12 circuits.
I knew my biggest challenge was the mounting of the new panel as space was an issue.
Some things to note, I purchased the SO wire from a local electrical supply for about 20.00 I used 6/4 wire. Another thing is on the side of the trailer where my 30 amp can out, I had a locking cover. When removing this cover I had a large whole left and no way to mount the Marinco style input connector. I used a tip found on a forum and cut out a pice of cutting board to cover the hole and provide a new mounting surface.
I ordered the 50A Marinco style input from EBay for 29.99 and was very happy with the quality. Locally they are 95-130.00
For me it was easy to run the new wire from the input connector to the new panel as this was right next tomy storage compartment. This is without a doubt the hardest part in doing this upgrade.
After removing the old panel and marking the wires we got the new panel installed after som minor modifications. The other thing was the old wires were not long enough to reach inside the new load center, so some splicing was required.
I balanced the load as follows;
Bus1, Main
Bus2, Main
Bus1, Front RV
Bus1, Microwave
Bus2, Rear RV
Bus2, Water heater
Bus1, Fireplace
Bus1, AC
Bus2, Not used
Bus2, Not used
I used 2 15A double breakers and 1 20A double breaker.
I still have room for 2 more circuits.
The one thing I'm not sure of is where the convertor is tied in to. In the future I might relocate it to its own breaker.
All in all it was well worth the money and time. We can now run the 1500 watt fireplace, and the 1500 watt heater in the rear, as well as a heater in the front bedroom.
This upgrade requires knowledge of electrical wiring and should only be done by qualified people.
I hope this might help someone and feel free to contact me if you have any questions.
The old load center

The old load center removed and modifications starting to get enough room to get new load center in.

A view of the storage compartment showing the new cable running up to the new load center

The outside modifications for input connector

New load center installed and working

The Fireplace installed
