cancel
Showing results for 
Search instead for 
Did you mean: 

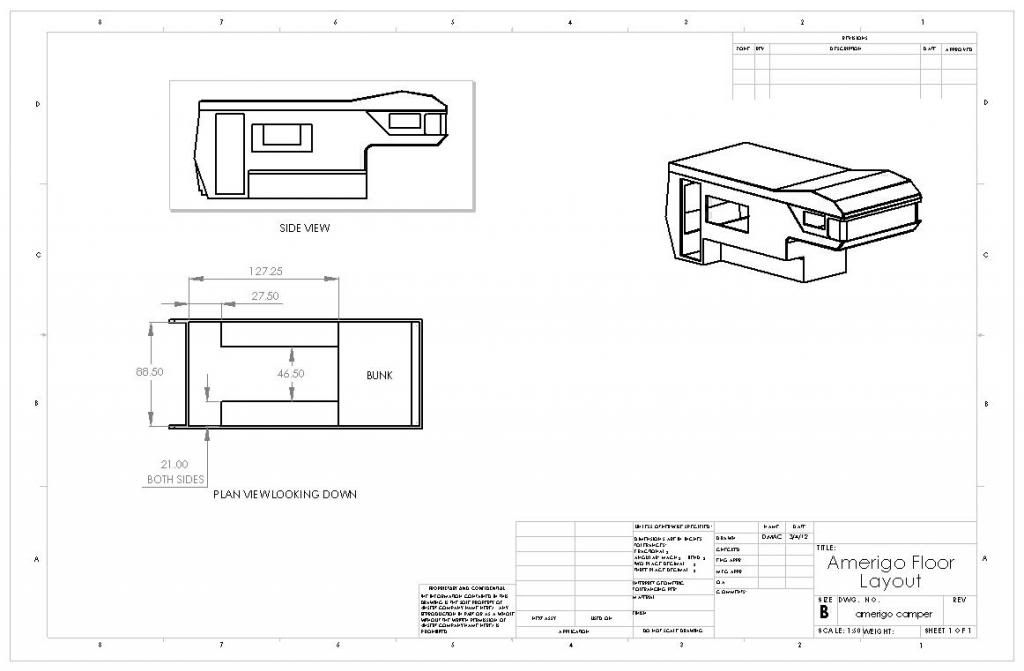
1972 Amerigo Camper Rebuild

2cknights
Explorer
Explorer
After posting a few comments on another thread, I decided to start this one under a topic more easily recognized. I also have started a blog at: http://www.tcreviver.com. Okay, MKish, here it is. I'll post to it whenever I get a chance. -Carey
'03 Ford F-350 7.3 LB SRW. Ride Rites.
Old rig '99 Lance 1130
New rig 2017 Jayflight 31QBDS
2014 Harley Davidson Ultra Classic
394 REPLIES 394

Sweet_Tater
Explorer
Explorer
2cknights wrote:
First I have to figure out how to clean the roof. Mine has mold, mildew and even lichen growing on it in spots. I tried to wash it off the cabover right after I bought it. but the small lichen spots still show. The only place I've got them off is where I scraped the areas to be patched with a razor blade. I sure hope I don't have to do the whole roof that way, but if that's what it takes... I noticed from Sweet Tater's post, he's having the same problem. If anyone has a solution I'd sure like to hear it. Scotch Brite pads and Comet powder might work, I haven't tried that yet. BTW - Does anyone's spell check on this forum work? I don't think mine ever has.


Im gonna try to get on a ladder and presure wash the daylights out of it in the spring. only other thing I can think of is get it as clean as you can with bleach to kill mold and stuff and paint a base coat with kills. oh and yes my spell check works, I just ignore it more of the time.

2cknights
Explorer
Explorer
First I have to figure out how to clean the roof. Mine has mold, mildew and even lichen growing on it in spots. I tried to wash it off the cabover right after I bought it. but the small lichen spots still show. The only place I've got them off is where I scraped the areas to be patched with a razor blade. I sure hope I don't have to do the whole roof that way, but if that's what it takes... I noticed from Sweet Tater's post, he's having the same problem. If anyone has a solution I'd sure like to hear it. Scotch Brite pads and Comet powder might work, I haven't tried that yet. BTW - Does anyone's spell check on this forum work? I don't think mine ever has.
'03 Ford F-350 7.3 LB SRW. Ride Rites.
Old rig '99 Lance 1130
New rig 2017 Jayflight 31QBDS
2014 Harley Davidson Ultra Classic

1971amerigo
Explorer
Explorer
Yes the PO covered the entire roof down to the trim on the sides.
The product comes in white and 1 gallon covers 25 S.F.
It does have a slight sand texture, but when I had to clean the roof last summer after all the pollen it was easy.

2cknights
Explorer
Explorer
Yeah John, you got that right, a long way; his and Bob's too. I thought about you the other night when I saw the storm line come across your area. Glad you survived it.
Bob, Thanks for that information. I was looking at a product for fiberglass roofs in the AdventureRV catalog. Did the P.O cover the roof all the way down to the trim on the side? I've seen that product in the store, but the only Black Jack product I've used before was black. I never thought about them producing any other color. Carey
'03 Ford F-350 7.3 LB SRW. Ride Rites.
Old rig '99 Lance 1130
New rig 2017 Jayflight 31QBDS
2014 Harley Davidson Ultra Classic

Sweet_Tater
Explorer
Explorer
Hope you all survived the storm last night, I almost lost the door to my camper. The wind was coming from the south and that's the end of the camper I haven't enclosed yet so it blew it open. Had to prop a 4x4 under the knob to keep it shut.
Glad to hear you are about done with the roof. I have 1 more to seal, the bathroom vent hole. But its been to cold to fiberglass for awhile. Sunday is suppose to be 60 so I might try and see if it will cure. You sure are moving along with yours, cant wait to see how it comes out, You got your work cut out to get it like Dave's 🙂

1971amerigo
Explorer
Explorer
The previous owner of my TC applied BlackJack Elastometric roof coating (Home Depot or Lowes) on the roof. It has a slight sand texture finish which is great for hiding imperfections. It stays flexible and is water based.
Cleans well with a brush

Don't forget to post more pics!

Bob W.

2cknights
Explorer
Explorer
Man, what a great day today was. The weather was perfect. I finally got around to patching all the roof holes and damage done by the P.O. It was my first attempt at fiberglassing, but all went well. I had two damaged areas that I patched using 2 layers of glass mat. I'll go over them again tomorrow if it doesn't rain before I get to it. I still have a little asthetic work to do to them, but I'm really glad it finally got warm enough to finish this. I also started fastening the rafters and placing the plywood above them. I have the 2X6s and bottom skin for the floor. That will be the next big shot, then the fun begins. I can start on the interior. Looking forward to the weekend.
'03 Ford F-350 7.3 LB SRW. Ride Rites.
Old rig '99 Lance 1130
New rig 2017 Jayflight 31QBDS
2014 Harley Davidson Ultra Classic

2cknights
Explorer
Explorer
I appreciate all the information you guys are sharing. It saves me a lot of time researching areas outside my limited expertise.
'03 Ford F-350 7.3 LB SRW. Ride Rites.
Old rig '99 Lance 1130
New rig 2017 Jayflight 31QBDS
2014 Harley Davidson Ultra Classic

1971amerigo
Explorer
Explorer
I did get a quote from that company for replacement siding.
To replace all of the siding on my TC was $500 for the panels and unfortunatley because i live on the other side of the Country $600 for shipping. I am keeping this in mind for a project for next year.

76AMERIGO
Explorer
Explorer
Carey,
Check out HEMETVALLEYRV.NET they sell the pleated siding that Amerigo's came with. I'm not sure of the cost, but it would be back to an original look. 🙂
We do alot of fiberglassing at my work and there are several ways to patch. For holes, if you can get to the back side of the repair area, you can block off the hole with duct tape, scuff up the finished side and add the resin and let it set up and sand smooth. Where you have larger repairs, you need to use the fiberglass matting and several coats of resin to blend your repair....sort of like drywall repair in your house. I used glazing putty for auto body repairs to fill in the hair line cracks and imperfections, wet sand, primer and paint.
Hope this helps,
Dave
Dave
2001 F-350 PSD C/C LB 4X4
1976 Amerigo w/ Snap N Nap *SOLD*
1979 CJ-7 304ci/Turbo 400
2014 Cougar Lite 28RDB

2cknights
Explorer
Explorer
Dave,
Glad you mentioned the check valves. I've had a nagging suspicion that I might need this because the drain height and top of the gray tank are only about 1" different. I think I might have mentioned this somewhere in the beginning. Thanks for the input about tying the rear wall to the beam. I can see that connection being important. I have some angle iron that I can cut some clips out of. Hopefully, we'll get some good days in February to work on it. Anyone have any suggestions on fiberglass repair kits? I don't need a lot of epoxy or glass, but am not real knowledgable about the process, just willing to get my hands dirty learning. I have gotten some good information on System 3 from a book that I got at the Woodcraft Store. Thanks for the input. Carey
'03 Ford F-350 7.3 LB SRW. Ride Rites.
Old rig '99 Lance 1130
New rig 2017 Jayflight 31QBDS
2014 Harley Davidson Ultra Classic

76AMERIGO
Explorer
Explorer
Hi Guys,
Just checking in and see you made lots of progress. It looks great by the way....keep on building!
I noticed you mentioned about being tall....that is one problem I found out after I put the Air Conditioner in that I'll hit my head on the cover. You have the chance to create more head-room by removing the entire floor and lowering it by 3 to 4 inches...actually extending the walls to the floor. This will have no visual effect on the upper portion of the camper. Just thought I'd share that with you.
I like all the holding tanks....seems like a lot of weight if they are nearing full capacity...could add around 600lbs or more??
I think what I may do to my holding tank is to mount one big tank for black and grey...it would make for easier grey plumbing and I could add a cutout in the grey line to hook my sewer hose if I have full hook-ups. I would add check valves on the grey lines for any issue with back flow.... I have start looking for a tank.
I found the issue with the sagging is how they tied the vertical back corners into the main 2X6 headers. The just put 3 or 4 screws thru the 2X2 wall stud into the end of the 2X6. Once these start to rust and rot the wall just pulls down from the weight and you get the sag and the door frame starts cracking from all the stress. I added big "L" braces to to the side to pick up the 2x6 and 2x2 to lock those upper corners in tight. No issues so far..
Good luck and keep up the good work!
Dave
Dave
2001 F-350 PSD C/C LB 4X4
1976 Amerigo w/ Snap N Nap *SOLD*
1979 CJ-7 304ci/Turbo 400
2014 Cougar Lite 28RDB

2cknights
Explorer
Explorer
I could probably work that in. I'll have the two 2X6s only about 12" apart running all the way to the rear on the curb side. I think having that much strength cantilevered such a short distance should keep her rear up.
'03 Ford F-350 7.3 LB SRW. Ride Rites.
Old rig '99 Lance 1130
New rig 2017 Jayflight 31QBDS
2014 Harley Davidson Ultra Classic

Sweet_Tater
Explorer
Explorer
2cknights wrote:
Got a chance to work on her today and added some pictures to the blog. I don't have to work tonight so if the weather isn't too bitter tomorrow, I might try to work some more then. I really would like to get the floor out and new wood under there. If you go to the blog, you'll notice that there is an area between the gray tank and the curb side that has unused space. I plan to run a 2X6 down that area all the way to the back as well as one on the outer curb side to shore up the rear end and try to eliminate the ass-sag that is so prevalent in these units. I know that I'm changing the look of this camper on the truck, but it sat down on the side rails and almost on the cab. I needed some head room. This will give me more headroom than I need and I am big on asthetics, but after the TT, I just don't want to go without the use of gray and black tanks. Everything is a tradeoff. I've weighed the advantages of one against the need for the other. I'm not sure it won't really look redneck, but after all - I'm just a farm boy at heart. -Carey


Carey, I dont know for sure if its feasible for you, but one thing I did to try and help with the sagging rear (no I didnt divorce her) lol, Along the seat level I ran another solid 2x4 the entire length like the header. It seamed to help hold the weight, so far.