Forum Discussion
8,453 Replies
Bruce Brown wrote:
Seeing as they'll be under the roof material you could just put a strip of gorilla tape over them.
When I did the roof on my TT rebuild I used gorilla tape in the sheeting seams and edges, based on a recommendation from the local RV guys. Worked well.
Thanks. Bruce_BrownModeratorSeeing as they'll be under the roof material you could just put a strip of gorilla tape over them.
When I did the roof on my TT rebuild I used gorilla tape in the sheeting seams and edges, based on a recommendation from the local RV guys. Worked well.dodge guy wrote:
Are you going to put something over the screws as protection even thought they are countersunk?
Yes. I needed to get this area level, (countersunk screws), so I could cover it. With the hex heads sticking up, that would be a problem trying to put something there.- Bruce_BrownModerator
LouLawrence wrote:
Most likely POR 15.
:B :B :B  LouLawrenceExplorer IIMost likely POR 15.
- dodge_guyExplorer IIAre you going to put something over the screws as protection even thought they are countersunk?
- Did I mention I dislike going up on a ladder? Ah, yeah, I did. Never the less, sometimes ya gotta do, what ya just gotta do.
However, when going up on the roof of the moho, the ladder is about as tall as the roof. As such, that means that I have to use those top 2 steps - you know - the ones that you are never to step on....
Yeah, those 2. What to do?
Well, here's what I did. I just added a little extension to the ladder to help keep me steady while getting on and off the roof.
A 2x3 and a couple of clamps and I'm good to go!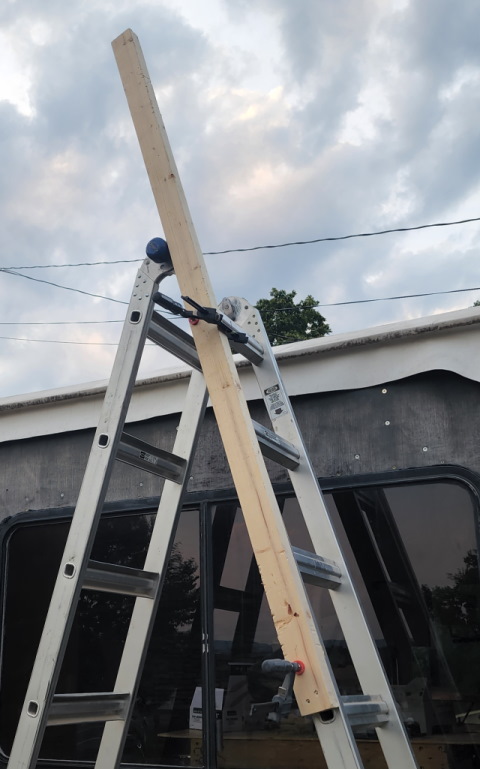
- As you can see here, I finally got all of the hex head screws out, and replaced by flat head screws that are countersunk into the front cap.
I also cleaned up almost all of the left over gunk there, except for just a small portion on the drivers side.
I found that the best way to remove it was by using a sharp razor blade and carefully scrape it off. Not a lot of fun, but it's finally pretty clean.
- After removing the hex heads, I used a counter sink so the heads will be level or below the level of the fiber glass.
Here's my quick check to make sure the head of the screw won't stick up too high. I flipped the screw upside down and that gave me what I wanted to know.
The red arrow points to some grunge that is extremely miserable to remove. It's old caulk, and who knows what else.
Scraping takes less time than sanding with 36 grit, but it's still not fun.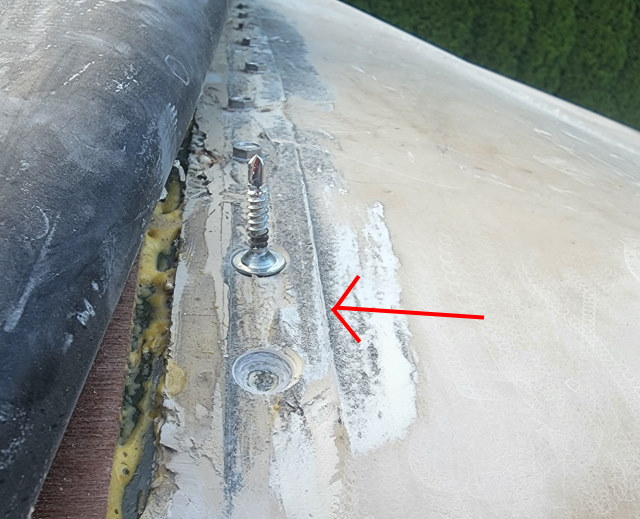
In case you are wondering, this was a couple of hours worth of work. I know, it looks like it should have taken about 15 minutes. I wish.
I still have probably about a dozen more screws to remove and replace, and I'll probably have to get on the roof to access them. - When I originally attached the front cap to the roof joist, I used some hex head screws, as in the red circle.
I am replacing then with flat head screws as in the blue circle.
Why did I use the hex heads? That's all I had at the time.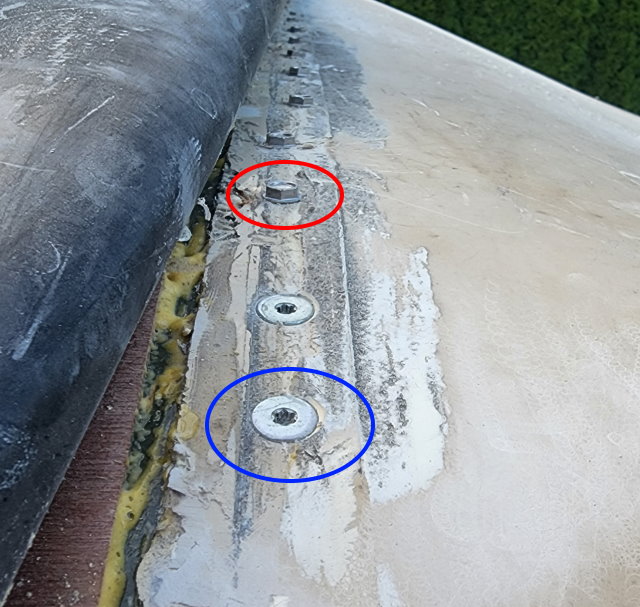
About Motorhome Group
38,748 PostsLatest Activity: Aug 20, 2025