Oh no he is at it again, this did not turn out to be one of my more favorite projects, I really expected more.
I purchased an electric awning to replace our manual one after it was torn off, after repairs from an RV Service center. (I have said before shot me if I ever take something I can do myself to a RV service center again.)
Ok on to the project.
The awning is the best one CareFree of Colorado has to sell.
I wanted more light out side the RV at night.
I had seen posts on LEDs in the awning roller and though that was a good idea (it moved the light source away from the Motor Home and was up high).
I did some research and was not really interested in the flashing strobe and changing color effects that color LED strips offered. I did however like the yellow (Bug Light) color they could produce and that they can be dimmed or brightened to the desired level of light.
So I purchased the Color LED light kit from CareFree thinking things would be thought out and engineered for their awnings, I was half right.

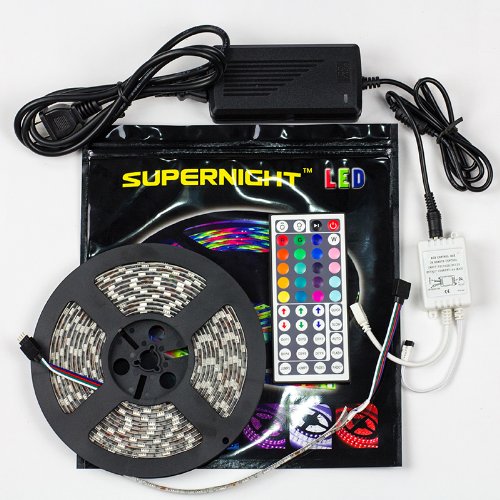
The kit contains The LED strip, a 12 Volt power cord, an A/C to 12 volt power source, the controller for the LED strip, the remote control for the controller, instructions, and 12 volt connections with a fuse.

This is the awning before the start.

A lot of the highly intense suspense and action takes place on this end of the awning

There are two pages in the instruction book that contain information to install the LED light strip.


Step 1 Open the awning to expose the roller tube.
Step 2 use the isopropyl wipe included with the kit and thoroughly clean the area where the LED strip is to be mounted on the roller tube.
(in another location in the instruction manual was this bit of wisdom "Two types of roller tubes are used on CareFree products. Older roller tubes (3-slot) have a smooth surface between the canopy and the accessory slot. New roller tubes (4-slot) have an additional shallow slot for mounting LED strips")
As mine is a newly installed awning I have the 4-slod design.
Step 3 Measure the horizontal position of the strip: The instruction book gives offsets from the end of the tube to center the LED strip on the tube, I found them to be incorrect, my offset to center the LED strip was 19 1/2 inches.


Step 4 is for is the 3-slot tubes and has to do with marking the LED strip location on the tube.
Step 5 Remove the release paper from the back of the strip. I would not do this as you could end up with the tape stuck to itself. I would remove the paper as you apply the LED strip to the roller.
With the 4-slot tube the LED strip is a press fit into the slot and the adhesive on the back of the strip is almost not needed. I actually pressed the strip into the grove to get the center location on the roller and it stayed there while I took measurements. Once marked I then did remove the paper backing and install the strip.

Here the instructions get a little sketchy.
Step 6 is for shorter tube and has to do with cutting the LED strip.
step 7 Lay the wire harness for the LED strip flat against the roller tube. Secure with the 1 X 5 piece of Velcro furnished with the kit. It may be necessary to trim the Velcro to fit as shown. I did not get enough Velcro with the kit.
That is the end of the instructions for the install. I only got a 2 inch long piece of Velcro with the kit. I used duck tape to hold the wiring harness in place and used the Velcro to hole the controller in place. I do not like it.

So...on to my modifications.
The pigtail tail on the end of the controller is not long enough to reach the LED strip if mounted on the motor for the roller (only flat spot anywhere near the LED strip, what could have been done was to have provide a long pigtail and short power cord, and the controller could have been mounted remotely) (if the LED strip had been placed off center using the measurements for the install of the LED strip the pigtail on the controller would still have been to short).

The pigtail is 6 inches to short, but I have some ideas, more later.
Only choice is to mount the controller on the roller tube with Velcro. At lest the Velcro is protected from the weather. We have light.

For power you have two choices, use the A/C converter to 12 volts, or tap into a 12 volt source and install the plug they provide. I actually had a third choice. This coach came equipped with the "thin Light that was installed in the original roller tube.

When this option was installed a power jack was installed in the porch light, and this is what I used. (yes I know the Motor Home is screaming for a wash)

This means the wire dangles from the frame of the awning, not acceptable, more later.
The instruction manual (in another location states) "NOTE: tucking the connector under the canopy will securely hold and protects the connector during storage but may cause minor "dimpling" in the canopy".
I have to admit the connector pins are very delicate and appear to have the propensity for damage.
More Modification work.

I cannot have the connector sticking out like that, If carefree had made it square it would have fit into the grove.

The PLAN, enlarge the hole.

This is not my best effort, my heart was not in it, I should have taken a break, as an excuse it was ant a difficult angle. I did go to the parts store an get some paint to match the roller and will try again for a better match.


I thought about going all the way through the awning roller but decided against it.
I purchased some double sided tape to hold the wire harness in place.

I purchased some Velcro and put a strip on either side of the connector and when ready to store will install the matching piece over the connector to hold it in place.

Like so

As stated earlier the controller pigtail does not reach the motor housing of the roller.
So...I have positioned it inside out of the elements.


And found a good spot to put the remote control when the roller is deployed.

The power cord is an eye sore and needs additional thought,

and of course I have some.

This is an electric awning and they ran the power cord for the motor through the arms.

I could do the same, with a little vacuum hose to make the wire casing the correct size it will press into the second channel in the arm out of site.

This part of the project will have to wait a bit as I have to figure out what to do with the ends of the cord when stored. They will not fit in the channel.
What to do with the controller and remote control when not in use, well I have made great use of Velcro on this project so just a little more.
Just inside the Motor Home door is a small control console.

It is next to impossible to see the back side of that console so it will make a great storage spot for the two items.

So I almost forgot, and remember I am not really interested in all the special effects, just the "Yellow Bug Light" that can be dimmed and brighten, and of course there is white, but here are some colors.