fcooper
Aug 23, 2013Explorer
Repairing a hole in the front cap
After a thunderstorm about 2 weeks ago, I discovered a hole in my front cap caused by a falling limb. My insurance has a high deductible, and I didn't want to have the coach in the shop for an extended time, so I tackled the repair myself. Having a good friend that builds/repairs boats means I got a lot of good free advice, which was a big help. I've made a few pictures of the repair process that may help someone else if they have this same problem.
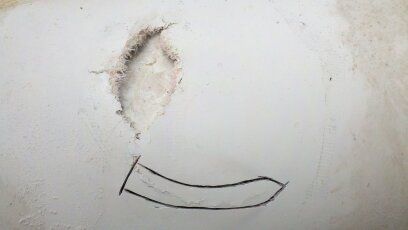
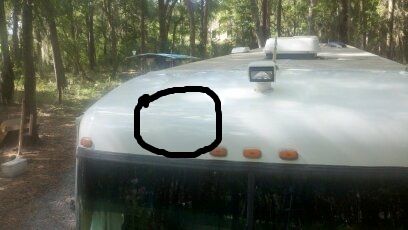
The first picture is of the damage area on the curved area of the front cap. The black line outlines a crack that has to be cut out. (and yes, the coach roof is very dirty in this picture)
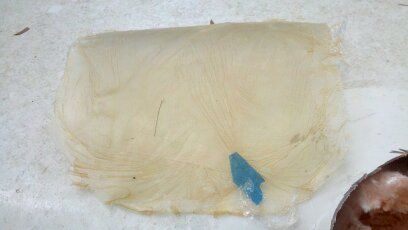
After cutting out the damaged area, I taped some saran wrap onto the outer surface of the curve close to the damaged area, and built up 3 layers of fiberglass. This gave me a backing plate to be inserted into the back side of the hole, with the backing plate having a curve that closely matches what must be achieved in the repair.
This picture shows the 3 layers of fiberglass on the saran wrap, but it has been moved upward from where I made the backing plate.
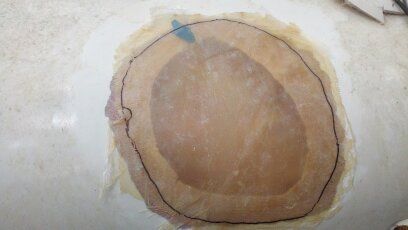
I took the backing plate, placed it over the hole and marked it for trimming to size. I had ground out about 1 1/2 inches around the hole front and back for adhesion, and made the backing plate this size. At only 3 layers thick, the backing plate could be flexed enough to insert into the hole. This picture shows the backing plate being marked for cutting to size.
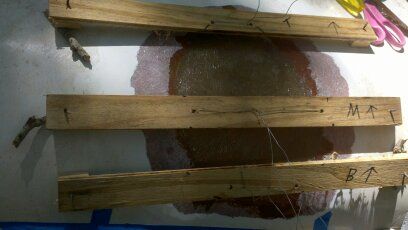
I fabricated some supports to span over the hole to attach support wires. The wires run through holes in the fiberglass backing plate. Before inserting the backing with wires attached, rosin was applied to the inner part of the hole, to the backing plate, and then two layers of fiberglass mat with rosin were added onto the backing plate. The backing plate was then flexed and inserted into the hole, and pulled up tight with the wires. Caution...wear gloves because this is messy. The next picture shows the backing plate wired into place waiting for the rosin to cure.
After the cure was completed, I removed the supports and wires, did some grinding to smooth out minor problems with the backing repair, and then added more layers of fiberglass on the outside. The remainder of the repair was standard auto body type work with applying the fiberglass, grinding/sanding smooth, filling imperfections with bondo and spot putty, primer, etc.
Here's the finished repair after repainting the front cap above the windshield. I had 2 part paint matched to the color of the existing gelcoat. The repaired area is circled.
The only significant costs was the 1/2 gallon of paint at $162.
The repair took about 2 weeks working between thunderstorms as we seem to be having a lot of rain lately.
Fred
The first picture is of the damage area on the curved area of the front cap. The black line outlines a crack that has to be cut out. (and yes, the coach roof is very dirty in this picture)
After cutting out the damaged area, I taped some saran wrap onto the outer surface of the curve close to the damaged area, and built up 3 layers of fiberglass. This gave me a backing plate to be inserted into the back side of the hole, with the backing plate having a curve that closely matches what must be achieved in the repair.
This picture shows the 3 layers of fiberglass on the saran wrap, but it has been moved upward from where I made the backing plate.
I took the backing plate, placed it over the hole and marked it for trimming to size. I had ground out about 1 1/2 inches around the hole front and back for adhesion, and made the backing plate this size. At only 3 layers thick, the backing plate could be flexed enough to insert into the hole. This picture shows the backing plate being marked for cutting to size.
I fabricated some supports to span over the hole to attach support wires. The wires run through holes in the fiberglass backing plate. Before inserting the backing with wires attached, rosin was applied to the inner part of the hole, to the backing plate, and then two layers of fiberglass mat with rosin were added onto the backing plate. The backing plate was then flexed and inserted into the hole, and pulled up tight with the wires. Caution...wear gloves because this is messy. The next picture shows the backing plate wired into place waiting for the rosin to cure.
After the cure was completed, I removed the supports and wires, did some grinding to smooth out minor problems with the backing repair, and then added more layers of fiberglass on the outside. The remainder of the repair was standard auto body type work with applying the fiberglass, grinding/sanding smooth, filling imperfections with bondo and spot putty, primer, etc.
Here's the finished repair after repainting the front cap above the windshield. I had 2 part paint matched to the color of the existing gelcoat. The repaired area is circled.
The only significant costs was the 1/2 gallon of paint at $162.
The repair took about 2 weeks working between thunderstorms as we seem to be having a lot of rain lately.
Fred