Forum Discussion

Almot's avatar
Almot
Explorer III
Mar 08, 2015

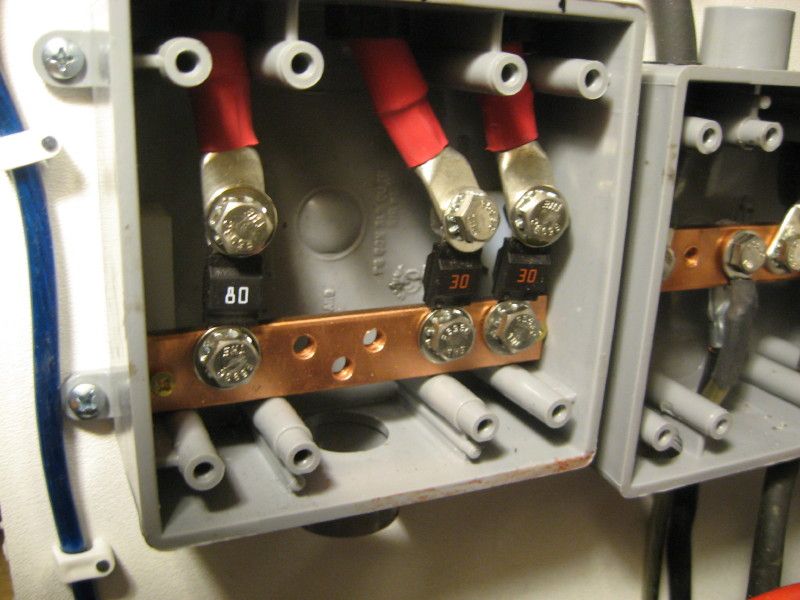
Wire #6, #4, lugs and bus bars

"Beautifying" my solar wiring from controller to battery. Scrap pieces of #18 wire (yes, like on your desk lamp) twisted together to make it #12 need to be replaced with proper #6 and #4 wires.

Trying to make it "right", with only one Neg and Pos cable going from battery to respective bus bar, and then everything is tied to these bars.

Q1: #6 wire from controller to Pos/Neg bus (link to the bus is below), no lugs. Do I just cut a welding cable with a hack saw and strip the ends, that's it? No magic potion to put on the wire to keep it from oxidation and other perils for years to come?

Q2: #4 wires from battery to Pos/Neg bus will have 5/16 lugs on the battery end. I'm leaning to order the assembled cable from Genuinedealz like I did before. They install lugs and shrink tubes for a low fee, a few pennies on top of materials cost. Alternatively, does anybody know of cheap crimping tool that would make sense financially - for a dozen lugs or so?

Q3: #4 wire from Neg bus to trailer frame. I think to just bolt it to the frame like my OEM RV Neg pigtail for battery. They bolted Neg #8 pigtail to the trailer tongue with a #8(?) tapping screw and pair of washers. Or should I get some fancy ground lug?

Q4: Before I start ordering fat cables, - will a twisted AWG 6 fit in a bus bar that has holes "up to #6 gauge"? I suspect they mean "up to #6 solid wire". Photo of Midnite Solar Mini Bus Bar is below, and drawing is here.


Substandard quality by Midnite, btw. Nice company but Chinese manufacturing is a biatch. Set screws were "welded" to terminals with corrosion (new from the box), holes for insulators in breaker box are not straight, and so on.

18 Replies

  • What is the wire size count on your bus? The picture seems to show 2x 1/0 to 14 and 4x 6 to 14.

    I would put a lug on the end before bolting to the frame.

    Premade cables when you can is a great way to go especially with larger cable. Although some longer runs can be more difficult to measure. I have a HF 7 ton hydraulic crimper. Tinned closed lugs and heat shrink for a permanent install.
  • Bus bars with crimped and heat=shrinked terminals:
    I used a cheap hammer crimper ($10)but a hydraulic crimper is on my short list. If you need to buy everything to only make a few cables, Genuine Dealz is probably a better alternative. Available now are also pretinned ring terminals and compression jackets, just apply heat.
  • RoyB's avatar
    RoyB
    Explorer II
    I am not a fan of slipping wire leads under screw down lugs.

    Whenever possible I always go for the crimp-on ring terminals and use adhesive type heat shrink ends to cover the terminals. Especially if being outside in the weather.

    All of my cable are usually ANCOR Marine Brand wiring and all of my connections are BLUE SEA Products (Fuse bars, Bus Bar, Switches, etc) that uses RING TERMINAL connections...

    I am a big fan of using PVC electrical conduit boxes and PVC FLEXIBLE Conduit running wires from point A to B. Not a fan of just running cables laying loose everywhere.

    This type of PVC Electrical Junction Box can be drilled through the center of it to go through Walls etc keeping all of the outside wiring enclosed. These boxes come in all sizes and number of ports... These boxes have weather tights lids... Even my WIRE BUSS connections will be done inside one of these weather tight boxes. All available from LOWE.


    On the roof areas I would probably use solid PVC Conduit and Flexible type PVC Conduit inside the trailer. You also have to consider what UV's will do to your outside PVC items as well...

    My solar panel wiring will also have molded weather tight quick disconnects so the panels may be easily removed.

    This is the way we did similar projects in my working years with SPAWAR Charlestion NAVY Shore Facility Electronic Installations...

    Roy Ken
  • Most auto audio stores have a good selection of braided large cable for hooking up amplifiers.
    Make sure you pick up some electrical de-oxidation grease from your local hardware store. Use it on terminal wire connections, inside crimped connectors and heavily on your steel frame ground connection.
  • wa8yxm's avatar
    wa8yxm
    Explorer III
    I you have the tools needed you could "Tin" the ends of the wires which will reduce corrosion (Coat with solder0 you can also use conductive grease.

    De-Ox-IT gold comes with a tarnish inhibitor as well, but EXPENSIVE less you can ind some at a closing Radio Shack.
  • I recently had to use a Home Depot tinned copper open end ring terminal on 8 awg tinned marine cable.

    After crimping with a hydraulic crimper, I soldered the open end shut, dremelled it smooth, and covered the exposed copper with more solder. I then fed solder into the other end, amazingly without melting the insulation. After cleaning off all the flux, I heat shrinked it.

    The wire remained flexible right upto the ring terminal. It was sealed with solder, and then heat shrinked.

    I like overkill. But now I own closed end ring terminals and nice thick adhesive lined heatshrink, and might redo the whole dang thing.

    Well, I would if it were not for just a 18 amp blower motor.
  • Personally I choose ROPE STRANDED AWG wire.

    People seem to ignore the fact that unsoldered wire to terminal socket interface renders exposed wire strand surfaces and terminal sockets vulnerable to oxidation. Oxi. Oxygen. Copper oxide. The best crimped terminals and adhesive lined shrink tubing does not reduce wire surface oxidation one whit. Crimped and sealed the wire strand contact area has a few billion oxygen molecules busy. When the void is filled with tin/lead the oxidation of wire strand to termimal surface O2 contamimation drops to zero.

    partsexpress.com sells an excellent value ratchet crimper to 2-gauge capacity. Thirty some odd dollars. Not Chinese junk. Sell the tool when you get done with the job.

    Picky me. I choose a frame hole. I rub and scrub the steel with 90-grit emery cloth until it shines. Then with a propane torch I spend what seems an eternity heating the shined surface and apply a layer of solder. In this instance 100% lead works best for corrosion resistance. I use a stainless steel bolt, nut, and lockwasher. When the lug is attached I smear a glob of chassis grease overtop the lug and both ends of the bolt. This is a long-duration connection wildly more reliable than other methods I have tried.

    With larger size lugs 2-gauge and bigger I order the next size larger lug.I have fought too many battles with same size lugs. House and industrial wire will fit - but not welding cable.

    Wrap the wire end to be cut with a hacksaw TIGHTLY with duct tape. Use water as a lubricant. This is a toigh tow to hoe without a proper wire cutting tool.

    In lieu of anything else coat the ready to be assembled stripped cable ends in dielectric grease. PLEASE! NO ARGUMENTS! I have done thousands of cable connections this way with no failures. Soldering is by far the best way but silicone dielectric grease is a steady 2nd place.
  • Don't know the electrician lingo, but there is a copper or brass sleeve that slips over the stranded wires to keep them from spreading. Even Home Depot has them

About Technical Issues

Having RV issues? Connect with others who have been in your shoes.24,315 PostsLatest Activity: Sep 09, 2025