BillHoughton
Jun 21, 2022Explorer II
Replacing under cabinet lights with LED lights
Our 2007 Itasca Navion came with halogen under-cabinet lights: not very bright, at least one failed every year of late, and they weren't cheap. In the intervening years, of course, LED lights became bright and reliable, so I started looking into replacements. Adam Van Cleve, at Lichtsinn, suggested some lights (part #329927-01-01A, incidentally) from a 2022 Itasca, $6.00 each (!) - it's SO great to find a good parts person. They're very different from the halogen lights, so this post is about replacing them, offered in hopes it will have useful information for someone else.
The halogen lights were recessed into a 2-5/16" hole in the bottom of the cabinet, with a flange with screw holes to fasten to the cabinet. The LED lights were flat on the back, with wires in the center of the back and three mounting holes at the edges of the base that were, but naturally and of course, not the same as the halogen lights. The circle described by the mounting holes was 2-9/16" in diameter, so the screws would be just 1/8" from the edge of the hole for the halogen fixtures. I tried just guessing a location, but, with nothing to register the new fixture against the hole for the old one, that didn't work well.
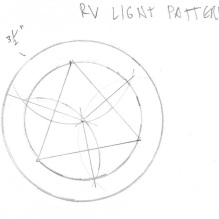
So I cut a hole in a 5”x8” card for the wires to go through, then put them through a doghole in my woodworking bench, so I could mark the screw mounting holes. I drew lines from hole to hole, making an equilateral triangle (not really necessary, but it felt good). Using simple geometry principles, I determined the center of the triangle (necessary, see future steps), then struck a circle from that (unnecessary, except to determine the diameter I cited below).

I transferred the marks - mounting screw holes and center mark - to a piece of masonite, and marked off a circle the diameter of the overall puck light, so I’d know it would fit in the existing spaces on the RV. I then drilled a 1/4” hole in the center mark and 3/32” holes (for #6 screws) in the mounting marks, then cut out the piece at the overall diameter.
The existing puck light hole, as I mentioned, was 2-5/16”, which is close to the plug my 2-1/2” hole saw would make, so I cut a plug from the masonite. That automatically gave me a 1/4" hole at the center of the circle. If I didn't have the right hole saw or the hole had been a diameter that didn't work with a hole saw, I'd have laid out the circle, drilled the center hole, and then cut out the circle carefully with a saber/jig saw or bandsaw. I cut the head from a 1/4” bolt, trapped the plug between two nuts and washers, put that in my drill press, and sanded it to a moderately tight sliding fit in an existing puck light hole.
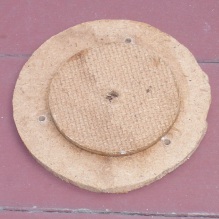
I glued up the two pieces, using a 1/4” bolt with washers and a nut hole through the hole in the center of each piece to align them and clamp them together. Presto: a drilling jig!

In use: pull the old lights, cut off the wires, push the wires back into the hole, push the jig in place and hold it still while drilling the screw mounting holes, pull it out, and install the light (don't forget to hook up the wiring). Since the new lights have nothing to center them, I made light chalk marks on the cabinets, radiating out from the screw hole locations, to guide me in putting the new lights in. I would put in one screw, then gently move the light around to align with the chalk marks until a hole came into view. The third hole automatically aligned, once I'd fastened two screws in place.
It worked well, and, boy, are they bright, compared to the old fixtures! There are two over the head area of one of the beds, and only one is more than enough to read by; both are too bright, even for my 73-year-old eyes.
The halogen lights were recessed into a 2-5/16" hole in the bottom of the cabinet, with a flange with screw holes to fasten to the cabinet. The LED lights were flat on the back, with wires in the center of the back and three mounting holes at the edges of the base that were, but naturally and of course, not the same as the halogen lights. The circle described by the mounting holes was 2-9/16" in diameter, so the screws would be just 1/8" from the edge of the hole for the halogen fixtures. I tried just guessing a location, but, with nothing to register the new fixture against the hole for the old one, that didn't work well.
So I cut a hole in a 5”x8” card for the wires to go through, then put them through a doghole in my woodworking bench, so I could mark the screw mounting holes. I drew lines from hole to hole, making an equilateral triangle (not really necessary, but it felt good). Using simple geometry principles, I determined the center of the triangle (necessary, see future steps), then struck a circle from that (unnecessary, except to determine the diameter I cited below).

I transferred the marks - mounting screw holes and center mark - to a piece of masonite, and marked off a circle the diameter of the overall puck light, so I’d know it would fit in the existing spaces on the RV. I then drilled a 1/4” hole in the center mark and 3/32” holes (for #6 screws) in the mounting marks, then cut out the piece at the overall diameter.
The existing puck light hole, as I mentioned, was 2-5/16”, which is close to the plug my 2-1/2” hole saw would make, so I cut a plug from the masonite. That automatically gave me a 1/4" hole at the center of the circle. If I didn't have the right hole saw or the hole had been a diameter that didn't work with a hole saw, I'd have laid out the circle, drilled the center hole, and then cut out the circle carefully with a saber/jig saw or bandsaw. I cut the head from a 1/4” bolt, trapped the plug between two nuts and washers, put that in my drill press, and sanded it to a moderately tight sliding fit in an existing puck light hole.
I glued up the two pieces, using a 1/4” bolt with washers and a nut hole through the hole in the center of each piece to align them and clamp them together. Presto: a drilling jig!

In use: pull the old lights, cut off the wires, push the wires back into the hole, push the jig in place and hold it still while drilling the screw mounting holes, pull it out, and install the light (don't forget to hook up the wiring). Since the new lights have nothing to center them, I made light chalk marks on the cabinets, radiating out from the screw hole locations, to guide me in putting the new lights in. I would put in one screw, then gently move the light around to align with the chalk marks until a hole came into view. The third hole automatically aligned, once I'd fastened two screws in place.
It worked well, and, boy, are they bright, compared to the old fixtures! There are two over the head area of one of the beds, and only one is more than enough to read by; both are too bright, even for my 73-year-old eyes.