Community Alumni
Jun 19, 2019The Streetside Awning Project
Ready for takeoff...
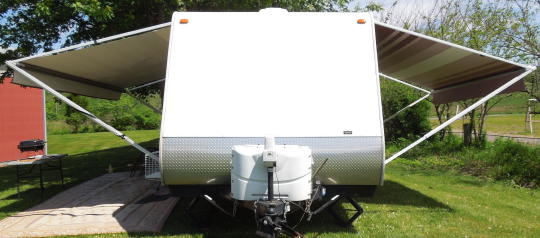
For years I've thought about having a streetside awning. I never saw an RV with a streetside awning. There appeared to be no such thing. But I can think of several advantages... 1) Occasionally the view is streetside and it'd be nice to have some shade to sit under. 2) Enhanced privacy. 3) Enhanced sun and heat protection (our fridge and food pantries are steetside). 4) Shade while servicing the streetside hubs and brakes.
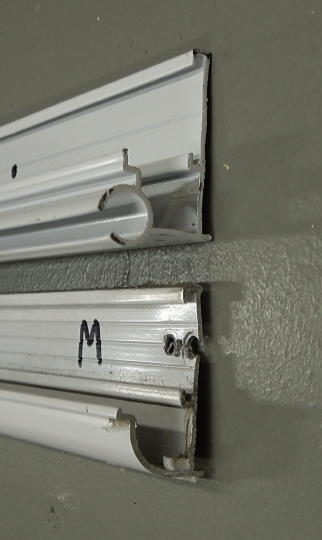
Step one was to replace the existing streetside insert drip rail with an insert gutter/awning rail just like what's curbside. I bought three 8' sections to do the job. It does come in 16' sections, but shipping expenses were impractical. I also added an extra long rain spout at each end of the trailer.
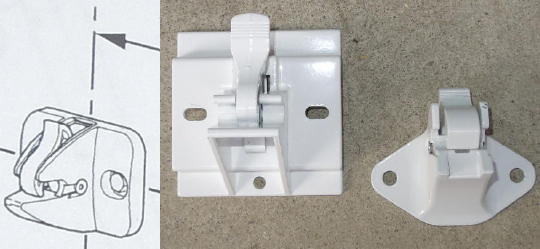
I went with a 13' Carefree Pioneer Lite because it looked to be about the most simplistic and least expensive option. The installation instructions were "okay". The biggest surprise was the bottom brackets. They didn't look like what the instructions showed. The bolt pattern didn't look like it would work without backing blocks, which I knew my wall didn't have. So I ordered a pair of Dometic brackets exactly like those for my existing curbside awning.
This whole project was predicated on the assumption that I wouldn't need backing blocks if I screwed into the bottom edge of the wall where the wall is strengthened by the adjoining floor. You know what they say about assumptions. But the bottom brackets remain solid after many miles of bumpy roads.
What the instructions showed. What was included. What I used...
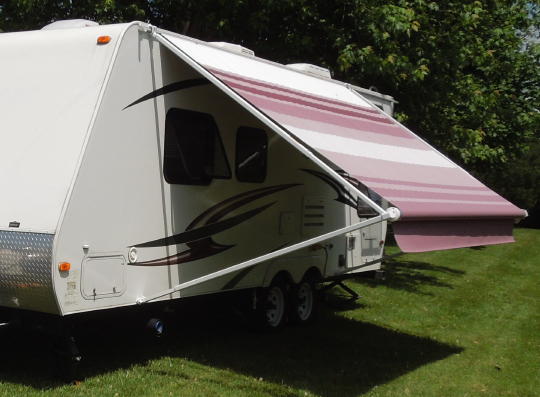
Pioneer Lite awning arm with a Dometic bottom bracket...

There's no streetside door so the awning can be kept low if desired....
More details on my RV webpage at...
http://www.jeff-z.com/rv/amods/amods.html
For years I've thought about having a streetside awning. I never saw an RV with a streetside awning. There appeared to be no such thing. But I can think of several advantages... 1) Occasionally the view is streetside and it'd be nice to have some shade to sit under. 2) Enhanced privacy. 3) Enhanced sun and heat protection (our fridge and food pantries are steetside). 4) Shade while servicing the streetside hubs and brakes.
Step one was to replace the existing streetside insert drip rail with an insert gutter/awning rail just like what's curbside. I bought three 8' sections to do the job. It does come in 16' sections, but shipping expenses were impractical. I also added an extra long rain spout at each end of the trailer.
I went with a 13' Carefree Pioneer Lite because it looked to be about the most simplistic and least expensive option. The installation instructions were "okay". The biggest surprise was the bottom brackets. They didn't look like what the instructions showed. The bolt pattern didn't look like it would work without backing blocks, which I knew my wall didn't have. So I ordered a pair of Dometic brackets exactly like those for my existing curbside awning.
This whole project was predicated on the assumption that I wouldn't need backing blocks if I screwed into the bottom edge of the wall where the wall is strengthened by the adjoining floor. You know what they say about assumptions. But the bottom brackets remain solid after many miles of bumpy roads.
What the instructions showed. What was included. What I used...
Pioneer Lite awning arm with a Dometic bottom bracket...
There's no streetside door so the awning can be kept low if desired....
More details on my RV webpage at...
http://www.jeff-z.com/rv/amods/amods.html
