cancel
Showing results forย 
Search instead forย 
Did you mean:ย 

Happijac lubrication

KKELLER14K
Explorer II
Explorer II
Thanks to the new Chrome extension, the pics are back! You must view in Chrome with the extention. Here is the link: https://chrome.google.com/webstore/detail/photobucket-embedded-imag/ogipgokcopooepeipngiikdkpmcpkaon... .. It has been a misconception even on my part, that adding machine oil to the crank socket lubricates the jack itself. This is UNTRUE! I now have a complete tear down with pics to show everyone what goes on inside and how to disassemble and lube the working parts if need be. This is a little lengthy but most will find the education worth the read. This is a model 4150.

First you have to make a little tool like this. An old hanger works good. This will serve two purposes, explanations following.

Remove the two screws that hold on the motor.

Pull the motor off the jack.

Pull out the spring loaded socket.


Remove the lever and pin...a pair of flush wire cutters works well. Wedge them underneath and they pop right out.


Remove the internal plastic manual mechanism...note how this is installed. one side has a round hole and the other an oval shape where the lever goes.


There is a "C" clip here, you need to remove it with the little tool you made. Just put it in from the side and pull back. It will pop right out.


Once you get the clip off then pull out the manual socket.


This is the hole in the socket that is to be oiled, but as you can see in the next few pics, the only thing that is being lubed is the socket itself.

Once you pull out the socket, remove the manual gear.

Now as you can see the oil really goes nowhere. There is actually a lot of grease here. What your going to do next is pull this gear off that shaft straight towards you. Use that tool again to hook the gear from behind and pull it. You may have to do it a few times, the shaft gets a little burr on it but if it gets stuck ,just push it down and keep yanking, it will come off!

Once the gear comes off, this is what the back looks like. It has two slots. The slot that has the closed ends is what holds the pin in place. IT IS IMPORTANT YOU PUT THIS BACK TOGETHER THE WAY IT COMES APART!

Rotate the shaft so the pin is facing towards the corner and pull it out.

Now pull the leg assembly out of the jack housing.

Get ready to inspect and re lube.


Pull this cinch spring off and inspect this bearing.
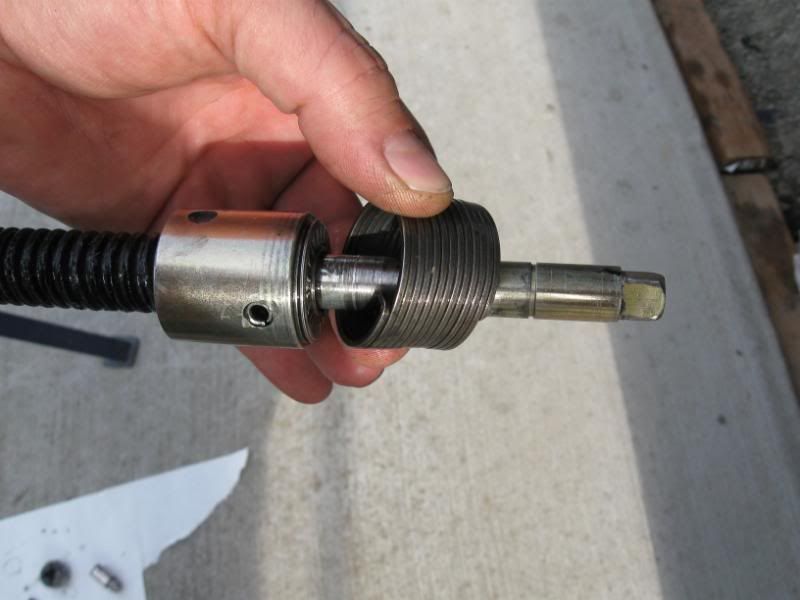

Use an air ratchet or drill to turn the worm screw all the way out, inspect and re lube.

Re-assembly is just the opposite of the tear down. I found that even though this jack was sticking on me, it was still pretty well lubed, but maybe not enough.....Hope this dispels any unknown facts as to how these things work. One other note is that if the worm drive of the leg was to wear out...seems like you should be able to replace it rather than the whole jack. MMMMMM...haven't got to that yet but I wonder if they sell it seperatly? Does any one know?
225 REPLIES 225

LannyV
Explorer
Explorer
Definitely one of the best threads on the Happijac and to be still going 9 years plus shows a need for such a thread. A big thanks to KKeller14K and all the others that have contributed. I had developed a problem with mine and they are only 22 months old. However, my problem turned out to be the motor seized (rusted) between the armature and the permanent magnets, plus the bottom bearing. I took photos as I torn down the motor. I will try to share this with the group. What is the best way to share?
KB3BV
2009 Dodge 3500 Quad Cab Diesel 4x4
2017 Northern Lite 10โ€™2 EX CD SE
Tork Lift Mounts and SuperHitch
22' Grady-White boat with 225 Yamaha
2012 Cam Am Spyder
2014 7x16 Car-Mate Trailer

bigfootford
Nomad II
Nomad II
AnEv942 wrote:
I have 6 of the H/J pdf files uploaded to google,
They can be downloaded from here...
https://drive.google.com/drive/folders/1dfkxKiCIuDGdBL8Db6SK78Maa9h1ZrbQ?usp=sharing


5 stars for you! Thanks for the effort..

Jim
2000 2500 9.6 Bigfoot,94 F250, Vision 19.5, Bilstein shocks, air bags/pump, EU2000, PD 9260, Two Redodo 100ah Mini's, Aims 2500 Conv/Inv, 200W. solar, Morningstar Sunsaver 15A/ display panel, Delorme/laptop for travel, Wave-3 heat.

AnEv942
Nomad
Nomad
I have 6 of the H/J pdf files uploaded to google,
They can be downloaded from here...
https://drive.google.com/drive/folders/1dfkxKiCIuDGdBL8Db6SK78Maa9h1ZrbQ?usp=sharing
01 Ford F250 4x4 DRW Diesel, 01 Elkhorn 9U
Our camper projects page http://www.ourelkhorn.itgo.com

bigfootford
Nomad II
Nomad II
KKELLER14K wrote:
Still paying this forward....lucky I was able to get around the Photobucket issue and recover this thread for the good of helping out. Many thanks to all.


From past experience I wrote this way back in 2010.... in this thread!

And in the end.... It was the PhotoBucket pukes that ruined it and much more damage on forums all over the internet!


bigfootford

Fair Oaks, California

Senior Member

Joined: 12/03/2002

View Profile


Good Sam RV Club Member


Posted: 08/14/10 10:01am Link | Quote | Print | Notify Moderator
I think everyone that has HJ's should print the whole procedure, pix's and all.

The pictures may disappear and then the article/thread will be worthless....
The pictures are on Photo Bucket so if KKeller14K does not keep his account up we will loose these valuable pictures.

Jim
2000 2500 9.6 Bigfoot,94 F250, Vision 19.5, Bilstein shocks, air bags/pump, EU2000, PD 9260, Two Redodo 100ah Mini's, Aims 2500 Conv/Inv, 200W. solar, Morningstar Sunsaver 15A/ display panel, Delorme/laptop for travel, Wave-3 heat.

KKELLER14K
Explorer II
Explorer II
Still paying this forward....lucky I was able to get around the Photobucket issue and recover this thread for the good of helping out. Many thanks to all. You have to view the thread with Chrome not Explorer

d3500ram
Explorer III
Explorer III
d3500ram wrote:
I too saved the OP's first post with pictures in .doc, docx and PDF format for when I did the repair.

...if anyone wants a copy PM me with an e-mail address and I can forward a copy.


Bumping this up and willing to forward to anyone who wants a copy of the PDF of the maintenance procedure written up by KKELLER14K
Sold the TC, previous owner of 2 NorthStar pop-ups & 2 Northstar Arrows...still have the truck:

2005 Dodge 3500 SRW, Qcab long bed, NV-6500, diesel, 4WD, Helwig, 9000XL,
Nitto 285/70/17 Terra Grapplers, Honda eu3000Is, custom overload spring perch spacers.

Old_Islander
Explorer
Explorer
Don't know how this will work -- it's Happijac's series of photos on how to dismantle the 4150 series jack. It's not as good as the OP's photos; now all gone, thanks to Photobucket... Hopefully if you click the photo, you'll see the full size page.

d3500ram
Explorer III
Explorer III
I too saved the OP's first post with pictures in .doc, docx and PDF format for when I did the repair.

...if anyone wants a copy PM me with an e-mail address and I can forward a copy.
Sold the TC, previous owner of 2 NorthStar pop-ups & 2 Northstar Arrows...still have the truck:

2005 Dodge 3500 SRW, Qcab long bed, NV-6500, diesel, 4WD, Helwig, 9000XL,
Nitto 285/70/17 Terra Grapplers, Honda eu3000Is, custom overload spring perch spacers.

bigfootford
Nomad II
Nomad II
I have deleted my post... I would like to see what KKELLER has to say first. My Bucket pictures are still in posts I have made... Sleepy's are still there too... All 10,000,000,000 of them...
Jim
2000 2500 9.6 Bigfoot,94 F250, Vision 19.5, Bilstein shocks, air bags/pump, EU2000, PD 9260, Two Redodo 100ah Mini's, Aims 2500 Conv/Inv, 200W. solar, Morningstar Sunsaver 15A/ display panel, Delorme/laptop for travel, Wave-3 heat.

zulu52
Explorer
Explorer
This thread has lost its pictures also. This is truly a travesty.
Luckily, a few months back, I found this thread so valuable that I printed out the entire thread so I at least have the pictures.

Zulu

Old_Islander
Explorer
Explorer
stevenal wrote:
Old Islander wrote:
BTW, HappiJac sent me a package of 13 PDF's with a good deal of information about these jacks (exploded diagrams, etc). They total about 10 megs. If anyone can suggest a public place to upload them so they're available to all, I'd be happy to do that.


I use http://files.engineering.com/upload.aspx. Not sure what the size limit is.


I just found your reply... Tried to upload to this site, but for some reason it wouldn't let me. Here are the 13 files in the 10 meg zip file:

- 45 series parts breakdown.pdf
- 4800 field manint lowres 150.pdf
- 4150 4160 diagrams partlist.pdf
- 4500 4600 differenc.pdf
- cam install.pdf
- clutch adjustment.pdf
- comm cable conigurations.pdf
- jack dimensions.pdf
- new jack motor.pdf
- outer jack tube removal.pdf
- triflow1.png
- upperassemblypdf.pdf
- usingjacks.pdf

The clutch adjustment for the 4150 series jacks was very helpful. I had one that was constantly slipping/chattering while under medium load. The adjustment seems to have fixed that...

If anyone knows a public site to upload them to, let me know.

bigfootford
Nomad II
Nomad II
Looking at the wear on your inside tube It got me wondering if your jacks are not straight/perpendicular to the ground.

If the jack bracket causes the jack to tilt slightly in, out or left right, then when the jack is lowered it will start binding and put lots of force on the nylon shims at the bottom of the outer tube.... It will cause the inner tube to destroy the powder coating and lead to rust...

I have 1 jack bracket that is slightly misaligned... It is 1/8" steel and formed to the body of the bigfoot... I ended up shimming the jack enough to make it perpendicular as close as I could get it. You could really hear the motors labor to raise the camper because of that binding... Lowering was not too bad. This is not a HJ problem the brackets are made for Bigfoot.

Glad you have a great conclusion to your issue.

Jim
2000 2500 9.6 Bigfoot,94 F250, Vision 19.5, Bilstein shocks, air bags/pump, EU2000, PD 9260, Two Redodo 100ah Mini's, Aims 2500 Conv/Inv, 200W. solar, Morningstar Sunsaver 15A/ display panel, Delorme/laptop for travel, Wave-3 heat.

d3500ram
Explorer III
Explorer III
I did not need to run the rod all that much... it was in great shape and not dry or rusted at all- I did wipe it down and apply axle bearing grease.

Not going to powder coat the inside although I am sure that would have helped in not having all that crud build up on the inside. I need to just make sure to (as the mfgr states) to fully extend and retract the jacks at least once a year to distribute the grease inside and as well to keep an eye on the general condition of the jacks.

I am just very surprised at how quick the rust build up cause a total failure of the operation- I sensed it last year and noted to myself that I need to give some lovin' to the jacks and the only time I needed to raise the camper this year it would not work!

Glad I got it working without needing to buy new.
(edited by me for speeling corecshun.)
Sold the TC, previous owner of 2 NorthStar pop-ups & 2 Northstar Arrows...still have the truck:

2005 Dodge 3500 SRW, Qcab long bed, NV-6500, diesel, 4WD, Helwig, 9000XL,
Nitto 285/70/17 Terra Grapplers, Honda eu3000Is, custom overload spring perch spacers.

bigfootford
Nomad II
Nomad II
Way to go d3500ram!

Run that rod in and out with an electric drill... PB blaster to clean the rust and then grease...

I use boat trailer grease BTW.

Good job!

Oh, you going to have the inside tube powder coated?

Jt
2000 2500 9.6 Bigfoot,94 F250, Vision 19.5, Bilstein shocks, air bags/pump, EU2000, PD 9260, Two Redodo 100ah Mini's, Aims 2500 Conv/Inv, 200W. solar, Morningstar Sunsaver 15A/ display panel, Delorme/laptop for travel, Wave-3 heat.

d3500ram
Explorer III
Explorer III
Update to my adventures... ended up being able to salvage the jack but what a pain in the buttuchis.

I sprayed a whole bunch of penetrating oil in side the bottom of the jack tubes and let it set overnight. On Sunday, I again tried tapping out the inner tube. it was still very tough but made more progress to where I could remove it.

It seems that a lot of rust particles and debris built up inside and it was this restriction that caused my problems not he internals themselves as described in the OP's posting. I did go through the whole procedure as illustrated, but it was the physical binding of stuff between the tubes causing my restriction.

My advice to folks doing this maintenance is to first try to identify the problem and if it is anything like I describe, then spray penetrating oil prior to any disassembly. I was able to salvage my jack and with a little touch-up paint, it looks pretty good and operates like new.

Oh, another thing- be sure of where all the parts go- I ended up needing to disassemble again because I did not install one bushing in the right order.

Also- in attempting to dislodge the lower jack tube I used a brass drift and a hammer at the top rod. Even though brass is soft, the steel rod at the top by the gears in relatively soft too. I knurled part of it over to the point where i could not install the plastic square pieces back on. I had to take it all apart again to get a file on that square top of the steel rod. I feel as if now I could do maintenance on the other 3 without instructions...LOL

Folks- not that hard of a job if there are no out of the ordinary difficulties like I experienced.
Sold the TC, previous owner of 2 NorthStar pop-ups & 2 Northstar Arrows...still have the truck:

2005 Dodge 3500 SRW, Qcab long bed, NV-6500, diesel, 4WD, Helwig, 9000XL,
Nitto 285/70/17 Terra Grapplers, Honda eu3000Is, custom overload spring perch spacers.