Forum Discussion

Healeyman's avatar
Healeyman
Explorer
Oct 14, 2018

Slide Problem

We got along for 12 years with 2 RVs without slides.

I always said, "ALL Slides ARE a problem or WILL BE a problem".

Then we figured because we are spending more time in one place, we need a slide, so... we got an RV with a slide.

It is a 2013 Coachmen Freelander 29QB.

The last time we were out, we tried to put the slide out and the front top corner wouldn't go. While the switch was pressed, I PUSHED hard on the front top corner and the slide went out fine.

Being an engineer, I suspected that I knew what the problem was. I went out and looked and I was correct.

I've got a friend with a mill, so I think that I can cut the tooth pattern in short piece of stainless and after cutting off the damaged portion of the rack, bolt the new piece to the wall.

Anybody else had this problem? If so, how did you fix it?

Tim
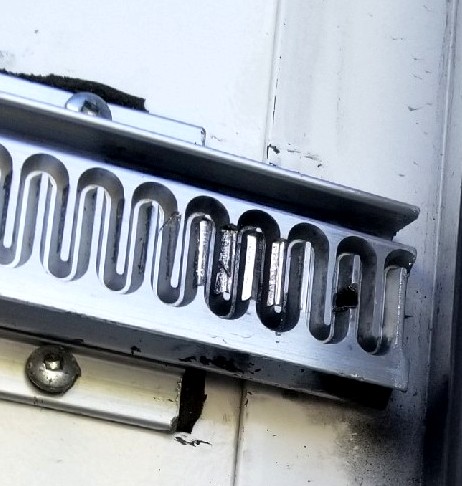
  • Myself, I just would not even consider an RV without a slide. That wear is why they went to the steel track newer design. The rocking going down the road will eventually wreck the teeth on aluminum tracks. That said, We have 40K on our Class A and while I can see the tracks are getting worn in the close position, I still have a while until I need to replace the track (the more worn it gets, the more play there will be and the faster the wear will accelerate). Unfortunately just another maintenance item they saddled us with. It is nice not having to worry about putting locking sticks at the top of the slide before driving, though. We'll see how the new steel design lasts. If I were you, I'd just get another aluminum track and install it. I'd worry about a stainless part eating up the gear which would be a real PITA to replace.
  • The only trouble we've had with ours so far (besides the approaching trouble with the track) was a build issue. The screw that held one of the motors was installed too high. The screw prevents the motor from lifting up. The motor has 4 steel pins that stick out the bottom and engage in 4 holes in the body of the mechanism and prevent the motor from being able to rotate rather than turn the driveshaft. In my case, the motor was not fully seated although the 4 pins were still sufficiently engaged to perform their job. What wasn't kosher was the coupling was just BARELY engaged and after 3 years of use wore enough to start slipping. Luckily this was just as the very top of the coupling. It began to make a loud popping noise and the slide jammed. After taking it apart and determining what was happening, I was able to lower the motor into the proper position (there was plenty of 'meat' left in the coupling) and replace the hold down screw in the correct lower position. All is well now until I need to replace the track.
  • In case you haven't gotten that far yet, There is a plastic trim over the aluminum trim that secures the slide drive mechanism to the side of the RV. There is a screw at the top that goes through the trim into a hole in the motor. That screw can be left in place while you remove all the screws on each side of the aluminum trim so you can remove it and access the motor. Since the hold down screw leaves with the trim, you can now lift up the motor and disengage it from the coupling. Now you can remove both tracks simultaneously since the driveshaft with the top and bottom gear can now freely rotate.
  • https://www.lci1.com/assets/content/support/manuals/IN-WALL-Repair-Kits-Manual.pdf