Turn on suggestions
Auto-suggest helps you quickly narrow down your search results by suggesting possible matches as you type.
Showing results for
- Good Sam Community
- Everything RV
- Tow Vehicles
- Dexter HD Suspension & EZ-Flex Install (long w/ pi...
Options
- Subscribe to RSS Feed
- Mark Topic as New
- Mark Topic as Read
- Float this Topic for Current User
- Bookmark
- Subscribe
- Mute
- Printer Friendly Page
Dexter HD Suspension & EZ-Flex Install (long w/ pictures)
Options
- Mark as New
- Bookmark
- Subscribe
- Mute
- Subscribe to RSS Feed
- Permalink
- Report Inappropriate Content
Jul-02-2008 06:00 PM
I recently purchased the Dexter HD suspension kit that comes with the new EZ-Flex Idler... I had installed a similar kit on my previous Nomad 27' TT and it worked quite well so I decided to install the newer kit on my 31' Nomad... Below is a picture of the kit I installed...


Now it's worth mentioning here that this type of job isn't exactly for the "faint of heart"... Basically what your going to do is to put your TT on Jack stands and rip off the suspension and install a new one... Your going to need a pretty good assortment of standard mechanics hand tools and an air compressor with a variety of air tools is also very helpful... I would also suggest that you buy the
You could just use a big hammer and beat things into submission, but pressing the bearings and bolts in is a lot more elegant and easier on the frame and also the installers hands... I also used an air operated impact (gun) wrench, an air operated ratchet wrench, demolition bar, numerous 1/2" drive sockets, 3 pound hammer, grease gun, assorted screwdrivers, vise grips and other hand tools...
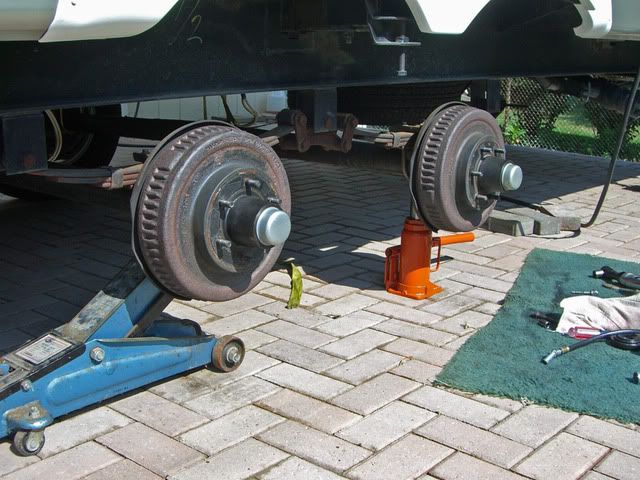
Start the project by putting your trailer on jack stands on a good firm surface... I also used my 6 stabilizer jacks attached to the trailer to further aid with stability... Here are some photos of that...
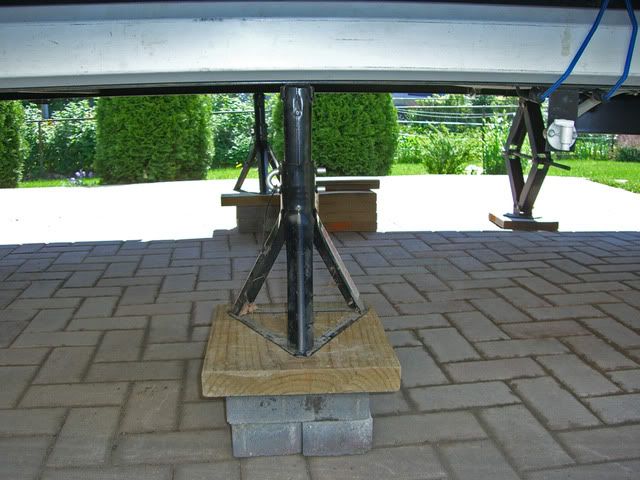
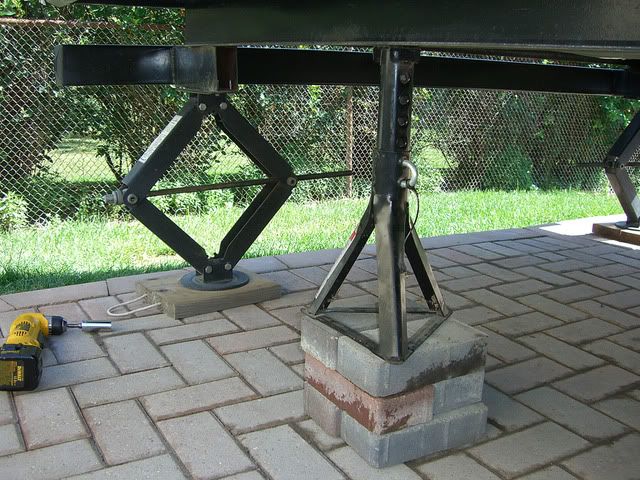
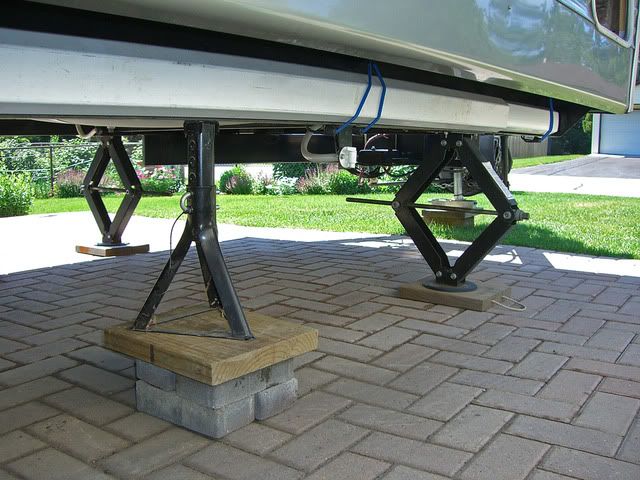
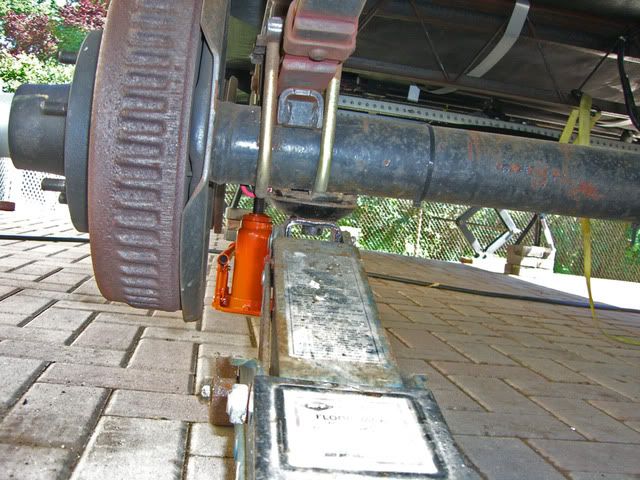
You should also have 2 or 3 hefty jacks, either the bottle type or floor type to aid in the installation... I use a 4 ton floor jack and a 12 ton bottle jack... The 12 ton picks up the TT effortlessly and is small and compact... Here are a few photos of them...
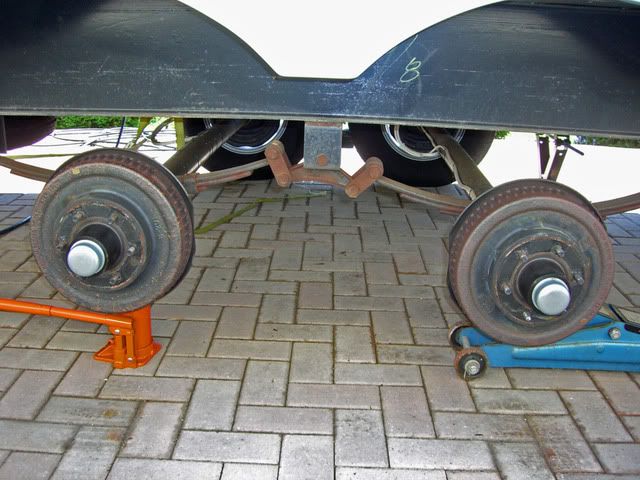
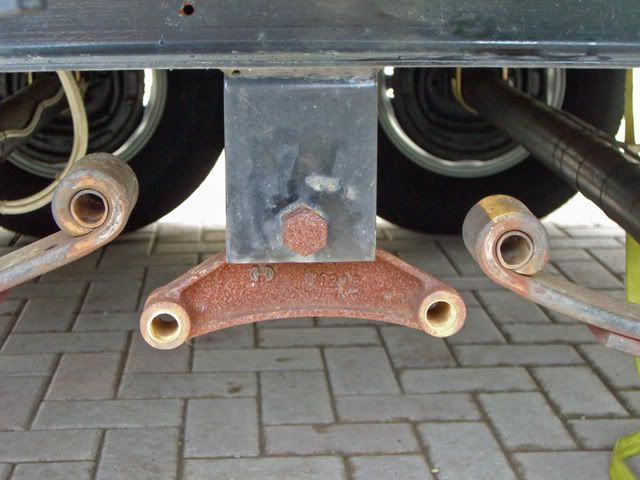
Start by removing the standard OEM idlers and shackles... This is done by removing the lock nuts on the inside of the suspension components and then hammering the bolts out of the hangers... All the bolts on my OEM suspension system were serrated, so using the impact gun to turn them and remove them would have damaged the shackle hangers by reaming out the mounting hole... If I would have done that then the new serrated bolts would have no material to bite in to... Here are a few pictures of the old suspension components...
Here is the rear OEM bolt...
In this photo the springs have been removed from the idler and their plastic bearings have not yet been removed...
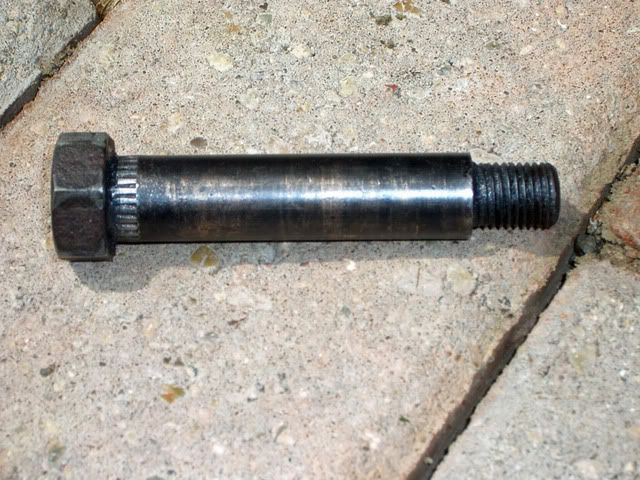
Once the old components have been removed, you can begin to install the new ones... When pressing in the new bronze bushings, it is a good idea to use a pilot bolt or installation bolt so that the soft bronze bearing does not distort or bend... Here is a bolt I used for that purpose... Note that I ground off the serrations... This bolt is also used to push out (hammer out) the plastic bearings...
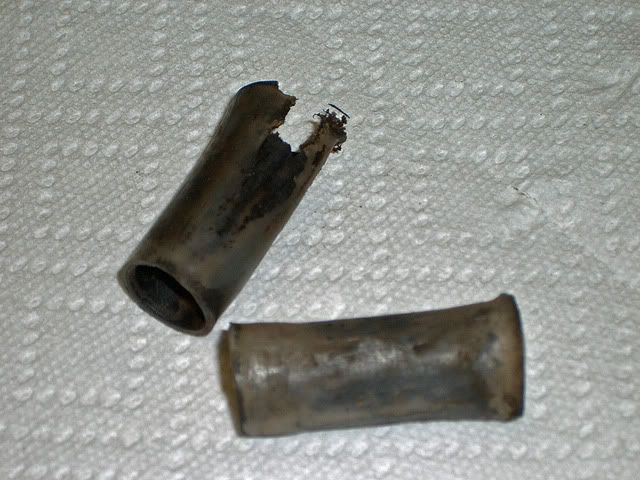
Here are a few typical plastic bearings after about 6000 miles... Some were already showing signs of extreme wear...
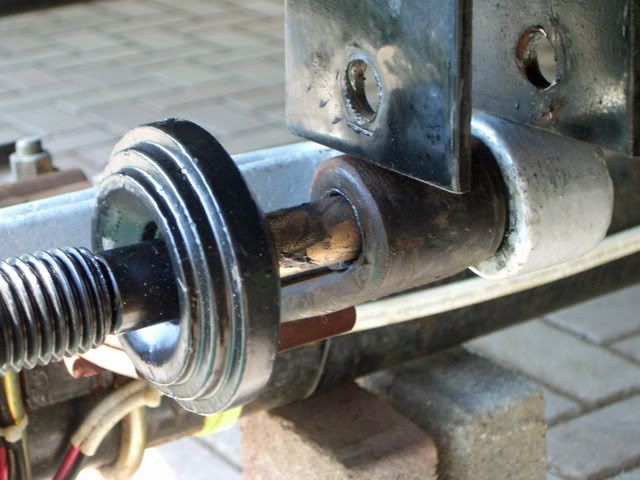
Now we can install the bronze bushings in the spring eyes... Apply grease to the inside of the spring eye, the outside of the bronze bearing, and the inside of the bronze bearing as well... Then use the Harbor Freight Ball Joint Tool (HFBJT) to push the bronze bearings into the spring eye as shown below...

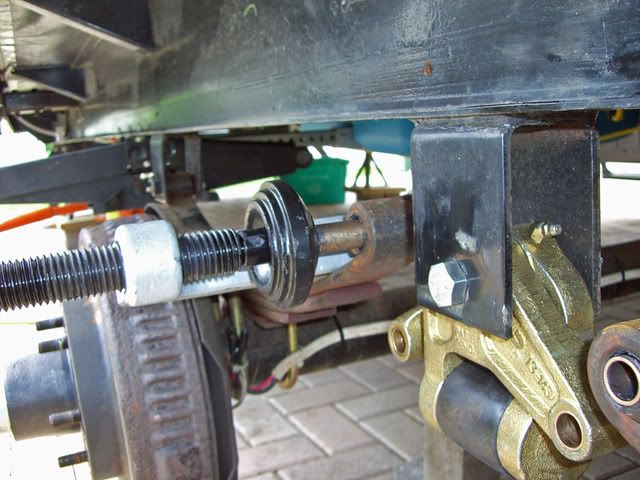
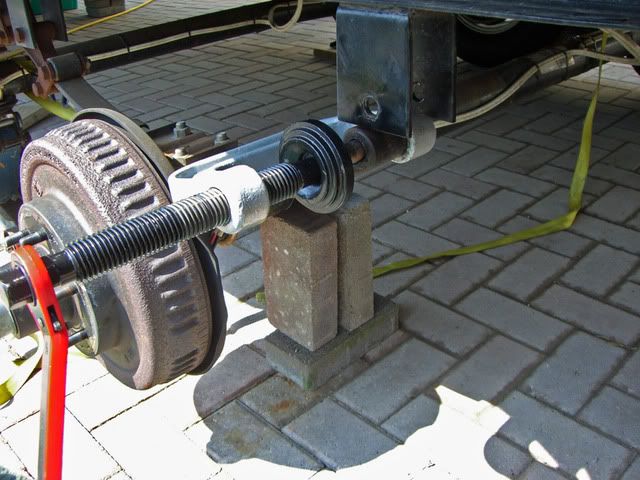
Once the bearing is pressed into the spring eye, then we press the serrated greasable bolt into hanger using the HFBJT...
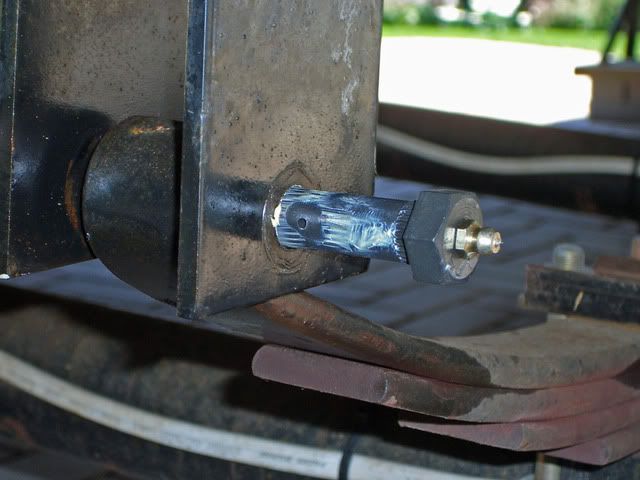
This isn't the spring eye but here we are pressing the idler bolt into the hanger the same way you would do it with the spring hanger...
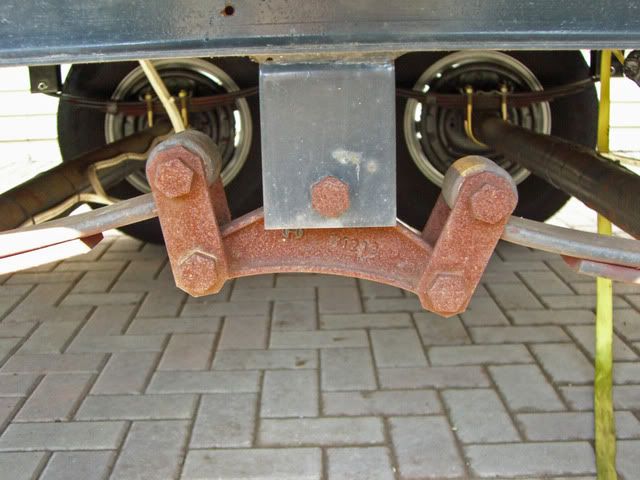
Once you complete the spring eye ends, then you can install the EZ-Flex Idler... It is installed by holding the idler between the frame hanger, inserting the proper size bolt and using the HFBJT to press the serrated bolt into the hanger... In the picture below the EZ-Flex idler has been hung on the bolt...
In the picture below, the serrated bolt is being pressed into the hanger...
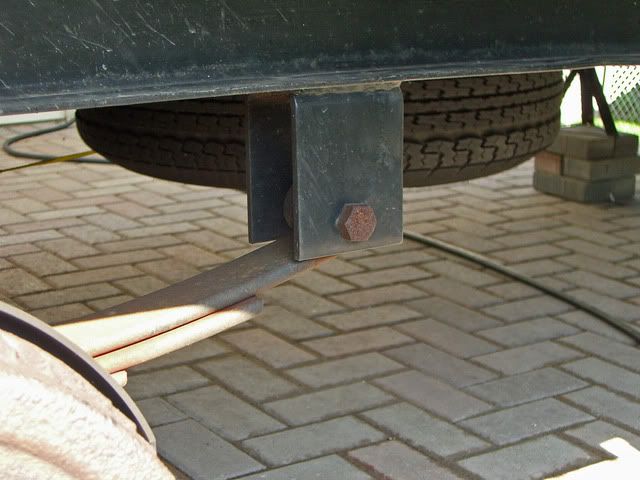
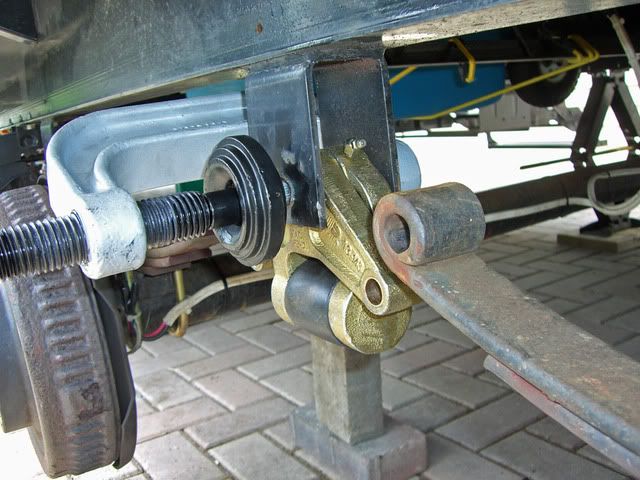
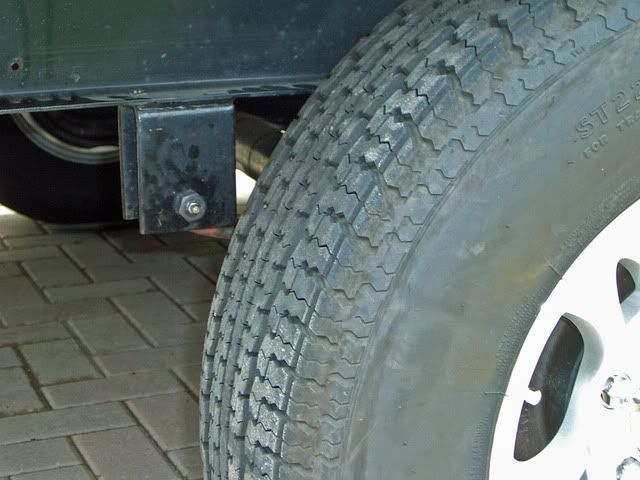
Once you have the EZ-Flex Idler mounted you can install the HD shackles for the front and rear springs... Here are a few photos of that operation... The photo below shows one shackle in place...
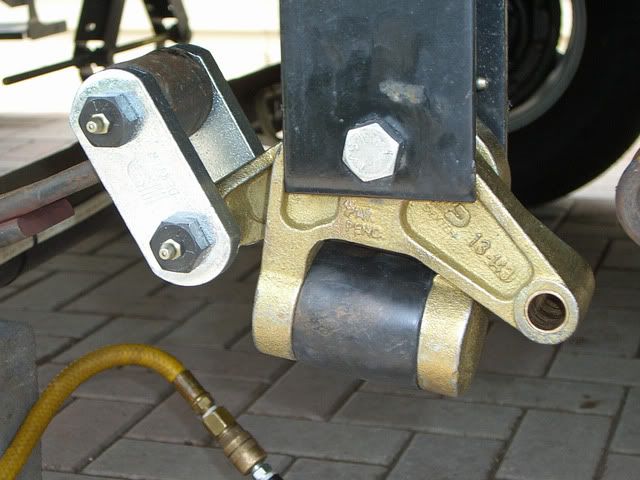
The photo below shows the second HD shackle being installed...
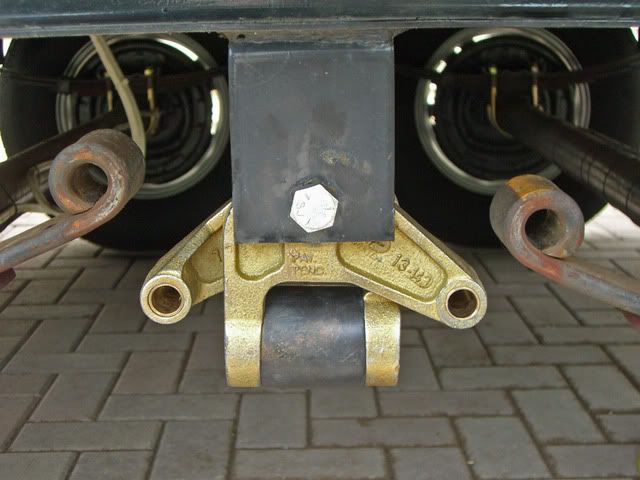
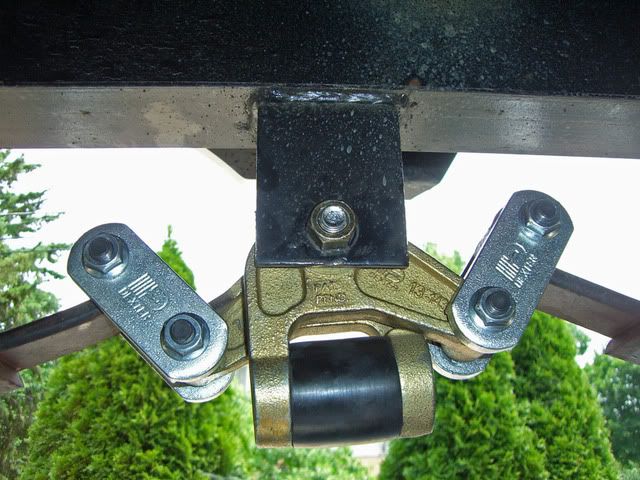
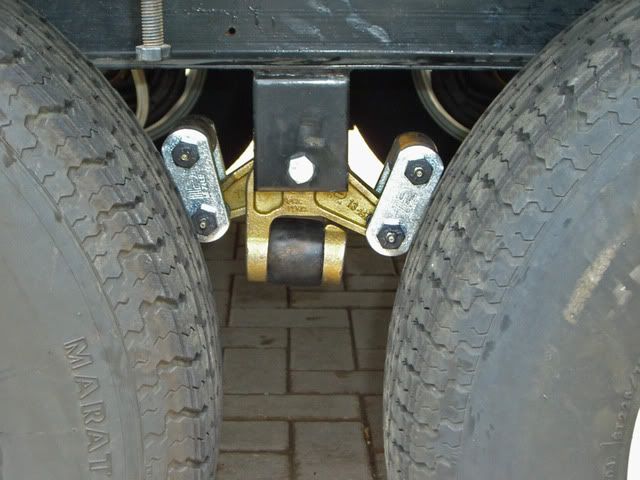
And this is what the assembly looks like when completely installed...
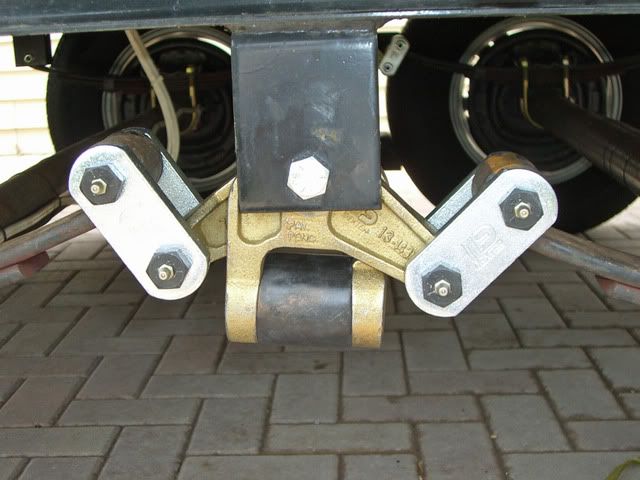
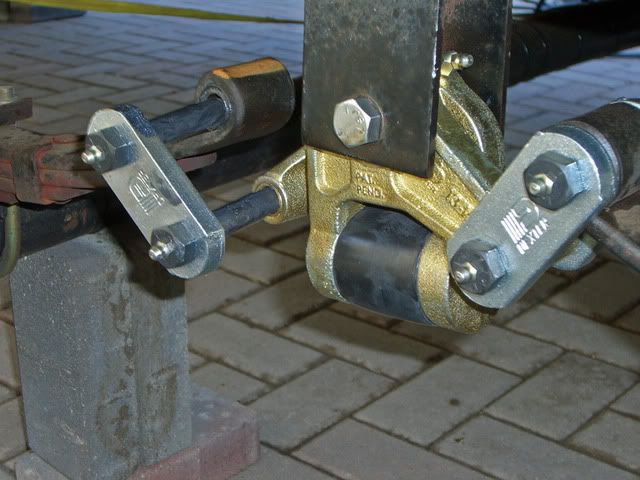
Here are a few photos from underneath the trailer looking at the inside view of the suspension components...

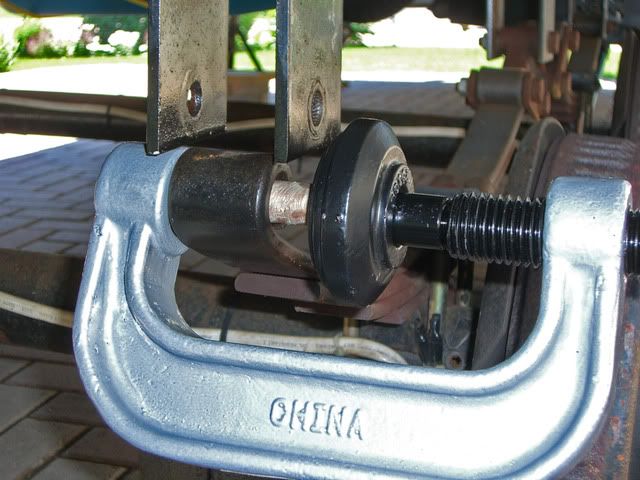
And here are a few extra views of the HFBJT in use... This tool was really a life saver... We used a similar tool that my buddy had at his shop when we did the previous trailer and I knew I would need a similar tool to successfully complete the installation of the HD EZ-Flex Kit...
And the finished product with the TT wheels again mounted...
It took me all day yesterday to install the EZ-Flex kit and HD suspension shackles on the curb side of the TT... I spent about 8+ hours on it but it was somewhat a learning experience... Today I installed the street side portion of the kit and I did that in about 4 hours... Not too bad for the first time although I don't plan to do another any time soon...
I haven't done a test ride yet - that will come in about 2 weeks when we attend another rally, but I suspect the HD Suspension shackles and EZ-Flex will be a big improvement just like the last one was, although my last one had a solid idler assembly, not rubber shock mounted like the EZ-Flex...
I'm having some problems getting grease to flow in the spring eye portions of the greasable bolts... I called Dexter Tech support and they suggested I reverse their direction... All the greasable bolt holes should run in a horizontal plane facing either the front of rear of the TT as opposed to pointing either skyward or ground ward... Dexter says the grease will not migrate properly if they are in the up or down position... So I reversed the direction of the leaf spring eye bolts and I still can't get grease into them...
I'm going to run the TT a bit and see if the bronze bearings loosen up to the point where they will take grease readily... I remember my last TT being like this and sometimes I had to jack the frame a bit to relieve pressure on the greasable bolts... We'll see what happens with this issue... There were no problems getting grease into the center idler and shackles...
Les
Now it's worth mentioning here that this type of job isn't exactly for the "faint of heart"... Basically what your going to do is to put your TT on Jack stands and rip off the suspension and install a new one... Your going to need a pretty good assortment of standard mechanics hand tools and an air compressor with a variety of air tools is also very helpful... I would also suggest that you buy the
Harbor Freight Ball Joint Tool
that you see in this post... It is used for pressing in bronze bearings and serrated bolts and works very well for this application...You could just use a big hammer and beat things into submission, but pressing the bearings and bolts in is a lot more elegant and easier on the frame and also the installers hands... I also used an air operated impact (gun) wrench, an air operated ratchet wrench, demolition bar, numerous 1/2" drive sockets, 3 pound hammer, grease gun, assorted screwdrivers, vise grips and other hand tools...
Start the project by putting your trailer on jack stands on a good firm surface... I also used my 6 stabilizer jacks attached to the trailer to further aid with stability... Here are some photos of that...
You should also have 2 or 3 hefty jacks, either the bottle type or floor type to aid in the installation... I use a 4 ton floor jack and a 12 ton bottle jack... The 12 ton picks up the TT effortlessly and is small and compact... Here are a few photos of them...
Start by removing the standard OEM idlers and shackles... This is done by removing the lock nuts on the inside of the suspension components and then hammering the bolts out of the hangers... All the bolts on my OEM suspension system were serrated, so using the impact gun to turn them and remove them would have damaged the shackle hangers by reaming out the mounting hole... If I would have done that then the new serrated bolts would have no material to bite in to... Here are a few pictures of the old suspension components...
Here is the rear OEM bolt...
In this photo the springs have been removed from the idler and their plastic bearings have not yet been removed...
Once the old components have been removed, you can begin to install the new ones... When pressing in the new bronze bushings, it is a good idea to use a pilot bolt or installation bolt so that the soft bronze bearing does not distort or bend... Here is a bolt I used for that purpose... Note that I ground off the serrations... This bolt is also used to push out (hammer out) the plastic bearings...
Here are a few typical plastic bearings after about 6000 miles... Some were already showing signs of extreme wear...
Now we can install the bronze bushings in the spring eyes... Apply grease to the inside of the spring eye, the outside of the bronze bearing, and the inside of the bronze bearing as well... Then use the Harbor Freight Ball Joint Tool (HFBJT) to push the bronze bearings into the spring eye as shown below...
Once the bearing is pressed into the spring eye, then we press the serrated greasable bolt into hanger using the HFBJT...
This isn't the spring eye but here we are pressing the idler bolt into the hanger the same way you would do it with the spring hanger...
Once you complete the spring eye ends, then you can install the EZ-Flex Idler... It is installed by holding the idler between the frame hanger, inserting the proper size bolt and using the HFBJT to press the serrated bolt into the hanger... In the picture below the EZ-Flex idler has been hung on the bolt...
In the picture below, the serrated bolt is being pressed into the hanger...
Once you have the EZ-Flex Idler mounted you can install the HD shackles for the front and rear springs... Here are a few photos of that operation... The photo below shows one shackle in place...
The photo below shows the second HD shackle being installed...
And this is what the assembly looks like when completely installed...
Here are a few photos from underneath the trailer looking at the inside view of the suspension components...
And here are a few extra views of the HFBJT in use... This tool was really a life saver... We used a similar tool that my buddy had at his shop when we did the previous trailer and I knew I would need a similar tool to successfully complete the installation of the HD EZ-Flex Kit...
And the finished product with the TT wheels again mounted...
It took me all day yesterday to install the EZ-Flex kit and HD suspension shackles on the curb side of the TT... I spent about 8+ hours on it but it was somewhat a learning experience... Today I installed the street side portion of the kit and I did that in about 4 hours... Not too bad for the first time although I don't plan to do another any time soon...
I haven't done a test ride yet - that will come in about 2 weeks when we attend another rally, but I suspect the HD Suspension shackles and EZ-Flex will be a big improvement just like the last one was, although my last one had a solid idler assembly, not rubber shock mounted like the EZ-Flex...
I'm having some problems getting grease to flow in the spring eye portions of the greasable bolts... I called Dexter Tech support and they suggested I reverse their direction... All the greasable bolt holes should run in a horizontal plane facing either the front of rear of the TT as opposed to pointing either skyward or ground ward... Dexter says the grease will not migrate properly if they are in the up or down position... So I reversed the direction of the leaf spring eye bolts and I still can't get grease into them...
I'm going to run the TT a bit and see if the bronze bearings loosen up to the point where they will take grease readily... I remember my last TT being like this and sometimes I had to jack the frame a bit to relieve pressure on the greasable bolts... We'll see what happens with this issue... There were no problems getting grease into the center idler and shackles...
Les
2000 Ford F-250SD, XLT, 4X4 Off Road, SuperCab
w/ 6.8L (415 C.I.) V-10/3:73LS/4R100
Banks Power Pack w/Trans Command & OttoMind
Sold Trailer - not RV'ing at this point in time
HUNTER THERMOSTAT INSTALL
HOME MADE WHEEL CHOCKS
419 REPLIES 419
Options
- Mark as New
- Bookmark
- Subscribe
- Mute
- Subscribe to RSS Feed
- Permalink
- Report Inappropriate Content
Aug-29-2008 12:00 PM
I'm getting ready to install the Dexter EZ Flex and HD suspension upgrade on my 30 ft TT. I've read the posts and really appreciate all the efforts you guys put into the write-ups and photos. I do have one basic question about the process. I plan to work on one side at a time but does the other side need to be raised off the ground and supported also? I couldn't really tell by the pics. I would think that leaving the opposite side on the ground would save some time and eliminate the extra jack stands needed, but I think it might make it difficult to do the install on the lifted side.
Options
- Mark as New
- Bookmark
- Subscribe
- Mute
- Subscribe to RSS Feed
- Permalink
- Report Inappropriate Content
Aug-08-2008 07:17 PM
OK Bob - hope it 's done soon so you can camp a little this year... We toured the Jayco factory and watched em bang out 5er's when we were at Eby Pines in July... I can see why you might have to wait at the pace they were going...
Les
Les
2000 Ford F-250SD, XLT, 4X4 Off Road, SuperCab
w/ 6.8L (415 C.I.) V-10/3:73LS/4R100
Banks Power Pack w/Trans Command & OttoMind
Sold Trailer - not RV'ing at this point in time
HUNTER THERMOSTAT INSTALL
HOME MADE WHEEL CHOCKS
Community Alumni
Not applicable
Options
- Mark as New
- Bookmark
- Subscribe
- Mute
- Subscribe to RSS Feed
- Permalink
- Report Inappropriate Content
Aug-07-2008 07:25 PM
LAdams wrote:
snip........how IS that roof repair coming :H
Les
Still waiting for all the parts to come in. I think the long lead item is the fiberglass side wall, because they have to wait until they can interrupt this model year production at the supplier to re-tool for this single run.
Turk2500
Options
- Mark as New
- Bookmark
- Subscribe
- Mute
- Subscribe to RSS Feed
- Permalink
- Report Inappropriate Content
Aug-07-2008 07:13 PM
Thanks guys and Bob - - - - how IS that roof repair coming :H
Les
Les
2000 Ford F-250SD, XLT, 4X4 Off Road, SuperCab
w/ 6.8L (415 C.I.) V-10/3:73LS/4R100
Banks Power Pack w/Trans Command & OttoMind
Sold Trailer - not RV'ing at this point in time
HUNTER THERMOSTAT INSTALL
HOME MADE WHEEL CHOCKS
Community Alumni
Not applicable
Options
- Mark as New
- Bookmark
- Subscribe
- Mute
- Subscribe to RSS Feed
- Permalink
- Report Inappropriate Content
Aug-03-2008 06:06 PM
Les,
Yes, very nice project.
Once I have my TT roof and fiberglass sidewall replaced, I think I know what my next project will be :B.
Turk2500
Yes, very nice project.
Once I have my TT roof and fiberglass sidewall replaced, I think I know what my next project will be :B.
Turk2500
Options
- Mark as New
- Bookmark
- Subscribe
- Mute
- Subscribe to RSS Feed
- Permalink
- Report Inappropriate Content
Aug-02-2008 10:07 AM
LAdams, that is a fantastic write-up and great photos. I know that takes a long time to download photos link them etc. Thanks for taking the time to do that... and great job!
Moose.
Moose.
Options
- Mark as New
- Bookmark
- Subscribe
- Mute
- Subscribe to RSS Feed
- Permalink
- Report Inappropriate Content
Aug-01-2008 08:52 PM
Trailer tows a lot better - less bouncing and I don't have shocks like Barney does... Also less jerking over those larger expansion bumps... I had installed a similar suspension on my previous trailer although Dexter didn't have the EZ-Flex at that time... I just like the idea of the greasable suspension - that's the way they all should come from the factory - not with cheap plastic bushings!!! :M :M
Les
Les
2000 Ford F-250SD, XLT, 4X4 Off Road, SuperCab
w/ 6.8L (415 C.I.) V-10/3:73LS/4R100
Banks Power Pack w/Trans Command & OttoMind
Sold Trailer - not RV'ing at this point in time
HUNTER THERMOSTAT INSTALL
HOME MADE WHEEL CHOCKS
Options
- Mark as New
- Bookmark
- Subscribe
- Mute
- Subscribe to RSS Feed
- Permalink
- Report Inappropriate Content
Aug-01-2008 09:53 AM
BarneyS wrote:Ed ke6bnl wrote:
how has this changed the ride of the trailer and how much are we talking about. Ed
Ed,
See my post here for information on price and where I purchased it. I have not towed with it yet so cannot give a report on that.
Barney
looking forward to hearing the tow result thanks ED not a lot to spend if it make a good improvemnent
Options
- Mark as New
- Bookmark
- Subscribe
- Mute
- Subscribe to RSS Feed
- Permalink
- Report Inappropriate Content
Aug-01-2008 08:39 AM
Ed ke6bnl wrote:
how has this changed the ride of the trailer and how much are we talking about. Ed
Ed,
See my post here for information on price and where I purchased it. I have not towed with it yet so cannot give a report on that.
Barney
2004 Sunnybrook Titan 30FKS TT
Hensley "Arrow" 1400# hitch (Sold)
Not towing now.
Former tow vehicles were 2016 Ram 2500 CTD, 2002 Ford F250, 7.3 PSD, 1997 Ram 2500 5.9 gas engine
Hensley "Arrow" 1400# hitch (Sold)
Not towing now.
Former tow vehicles were 2016 Ram 2500 CTD, 2002 Ford F250, 7.3 PSD, 1997 Ram 2500 5.9 gas engine
Options
- Mark as New
- Bookmark
- Subscribe
- Mute
- Subscribe to RSS Feed
- Permalink
- Report Inappropriate Content
Aug-01-2008 12:51 AM
how has this changed the ride of the trailer and how much are we talking about. Ed
Options
- Mark as New
- Bookmark
- Subscribe
- Mute
- Subscribe to RSS Feed
- Permalink
- Report Inappropriate Content
Jul-29-2008 06:41 AM
John,
That thumb belongs to my #2 son Gary. He was here when we got home Sunday from the rally and we did the job that afternoon while girls went to a wedding shower. We will finish the job when he comes home again for the wedding in a couple of weeks.
That thumb obviously could not be mine as my hands are too lumpy and wrinkled.:D
The shocks on the trailer came with it from the factory. I will make a post here after we get it done and see how it rides.
Barney
2004 Sunnybrook Titan 30FKS TT
Hensley "Arrow" 1400# hitch (Sold)
Not towing now.
Former tow vehicles were 2016 Ram 2500 CTD, 2002 Ford F250, 7.3 PSD, 1997 Ram 2500 5.9 gas engine
Hensley "Arrow" 1400# hitch (Sold)
Not towing now.
Former tow vehicles were 2016 Ram 2500 CTD, 2002 Ford F250, 7.3 PSD, 1997 Ram 2500 5.9 gas engine
Options
- Mark as New
- Bookmark
- Subscribe
- Mute
- Subscribe to RSS Feed
- Permalink
- Report Inappropriate Content
Jul-28-2008 10:51 PM
Barney
Nice job!
OK Who is giving thumbs up? You or the Son? :R And which one?

Now you have both schocks and the upgraded equalizer link. Sort of the cream of the crop combo in suspesnion mods on leaf springs.
Please let us know how the combo tows.
Thanks for the hack saw tip. Good tip.
John
Nice job!
OK Who is giving thumbs up? You or the Son? :R And which one?
Now you have both schocks and the upgraded equalizer link. Sort of the cream of the crop combo in suspesnion mods on leaf springs.
Please let us know how the combo tows.
Thanks for the hack saw tip. Good tip.
John
2005 Ford F350 Super Duty, 4x4; 6.8L V10 with 4.10 RA, 21,000 GCWR, 11,000 GVWR, upgraded 2 1/2" Towbeast Receiver. Hitched with a 1,700# Reese HP WD, HP Dual Cam to a 2004 Sunline Solaris T310R travel trailer.
Options
- Mark as New
- Bookmark
- Subscribe
- Mute
- Subscribe to RSS Feed
- Permalink
- Report Inappropriate Content
Jul-28-2008 01:29 PM
LES,
How did it ride on your trip?
Ya'll costing me money as I sit here and read this topic..
Nice mod and very nice write up & pictures.
Barney thanks for your add on pictures and follow up..
Might as well do this mod, I sure haven't camped much this year.
randy
2011 Keystone Cougar 327RES
Happy Campin'
Randy
Piedmont area of NC
How did it ride on your trip?
Ya'll costing me money as I sit here and read this topic..
Nice mod and very nice write up & pictures.
Barney thanks for your add on pictures and follow up..
Might as well do this mod, I sure haven't camped much this year.
randy
2014 F-350 SRW CC/LWB 4X4 6.7PSD
2011 Keystone Cougar 327RES
Happy Campin'
Randy
Piedmont area of NC
Options
- Mark as New
- Bookmark
- Subscribe
- Mute
- Subscribe to RSS Feed
- Permalink
- Report Inappropriate Content
Jul-27-2008 05:39 PM
Well, I got mine 1/2 installed the other day. Took my son and I about 1.5 hours to block up the trailer and do just the first bushing. We found that it was much easier to use a hacksaw blade and cut a slit in the bushing and then twist it out with needle nose pliers than to drive it out. After we learned on that first one, it only took about another hour to finish the job on one side of the trailer.
Blocking and setting up trailer for work.

I know what Les is talking about when speaking about old bones as I was so tired from crawling around under the trailer and bending over that we decided to wait for a few weeks to do the other side when my son is home again. I also decided to put the grease zerks on the inside because it looked like it would be hard to get to them when the wheels and tires were on.
The other side should be a piece of cake since we now know what we are doing. It is sure easier with two persons though. I would not have wanted to tackle it by myself. The springs have a tendency to twist a bit after removal of the old pieces and it does take a bit of "persuasion" to get things lined up perfectly again. A crow bar and careful use of the bottle jack took care of that though.
All in all, not a bad job and I am certain the results are going to be well worth the effort. Much thanks to LAdams for the pictures, tutorial, and other invaluable help. I cannot believe the difference in the quality and stoutness of the old and new components! Don't know why manufacturers don't just add a few bucks to the price of the rigs and put the good stuff on right away!
Yep, I know, I need to wire brush and paint the frame in this area!:o The rest of the frame looks good but this area is hidden behind the wheels and I didn't realize it was this rusted.
Barney
Cutting bushing with hacksaw blade

Removing old bushing with needle nose pliers

Finished job

Blocking and setting up trailer for work.
I know what Les is talking about when speaking about old bones as I was so tired from crawling around under the trailer and bending over that we decided to wait for a few weeks to do the other side when my son is home again. I also decided to put the grease zerks on the inside because it looked like it would be hard to get to them when the wheels and tires were on.
The other side should be a piece of cake since we now know what we are doing. It is sure easier with two persons though. I would not have wanted to tackle it by myself. The springs have a tendency to twist a bit after removal of the old pieces and it does take a bit of "persuasion" to get things lined up perfectly again. A crow bar and careful use of the bottle jack took care of that though.
All in all, not a bad job and I am certain the results are going to be well worth the effort. Much thanks to LAdams for the pictures, tutorial, and other invaluable help. I cannot believe the difference in the quality and stoutness of the old and new components! Don't know why manufacturers don't just add a few bucks to the price of the rigs and put the good stuff on right away!
Yep, I know, I need to wire brush and paint the frame in this area!:o The rest of the frame looks good but this area is hidden behind the wheels and I didn't realize it was this rusted.
Barney
Cutting bushing with hacksaw blade
Removing old bushing with needle nose pliers
Finished job
2004 Sunnybrook Titan 30FKS TT
Hensley "Arrow" 1400# hitch (Sold)
Not towing now.
Former tow vehicles were 2016 Ram 2500 CTD, 2002 Ford F250, 7.3 PSD, 1997 Ram 2500 5.9 gas engine
Hensley "Arrow" 1400# hitch (Sold)
Not towing now.
Former tow vehicles were 2016 Ram 2500 CTD, 2002 Ford F250, 7.3 PSD, 1997 Ram 2500 5.9 gas engine
Options
- Mark as New
- Bookmark
- Subscribe
- Mute
- Subscribe to RSS Feed
- Permalink
- Report Inappropriate Content
Jul-27-2008 11:17 AM
Les it was a compliment although it did not come across that way
that age number seems to be getting in my way more often too
that age number seems to be getting in my way more often too
Related Content
- 1978 Holiday Rambler - 12V DC problems - no lights in Technical Issues
- Will Air bags make a big difference? in RV Tips & Tricks
- dingy induced sway in RV Tips & Tricks
- Simple and inexpensive roof vent modification (Vent Covers) in DIY Maintenance
- Recent cost to install solar by an RV tech/shop??? in Technical Issues


