- Good Sam Community
- Groups
- Travel Trailer Group
- Forum
- Re: Oh,Oh, Soft Floor !
- Subscribe to RSS Feed
- Mark Topic as New
- Mark Topic as Read
- Float this Topic for Current User
- Bookmark
- Subscribe
- Mute
- Printer Friendly Page
Oh,Oh, Soft Floor !
- Mark as New
- Bookmark
- Subscribe
- Mute
- Subscribe to RSS Feed
- Permalink
- Report Inappropriate Content
Mar-29-2023 11:43 AM
I would think they would have used construction adhesive ? At least they should have.
We love the floorplan , a Creekside 20FQ. From the factory it came with a reinforced double frame. I've done a fair bit of work on it, repairing, modifying and replacing.
- Mark as New
- Bookmark
- Subscribe
- Mute
- Subscribe to RSS Feed
- Permalink
- Report Inappropriate Content
Oct-10-2023 09:14 AM
- Mark as New
- Bookmark
- Subscribe
- Mute
- Subscribe to RSS Feed
- Permalink
- Report Inappropriate Content
Oct-10-2023 05:22 AM
Assessment: Inspect and remove any rot.
Replace: Use suitable materials like pressure-treated plywood or Douglas fir for damaged areas.
Adhesive Bonding: Apply RTV162 white adhesive to bond new and existing materials.
Reattach: Securely reattach the fiberglass hardboard.
Seal: Seal seams and gaps to prevent future water infiltration.
For extensive damage or uncertainty, consider consulting an RV repair specialist.
- Mark as New
- Bookmark
- Subscribe
- Mute
- Subscribe to RSS Feed
- Permalink
- Report Inappropriate Content
Jul-14-2023 06:33 PM
We had a water leak from the 10watt solar panel it came with.It dripped on to the stove. The joint between the roof membrane and the side trim is what I suspected, this time. The nose has been a problem as well.And yes, hatches leak.I put new seal on it, but I don't have much hope.
I've finished it. It involved much head scratching and a lot of pure misery. Since it has a fiberglass exterior, I had to get at the rotten studs from the inside.Scrunching up into a ball at my age is down right painful.
We've had it out for six days already , and leaving next weekend, again. Some where in the province that isn't burning.
- Mark as New
- Bookmark
- Subscribe
- Mute
- Subscribe to RSS Feed
- Permalink
- Report Inappropriate Content
Apr-03-2023 09:05 PM
Downwindtracker2 wrote:
Snip...
Thank you John, that's a post that needs to sticky-ed . With my typing skills it would have taken me days.
It's under one of the bedroom windows, my side.I better check the other side too. When we got it,I didn't pull and reseal with Pro-Flex the windows, just around the edge of the frame. My mistake, which I'm regretting. I did do the trim, though.
I haven't pulled the paneling, yet. So that is how these trailers are repaired. That's going to be difficult.
They used SPF studs which is mostly spruce, a not very rot resistant wood. So I'm honestly afraid of what I'll find in the wall.The floor goes under two cabinet walls.
Thanks again . I do have Multicrafter.
Hi Downwindtracker2,
First, thanks for the good words.
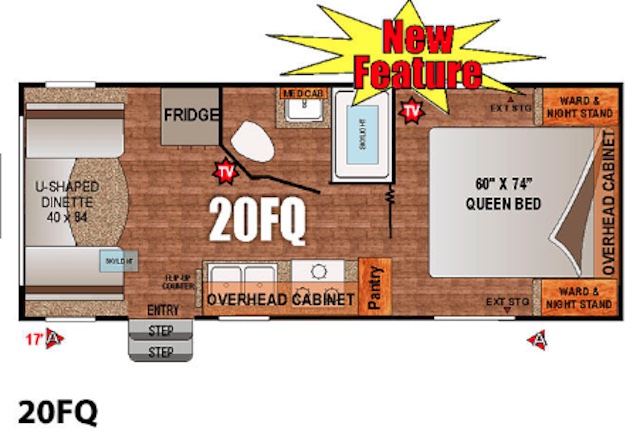
I tried to find your 2012 floor plan on the web, but I could not find it but found this 2016 one, which may be close to yours. Please confirm it is.

I also found this 2012 Creekside video by Outdoors RV showing the features of the camper. They do a good job on those campers. Ron Nash started something good with the Outoors RV division, I like what they have done. https://www.youtube.com/watch?v=5U8We36NJzI
Seeing your floor plan, do you have a pass-through cargo area under the bed with cargo doors on both the left and right front side of the camper? Please confirm this.
Now that I see the floor plan and you stated the floor damage is in the front bedroom, I have seen and dealt with water damage repairs where the cargo area had a leak in the camper corner and or a cargo door that damaged the floor. Water wicked into the bedroom area floor from the cargo area. You are correct; the windows, and I will add, the roof line are also possible sources. You may have more than just one source at the same time. It is common to have that.
Have you thought about possibly using a moisture meter to scan the camper before you start taking the camper apart? I'm willing to type and show how they work if you have any interest.
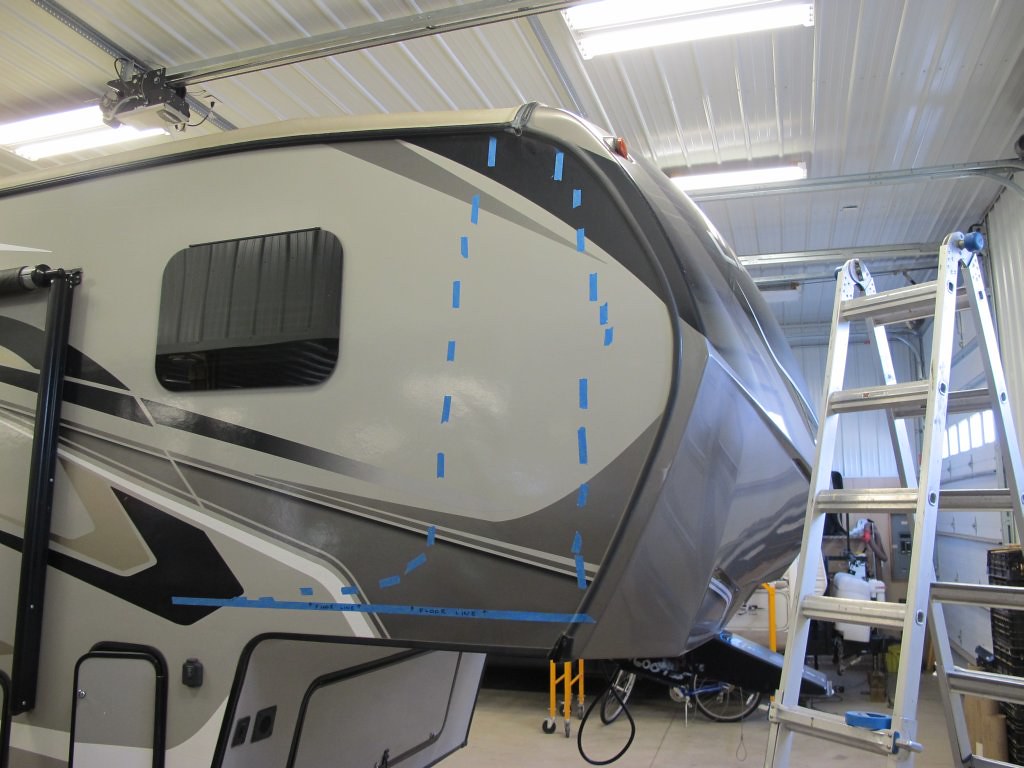
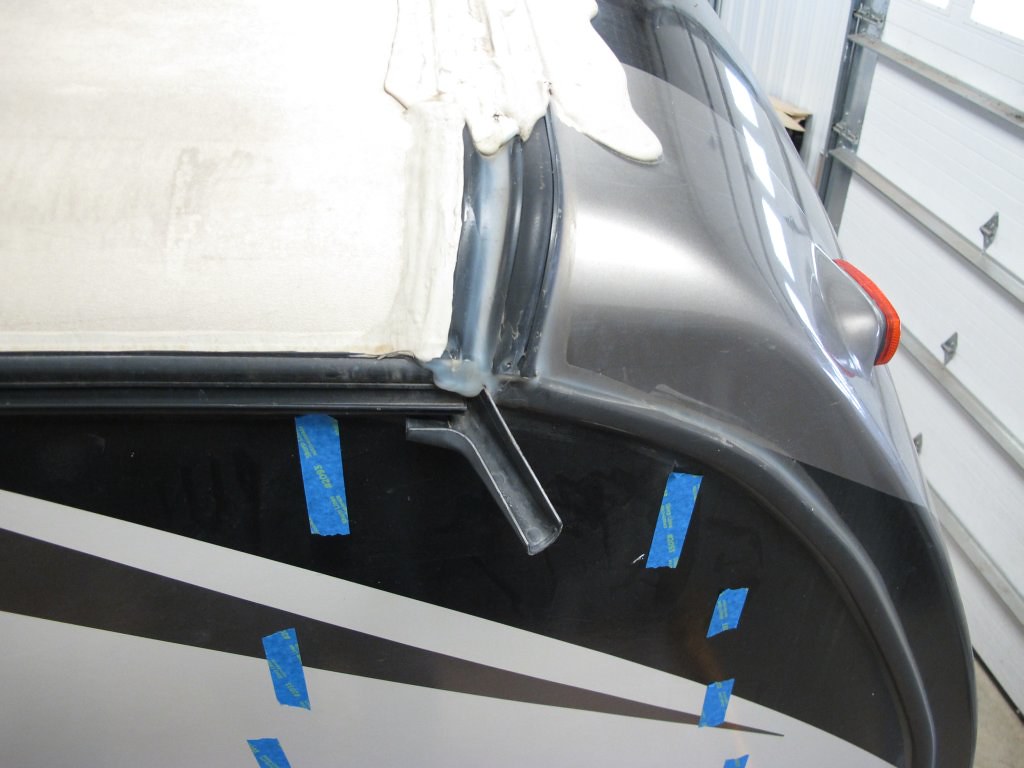
To show how a pinless moisture meter can find moisture behind a fiberglass-sided camper, see this 2019 Keystone Laradeo 5th wheel I worked on for a neighbor this winter. I could see the start of delam, pulled out the meter, and there was a leak starting at the roof line, where the front cap and side wall join the roof. The blue tape is the outline of the moisture, inside, the outline was wet, and outside, it was dry. I also picked up the bottom metal in the wall from the aluminum frame. In this case, the leak was found early, only the outside layer was wet, and the inside of the wall was dry. I scan both sides to understand how progressed the damage is.


I found the leak entry point when I pulled the roof apart at that gutter rail area joint. The meter guided me to where to start.
Let me know if you want more on the moisture meter and how to apply it to find your leak sources.
I hope this helps,
John
- Mark as New
- Bookmark
- Subscribe
- Mute
- Subscribe to RSS Feed
- Permalink
- Report Inappropriate Content
Apr-01-2023 05:35 PM
It's under one of the bedroom windows, my side.I better check the other side too. When we got it,I didn't pull and reseal with Pro-Flex the windows, just around the edge of the frame. My mistake, which I'm regretting. I did do the trim, though.
I haven't pulled the paneling, yet. So that is how these trailers are repaired. That's going to be difficult. I had taken the canopy/boatloader off to use my hunting camper (another story) last fall and hadn't got around to putting it back on.Putting it back on, I realized the boatloader frame needed some work. It doesn't just rain, it pours, chuckle.
Pressure treated eats aluminum. If you use them together, you have to epoxy coat it. Aluminum boats and pressure treated are a no, no.
They used SPF studs which is mostly spruce, a not very rot resistant wood. So I'm honestly afraid of what I'll find in the wall.The floor goes under two cabinet walls.
Thanks again . At least my hunting camper was a stick and tin. I do have Multicrafter.
- Mark as New
- Bookmark
- Subscribe
- Mute
- Subscribe to RSS Feed
- Permalink
- Report Inappropriate Content
Apr-01-2023 09:27 AM
Downwindtracker2 wrote:
I've got a problem, I can deal with the the rotten chipboard, simply replace with pressure treated plywood . But I think there is rot in the wall. Our TT is an early OutdoorRV, a 2012 build. It's a hybrid, standard stud walls with fiberglass coated hardboard . The bottom plate looks like I'll have to replace it. A stick and tin would be easy, peel the aluminum and splice in Douglas fir. How do you deal with that fiberglass hardboard ?
I would think they would have used construction adhesive ? At least they should have.
Hi,
I may be able to help, but I need more info and pics of what you are up against. I repair/restore older campers with water damage. When you say rotted chipboard, this sounds like floor rot. Yes/No? Unless you had a water piping leak from inside, floor rot comes from above the floor, walls or roof, or both.
A few suggestions before you tear into this if you have not already,
Figure out first where the water damage started, and there can be multiple places of leakage, not just one smoking gun. There may also be other water-infected areas in the camper beyond the floor you may not know about. The point is to figure out how big the problem is, where it started, and if there are other areas you do not know about which are infected.
Once you have inspected the entire camper, decide whether to fix it or if this problem is way too big beyond the current floor issue, you may consider other choices. If you decide to repair it, you know how far you must go to get all the leak sources that created the floor rot.
You can scan the inside and outside walls since you do not have the tin siding using a moisture meter to inspect for trapped moisture. You can scan the ceiling up from the inside, and if there is no large mold growth on the roof, scan the roof down. Pending how the bottom of the camper is made, if there is a Darco wrap (black cross-knit waterproof membrane), you can scan up looking into the basement for wet insulation. And if there is vinyl flooring, scan inside, looking down into the basement. It can scan carpet, too; it just cannot scan as deeply into the floor. The pinless meter I use can see 5/8" to 3/4" beyond the sensor, which is deep enough to find wet behind it. After using the meter on enough wet campers, sadly... it has never failed me to find water trapped behind it.
I tell my friends/clients to spend the $45 for the meter and scan the entire camper. Create a hand sketch, take a picture of each wall, etc., and write the moisture percentages on the sheet, showing how big or small that water area is. I can predict how big the job will be to do a total restore from that sketch. Then they determine what they want to do. It may take them on and off, a few days to do the scanning and sketches on and off, but they then know what better to expect going into this.
Before I get into the meter etc, let me know if this is even of any interest to you. The scanning is not hard to do, there is a small learning curve to know how to use it and how metal in the wall can create a false trip on the meter, but water damage is not a blip in the wall; it is a big area.
So far, the total restoration efforts I have done on older campers have taken 750 to 800 work hours for a total restoration. It takes someone who does not want a new camper, they love the one they have, and they know it. They just got caught up in water damage. Buying a new camper for big bucks now, that has lower quality than what they have, was not a good choice for them, it made more sense to fix the old one and camp with for the next 10 to 15 years. The restored camper will be better sealed up and less likely to leak, as the owner has learned how a camper can leak and how to stay on top of those seal areas. While you may not want to do a total restoration, you can at least stop other leaks you did not know about yet to buy more time using the camper.
A few other things, I suggest "not" to tear into the wall or ceiling from the inside; that is your last ditch effort and only if the wallboard is 100% gone. There are ways to restore partly water-damaged wallboard if it is not totally toast. And there are ways to splice into it from the inside and make a repair that sometimes blends in well. And there are ways to rebond delaminated FRP panels from the outside if that type of repair makes sense in your case.
You mentioned using pressure-treated wood; I know that may sound good, but it is not always a great idea. There are fastener corrosion issues, increased costs, and it does not stop the leak source. Spend the extra money on better ways the seal the camper to stop the leak in the first place.
The inside 1/8" luan wallboard is structural. These campers are not built like a house; the sum of all the parts creates rigidity. While the wall studs take the vertical loads, the wallboard creates the rigidity of the wall section, as does the ceiling board for the roof. A studded camper wall without any glued and stapled 1/8" inside luan wallboard will flex all over the place. The wallboard creates rigidity before the siding is put on to help increase the strength. That said, small pieces of wallboard being removed and replaced can recreate lost rotted wall rigidity; you do not have to replace the entire sheet in some cases. While you have FRP side walls on 1/4" luan exterior walls, stick and tin campers do not, and the wallboard is the major rigidity member.
Post pics of the outside and give us a floor plan etc, of where the floor rot is. Some tricks can help pending on the area near it. I need more info to help better.
If you want to keep your camper, it is fixable and practical if you can do the work yourself. The work hours will be high, but it is a lot less $$$ than starting over with new current-day campers. I know, lots of things to think about.
I hope this helps,
John
- Mark as New
- Bookmark
- Subscribe
- Mute
- Subscribe to RSS Feed
- Permalink
- Report Inappropriate Content
Mar-30-2023 12:29 PM
2013 GMC 2500HD Duramax Denali. 2015 CreekSide 20fq w/450 watts solar and 465 amp/hour of batteries. Retired and living the dream!
- Mark as New
- Bookmark
- Subscribe
- Mute
- Subscribe to RSS Feed
- Permalink
- Report Inappropriate Content
Mar-30-2023 10:00 AM
- Mark as New
- Bookmark
- Subscribe
- Mute
- Subscribe to RSS Feed
- Permalink
- Report Inappropriate Content
Mar-29-2023 08:40 PM
2013 GMC 2500HD Duramax Denali. 2015 CreekSide 20fq w/450 watts solar and 465 amp/hour of batteries. Retired and living the dream!


