Turn on suggestions
Auto-suggest helps you quickly narrow down your search results by suggesting possible matches as you type.
Showing results for
- Good Sam Community
- Everything RV
- DIY Maintenance
- Re: Roof Replacement on 2001 Cedar Creek 33RLBS Fi...
Options
- Subscribe to RSS Feed
- Mark Topic as New
- Mark Topic as Read
- Float this Topic for Current User
- Bookmark
- Subscribe
- Mute
- Printer Friendly Page
Roof Replacement on 2001 Cedar Creek 33RLBS Fifth Wheel
Options
- Mark as New
- Bookmark
- Subscribe
- Mute
- Subscribe to RSS Feed
- Permalink
- Report Inappropriate Content
May-20-2013 10:38 AM
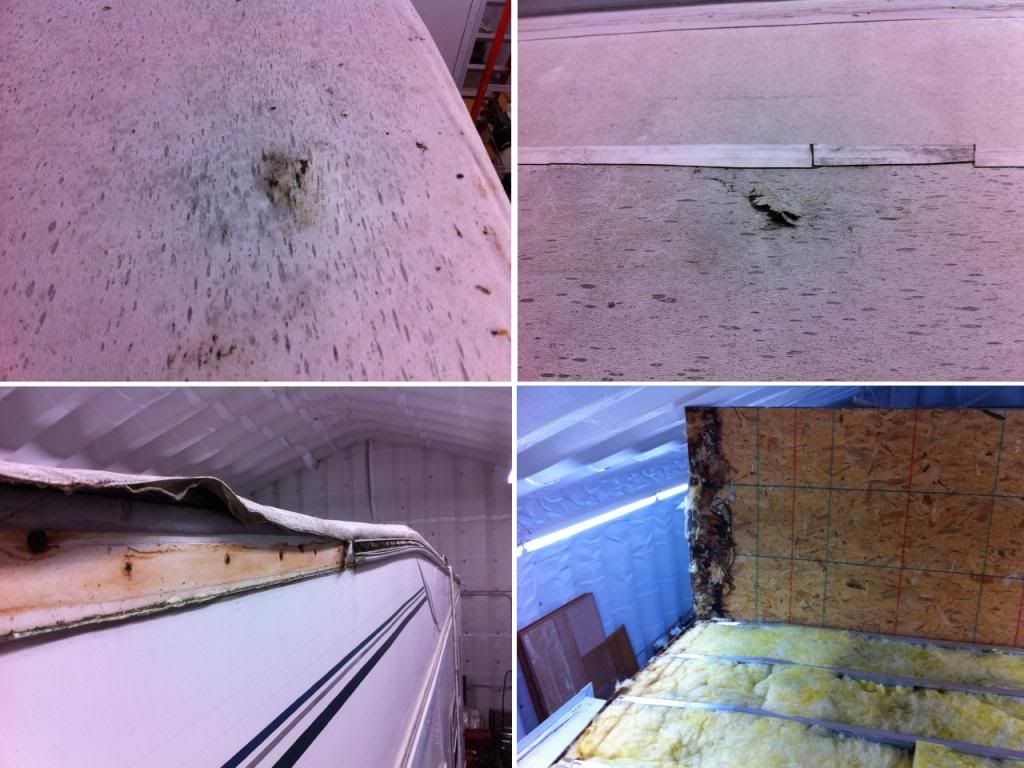
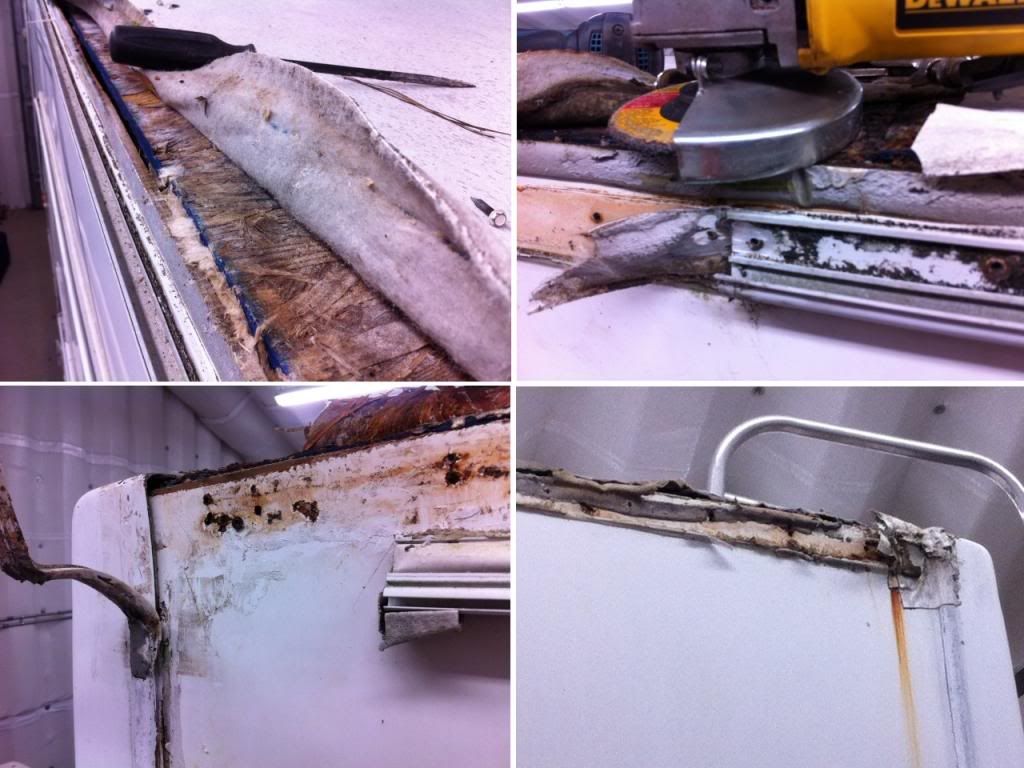
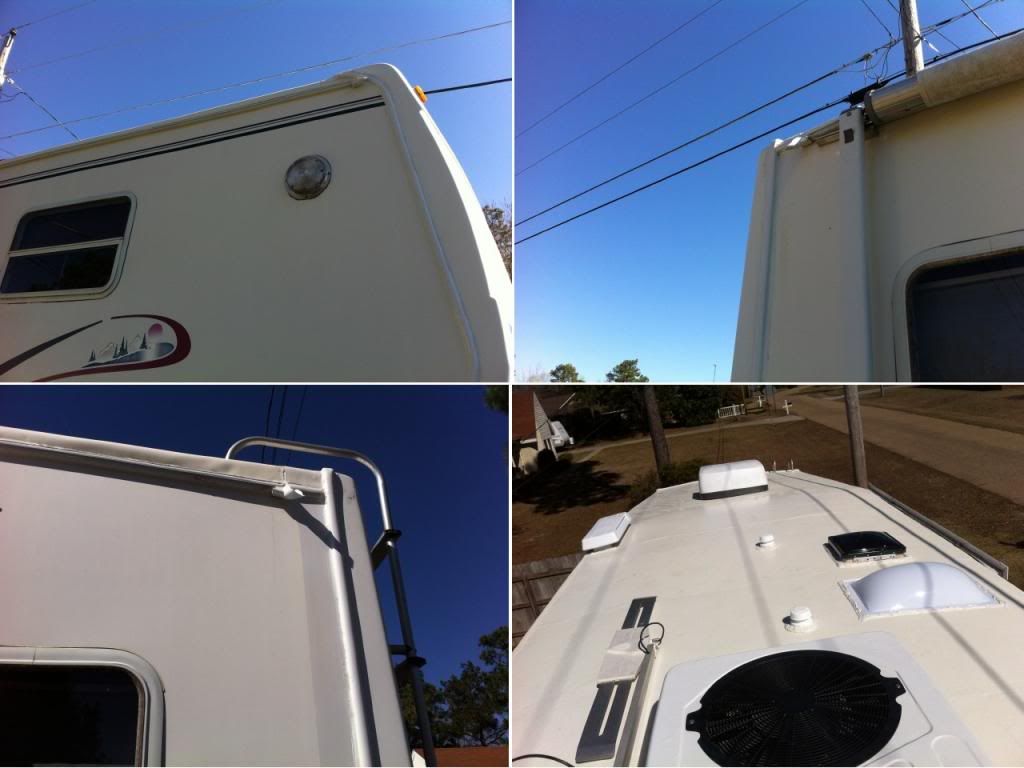
The 12 year old original ThermoPlastic Olefin (TPO) roof on our 2001 Cedar Creek 33RLBS fifth wheel began to disintegrate as you can see in these photos. The top left photo shows a spot where the TPO separated from the fabric.
The top right photo shows the edge of the roof with another separating spot. Eternabond tape over the roof edge worked for a while but almost all of the left side was seeping where the oriented strand board (OSB) roof deck met the side wall.
I believe that the original roof deck to side wall design which left the TPO membrane stretched over a gap and right angle at the junction of side wall to deck was a factor in the membrane's failure not to mention spending twelve years in the elements. The right bottom photo shows some moisture damage along the edge of the OSB decking. The left bottom photo shows a part of the roof after some of the gutter had been removed.
Newer units have more membrane coming down over the side before being secured under the gutter which is an inch or two lower on the sides.There is also a more rounded junction between roof and side wall. I decided to attempt to upgrade the side wall to deck meeting of the roof as part of the project.
Thanks to Alton, a generous friend with a great insulated and secure metal building, I was able to begin 'demolition' of the old roof in January which was unusually mild in south Mississippi.
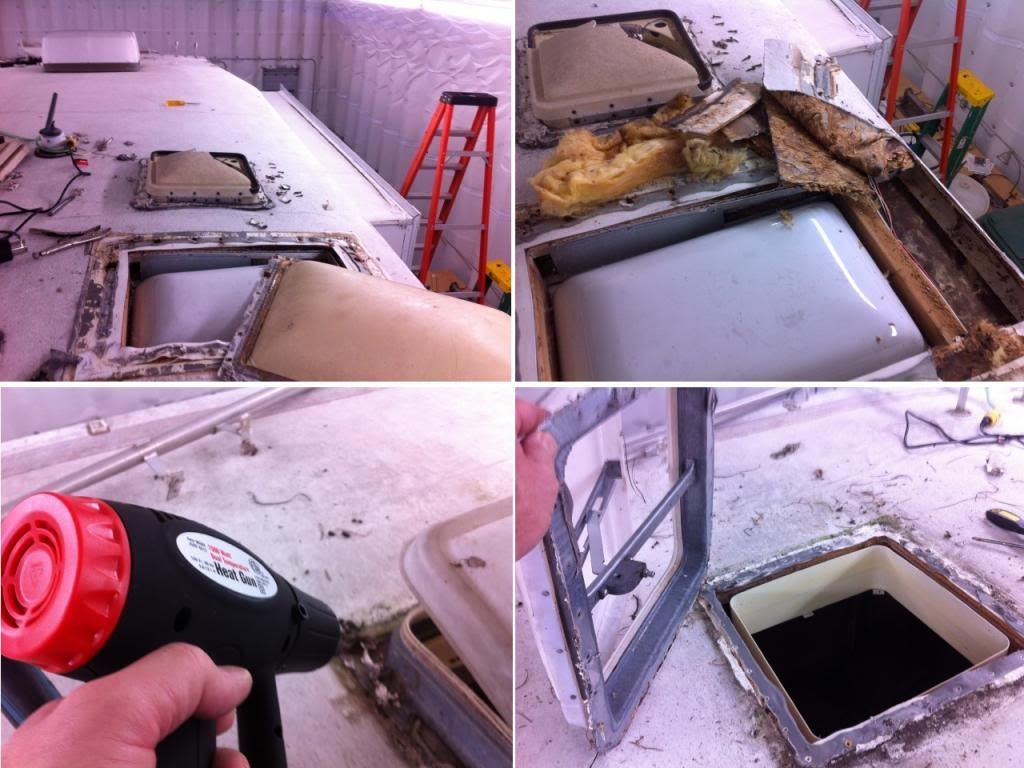
A ten dollar heat gun was one of the most valuable tools throughout the project. The 12 year old sun-baked sealant around roof objects became much easier to deal with with heat. The heat gun was also invaluable in removing the rain gutters/membrane hold-down strips as they were firmly in place with 'fossilized' putty tape. Also, several gutter screws had to be dealt with with a grinder. After the gutters were removed their backsides had to be cleaned of the putty and the top of the side walls needed to be scraped of the putty remnants.
The next set of photos shows some of the removal. The Fantastic Fan cover was brittle and cracked on touch as did the outer skylight plastic so replacement covers were ordered.
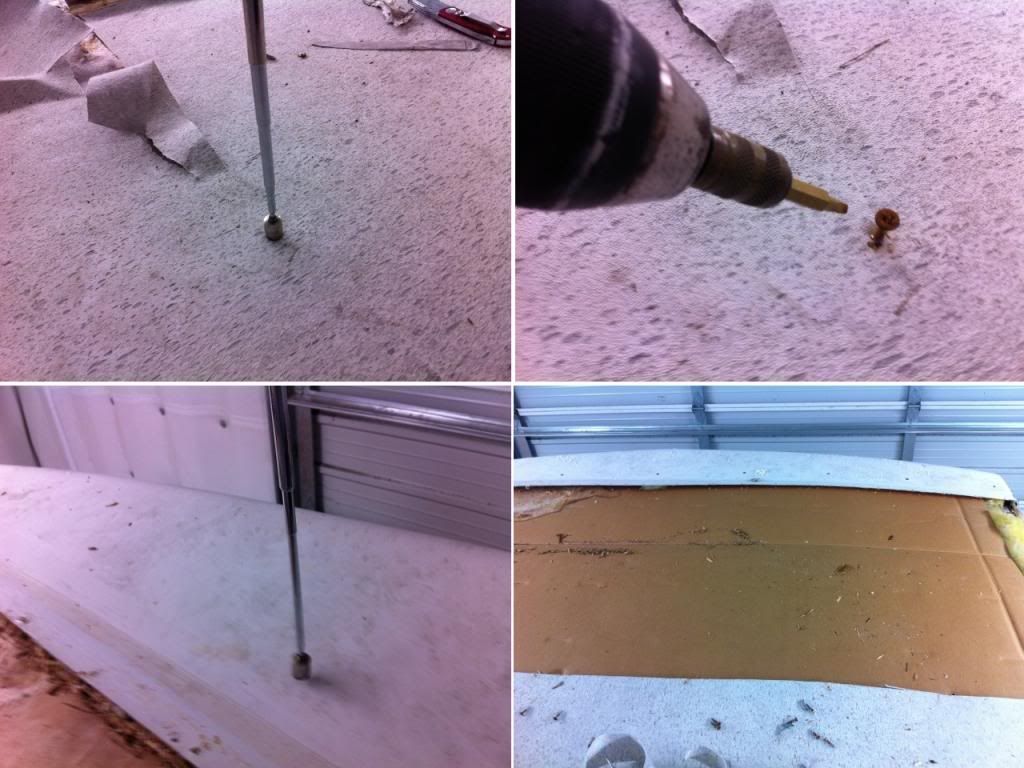
There were 8 4'x8' OSB deck panels to remove and each one was secured to the aluminum rafters with 32 screws. That's a total of 256 screws and they were countersunk and covered by the roof membrane.
A magnet on a stick was used to locate the screws. By holding the magnet stem loosely by the fingertips it was fairly easy to locate the screws but doing it 256 times was pretty tedious. Some of them didn't cooperate and had to be dug around and twisted out with vice-grips. For others it was only a matter of pushing the Roberts bit of the cordless drill/screwdriver (another invaluable project tool) through the membrane, seating it in the screw, and backing it out.
At the front of the rig, the panels had been installed at the factory prior to installation of the end cap which overlapped the panels by several inches. I decided that rather than remove the end cap I would drill through it above the screws and then patch the holes after the new deck panels were secured with screws. Again, the magnet on a stick located the screws so the cap could be drilled. The panels were removed moving front to back. The two air conditioning roof units never left the roof. They were moved toward the back and one old panel was kept on top to hold the units until the first new deck material was installed.
The next photos show some of the good, not-as-bad-as-it-looks, and ugly that was under the deck. Actually, no damage had made its way into the rig and although the left front and right back corners (bottom left and right photos) are not pretty the damage was superficial.
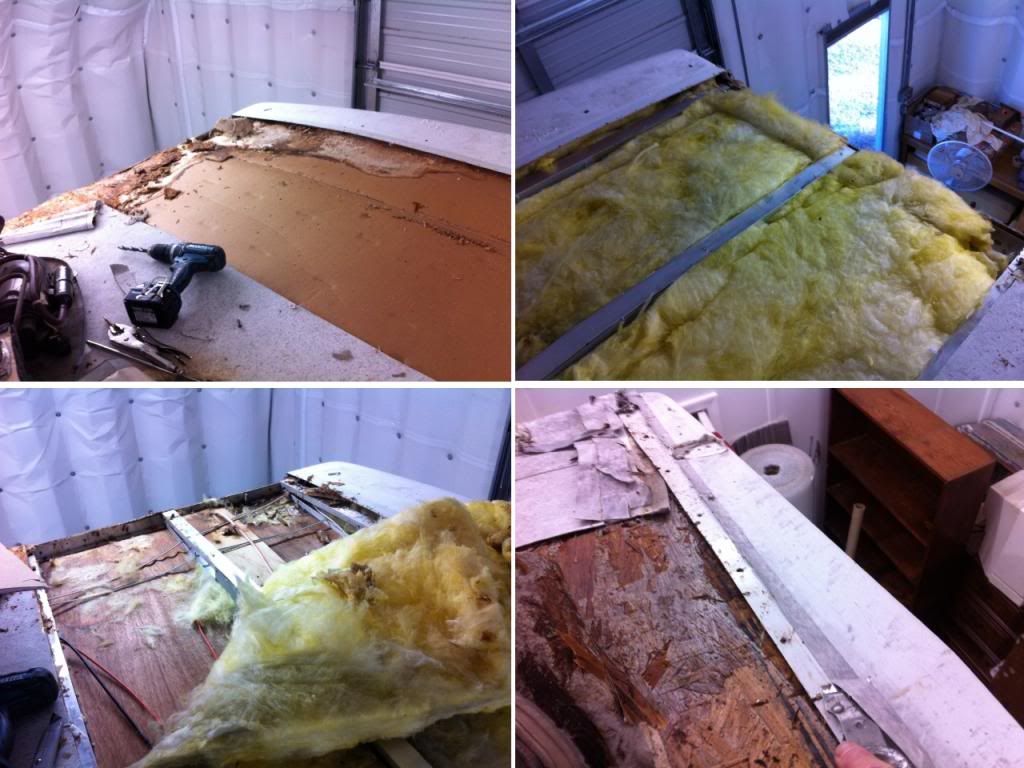
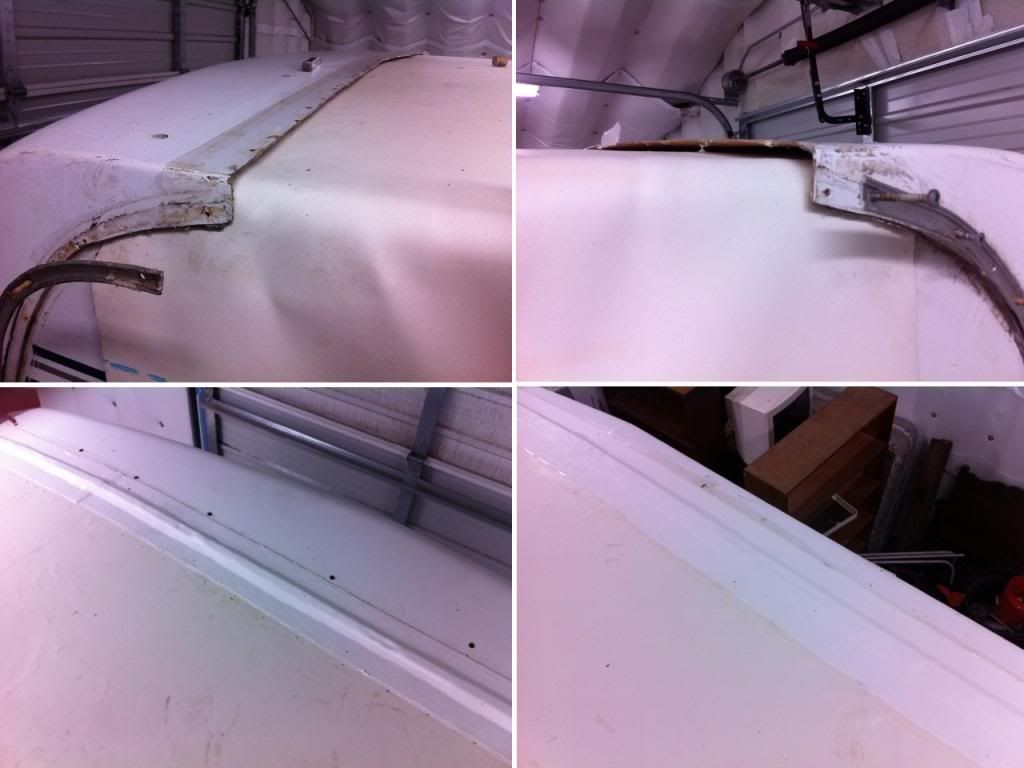
In the next set of photos the top left shows some of the detail of the original deck and side wall junction. Putty tape or a round form of putty material was originally used to cushion the junction. The top right photo shows where a screw had to be ground to remove a gutter. The bottom two photos show the rear end cap/side wall/roof junction after the gutters were removed. The right corner had not been scraped of old material when this photo was made. Another reason for moving the gutter down some was to not reattach it in the same screw holes.
The photo below is the front half of the rig topless. I took advantage of this opportunity to make some wiring changes such as putting one of the air conditioners and an outlet for an electric heater on an auxiliary circuit to get around the 30 amp limitation of the original wiring. I also ran a HDMI cable from a HDMI splitter from the output of the Satellite HD DVR to the bedroom so that we could enjoy the same programming upstairs as we do in the living room. It was a good feeling to put something new in rather than take out old!
We were now in 'reconstruction' mode. I'm thankful to my friend and fellow fifth-wheeler, Bobby, who was a great help in getting the old decking down from the roof. We used the old panels as templates for the cutouts on the new decking. Bobby would cut the holes and hand the panels up to me on the roof. He also brought homemade cinnamon rolls and coffee several days. I chose to use 3/8" Luan for the new decking material. It was smooth and ready for the roof adhesive.
The top left photo shows the AC units temporarily situated on the first (rearmost) panel.The top right photo shows panel two installed (with AC hole) and the third panel in position but not fastened. Decking screws (256 of them) were used to attach the panels to the rafters.
The bottom left photo shows more progress with Fantastic Fan cutout and skylight cutout. The bottom right shot was taken from the front showing the front AC cutout. The AC units are still on the rear panel waiting patiently to be reinstalled. A piano dolly was used to jockey them around (very carefully on the curved roof).
If you look closely at the bottom right photo you can see that the side wall rises slightly higher than the level of the decking.
The top left photo in the next set shows the use of a router to trim the side wall flush with the deck.
The top right photo shows drywall self adhesive web tape covering the gaps between each sheet of new deck.
Since the gap between the side wall and deck seemed to be a problem in the original design I decided to use self adhesive pipe insulation tape to bridge the gap and provide a rounded and cushioned transition surface from deck to side. The bottom photos show the tape and its application.
The next set of photos show Bobby helping to spread out the new ethylene propylene diene monomer (EPDM) covering. I chose to opt for 60 mil EPDM from Flat Roof Solutions in Tennessee. They sell complete kits with ample adhesive, EPDM friendly sealant, air conditioner gasket material, butyl rubber tape for sealing the end caps, and an instructional DVD.
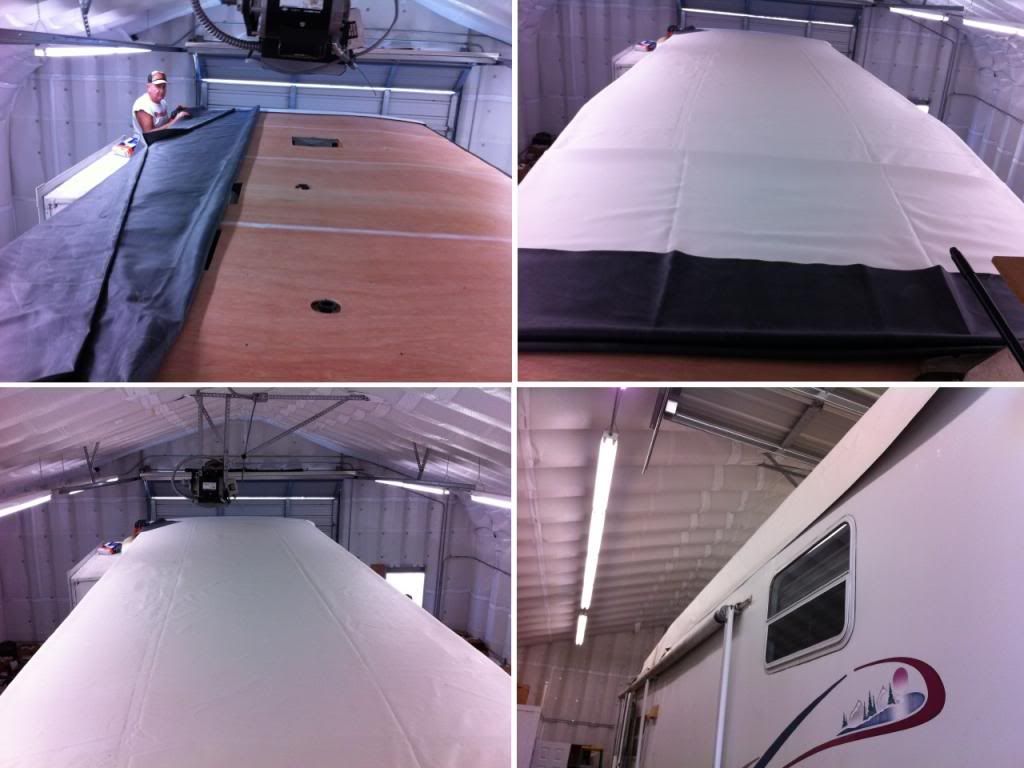
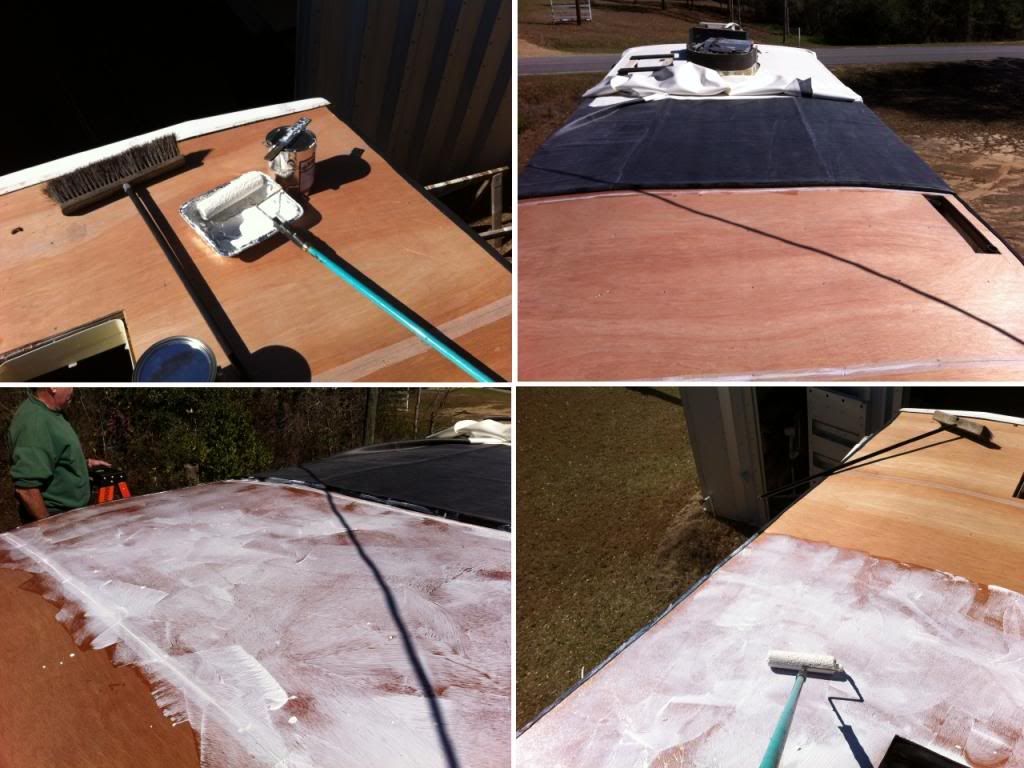
The weather was perfect on the day that we spread the adhesive and secured the covering so I hitched up and pulled the rig out of the building for some sunshine. The photos below show the process of starting with one half of the covering pulled back and adhesive being spread one four foot panel at a time. After a section was covered with adhesive the cover was pulled over it and bubbles worked out. This process was repeated until one half was attached then the unattached half was pulled back and the application/pulling process was repeated.
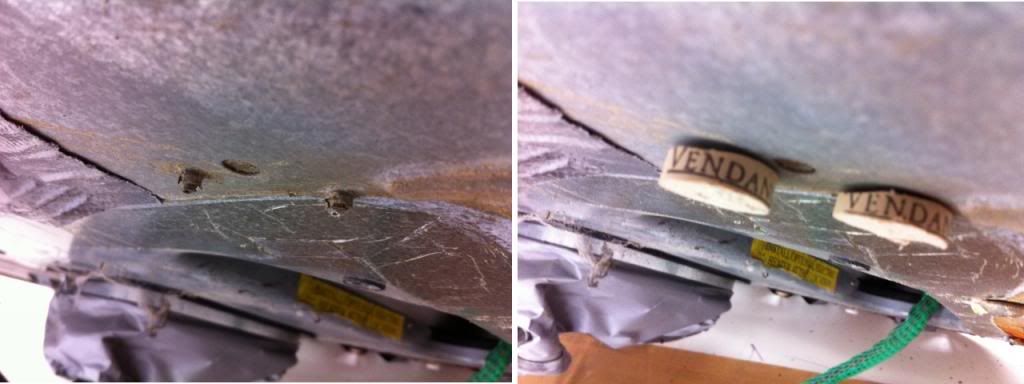
It was time to cut the covering for the roof items. When dealing with the air conditioner units I had noticed that there were protruding screws that were precariously close to the new covering. I made some ‘bumpers’ out of some corks I found in a kitchen drawer.
The next set of photos show the covering as it was worked under the front cap.
Here are some photos of the completed project.
End notes:
In addition to the EPDM roofing kit I also replaced covers for a skylight and Fantastic Fan as mentioned earlier. Also replaced were the aluminum strips and the covering plastic molding at the side edges of the rear endcap. On the front the original aluminum strips were ok so only the molding over the strips was replaced. The EPDM friendly sealant was used on all objects that were in contact with the EPDM. The molding was sealed with white proflex sealant.
While the ladder was off I replaced the special nuts that fit inside the aluminum tubing as well as the screws that hold the ladder together.
The overall cost of the project was right under $1500.00 which was about $6000.00 less than it would have cost at an RV center.
We have been in several Louisiana downpours while camping and our rig has not leaked a drop ........ so far.
The top right photo shows the edge of the roof with another separating spot. Eternabond tape over the roof edge worked for a while but almost all of the left side was seeping where the oriented strand board (OSB) roof deck met the side wall.
I believe that the original roof deck to side wall design which left the TPO membrane stretched over a gap and right angle at the junction of side wall to deck was a factor in the membrane's failure not to mention spending twelve years in the elements. The right bottom photo shows some moisture damage along the edge of the OSB decking. The left bottom photo shows a part of the roof after some of the gutter had been removed.
Newer units have more membrane coming down over the side before being secured under the gutter which is an inch or two lower on the sides.There is also a more rounded junction between roof and side wall. I decided to attempt to upgrade the side wall to deck meeting of the roof as part of the project.

Thanks to Alton, a generous friend with a great insulated and secure metal building, I was able to begin 'demolition' of the old roof in January which was unusually mild in south Mississippi.
A ten dollar heat gun was one of the most valuable tools throughout the project. The 12 year old sun-baked sealant around roof objects became much easier to deal with with heat. The heat gun was also invaluable in removing the rain gutters/membrane hold-down strips as they were firmly in place with 'fossilized' putty tape. Also, several gutter screws had to be dealt with with a grinder. After the gutters were removed their backsides had to be cleaned of the putty and the top of the side walls needed to be scraped of the putty remnants.
The next set of photos shows some of the removal. The Fantastic Fan cover was brittle and cracked on touch as did the outer skylight plastic so replacement covers were ordered.

There were 8 4'x8' OSB deck panels to remove and each one was secured to the aluminum rafters with 32 screws. That's a total of 256 screws and they were countersunk and covered by the roof membrane.
A magnet on a stick was used to locate the screws. By holding the magnet stem loosely by the fingertips it was fairly easy to locate the screws but doing it 256 times was pretty tedious. Some of them didn't cooperate and had to be dug around and twisted out with vice-grips. For others it was only a matter of pushing the Roberts bit of the cordless drill/screwdriver (another invaluable project tool) through the membrane, seating it in the screw, and backing it out.
At the front of the rig, the panels had been installed at the factory prior to installation of the end cap which overlapped the panels by several inches. I decided that rather than remove the end cap I would drill through it above the screws and then patch the holes after the new deck panels were secured with screws. Again, the magnet on a stick located the screws so the cap could be drilled. The panels were removed moving front to back. The two air conditioning roof units never left the roof. They were moved toward the back and one old panel was kept on top to hold the units until the first new deck material was installed.

The next photos show some of the good, not-as-bad-as-it-looks, and ugly that was under the deck. Actually, no damage had made its way into the rig and although the left front and right back corners (bottom left and right photos) are not pretty the damage was superficial.

In the next set of photos the top left shows some of the detail of the original deck and side wall junction. Putty tape or a round form of putty material was originally used to cushion the junction. The top right photo shows where a screw had to be ground to remove a gutter. The bottom two photos show the rear end cap/side wall/roof junction after the gutters were removed. The right corner had not been scraped of old material when this photo was made. Another reason for moving the gutter down some was to not reattach it in the same screw holes.

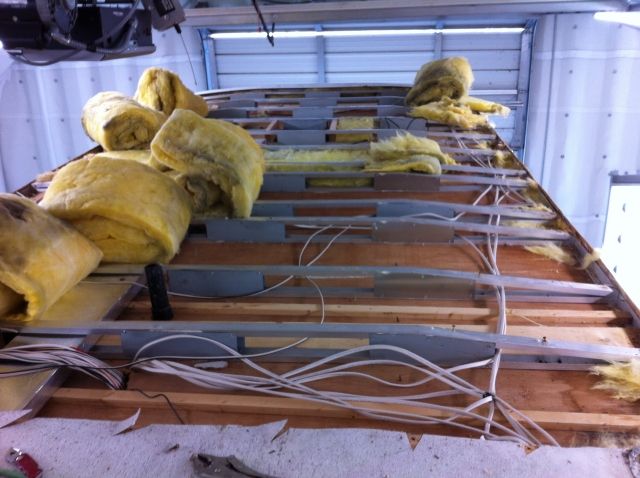
The photo below is the front half of the rig topless. I took advantage of this opportunity to make some wiring changes such as putting one of the air conditioners and an outlet for an electric heater on an auxiliary circuit to get around the 30 amp limitation of the original wiring. I also ran a HDMI cable from a HDMI splitter from the output of the Satellite HD DVR to the bedroom so that we could enjoy the same programming upstairs as we do in the living room. It was a good feeling to put something new in rather than take out old!

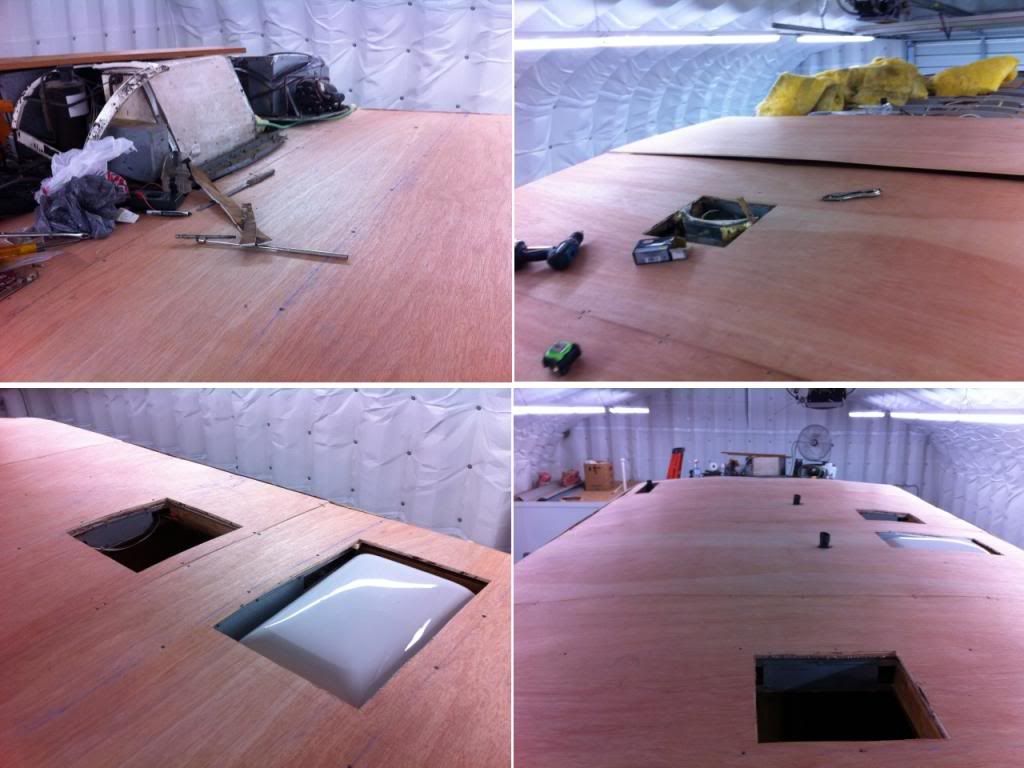
We were now in 'reconstruction' mode. I'm thankful to my friend and fellow fifth-wheeler, Bobby, who was a great help in getting the old decking down from the roof. We used the old panels as templates for the cutouts on the new decking. Bobby would cut the holes and hand the panels up to me on the roof. He also brought homemade cinnamon rolls and coffee several days. I chose to use 3/8" Luan for the new decking material. It was smooth and ready for the roof adhesive.
The top left photo shows the AC units temporarily situated on the first (rearmost) panel.The top right photo shows panel two installed (with AC hole) and the third panel in position but not fastened. Decking screws (256 of them) were used to attach the panels to the rafters.
The bottom left photo shows more progress with Fantastic Fan cutout and skylight cutout. The bottom right shot was taken from the front showing the front AC cutout. The AC units are still on the rear panel waiting patiently to be reinstalled. A piano dolly was used to jockey them around (very carefully on the curved roof).
If you look closely at the bottom right photo you can see that the side wall rises slightly higher than the level of the decking.

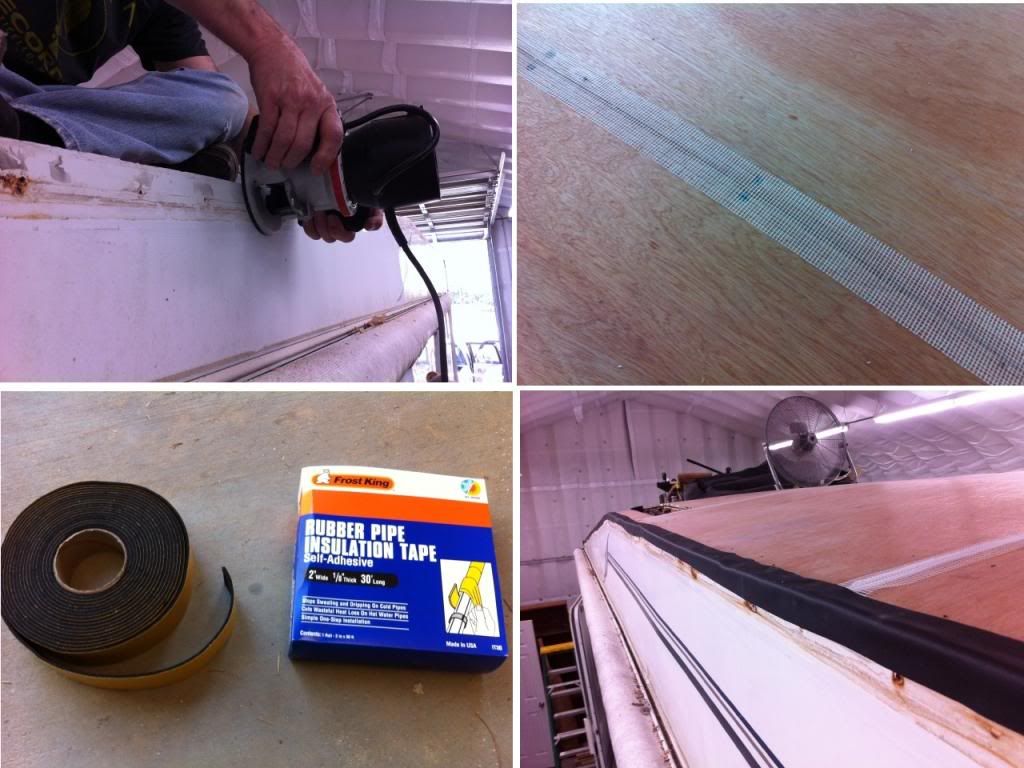
The top left photo in the next set shows the use of a router to trim the side wall flush with the deck.
The top right photo shows drywall self adhesive web tape covering the gaps between each sheet of new deck.
Since the gap between the side wall and deck seemed to be a problem in the original design I decided to use self adhesive pipe insulation tape to bridge the gap and provide a rounded and cushioned transition surface from deck to side. The bottom photos show the tape and its application.

The next set of photos show Bobby helping to spread out the new ethylene propylene diene monomer (EPDM) covering. I chose to opt for 60 mil EPDM from Flat Roof Solutions in Tennessee. They sell complete kits with ample adhesive, EPDM friendly sealant, air conditioner gasket material, butyl rubber tape for sealing the end caps, and an instructional DVD.

The weather was perfect on the day that we spread the adhesive and secured the covering so I hitched up and pulled the rig out of the building for some sunshine. The photos below show the process of starting with one half of the covering pulled back and adhesive being spread one four foot panel at a time. After a section was covered with adhesive the cover was pulled over it and bubbles worked out. This process was repeated until one half was attached then the unattached half was pulled back and the application/pulling process was repeated.

It was time to cut the covering for the roof items. When dealing with the air conditioner units I had noticed that there were protruding screws that were precariously close to the new covering. I made some ‘bumpers’ out of some corks I found in a kitchen drawer.

The next set of photos show the covering as it was worked under the front cap.

Here are some photos of the completed project.

End notes:
In addition to the EPDM roofing kit I also replaced covers for a skylight and Fantastic Fan as mentioned earlier. Also replaced were the aluminum strips and the covering plastic molding at the side edges of the rear endcap. On the front the original aluminum strips were ok so only the molding over the strips was replaced. The EPDM friendly sealant was used on all objects that were in contact with the EPDM. The molding was sealed with white proflex sealant.
While the ladder was off I replaced the special nuts that fit inside the aluminum tubing as well as the screws that hold the ladder together.
The overall cost of the project was right under $1500.00 which was about $6000.00 less than it would have cost at an RV center.
We have been in several Louisiana downpours while camping and our rig has not leaked a drop ........ so far.
2000 GMC Sierra 2500 4X4
2001 Cedar Creek 33RLBS
Elm 3000
2001 Cedar Creek 33RLBS
Elm 3000
7 REPLIES 7
Options
- Mark as New
- Bookmark
- Subscribe
- Mute
- Subscribe to RSS Feed
- Permalink
- Report Inappropriate Content
May-22-2013 11:10 AM
Very nice, and great writeup. Thanks for sharing!
Richard White
2011 F150 Ecoboost SCREW 145" 4x4
Firestone Ride-Rite Air Springs/Air Lift Wireless Controller
2006 Sportsmen by KZ 2604P (30')
Hensley Arrow
2011 F150 Ecoboost SCREW 145" 4x4
Firestone Ride-Rite Air Springs/Air Lift Wireless Controller
2006 Sportsmen by KZ 2604P (30')
Hensley Arrow
Options
- Mark as New
- Bookmark
- Subscribe
- Mute
- Subscribe to RSS Feed
- Permalink
- Report Inappropriate Content
May-21-2013 11:19 AM
It's nice to seem quality workmanship and doing it the right way. Great Job. Something to really be proud of. No don't ever sell that camper because it's better than anything you can buy!
2015 GMC 2500 Denali Crewcab 4x4
2019 Forest River Wolfpack 23pack15
Hope your travels are safe and the friendships made camping are lasting.
2019 Forest River Wolfpack 23pack15
Hope your travels are safe and the friendships made camping are lasting.
Options
- Mark as New
- Bookmark
- Subscribe
- Mute
- Subscribe to RSS Feed
- Permalink
- Report Inappropriate Content
May-21-2013 08:15 AM
I do believe I see a career change in your future. That is how you do it right.
2003 Dodge CC 3500 SRW SWB Cummins 6 speed manual
2010 Cedar Creek 34 RLSA
Talladega - I went to a party with 150,000 people and a race broke out.
2010 Cedar Creek 34 RLSA
Talladega - I went to a party with 150,000 people and a race broke out.
Options
- Mark as New
- Bookmark
- Subscribe
- Mute
- Subscribe to RSS Feed
- Permalink
- Report Inappropriate Content
May-21-2013 06:31 AM
You guys did a great job! Since I'm a do it yourselfer, work like this just stands out. Yeh, I know you saved big bucks by doing it on your terms, but you never, never would have gotten this kind of job job at any RV repair joint! Well done!!
Options
- Mark as New
- Bookmark
- Subscribe
- Mute
- Subscribe to RSS Feed
- Permalink
- Report Inappropriate Content
May-20-2013 06:31 PM
WOW! Nice work!
2016 6.7 CTD 2500 BIG HORN MEGA CAB
2013 Forest River 3001W Windjammer
Equilizer Hitch
Honda EU2000
"I have this plan to live forever; so far my plan is working"
2013 Forest River 3001W Windjammer
Equilizer Hitch
Honda EU2000
"I have this plan to live forever; so far my plan is working"
Options
- Mark as New
- Bookmark
- Subscribe
- Mute
- Subscribe to RSS Feed
- Permalink
- Report Inappropriate Content
May-20-2013 11:08 AM
WOW--fantastic work. It looks great---glad it is leak-proof! Thanks for the step-by-step.
Options
- Mark as New
- Bookmark
- Subscribe
- Mute
- Subscribe to RSS Feed
- Permalink
- Report Inappropriate Content
May-20-2013 11:05 AM
Now there's a used trailer I would buy in a heartbeat.
Nice work!
Scott
Nice work!
Scott


