- Good Sam Community
- Groups
- Motorhome Group
- Forum
- Dual Pane Window Repair-My Way
- Subscribe to RSS Feed
- Mark Topic as New
- Mark Topic as Read
- Float this Topic for Current User
- Bookmark
- Subscribe
- Mute
- Printer Friendly Page
Dual Pane Window Repair-My Way
- Mark as New
- Bookmark
- Subscribe
- Mute
- Subscribe to RSS Feed
- Permalink
- Report Inappropriate Content
Jul-30-2012 09:59 PM
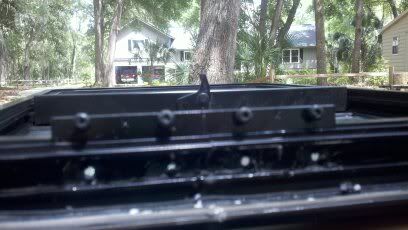
I removed the window, removed the 4 screws & matching plate that held the major frame together. I also removed two screws that held the mid window divider in place. I could then spread the frame and remove the two sections of windows. The picture below shows the plate removed from the frame.
This picture shows the frame being split open so that the two window sections can be removed.
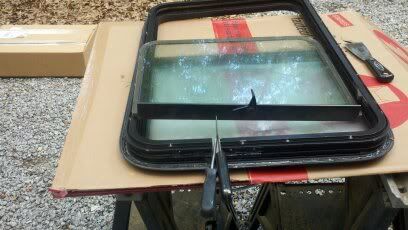
The lower window had a handle with lock pressed onto the top of the window. I had a lot of trouble removing this handle. It was a force fit with a rubber gasket and glue. I finally used a propane torch to add heat which loosed the adhesive.
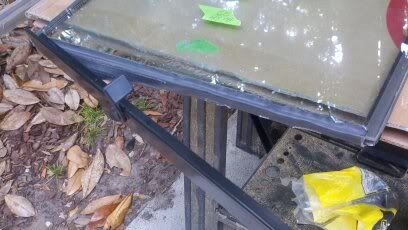
Using a razor knife and a single edge razor blade, I carefully cut the old sealant away from the glass. On the top one, the glass was no longer stuck to the adhesive.
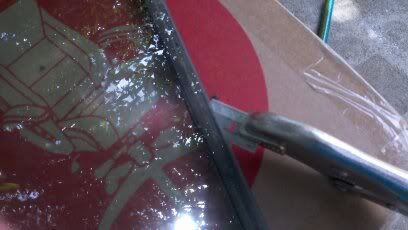
My windows had 3/16 inch spacers. I could not locate replacement 3/16 inch spacers, so I elected to reuse the old spacers after cutting away the old sealant. The picture below shows the spacer with some of the sealant cut away. I left a small amount of old sealer on the corners where two sections of spacer were joined to keep it glued together. I did remove more of the old sealer than is displayed in this picture.
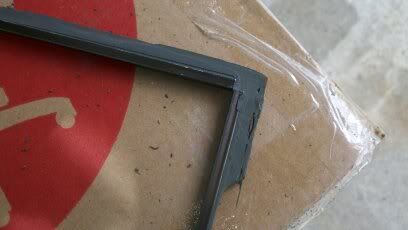
I carefully cleaned all of the inside surfaces of the glass panes. One of the top panes could not be cleaned. I tried all manner of solutions and mild abrasives, but the glass was too etched to clean. I ordered a replacement tempered pane (special cut) from a local glass company for $80.00.
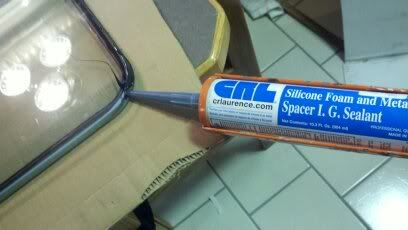
The sealant for the windows is C.R. LAURENCE 877 CRL Super Spacer Sealant, which is available from Amazon.com. It's about $13.00 per tube. I ordered two tubes, but only used one for these two window sections. The sealant tube fits a standard caulk gun, and comes with a screw on plastic tip that helps with getting the sealant between the glass surfaces.
Having no way to inject inert gas into the inside of the window, I used the motorhome as a "lower humidity" environment. I live in coastal Georgia, where the humidity is very high. I stored the window components in the motorhome for several days with the air conditioning and the dehumidifier running to get everything as dry as possible. I did the assembly inside the motorhome, and left everything to dry for a couple of days before reassembly.
After carefully positioning the 3/16 inch spacer and the panes, I used the caulk gun to inject sealer between the panes up to the spacer. I did not place sealer on the spacer before placing between the glass panes. I was careful to insure that the spacer remained centered, and the two panes were aligned. My advice is to assemble over cardboard, as some sealant will get between the window and the surface it is laying on. This is easily cleaned up with a razor knife or razor blade when dry, and the cardboard is disposable.
This picture shows the caulk being injected between the panes.
Reassembly was the reverse of the disassembly process. I did have difficulty getting the handle/lock on using the old rubber gasket. I finally left the old rubber gasket off, and used the sealant as a glue to attach the handle to the window. This worked well.
This picture shows the handle/lock ready to install.
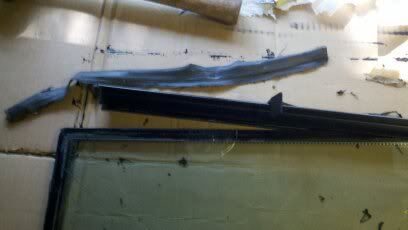
My window had a thin rubber seal between the window flange and the outside surface of the motorhome. I did not reuse this seal, but used butyl tape instead.
I know that some will question the durability of this repair, but I'm expecting that it will last several years at least.
My costs were: $80 for one window pane, $26.00 for sealant, and $7.00 for butyl tape, total $113. If you repair your windows soon after they first show moisture between the panes, your cost will be lower as you will not need to buy new glass.
Reinstalled, the window looks as good as new.
Fred
St. Augustine, Florida
- Labels:
-
Class A
- Mark as New
- Bookmark
- Subscribe
- Mute
- Subscribe to RSS Feed
- Permalink
- Report Inappropriate Content
Aug-01-2013 09:22 PM
I don't think a Monaco manufacturer would have the right windows for a Nemar..Dutch Star motorhome? Especially an older 99' model that we dearly love.
- Mark as New
- Bookmark
- Subscribe
- Mute
- Subscribe to RSS Feed
- Permalink
- Report Inappropriate Content
Aug-01-2013 09:16 PM
- Mark as New
- Bookmark
- Subscribe
- Mute
- Subscribe to RSS Feed
- Permalink
- Report Inappropriate Content
Nov-30-2012 05:36 PM
Most of the time is cleaning the glass.
They have about 12 water and electric sites for customers. Also a dump station but DO NOT USE. It will only take about a gallon before it pukes it back up and sprays about a 3' circle around the hole.
- Mark as New
- Bookmark
- Subscribe
- Mute
- Subscribe to RSS Feed
- Permalink
- Report Inappropriate Content
Nov-30-2012 05:11 PM
JanLiz wrote:
The spacer of the glass contains a desiccant which acts as the absorber of the moisture in the airspace. The seal is critical but if the dessicant is saturated, the moisture will not be drawn into it. The white haze is the result of the calcium in the desiccant dispersing on the interior of the glass and staining it. Gas filled units are an option on residential windows as it creates a denser air space. It is unlikely any unit in a vehicle will have a gas filled air space. Edgetech Super Spacer is the company that manufactures the spacer. www.edgetechig.com
Thanks for the info, and you are correct. As I stated in my write-up, I could not find the correct size spacer so I reused the old spacers. Last week we were traveling in central Florida where the nights were cool and days were fairly warm. I have a small amount of visible moisture in one of the windows I repaired. Under some conditions, it is not visible, but in the mornings there is visible moisture. If I try to repair another one, I will use new spacers.
Fred
St. Augustine, Florida
- Mark as New
- Bookmark
- Subscribe
- Mute
- Subscribe to RSS Feed
- Permalink
- Report Inappropriate Content
Aug-07-2012 08:40 AM
Jim@HiTek wrote:
...Many sticks and bricks homes windows with gas develop leaks just sitting there. I was a realtor in Oregon and saw the stains many times.
Stains?
- Mark as New
- Bookmark
- Subscribe
- Mute
- Subscribe to RSS Feed
- Permalink
- Report Inappropriate Content
Aug-06-2012 06:57 PM
I wouldn't waste money on gassing my dbl paned windows as it's a waste of time and money.
No offense, it's just that it doesn't make sense to me to put gas in the windows of an RV, because it's being driven and bounced around all the time. Many sticks and bricks homes windows with gas develop leaks just sitting there. I was a realtor in Oregon and saw the stains many times.
Have shop, will travel!
Visit my travel & RV repair blog site. Subscribe for emailed updates.
Winnebago Journey, '02
Cat 330HP Diesel, 36.5', two slides.
- Mark as New
- Bookmark
- Subscribe
- Mute
- Subscribe to RSS Feed
- Permalink
- Report Inappropriate Content
Aug-06-2012 06:46 PM
- Mark as New
- Bookmark
- Subscribe
- Mute
- Subscribe to RSS Feed
- Permalink
- Report Inappropriate Content
Aug-06-2012 07:58 AM
You need a MIG welder's gas supply
Force gas in to one of the two spots, till you are satisified that the spece between the glass is all inert, then seal the other opening, then while pulling your insertation needle out quickly seal the other opening.
Not hard, but not easy either.
The insertation needle.. A basketball needle will do.
That said. I don't think inert gas will help with moisture if you got it dry enough to begin with.
2005 Damon Intruder 377 Alas declared a total loss
after a semi "nicked" it. Still have the radios
Kenwood TS-2000, ICOM ID-5100, ID-51A+2, ID-880 REF030C most times
- Mark as New
- Bookmark
- Subscribe
- Mute
- Subscribe to RSS Feed
- Permalink
- Report Inappropriate Content
Aug-06-2012 04:00 AM
Lobstah wrote:2bzy2c wrote:
Thanks for the write up. You fixed the fogging issue for the moment, but there is
still moisture in between the glass. You did nothing to dry out the inside. My fear is the fogging will return soon.
Sorry, don't mean to be Buzz Kill, but the internal moisture has to be dealt with.
Other people that have done this report no fogging after 3yrs usage.
For the money, it's sure worth a try for me.
You guys with deep pockets can just pay the glass man or the RV dealer to fix it for you 🙂
Jim
I don't have deep pockets, just experience repairing these fogged glass pains. I tried at the time I was "fixing" them to fine the "swizzles" so I could replace them and do it right but couldn't. So I re-used them, only to have the condensation return in less than a year. That was on my old 93 Bounder, on my Islander, I only have two windows than might need attention just because of a "crawling seal", but I'll live with that as long as no condensation gets in.
- Mark as New
- Bookmark
- Subscribe
- Mute
- Subscribe to RSS Feed
- Permalink
- Report Inappropriate Content
Aug-05-2012 07:02 PM
2bzy2c wrote:
Thanks for the write up. You fixed the fogging issue for the moment, but there is
still moisture in between the glass. You did nothing to dry out the inside. My fear is the fogging will return soon.
Sorry, don't mean to be Buzz Kill, but the internal moisture has to be dealt with.
Other people that have done this report no fogging after 3yrs usage.
For the money, it's sure worth a try for me.
You guys with deep pockets can just pay the glass man or the RV dealer to fix it for you 🙂
Jim
Very Understanding Wife
1 Boxer 😞
3 Maine Coon cats
- Mark as New
- Bookmark
- Subscribe
- Mute
- Subscribe to RSS Feed
- Permalink
- Report Inappropriate Content
Aug-05-2012 05:47 PM
wiping off some condensation is a minor thing after all
2011 Jeep Wrangler Unlimited Sahara
Blue Ox Aventa LX Tow bar w/ Roadmaster adapters
AirForce One brake system
Life Member GOOD SAM Club
FMCA Member
If your not the lead dog
the view never changes
- Mark as New
- Bookmark
- Subscribe
- Mute
- Subscribe to RSS Feed
- Permalink
- Report Inappropriate Content
Aug-05-2012 02:22 PM
still moisture in between the glass. You did nothing to dry out the inside. My fear is the fogging will return soon.
Sorry, don't mean to be Buzz Kill, but the internal moisture has to be dealt with.
- Mark as New
- Bookmark
- Subscribe
- Mute
- Subscribe to RSS Feed
- Permalink
- Report Inappropriate Content
Aug-05-2012 01:32 PM
- Mark as New
- Bookmark
- Subscribe
- Mute
- Subscribe to RSS Feed
- Permalink
- Report Inappropriate Content
Aug-01-2012 11:32 AM
Glass Ware Pro
Please note, I am not affiliated nor have had any dealings with them.
2005 FW Expedition 38N Cat 300
2005 Jeep Wrangler Unlimited
The Great Outdoors, Titusville, FL
Villas, Cape May County, NJ
Rupinski Blog


