Turn on suggestions
Auto-suggest helps you quickly narrow down your search results by suggesting possible matches as you type.
Showing results for
- Good Sam Community
- Groups
- Travel Trailer Group
- Forum
- Re: Cool Mods - Thread restored 10/18/2012
Options
- Subscribe to RSS Feed
- Mark Topic as New
- Mark Topic as Read
- Float this Topic for Current User
- Bookmark
- Subscribe
- Mute
- Printer Friendly Page
Cool Mods - Thread restored 10/18/2012
Options
- Mark as New
- Bookmark
- Subscribe
- Mute
- Subscribe to RSS Feed
- Permalink
- Report Inappropriate Content
Jun-03-2007 01:48 PM
My daughter was getting a little warm in her bunk during our last camping trip, so I decided to put her a fan in to keep the air flowing.
I had been wanting to add a 12-volt fan to the main living area anyway, so I decided to tackle both jobs today. A trip to Wal-Mart for two fans($8.48 each) and we're halfway there.
She picked the spot, and I got to work -
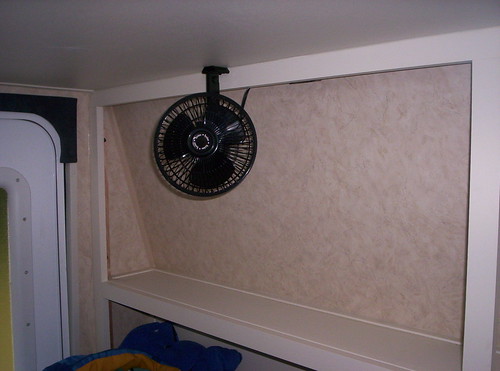
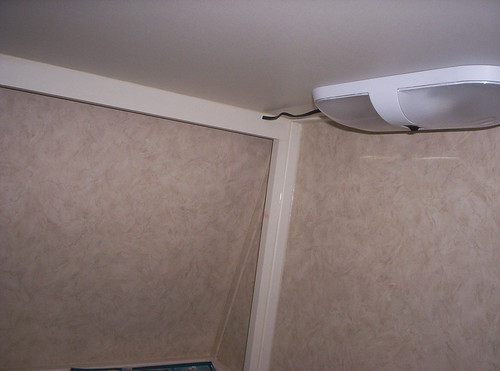
I picked up the power from her overhead light. All I have left is to install a short piece of wire cover and I'm done -
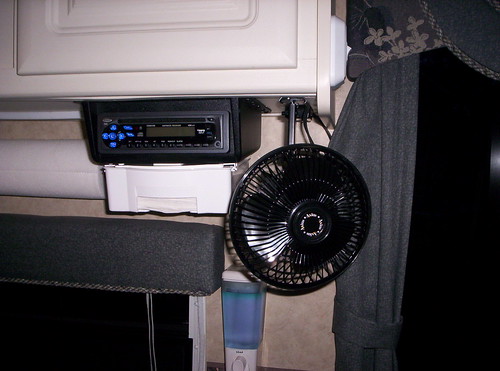
I added one in the main area -
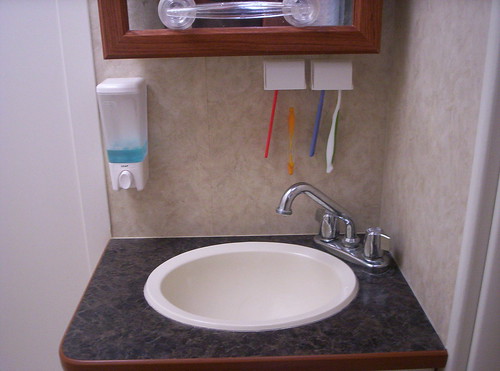
I dropped by Lowe's and found this cool soap dispenser. I also just installed these Pop-a-Toothbrush holders -
I added a sopa dispenser to the kitchen area as well. I also installed a Pop-a-Napkin under the radio -
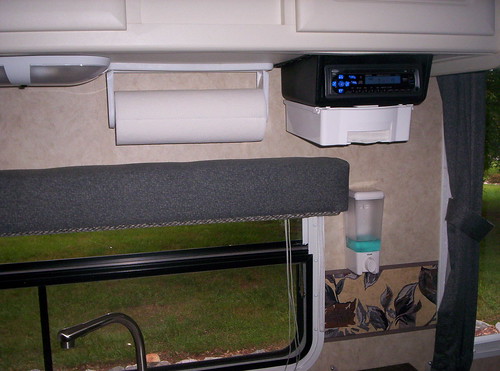
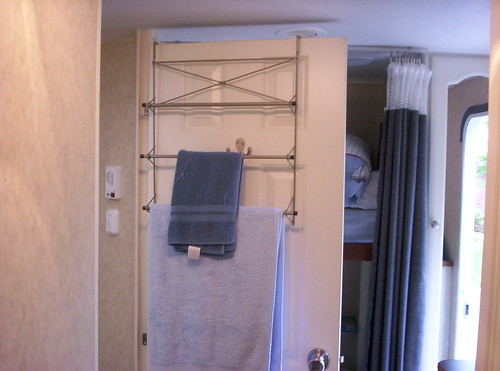
Here's an easy mod. I found this over the door towel rack at Walmart and it works great -
I had been wanting to add a 12-volt fan to the main living area anyway, so I decided to tackle both jobs today. A trip to Wal-Mart for two fans($8.48 each) and we're halfway there.
She picked the spot, and I got to work -
I picked up the power from her overhead light. All I have left is to install a short piece of wire cover and I'm done -
I added one in the main area -
I dropped by Lowe's and found this cool soap dispenser. I also just installed these Pop-a-Toothbrush holders -
I added a sopa dispenser to the kitchen area as well. I also installed a Pop-a-Napkin under the radio -
Here's an easy mod. I found this over the door towel rack at Walmart and it works great -
Chris
2005 Rockwood 2516G (sold)
2005 Max-Lite 24RS (sold)
2019 Rockwood 2608BS (sold)
2020 Grand Design 337RLS
2018 Chevy 2500HD
2005 Rockwood 2516G (sold)
2005 Max-Lite 24RS (sold)
2019 Rockwood 2608BS (sold)
2020 Grand Design 337RLS
2018 Chevy 2500HD
2,727 REPLIES 2,727
Options
- Mark as New
- Bookmark
- Subscribe
- Mute
- Subscribe to RSS Feed
- Permalink
- Report Inappropriate Content
Feb-28-2015 12:37 PM
You sure it's safe to watch an episode of Top Gear in your RV?
-CHR$
1996 Safari Sahara Edition 35' Diesel Pusher. Just getting the Solar stuff started.
1996 Safari Sahara Edition 35' Diesel Pusher. Just getting the Solar stuff started.
Options
- Mark as New
- Bookmark
- Subscribe
- Mute
- Subscribe to RSS Feed
- Permalink
- Report Inappropriate Content
Feb-27-2015 04:43 PM
The biggest mod I've done to mine thus far is fabricating a mount to secure a tv bracket onto. Now the counter space is clear, and I am able to tilt/swivel the TV to get rid of any annoying glare. After I took the picture, I cleaned up the cables with tie-wraps and the plastic conduit.
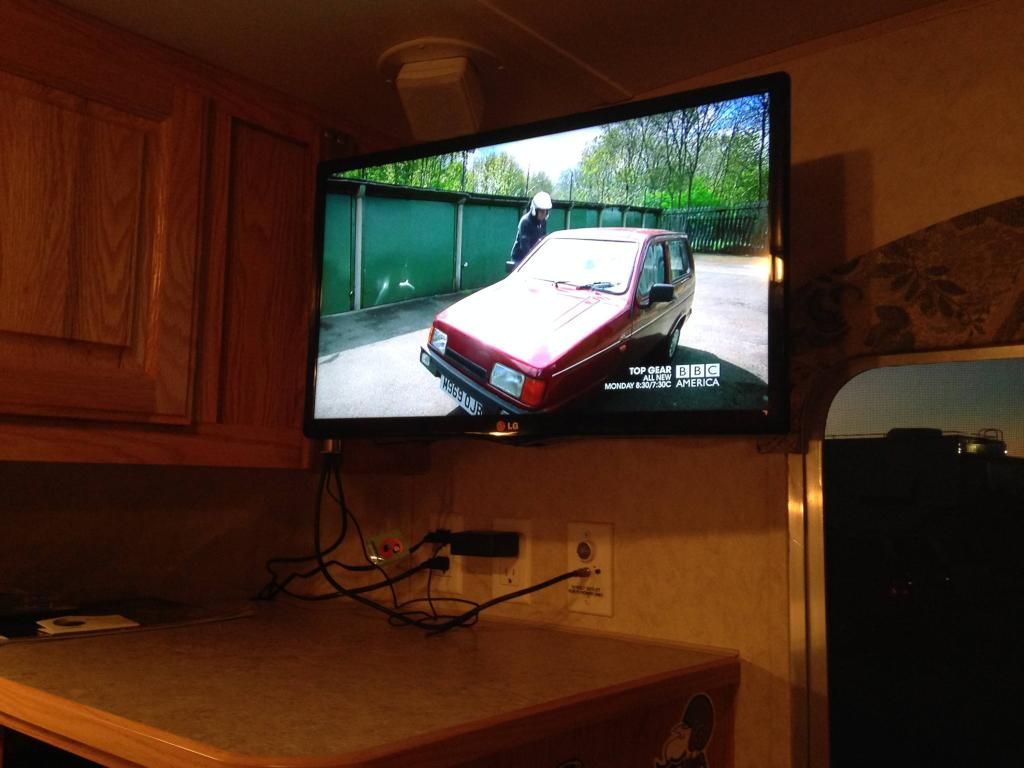
Some of the things that I don't have pictured is the before and after from painting the tongue and rear bumper areas. Rolled/brushed on the Rustoleum gloss black, and the improvement was well worth it, and added another layer of corrosion protection.
I have three of the Camco remote control organizers. The color that they are out of the box is a perfect match for the interior of my trailer. I have two beside the bed to hold the remote control for the fan/heater, and the other one holds my phone at night. I drilled a hole in the bottom so that I can run the power cord into the phone and let it charge overnight.
-2019 Forest River Wildcat 312RLI
-- Pulled by a 2018 GMC Sierra 1500
-- 4WD/Dbl Cab/Reg Bed/3.42rr
...Full timing for work, currently in Nashville...
-- Pulled by a 2018 GMC Sierra 1500
-- 4WD/Dbl Cab/Reg Bed/3.42rr
...Full timing for work, currently in Nashville...
Options
- Mark as New
- Bookmark
- Subscribe
- Mute
- Subscribe to RSS Feed
- Permalink
- Report Inappropriate Content
Feb-23-2015 08:19 AM
chr$ wrote:
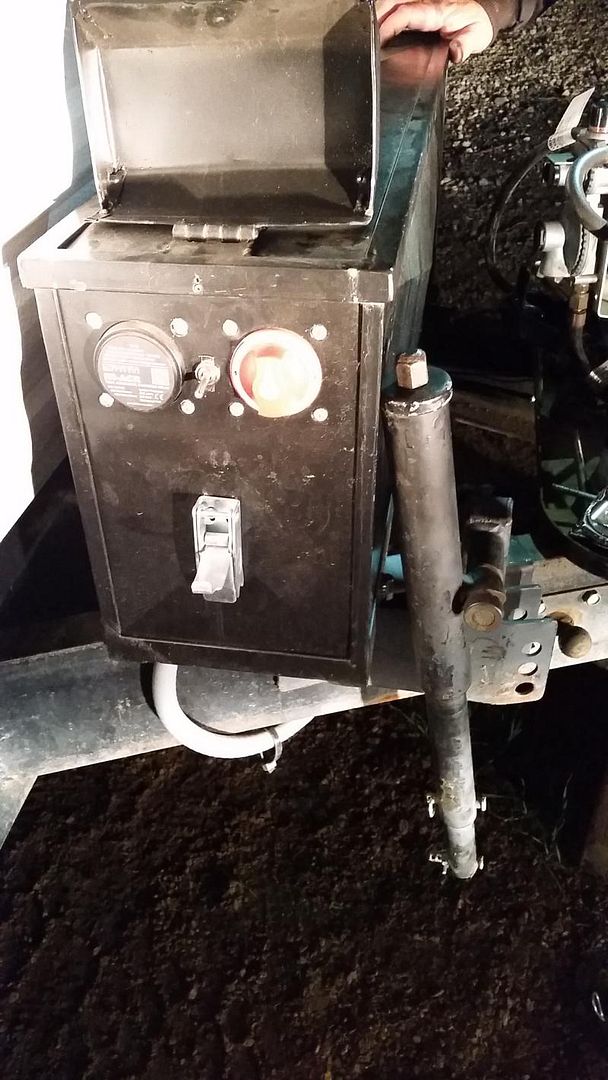
I have the smaller HF tongue box. I barely had room to add it behind the LP tanks so the big one was out.
I welded hasps to it to keep the thieves out. I can only fit 2 6V GC2's in it, however. I *might* be able to fit four if I grind the lip off the top and shove them in, but that won't be very serviceable.
Maybe I'll replace my front tanks with two horiz forklift tanks under the coach so I can fit more batteries up front...
I may also use one of those thin truck boxes for the side of a pickup bed. I could fit 4 GC2's in that, and use the little lip for storing tools. Just not sure If I want that thing all the way across, even though it will act as a rock guard.
I had to cut the front lip off that box to get the 4 batteries in there, it's no problem for me, i will only open the box 2-3 times a year to put the batts in, remove them, and maybe a mid season check for fluids... i intend to put on some type of beefier lock, also need to drill some vent holes. (i might even put the spare tire on top of the box)
the only thing to be concerned with is tongue weight, need something behind the axle to offset the 300 lbs, i will be putting a hitch on the back for a bike rack, so that, and the coolers at the back, should even things out.
For the propane tanks, i just snugged them up against the tongue jack, i intend to cut the handle off the tongue jack and weld on a nut so i can use a ratchet/speed handle/impact wrench to operate the jack, that way my propane tank cover will also cover the jack. It does decrease trailer clearance a bit when turning, but IMO it's a minor sacrifice.
Options
- Mark as New
- Bookmark
- Subscribe
- Mute
- Subscribe to RSS Feed
- Permalink
- Report Inappropriate Content
Feb-22-2015 07:05 PM
I have the smaller HF tongue box. I barely had room to add it behind the LP tanks so the big one was out.
I welded hasps to it to keep the thieves out. I can only fit 2 6V GC2's in it, however. I *might* be able to fit four if I grind the lip off the top and shove them in, but that won't be very serviceable.
Maybe I'll replace my front tanks with two horiz forklift tanks under the coach so I can fit more batteries up front...
I may also use one of those thin truck boxes for the side of a pickup bed. I could fit 4 GC2's in that, and use the little lip for storing tools. Just not sure If I want that thing all the way across, even though it will act as a rock guard.
-CHR$
1996 Safari Sahara Edition 35' Diesel Pusher. Just getting the Solar stuff started.
1996 Safari Sahara Edition 35' Diesel Pusher. Just getting the Solar stuff started.
Options
- Mark as New
- Bookmark
- Subscribe
- Mute
- Subscribe to RSS Feed
- Permalink
- Report Inappropriate Content
Feb-20-2015 08:31 PM
T3rry1 wrote:pchartrand wrote:not big on "comfort camping" with tv and satellite and stuff... i just got tired of my 12v deep cycle that wouldn't run the furnace for more than 1 night.
Wow!! Very nice. Do you have a good sized inverter to go with that?
My sentiments exactly
Joe Zeppe
In Pursuit Of Happiness and lost in wonder - Wife, Daughter, 2 Sons, dog
2006 Dodge Ram 2500 4x4 Diesel Auto Quad Cab Short Bed, some mods
1999 Kit Sun Chaser 29ft Bunkhouse, LT tires & some (unique?) mods
Used, Beaten Hensley Arrow member 0001556 = old
2006 Dodge Ram 2500 4x4 Diesel Auto Quad Cab Short Bed, some mods
1999 Kit Sun Chaser 29ft Bunkhouse, LT tires & some (unique?) mods
Used, Beaten Hensley Arrow member 0001556 = old
Options
- Mark as New
- Bookmark
- Subscribe
- Mute
- Subscribe to RSS Feed
- Permalink
- Report Inappropriate Content
Feb-20-2015 06:42 PM
pchartrand wrote:i have a 1000w, though i wont be using it much, it's more so we can charge mobile devices and run the furnace, not big on "comfort camping" with tv and satellite and stuff... i just got tired of my 12v deep cycle that wouldn't run the furnace for more than 1 night.
Wow!! Very nice. Do you have a good sized inverter to go with that?
Options
- Mark as New
- Bookmark
- Subscribe
- Mute
- Subscribe to RSS Feed
- Permalink
- Report Inappropriate Content
Feb-20-2015 04:31 PM
Wow!! Very nice. Do you have a good sized inverter to go with that?
2014 Keystone Bullet Premier 22RBPR
2017 Chevy Colorado (Duramax)
2017 Chevy Colorado (Duramax)
Options
- Mark as New
- Bookmark
- Subscribe
- Mute
- Subscribe to RSS Feed
- Permalink
- Report Inappropriate Content
Feb-20-2015 03:29 PM
I wont be running out of power any time soon 😄

Options
- Mark as New
- Bookmark
- Subscribe
- Mute
- Subscribe to RSS Feed
- Permalink
- Report Inappropriate Content
Feb-10-2015 05:54 AM
Okay, now that is a serious but very practical mod. I am not a boondocker because I am always worrying about battery usage. What a great solution. Nice mod!
Options
- Mark as New
- Bookmark
- Subscribe
- Mute
- Subscribe to RSS Feed
- Permalink
- Report Inappropriate Content
Feb-09-2015 08:57 PM
I want to play.
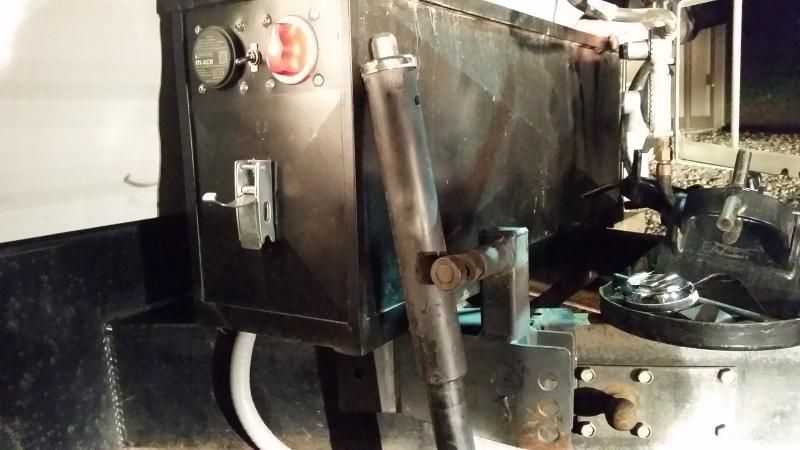
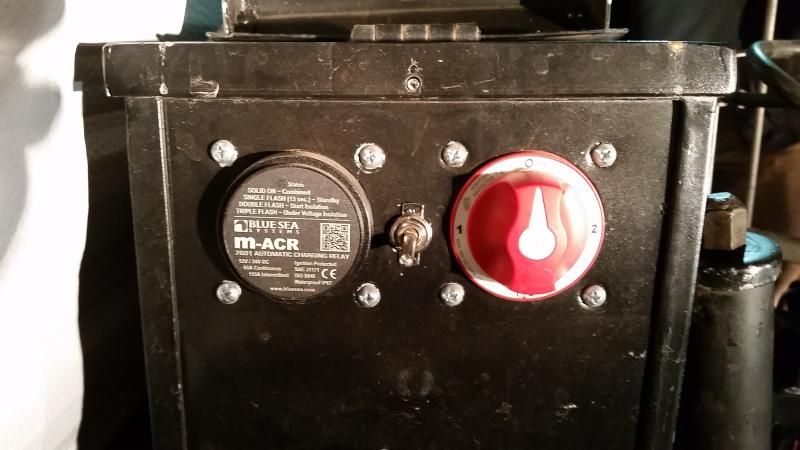
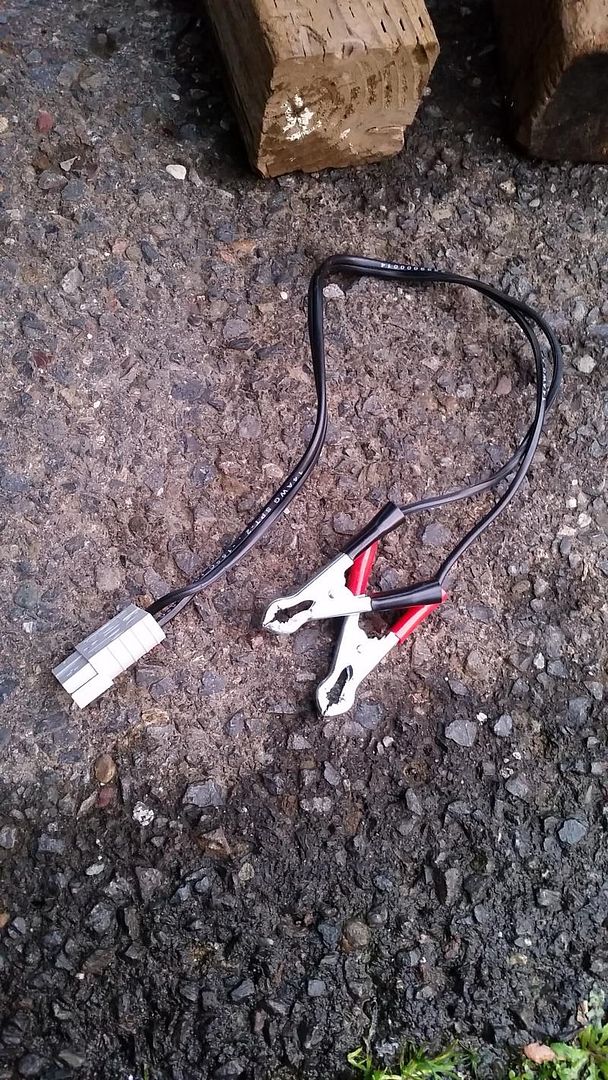
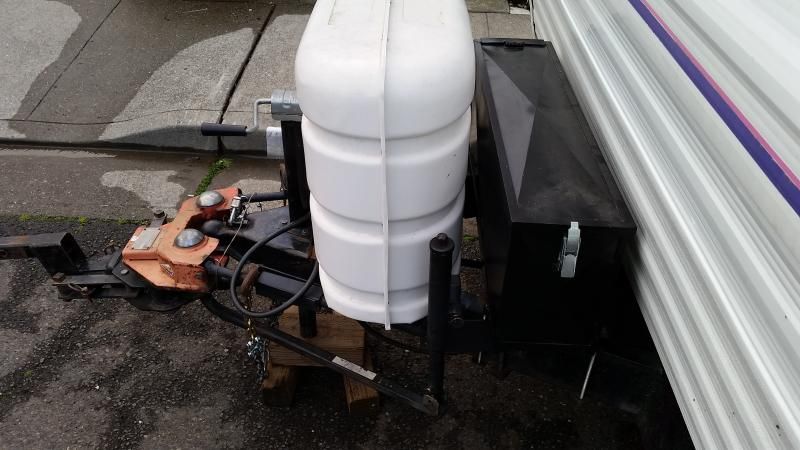
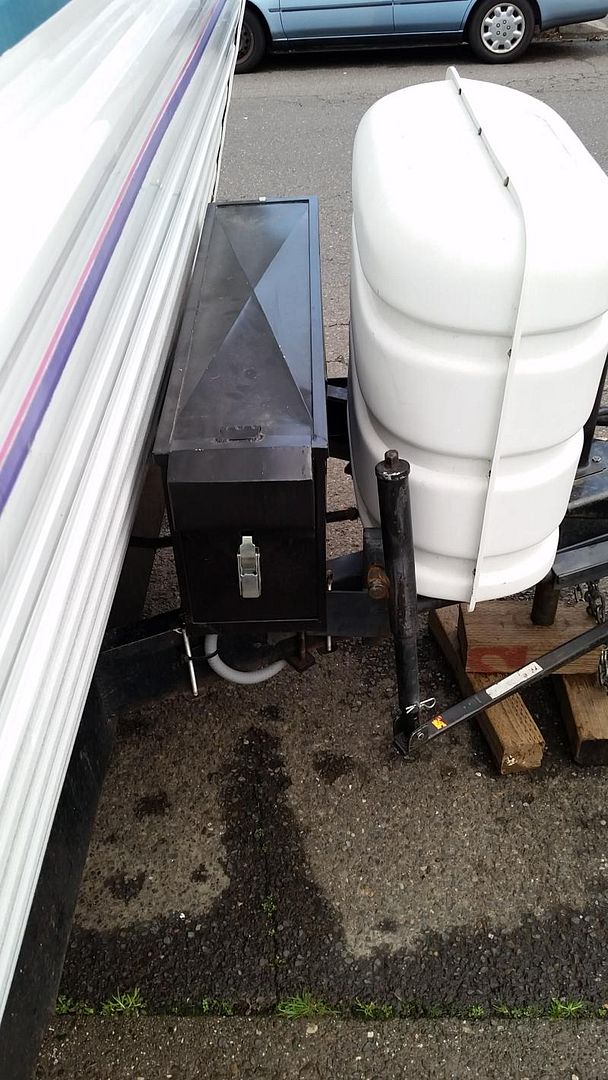
So I made a battery box since the trailer had only enough room for one deep cell, and the way my wife likes to dry camp (boondock) one 12 deep cell does not last through the evening and night. (we're working on it though).
The Box I made has two "banks" and Bank 1 is 2-6 volt Costco golf cart batteries, and Bank 2 is 1-12 deep cell group 27. I try to always have a back-up plan, so the idea is that the 6 volts were plan A, if plan A doesn't work, Plan B is there (Which is where my wiring comes in), and if I have a problem with plans A & B; it's easy to drop in a new easily obtainable 12 volt battery to save the day.
The Box has a standard main selector switch, and an automatic switch that charges the selected bank, once charged; the switch closes and charges the alternate bank. Assuming both banks are charged: As the batteries are drained, both banks are used to a set voltage, then the switch opens and only uses the selected bank. That way there is always a charged battery to switch to if the first bank doesn't make it. The switch has a slight draw, I installed an on/off switch for storage.
I don't think I have seen others do this, but I'm sure I'm not the first. Since I have done this modification, the 2-6 volt cart batteries have lasted until the next charge. We will go out for a week at a time, and I sometimes can last a few nights without a charge, if managed. (I have a big young family, so it's hard to manage).
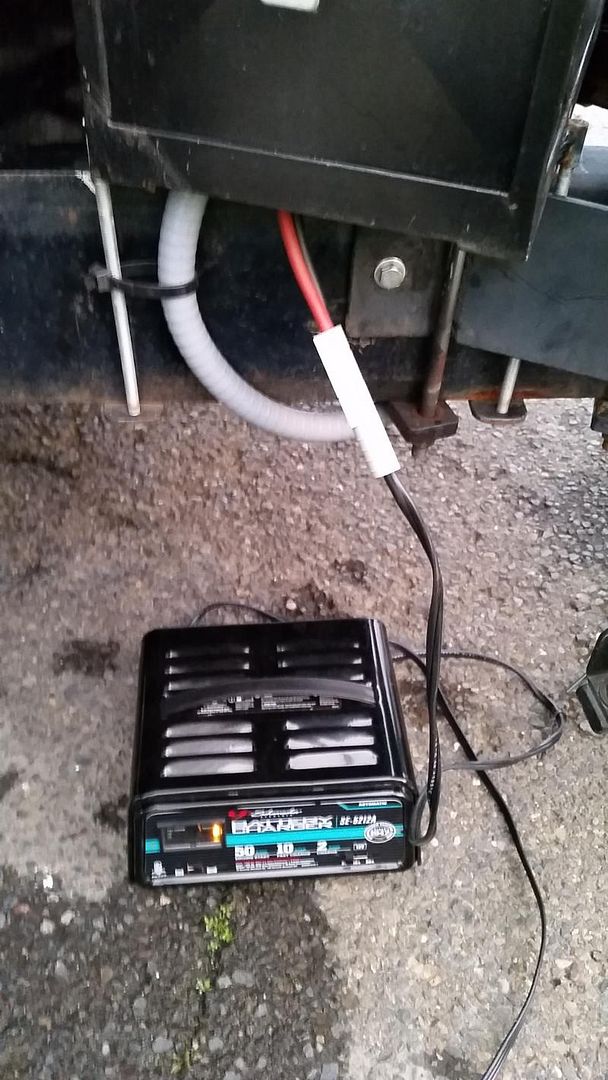
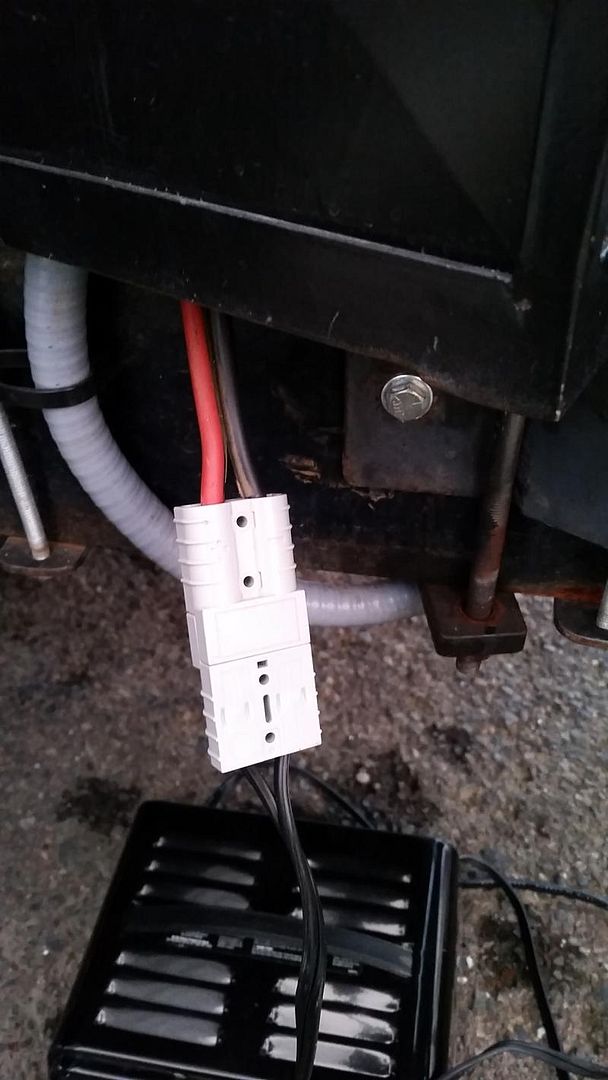
In the box, I have also installed a small 12 volt plug so that I can hook a charger, inverter, air compressor, accessory directly to the batteries. It takes less time to charge, and it gives a better charge. It's also handy when I need to fill up the inflatable water toys. I can use my jumper cables that have the plug on one side to hook it to other batteries, or a truck to charge the banks. Endless possibilities.
I made the cover lockable, even with a weather door to the controls that also can be locked.
I have other little mods that I will share later.
Enjoy!
Joe Zeppe
So I made a battery box since the trailer had only enough room for one deep cell, and the way my wife likes to dry camp (boondock) one 12 deep cell does not last through the evening and night. (we're working on it though).
The Box I made has two "banks" and Bank 1 is 2-6 volt Costco golf cart batteries, and Bank 2 is 1-12 deep cell group 27. I try to always have a back-up plan, so the idea is that the 6 volts were plan A, if plan A doesn't work, Plan B is there (Which is where my wiring comes in), and if I have a problem with plans A & B; it's easy to drop in a new easily obtainable 12 volt battery to save the day.
The Box has a standard main selector switch, and an automatic switch that charges the selected bank, once charged; the switch closes and charges the alternate bank. Assuming both banks are charged: As the batteries are drained, both banks are used to a set voltage, then the switch opens and only uses the selected bank. That way there is always a charged battery to switch to if the first bank doesn't make it. The switch has a slight draw, I installed an on/off switch for storage.
I don't think I have seen others do this, but I'm sure I'm not the first. Since I have done this modification, the 2-6 volt cart batteries have lasted until the next charge. We will go out for a week at a time, and I sometimes can last a few nights without a charge, if managed. (I have a big young family, so it's hard to manage).
In the box, I have also installed a small 12 volt plug so that I can hook a charger, inverter, air compressor, accessory directly to the batteries. It takes less time to charge, and it gives a better charge. It's also handy when I need to fill up the inflatable water toys. I can use my jumper cables that have the plug on one side to hook it to other batteries, or a truck to charge the banks. Endless possibilities.
I made the cover lockable, even with a weather door to the controls that also can be locked.


I have other little mods that I will share later.
Enjoy!
Joe Zeppe
In Pursuit Of Happiness and lost in wonder - Wife, Daughter, 2 Sons, dog
2006 Dodge Ram 2500 4x4 Diesel Auto Quad Cab Short Bed, some mods
1999 Kit Sun Chaser 29ft Bunkhouse, LT tires & some (unique?) mods
Used, Beaten Hensley Arrow member 0001556 = old
2006 Dodge Ram 2500 4x4 Diesel Auto Quad Cab Short Bed, some mods
1999 Kit Sun Chaser 29ft Bunkhouse, LT tires & some (unique?) mods
Used, Beaten Hensley Arrow member 0001556 = old
Options
- Mark as New
- Bookmark
- Subscribe
- Mute
- Subscribe to RSS Feed
- Permalink
- Report Inappropriate Content
Feb-03-2015 12:16 PM
Hoosier Daddy wrote:
After putting up a closet rod at the DD's new house I had an idea on a ladder for the Grand-kids to access the top bunk in the TT.
While originally thinking of doing it all in PVC, I was using a length of vinyl coated wooden closet rod from Home Depot that looked about the same size.... Hmmmm.
On the way home I picked up a single 1" PVC "T" from the local HWI to take home and test fit onto my scrap rod... sure enough, even though the Rod is 1-1/4" a 1" PVC "T" had nice snug fit! (stay with me here...PVC pipe is measured by it's ID while the closet rod is by it's OD.)
Did the math and next time I was at Home Depot picked up enough of the closet Rod, two 1-1/4" rubber feet and two 1" PVC Caps and their 1" PVC "T"s to tackle my project.
I cut everthing to size for 12" wide treads, and at a shorter 10" rise for the Tots little legs and started assembly.
Here is where I ran into a snag. While the rod did have a snug fit it was a little too snug to put all the way into the "T" by hand so I used a mallet to fully seat it. While assembling the rungs I broke the "T"...
I noticed the single test "T" that I had bought from HWI had molded in gussets in the corners and seemed to be better material.
So back to HWI for their superior pieces. Having already commited myself to a bunch of cut up closet rod, I even took an extra precaution and warmed the PVC in hot water while putting it all together.
That worked like a charm! The hot water bath expanded them and probably softened them just enough to make assembly much easier.
I put the two rubber foot caps on the bottom to keep it from sliding and the PVC caps on the other to give it a finished look. Final outcome holds my weight with little flex so I think it's going to be fine for the Grand-Kids to get in and out ofthe top bunk on their own

Nice ladder! Looks a lot better than the one I bought for my previous TT and probably cost you a lot less.
2011 Jayco Jay Feather Select 29L, Blue Ox Sway Pro
2007.5 Chevy Silverado 2500HD 6.6L Duramax Diesel, Air Lift
2007.5 Chevy Silverado 2500HD 6.6L Duramax Diesel, Air Lift
Options
- Mark as New
- Bookmark
- Subscribe
- Mute
- Subscribe to RSS Feed
- Permalink
- Report Inappropriate Content
Jan-20-2015 12:16 PM
myredracer-- Thanks, I'll keep that in mind.
Have Fun,
2007 Jayco JayFeather 20BH
2009 Ford F150 5.4L
2007 Jayco JayFeather 20BH
2009 Ford F150 5.4L
Options
- Mark as New
- Bookmark
- Subscribe
- Mute
- Subscribe to RSS Feed
- Permalink
- Report Inappropriate Content
Jan-20-2015 12:14 PM
Thanks I dry it out before storing it. It will rust almost immediately if I don't.
Have Fun,
2007 Jayco JayFeather 20BH
2009 Ford F150 5.4L
2007 Jayco JayFeather 20BH
2009 Ford F150 5.4L
Options
- Mark as New
- Bookmark
- Subscribe
- Mute
- Subscribe to RSS Feed
- Permalink
- Report Inappropriate Content
Jan-20-2015 05:36 AM
Jpbeck1 wrote:
Here are a couple simple mods we did to our Jayco. Each took less then a half hour to perform.
Since we boondock for weeks at a time I carry along a 55gal barrel to refill the fresh water I bought a 30 dollar cast iron A/C pump from harbor fright. It drains the barrel in about 5 minutes.


It's very important to drain that pump and never leave it completely full of water: it's a cast iron pump, and is thus not rated for domestic water applications. Domestic water is very high in oxygen, and thus will corrode the cast iron volute and any other ferrous materials in the water stream. They are used in closed loop systems, like boilers, where the dissolved air breaks its bond with the water molecules, and are removed from the system. Acceptable pumps volute/casing materials for domestic water applications: bronze, stainless steel, and plastic.
Just learning all about trailering with something longer than my 17 1/2' boat or pop-up tent trailer.
I accept any and all advice you can give me, and I hope to be able to help in my limited capacity. 🙂
I accept any and all advice you can give me, and I hope to be able to help in my limited capacity. 🙂
Options
- Mark as New
- Bookmark
- Subscribe
- Mute
- Subscribe to RSS Feed
- Permalink
- Report Inappropriate Content
Jan-20-2015 12:34 AM
Silicone (or any other type of caulk) will not adhere to cured silicone so re-applying it will not prevent leaks. It needs to be completely removed (not an easy job) before re-applying silicone. Consider using a high quality polyurethane or acrylic latex caulk instead. Lots of info. on the net or go to the John Bridge Tile Forum and ask the pros.
Jpbeck1 wrote:AH64ID wrote:
I thought sealing the shower walls was a no-no???
Great mods.
It came from the factory with a bead of silicone on it so I reapply when needed.


