Turn on suggestions
Auto-suggest helps you quickly narrow down your search results by suggesting possible matches as you type.
Showing results for
- Good Sam Community
- Groups
- Travel Trailer Group
- Forum
- Re: Torklift battery box mounting
Options
- Subscribe to RSS Feed
- Mark Topic as New
- Mark Topic as Read
- Float this Topic for Current User
- Bookmark
- Subscribe
- Mute
- Printer Friendly Page
Torklift battery box mounting
Options
- Mark as New
- Bookmark
- Subscribe
- Mute
- Subscribe to RSS Feed
- Permalink
- Report Inappropriate Content
Mar-21-2015 07:11 AM
Wondering if anyone can shed any light on this..I am going to purchase a Torklift box and switch this weekend and try to get mounted next week but can not find any mounting instructions. I assume every application is a little different but curious on how the box mounts to the frame? Do you drill holes in frame? U bolts? Thanks for any help
2012 2500HD GMC Sierra
2011 Outback 295RE
2011 Outback 295RE
6 REPLIES 6
Options
- Mark as New
- Bookmark
- Subscribe
- Mute
- Subscribe to RSS Feed
- Permalink
- Report Inappropriate Content
Mar-21-2015 11:53 AM
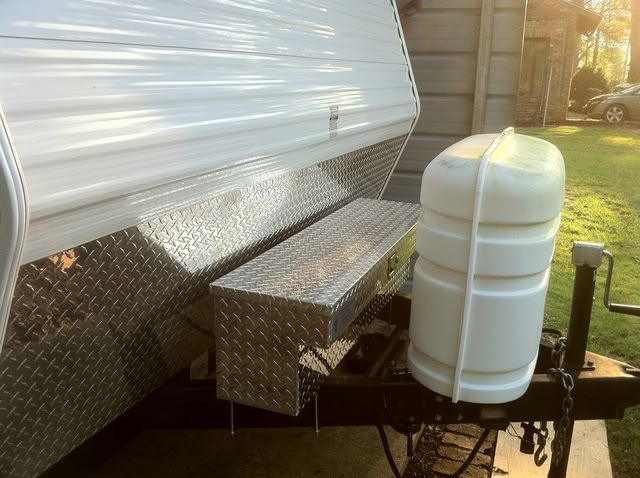
I just added the Torklift box two days ago the second HERE above. The box came with self tapping screws that worked like a champ put one in each corner of box. They also supply two angle pieces to help mount where the frame is wider. The one I bought was 35" long and had enough room for two batteries and I mounted a cut off switch (Harbor Freight Item). I had room to recess the switch in the side of the box also so all the wires are inside the box. The pictures on the post above the second HERE show the switch and box. I also added some bars to the frame to hold the WD bars.
Bruce & Cindy (Chihuahua's Rambo & Chuy)
2016 Jayco 23RLSW
2014 Ram 1500 5.7 Hemi
Blue Ox SwayPro
2016 Jayco 23RLSW
2014 Ram 1500 5.7 Hemi
Blue Ox SwayPro
Options
- Mark as New
- Bookmark
- Subscribe
- Mute
- Subscribe to RSS Feed
- Permalink
- Report Inappropriate Content
Mar-21-2015 10:57 AM
Could the OP post which Torklift box and RV that they have? A description of the tongue area or a picture would help too.
There are a few threads on the Forum about installing the battery boxes. Basically, you will need to drill some holes in the bottom of the box and through the trailer tongue frame. Torklift includes self-cutting fasteners with the box. You can use those or choose your own fasteners.
I have a Power Armor DH A7700 (26 1/2" L) and it has two slots in the bottom 8 1/2" apart. The slots are 4 1/4" from on center. You may be able to use the factory cut slots and attach to an existing battery tray, should you decide that is the best manner of mounting.
The Power Armor box comes with instructions.
'03 F-250 4x4 CC
'71 Starcraft Wanderstar -- The Cowboy/Hilton
'71 Starcraft Wanderstar -- The Cowboy/Hilton
Options
- Mark as New
- Bookmark
- Subscribe
- Mute
- Subscribe to RSS Feed
- Permalink
- Report Inappropriate Content
Mar-21-2015 10:38 AM
Options
- Mark as New
- Bookmark
- Subscribe
- Mute
- Subscribe to RSS Feed
- Permalink
- Report Inappropriate Content
Mar-21-2015 09:48 AM
ashnic wrote:
Wondering if anyone can shed any light on this..I am going to purchase a Torklift box and switch this weekend and try to get mounted next week but can not find any mounting instructions. I assume every application is a little different but curious on how the box mounts to the frame? Do you drill holes in frame? U bolts? Thanks for any help
Don't forget, there is a $30 factory rebate on most of the boxes now. :B
I'm an expert in only one field....I believe it's somewhere in Kansas.
2000 / 22' SKYLINE NOMAD LITE
1998 DODGE DAKOTA / 5.2L= 8mpg.
2006 POLARIS ATV
1500/1200 Watt Champion generator
Yada Wireless Back Up Camera
1998 Dyna Wide Glide
USMC 68-74
2000 / 22' SKYLINE NOMAD LITE
1998 DODGE DAKOTA / 5.2L= 8mpg.
2006 POLARIS ATV
1500/1200 Watt Champion generator
Yada Wireless Back Up Camera
1998 Dyna Wide Glide
USMC 68-74
Options
- Mark as New
- Bookmark
- Subscribe
- Mute
- Subscribe to RSS Feed
- Permalink
- Report Inappropriate Content
Mar-21-2015 09:22 AM
Roy, very nice and informative write up.
Thanks for posting.
Craig
Thanks for posting.
Craig
2014 Heartland Wildness 2775RB, 2015 Ram 2500 4x4 Mega Cab
Options
- Mark as New
- Bookmark
- Subscribe
- Mute
- Subscribe to RSS Feed
- Permalink
- Report Inappropriate Content
Mar-21-2015 08:53 AM
Everyone installation is probably different based on where the box is going to be mounting. I would want to mount outside if at all possible to prevent dangerous fumes from getting inside the trailer.
I would mount my metal boxes on top of the tongue area and extend out on both ends if I was using the box for four GC2 6VDC batteries. This would give me around 450AHs by connecting two groups of the 6VDC batteries is series and then paralleling the groups.
You have to plan for drainage of water or battery fluids inside the box, routing of DC cables to and from the box, Venting of battery fumes when being charged, allowing room for the box lid to gain access, locking of the lid to prevent theft, etc...
The best solution for me would be to use the ROUND HEAD STOVE BOLTS mounted through the tongue frame from the bottom up so the round bolt head is on the bottom of the frame. Then you would use washers, lock washers and bolts inside the metal box to secure it to the trailer frame. When the box is locked then it is very hard to get to the mounting bolts to remove the box... This is done this way to make it harder for theft of the entire box with the round head screws only being visible at the bottom of the tongue frame.
Inside the box you will need to add a floor to allow for the washers and bolts to not get in the way of the mounted batteries. The raised floor gives a good reservoir for catching possible rain water or battery fluids to drain off to the ground.
I am a big fan of having a recessed latch type lid lock but the torklift round key lock is a better idea than using just a plain ole hasp with padlock..
The mounting ideas is to make it most difficult for the thieves of the world to gain access of your high dollar batteries. Remember their weapon of choice is Heavy Duty bolt cutters and cut off saws...
I would also want to install some BLUE SEA components where like cables are added for you connections as well as BLUE SEA high current battery switch operations. The TORKLIFT boxes may not be large enough to accommodate these ideas...
I want all of my battery connection to use the proper size ring terminals and all connections to made using stud bolts everywhere. All LIKE cable paths to be cut to exact lengths and all ring terminals protected with adhesive type heat shrink sleeves... When combining the 6VDC and 12VDC batteries you want all the like paths to be the same lengths as possible so that all DC currents will remain the same charging each battery in the combination.
I am also a big fan of using PVC ELECTRICAL BOXES and solid and flex type PVC conduit to route all of the DC Cables from point A to point B.
I also like to use the BLUE SEA HD Switches to combine the batteries so that I have as much disconnect capability to use one group or the other or completely disconnect all groups from service.
All of this adds to the install cost of course...
My battery system is monitored for DC VOLTAGE taps for the dual battery banks and the amount of DC Current that is being demanded to charge the selected battery banks as well as how much DC current is being pulled from the selected battery banks when running off the batteries...
Knowing what is happening allows me to determine how charge capacity I have at any given time and permits me to decide when to quit using the batteries or not...
My game plan to have my batteries to do what they are suppose to do and last maybe 5-6 years...
Other folks just runs a couple ragged old beat-up cheap battery cables from local auto parts stores and hook'em up...
Roy Ken
My Posts are IMHO based on my experiences - Words in CAPS does not mean I am shouting
Roy - Carolyn
RETIRED DOAF/DON/DOD/CONTR RADIO TECH (42yrs)
K9PHT (Since 1957) 146.52M
2010 F150, 5.4,3:73 Gears,SCab
2008 Starcraft 14RT EU2000i GEN
2005 Flagstaff 8528RESS
Roy - Carolyn
RETIRED DOAF/DON/DOD/CONTR RADIO TECH (42yrs)
K9PHT (Since 1957) 146.52M
2010 F150, 5.4,3:73 Gears,SCab
2008 Starcraft 14RT EU2000i GEN
2005 Flagstaff 8528RESS


