- Good Sam Community
- Groups
- Motorhome Group
- Forum
- 1984 Fleetwood Jamboree E350 - fuel pump / filter?
- Subscribe to RSS Feed
- Mark Topic as New
- Mark Topic as Read
- Float this Topic for Current User
- Bookmark
- Subscribe
- Mute
- Printer Friendly Page
1984 Fleetwood Jamboree E350 - fuel pump / filter?
- Mark as New
- Bookmark
- Subscribe
- Mute
- Subscribe to RSS Feed
- Permalink
- Report Inappropriate Content
May-06-2013 01:54 PM
What we knew: The last time it was used the last ~20 miles it wouldn't go over 25mph. It was a hot day. Previous owners were cheap - used cheapest gas possible.
1984 original 460, C6, light maintenance done, Holley 4 barrell 96k miles, previous to the 1 issue none had been present.
I did some research and found that it could be carb related and/or vapor lock. Was able to get it to fire up and stay running by pouring fuel into the carb.
Fast forward... since then have:
1) Installed new cap, rotor, plugs, wires
2) had the carb rebuilt by a carb rebuilding company (had them install non Holley anti-backfire valve), convert to electric choke
3) rewired tail lights (ground was bad) - brake lights weren't getting 12v to the switch, wasn't able to locate where that comes from or a problem in the harness - so ran new 12V wire directly to the brake switch (fused)... hazards don't work because they should be on the same circuit
First trip was to a gas station about 1 mile away. Everything was fine up until about 1 block from the gas station - started to lose all power, no acceleration. Get off the gas pedal and engine would pick up a tad.
Pulled into the gas station - realizing there were no hard shifts or unnecessary revving of the engine - most likely not trans related.
Throw $30 of gas in the tank (previously just under 1/4 tank) and drove it around.... the problem resolved itself. Went back to the gas station & filled another $70... Took it on a test drive on the freeway and all was well.
Packed up and headed on the 130 mile trip. 4 points during the trip (first one was about 75 miles in or 1/3-1/2 tank later) it started to lose power, mostly when under load. Kept foot in it and the RV picked back up and kept going just fine like nothing happened. I should notate each time it happened on the drive home - it only happened for 10-20 seconds.
Got it home OK and planning a trip in about 3-4 weeks in which I plan to to an FJ40 behind (bigger load on the engine).... trying to figure out the problem.
It appears this is an in tank pump. Thoughts on what pump I can use/find? The E350's of the same year had dual tanks and different pumps. Any idea on what sock to use with the pump?
Where is the fuel filter? I replaced the in-carb filter but didn't see one along the rail anywhere (and very surprised).
What PSI should I expect in the fuel line?
I'm thinking this either has a pump going out, varnish in the tank that's clogging the pump sock, or the hidden filter is clogged....
Thoughts? Thanks!
- Labels:
-
Class C
- Mark as New
- Bookmark
- Subscribe
- Mute
- Subscribe to RSS Feed
- Permalink
- Report Inappropriate Content
May-20-2013 12:58 PM
Fuel tank was put back together.... oddly enough the Carter pump that was listed for an E350 was too short... the top of the body wouldn't fit in the assembly I had.
This began a long trip of driving everywhere unnecessary:
Diel Ford (so wanted to rip into the guy)... Parts department wasn't open, so no Ford part for me.
Oreilly Auto parts - thankfully they had an Airtex pump on hand... matched the OE unit, and researching online Airtex seems to be one of the better aftermarket brands.
Napa - to return the Carter pump & see if they could get the Onan carb bowl gasket... they couldn't... sent me to a place called "general chainsaw"
General Chainsaw - they couldn't even look it up and refused to believe the gasket I referenced was a bowl gasket. They sent me to Vacationland RV...
Vacationland RV wasn't able to get the part in short order... so they sent me to Rasmussen Marine.
Rasmussen Marine - not open (of course)
Got the fuel tank done and back in. Unfortunately the vapor line for the fuel tank filler neck was sliced and I didn't get a replacement.... back to Napa I went.... Got home and got it all back together.
Saturday I also completed fabbing up, welding, and painting the hitch receiver. 1/2 way through, of course, the welder ran out of wire & had to run down to Lowe's to get some more.
Sunday I got a few gallons of gas in the tank and ran down to a gas station, being very careful when driving - I didn't want the small amount of gas to rush away from the pump & kill the motorhome, LOL. Either way - got to the station, put another $50 in the tank and went up a somewhat steep long hill... not only did it maintain the speed but near the crest I gave it some gas.. it downshifted and it picked up speed. No signs of hesitation at all. I hope this continues through next weekend.
After getting it back home... I tried to start the generator... amazingly enough from a week and a half ago the main power wire has enough corossion that it won't start. Late yesterday I picked up a separate battery terminal (4/0 gauge) as the battery it's connected to has both styles of posts - and the typical post isn't being used. Plan to cut a few inches back and hope to find good wire in there. I *might* also tackle some of the horrid wiring under the hood....
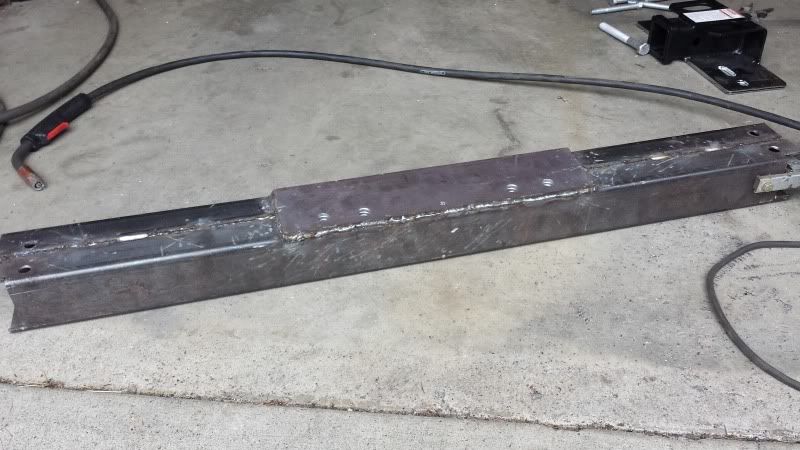
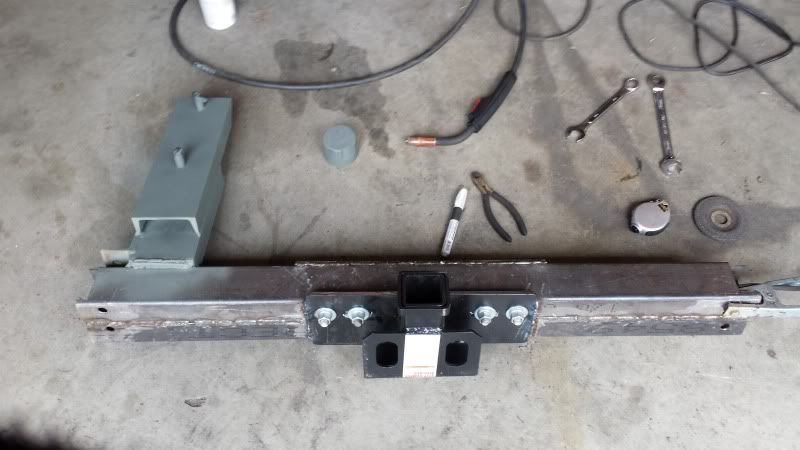
2 pieces of square tubing to fit inside the frame rail... drilled to the stock bolt holes, and a 3/8" plate steel in the center to add support:

mid build:

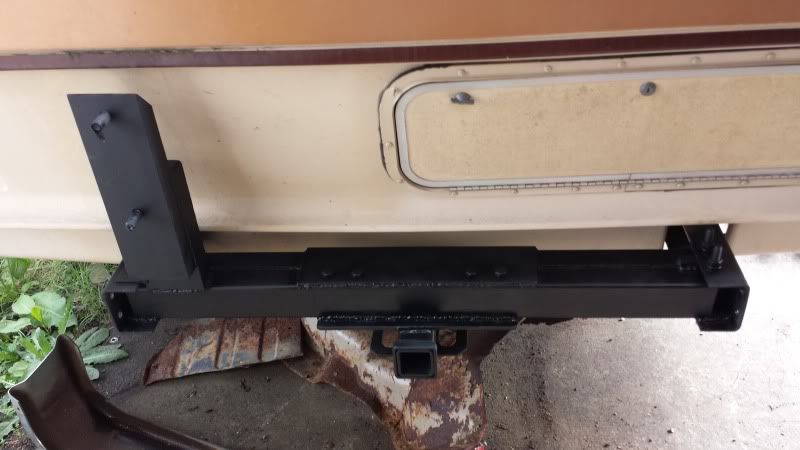
installed pre bumper:

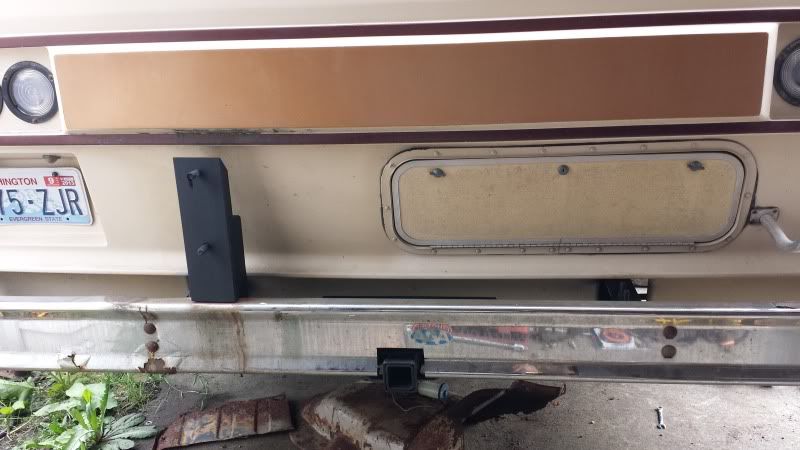
And installed with the bumper cut out:

Yes, everything is both bolted on and welded.... I wanted that to be the strongest point and never the point of failure.
- Mark as New
- Bookmark
- Subscribe
- Mute
- Subscribe to RSS Feed
- Permalink
- Report Inappropriate Content
May-17-2013 08:03 AM
- Mark as New
- Bookmark
- Subscribe
- Mute
- Subscribe to RSS Feed
- Permalink
- Report Inappropriate Content
May-16-2013 11:13 AM
I'm not overly concerned about wiring the tail lights for the trailer, that should only take 10 min or so.
The hitch I've designed so far.... It's using the existing holes in the back of the frame, there are 2 4" square tubes that back to one another, holes drilled through each and each is bolted to the frame separately. 1/2" bolts go through the frame and through the square tubing.
3/16" steel will be welded to the top to help reinforce the strength of the 2 tubes together. A cheap (but still 5000lb capable) bumper step receiver adapter will then be bolted to the rear tube with 5/16" bolts, then welded to both tubes.
Once all in, to make it unnecessarily rigid the entire assembly will be welded to the frame.
The tire mount uses some of the same bolts on the left frame rail. That will get chopped down to still bolt in through the top of the frame but then will bolt and/or be welded to the square tubing of the receiver.
So far the cost has been:
$30 in steel tubes (and I have extra)
$28 in galvanized bolts
$25 for the bumper receiver
$10 for the light adapter
I got the tank back yesterday, $100 after tax to have it boiled out & painted. New pump & strainer will go in on Saturday along with replacement of all of the soft fuel lines. This issue has ended up costing more than expected:
$100 to boil the tank
$40 for new soft fuel lines (may have extra)
$40 for a new filler neck (I was surprised at that cost)
$65 for the pump & filter
But I'm hoping that the knowledge that it's all replaced helps in easing my mind when heading out on longer trips.
- Mark as New
- Bookmark
- Subscribe
- Mute
- Subscribe to RSS Feed
- Permalink
- Report Inappropriate Content
May-15-2013 05:49 PM
toyotaspeed90 wrote:
I pulled the tank early Friday afternoon so I could get it down to the radiator shop on Friday. The tank didn't actually look as bad internally as I was hoping... but I still wanted to pay the relatively low price to have it boiled out as cheap insurance.
However - I did find a small amount of corrosion on the fuel pump connector and the fuel pump sock was completely black and mostly hardened over. Most likely being the culprit.
Glad you found something and did not drop the tank for nothing.
I still haven't received the gasket for the carb yet so nowhere with that. I think I've decided to use an old 86 MR2 muffler for the generator. This muffler is about 6" diameter, has a 90* bend in it, about 3ft wide (yes, longer than the regular generator muffler) and is meant to quiet a 1.6 that has a short exhaust (MR2's are mid engine cars, so there isn't much length in the exhaust to quiet it down).
The last time I changed my Carb gaskets NAPA had them in stock. The muffler on my 4.0 Onan that was on it when I got it is only 4 1/2 inches in diameter and 18" long. My local muffler guy says he stocks them.
I swapped the radio out... and I've never had a stereo be such a PITA before. I've done them in tons of cars, trucks, boats, etc.... Many of which take as little as 15 minutes to do a clean/fresh swap or install. As simple as stereos are - it still took me about 3 hours just to wire.
Doing ANY work under or inside the dash of our rigs is indescribably difficult, no room and no access.
The wiring in the RV is less than optimistic. The radio that came out only had 2 channels so all 4 speakers ran to left & right.... However in trying to find which went where I couldn't easily determine (partially due to how it was built, partially due to how the PO wired it). There was no switched 12V (and realized that's so that occupants can listen to the stereo sans keys - my resolution to this was an added switch above the radio). The tricky part, however was the speakers... I ended up having to remove the rear speakers, cut the wires off the old stereo, make a 10' test cable, and check for continuity between each wire. Somehow there were only 4 wires for all 4 speakers connected to the old tape deck and I could only see unions for 2 of the 8 wires (meaning positive left front and rear I could see but not negative). This left me stumped and is why I resorted to cutting and testing.
Way way back some of the first old stereos for cars that had four speakers only had four wires, all positive, one for each speaker. The idea was that you were supposed to ground each speaker to the frame to complete the connection. This only lasted a few years due to all the interference and bad contacts as you can imagine. I was lucky, mine had eight wires, I would not want to try to fish wires from the radio to the rear, lots of work.
It was also wired with what looks to be house THHN cable - completely unnecessary for speakers. If I remember.... right speakers are yellow (+) and white (-) and left speakers are orange (+) and white (-). The only distinction you have between front and rear from above the doghouse is that the rear speaker wires are in a loom and the front speakers just go to the sides. Part of me thinks it couldn't be stock... until I realized all the wire is the same...
I also fabbed a bracket to hold the stereo in place - it cradles under the radio, bolts into the radio, and is bent and bolts up to the upper right vent.
I also picked up some square tubing to build a receiver hitch. I'm going a bit overload here.... the square tubing will sit inside the frame rails (2 pieces running parallel), will bolt to the frame rails, will be welded to the frame rails, and will be bolted to one another. I will probably pick up a univeral receiver plate and bolt & weld it to the square tubing. Hoping that is in and done effective Saturday.
My hitch is also hand made and all welded, looks like a little better than 6000 LB capacity. Wait until you tap into the wiring for the hitch, it is pretty ugly back there too.
Sounds like you are getting things into shape, have fun.
- Mark as New
- Bookmark
- Subscribe
- Mute
- Subscribe to RSS Feed
- Permalink
- Report Inappropriate Content
May-14-2013 12:47 PM
However - I did find a small amount of corrosion on the fuel pump connector and the fuel pump sock was completely black and mostly hardened over. Most likely being the culprit.
I still haven't received the gasket for the carb yet so nowhere with that. I think I've decided to use an old 86 MR2 muffler for the generator. This muffler is about 6" diameter, has a 90* bend in it, about 3ft wide (yes, longer than the regular generator muffler) and is meant to quiet a 1.6 that has a short exhaust (MR2's are mid engine cars, so there isn't much length in the exhaust to quiet it down).
I swapped the radio out... and I've never had a stereo be such a PITA before. I've done them in tons of cars, trucks, boats, etc.... Many of which take as little as 15 minutes to do a clean/fresh swap or install. As simple as stereos are - it still took me about 3 hours just to wire.
The wiring in the RV is less than optimistic. The radio that came out only had 2 channels so all 4 speakers ran to left & right.... However in trying to find which went where I couldn't easily determine (partially due to how it was built, partially due to how the PO wired it). There was no switched 12V (and realized that's so that occupants can listen to the stereo sans keys - my resolution to this was an added switch above the radio). The tricky part, however was the speakers... I ended up having to remove the rear speakers, cut the wires off the old stereo, make a 10' test cable, and check for continuity between each wire. Somehow there were only 4 wires for all 4 speakers connected to the old tape deck and I could only see unions for 2 of the 8 wires (meaning positive left front and rear I could see but not negative). This left me stumped and is why I resorted to cutting and testing.
It was also wired with what looks to be house THHN cable - completely unnecessary for speakers. If I remember.... right speakers are yellow (+) and white (-) and left speakers are orange (+) and white (-). The only distinction you have between front and rear from above the doghouse is that the rear speaker wires are in a loom and the front speakers just go to the sides. Part of me thinks it couldn't be stock... until I realized all the wire is the same...
I also fabbed a bracket to hold the stereo in place - it cradles under the radio, bolts into the radio, and is bent and bolts up to the upper right vent.
I also picked up some square tubing to build a receiver hitch. I'm going a bit overload here.... the square tubing will sit inside the frame rails (2 pieces running parallel), will bolt to the frame rails, will be welded to the frame rails, and will be bolted to one another. I will probably pick up a univeral receiver plate and bolt & weld it to the square tubing. Hoping that is in and done effective Saturday.
- Mark as New
- Bookmark
- Subscribe
- Mute
- Subscribe to RSS Feed
- Permalink
- Report Inappropriate Content
May-14-2013 07:09 AM
- Mark as New
- Bookmark
- Subscribe
- Mute
- Subscribe to RSS Feed
- Permalink
- Report Inappropriate Content
May-09-2013 01:08 PM
The original tv antenna winding still works too (gets a few laughs from friends... I'm considering removing it or seeing if I can use it for CB instead).
The interior is relatively spotless as far as I can tell... no rips or tears in anything.
Now if only the wiring under the rig was as clean as the inside...
- Mark as New
- Bookmark
- Subscribe
- Mute
- Subscribe to RSS Feed
- Permalink
- Report Inappropriate Content
May-09-2013 12:50 PM
Amazing that you still have the original hub caps, running boards and roof air.
- Mark as New
- Bookmark
- Subscribe
- Mute
- Subscribe to RSS Feed
- Permalink
- Report Inappropriate Content
May-09-2013 11:06 AM
I'm not sure on the Model... it's an 84 Fleetwood Jamboree. I thought it was a 28 foot but the title/registration says 26MH - guessing that's indicating a 26'.
It has a rear bedroom/bathroom with the kitchenette right when you step in the side door... with a couch & 2 captains chairs behind the driver/passenger seat.

I'm guessing it's a relatively base model... so far the only additional option it seems to have is the wind up tv antenna....
This was taken right when I got it home.
- Mark as New
- Bookmark
- Subscribe
- Mute
- Subscribe to RSS Feed
- Permalink
- Report Inappropriate Content
May-09-2013 09:23 AM
Enjoy your new classic rig, I have had mine for ten years and driven it over 40,000 miles. I did not think I would keep it this long, but it is just right for us.
What model do you have? I have the model "P" with the full rear lounge / bed and a side bath right behind the drivers seat.
Be sure to come back to the Forum with some updates on your future repair adventures.
- Mark as New
- Bookmark
- Subscribe
- Mute
- Subscribe to RSS Feed
- Permalink
- Report Inappropriate Content
May-09-2013 06:48 AM
Our fuel pump was cylindrical thing. Holley had electric pumps that looked like that but larger, for carbed cars, long ago.
2003 Jayco Escapade 31A on 2002 Ford E450 V10 4R100 218" WB
- Mark as New
- Bookmark
- Subscribe
- Mute
- Subscribe to RSS Feed
- Permalink
- Report Inappropriate Content
May-08-2013 10:46 PM
http://dave78chieftain.zxq.net/OnanManuals/Onan%20965-0222%20BFA%203.0-4.0%20Parts.pdf
which is incredibly handy for the Genset 4.0BFE - it has part numbers. Luckily I was also able to find a superseded number for the gasket 146-0220 which is now 146-0792 (per another sears page/diagram I came across).
In my generator it was the powervalve that was clogged, among other things.
- Mark as New
- Bookmark
- Subscribe
- Mute
- Subscribe to RSS Feed
- Permalink
- Report Inappropriate Content
May-08-2013 09:25 PM
j-d wrote:
When we had our 84 Holiday, I was adding a generator. A dozen years or so ago, the people who actually knew something about those year were still available to chat with. Tech said they "didn't add a generator fuel line in prep". "Prep" included some wiring but the fuel source was a Tee in a tank feed line. That meant pulling fuel through the pump. Also meant being able to run a tank all the way out using the genset.
As discussed, genset has its own fuel pump. Another LOW Pressure one. ONAN specifies a pump that doesn't flow fuel when not running, OR an external fuel shutoff solenoid valve. But I didn't know that at the time I needed a replacement pump and bought a generic low pressure Purolator (now Facet/Purolator) pump at the local auto supply. Installed with an inline filter in place of the OEM Facet pump. The genset never leaked fuel at the carb, even though the needle and seat had pressure when the RV ran on that tank, genset running or not.
Remember, I have that fuel pump wiring diagram.
the pump on the generator turned out to be perfectly fine. the tank in my RV has a completely separate provision for the generator that feeds only the generator. I was just making mention that worst case scenario I could feed the engine using that line and a universal pump if pulling through the low pressure in-tank pump didn't work.
- Mark as New
- Bookmark
- Subscribe
- Mute
- Subscribe to RSS Feed
- Permalink
- Report Inappropriate Content
May-08-2013 09:21 PM
So I thought that pulling the drain plug with more than a 1/4 tank might get messy or unsafe.... I have a random inline universal low pressure pump lying around from a boat motorswap (which now has a different pump) so I wanted to, more safely, pull the fuel out.
Sure enough I found the supply line (pretty easy to identify - it's slightly larger in dia than the return line) and used an external battery to pull fuel.... no problems pulling through the pump to drain the tank.
While that pump (slowly) drained the gas I pulled the carb.... I'm much more fuel injected savvy so I'm not sure what the name is.... on the side of the carb is a small 'gear' that has a spring it sits against as it threads into the 'bowl' (which is just the body of the onan carb) and part of a needle assembly of some sort... pulled that out and cleaned the passages.... the genset fired right up.... runs well enough with a heavy load on it without hesitation. One of the gaskets ripped upon the 2nd disassembly so I'll have to order a gasket kit but at least that's 1 of about 1000 things fixed. Also need to find an appropriate muffler replacement seeing as I have none and it's audible a block away...
In reading I'm seeing that issues with the in tank pumps and wiring are common on the 80's E350 motorhomes. Plan is to pull the tank, send it off to be cleaned, replace the pump, replace the soft lines along the rail, and then maybe even replace the wiring.... I had read that others had considered running all new wiring and bypassing the current safety feature but using the oil pressure switch (this is something I had to set up in my boat since I went with an automotive 4.3 which didn't have the provision for a mechanical pump... so wired a relay into the ignition via an oil pressure switch).... so if I find that there's a voltage drop I may just do this. This option would also allow me to add some male/female connectors where I could splice in a universal pump easily in a pinch.
My biggest concern with the RV is the possibility of breaking down far from nothing... so trying to iron as much out as possible ahead of time.


