Turn on suggestions
Auto-suggest helps you quickly narrow down your search results by suggesting possible matches as you type.
Showing results for
- Good Sam Community
- Groups
- Motorhome Group
- Forum
- Re: solar panel on a conversion van
Options
- Subscribe to RSS Feed
- Mark Topic as New
- Mark Topic as Read
- Float this Topic for Current User
- Bookmark
- Subscribe
- Mute
- Printer Friendly Page
solar panel on a conversion van
Options
- Mark as New
- Bookmark
- Subscribe
- Mute
- Subscribe to RSS Feed
- Permalink
- Report Inappropriate Content
Aug-27-2015 10:59 AM
I just purchased 100W solar panel. Now to do mount. My problem is that the terminals come out of the panel but have little bendability for bringing into van thru the roof to wire up to the converter. The company I bought from has great product but lousy customer or tech support. Please help this dream become reality.
Labels:
- Labels:
-
Class B
5 REPLIES 5
Options
- Mark as New
- Bookmark
- Subscribe
- Mute
- Subscribe to RSS Feed
- Permalink
- Report Inappropriate Content
Sep-10-2015 10:45 AM
I don't know what voltage the panels are. This is just my two centavos, but since a van has such a small surface area, you want every watt that you can get from the panels, so even though a cheapie PWM controller costs $8, I'd highly recommend paying for a MPPT controller. Yes, they are more expensive because a MPPT controller requires an inductor coil. However, with the pictured panels, there are two scenarios:
Scenario 1: The panels are 12 volts in parallel. The PWM controller will just pass 12.0 volts through, which will do nothing to charge the batteries unless the batteries are almost dead. Even then, this would be at best peak times.
Scenario 2: The panels are in series, giving ~24 volts. The PWM controller will "lop off" virtually half of the incoming energy. Since every square inch of space on a van is precious, this is energy loss where it hurts.
Then there are shoulder hours of sunlight, which a MPPT controller is better at handling.
Not to say that PWM controllers are worthless. If one has a bunch of panels on top of a carport, it may not matter that a fraction of the energy coming from it gets lost by the charge controller. However, on a van, it is definitely worth the cost for the better controller, just because it not just adds some more useful energy, but allows a wider time of day the solar panels are usable.
Options
- Mark as New
- Bookmark
- Subscribe
- Mute
- Subscribe to RSS Feed
- Permalink
- Report Inappropriate Content
Sep-01-2015 04:30 PM
If you are wiring them in series, you may want to consider an MPPT controller to gain and extra 10-20% efficiency. If you are going parallel, PWM even a Ebay cheapy will do the job.
Options
- Mark as New
- Bookmark
- Subscribe
- Mute
- Subscribe to RSS Feed
- Permalink
- Report Inappropriate Content
Aug-30-2015 10:16 PM
That was a great price. My setup has one panel 20ft.of wire & controller. I still need inverter & battery.
Options
- Mark as New
- Bookmark
- Subscribe
- Mute
- Subscribe to RSS Feed
- Permalink
- Report Inappropriate Content
Aug-27-2015 01:20 PM
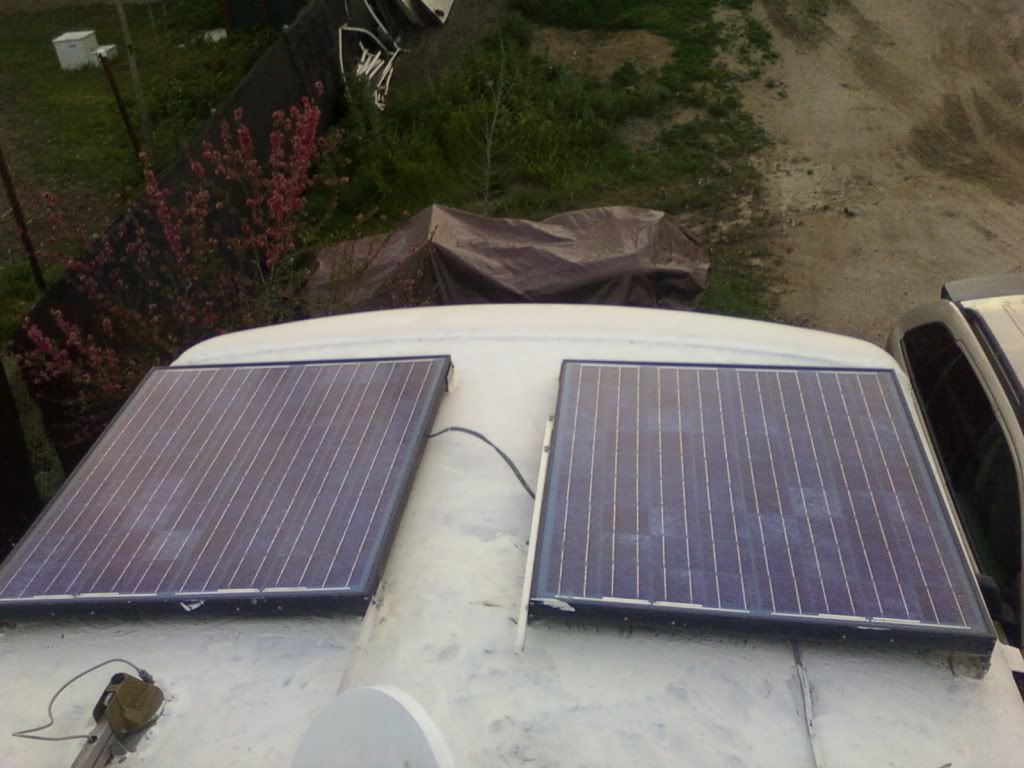
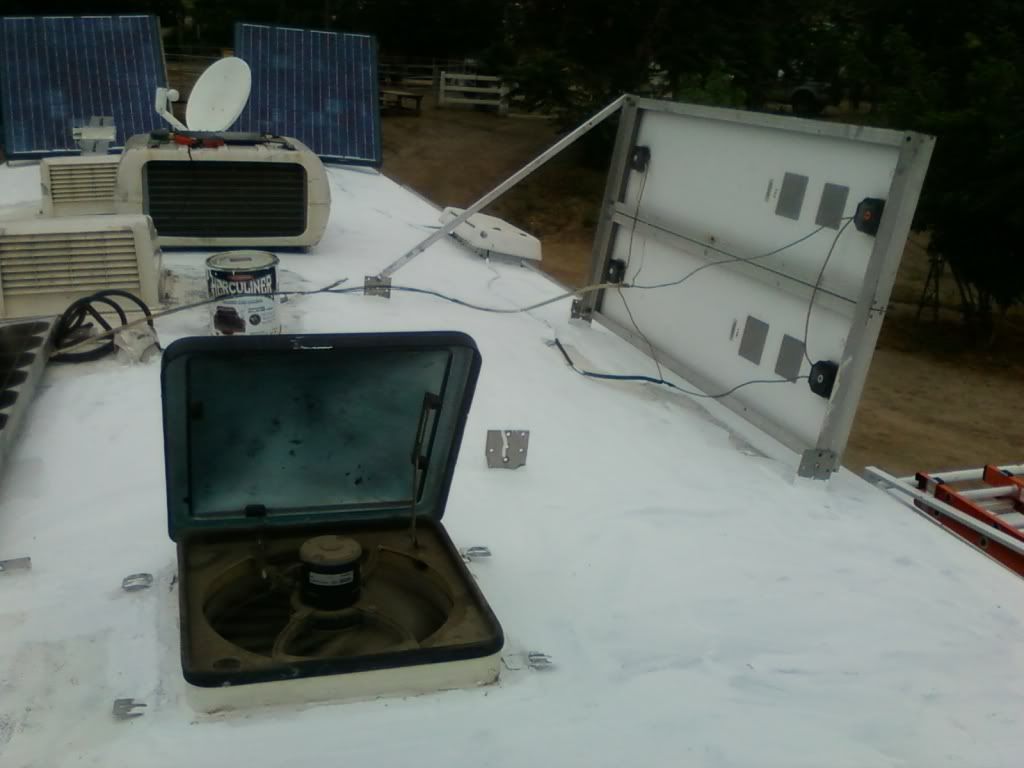
Here are pictures of my roof and the solar panels.
Normally you want to tilt the panels to about 45 degrees, or maybe a little less to catch less wind. If you are camping in a windy area, or traveling the next day (that will charge the battery by running the engine) do not bother to tilt the panels
Golden_HVAC wrote:rickthescot wrote:
Sounds like a great idea. I guess asking for pictures again is not going to persuade you though. We are visual creatures and I don't think 1000 words will accomplish what one image will. You can do it, just one pic.
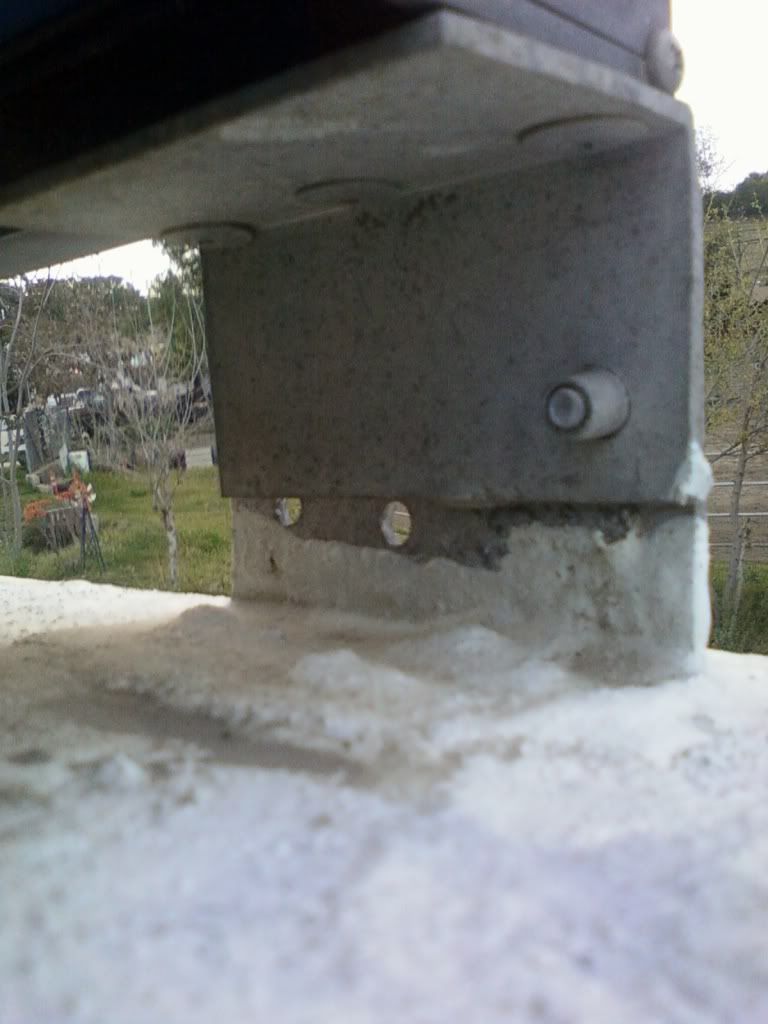
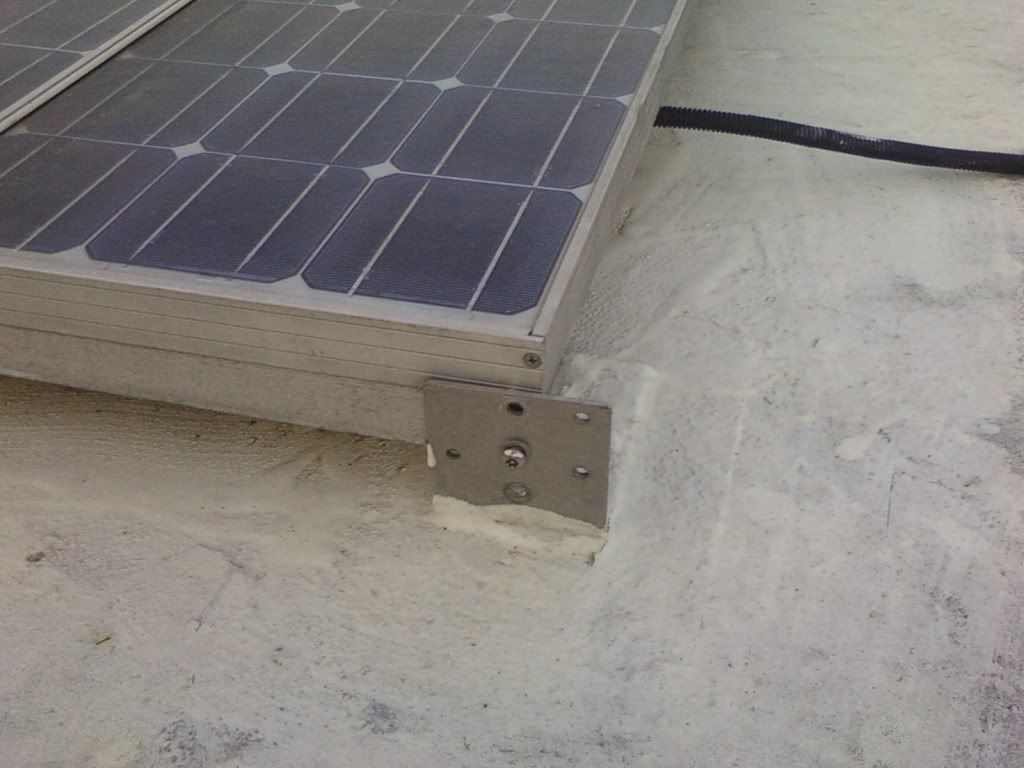
More pictures that I took a few days ago to post pictures of my solar panels, and their mounts. Some pictures are really close up pictures of the solar panel mounts, and give a clear picture of howrough the surface is.Golden_HVAC wrote:
Hi,
This is my front pair of panels. 120 watt mounted on a curved roof, 102" wide.
This is the mount it is held on with three rivets into the frame, and then the bottom half is 6" long aluminum, with nutsert in the upper piece, bolt you can not see from the outside edge pointing inward.
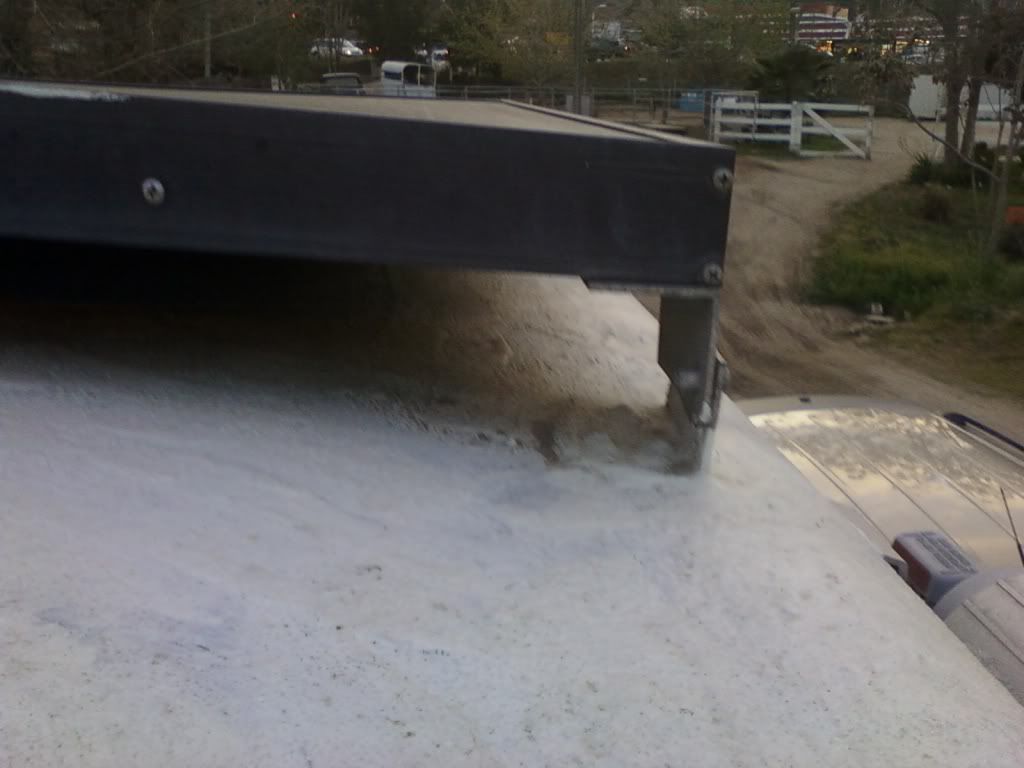
This picture shows the bigfoot panel mount sold by RvSolarElectric for $35 a set back in 1994. I wonder what they cost today?
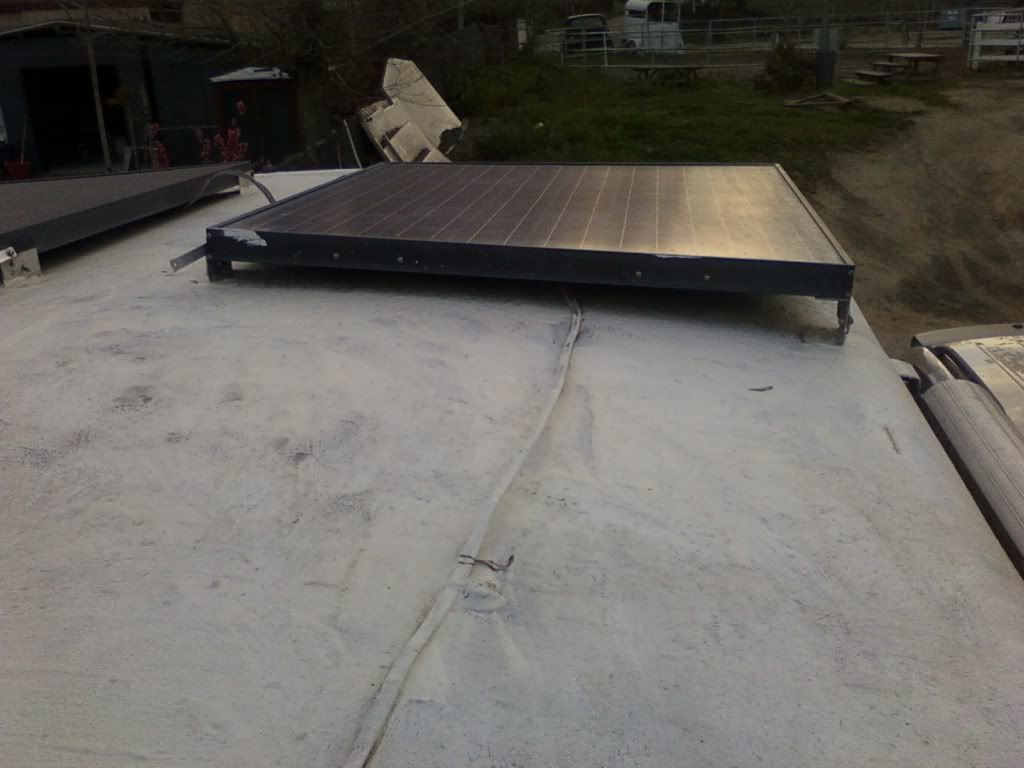
This picture shows the panels tilted while I was working on the roof.
Fred.
Normally you want to tilt the panels to about 45 degrees, or maybe a little less to catch less wind. If you are camping in a windy area, or traveling the next day (that will charge the battery by running the engine) do not bother to tilt the panels
Money can't buy happiness but somehow it's more comfortable to cry in a
I havn't been everywhere, but it's on my list.
Kangen.com Alkaline water
Escapees.com
Porsche or Country Coach!
If there's a WILL, I want to be in it!
I havn't been everywhere, but it's on my list.
Kangen.com Alkaline water
Escapees.com
Options
- Mark as New
- Bookmark
- Subscribe
- Mute
- Subscribe to RSS Feed
- Permalink
- Report Inappropriate Content
Aug-27-2015 01:17 PM
Hi,
For mounts, it really helps to have the panel about 1" above the roof, and this allows air under the panel, to help cool it, and that allows more power production.
I cut 6" long 2" angle aluminum, with three holes into the bracket on one side to the roof with #10 screws, and 5/16" hole for a 1/4-20 bolt into the solar panel frame.
I would recommend drilling a hole for the electrical wire someplace 'under' the panel final location, so that if it leaks, it will only leak the rain that falls below the panel. You could drill a 7/8" hole and install a raintight connector, or two screw connector, and then cover with a generous amount of rubber roof sealant. Also sealant under the brackets, and on top of the screw terminals.
If the panel mounts are really close to the end, you could tilt the panels to get more production when you will be parked for a while, and want to get up there and tilt the panels. I used 12" long arms. At one point, I had some brackets made from 3/4" thin gauge angle aluminum, 5/16" holes on each end.
For wiring, I used grey Romex #10 wire, and you can get that at Home Depot. It is rated for UV light, and out in the rain, even buried underground.
Good luck,
Fred.
Money can't buy happiness but somehow it's more comfortable to cry in a
I havn't been everywhere, but it's on my list.
Kangen.com Alkaline water
Escapees.com
Porsche or Country Coach!
If there's a WILL, I want to be in it!
I havn't been everywhere, but it's on my list.
Kangen.com Alkaline water
Escapees.com
