- Good Sam Community
- Everything RV
- Technical Issues
- Shadow Cruiser S185 FBR Solar Install/Upgrade
- Subscribe to RSS Feed
- Mark Topic as New
- Mark Topic as Read
- Float this Topic for Current User
- Bookmark
- Subscribe
- Mute
- Printer Friendly Page
Shadow Cruiser S185 FBR Solar Install/Upgrade
- Mark as New
- Bookmark
- Subscribe
- Mute
- Subscribe to RSS Feed
- Permalink
- Report Inappropriate Content
Apr-10-2016 08:59 PM
With that said, one of the first things I did was purchase an off-the-shelf solar solution. We have never (and probably won't unless we go somewhere hot where we want A/C) run a generator. I have two 6V Energizer (Johnson Controls) GC2 6V batteries providing approx 208 AH of power.
Initial system (2014):
- Renogy 100W 12V Monocrystalline Solar Starter Kit (Amazon). It was ~$185 when I purchased it initially.
Includes:
- 100W Monocrystalline Solar Panel
- PWM Controller (new version available now)
- 25ft of 12 AWG wire with MC4 connections on one end
In order to have the system work the way I wanted I also added:
- A outlet with switch
- Waterproof box and cover for the outlet
- 12 AWG wire from the switch to the controller
- 8 AWG wire from the controller to the batteries
- Aluminum "legs" to stand the panel up
- Male recepticle to the end of the extension wire
- Metal cable to lock the panel to the RV
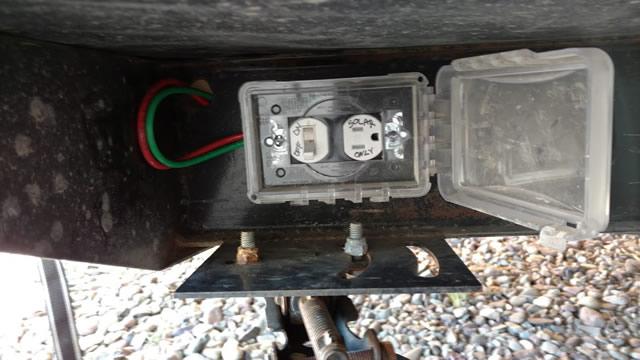
My goal was to be able to park the RV anywhere (shade, etc.) and then extend the panel out and point it at the sun. I also would re-point it throughout the day to keep the most juice coming. Here's a picture of the plug; the switch was when I wanted to make sure there was never one wire connected at a time; turns out if you hook it to the panel first (MC4 connections) that issue will never occur. The plug end works great; it is impossible to mess up the polarity.
This system worked very well for us for 2 full camping seasons. On the last trip of the season wind took my solar panel and chucked it into a rock... it shattered.
Since I had had success with my solar panel setup (never had "dead" batteries) I decided that would be a perfect opportunity to upgrade.
Initial setup total cost:
- Solar: $225
- Upgraded Batteries: $175
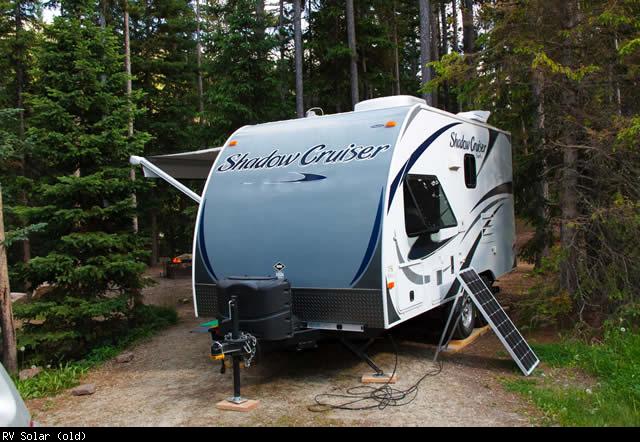
Here's a picture of it in operation (normally it is a lot further away; this site I caught the sun through a gap in the trees):
New System (Early April 2016)
With the smashed panel I immediately ordered a new 100W Renogy panel; seems to be the best price vs performance (not to mention free shipping). Additionally, I did a lot more research into what charge controller I wanted. Between HandyBob's Blog and LoveYourRV I decided to go with the Trimetric 2030 battery monitor with its accompanying Bogart SC2030 controller. Even though I originally was looking into a cheap(er) MPPT controller; the fact that the battery monitor and solar controller talk to each other seems like it'll more than make up for not being MPPT (especially since my system is so small).
So on top of the panel I ordered the following:
- Bogart Engineering SC-2030 PWM Charge Controller - price: $113.05
- Bogart Engineering TM-2030-A-F TriMetric Monitor - price: $150.50
- Bogart Engineering Temperature Sensor for SC-2030 Charge Controller - price: $12.00
- Bogart Engineering 22 Gauge 4 Wire Twisted Pair Cable Kit, 50ft - price: $26.26
- 500A, 50mV DC Shunt for Current Monitoring Meters - price: $23.03
With shipping it ran about $343. Sadly I couldn't get Bogart stuff from my favorite place (Amazon) so after browsing the web I found the AltE store to be well reviewed and have the best prices.
The final items to make the project go included (but definitely not limited to (and most from Home Depot or Wal Mart):
- 50ft of phone cord (only needed 35ft)
- 24ft of 6 AWG stranded copper wire
- various ring terminals
- 4"x4" weatherproof outdoor electrical box
- A red 5/16" Power Junction Block
- Various zip ties, attachment points, etc
- 2x 51" 2/0 flexible starter cables
- 30A circuit breaker
- 40A circuit breaker
For the first part of the upgrade I wanted to maintain the ability to move the panel around but try to reduce some of the voltage drops. I upgraded the wiring from the controller to the outlet from the 12 AWG to 8 AWG. I also made sure to run 6 AWG wire from the controller to the batteries.
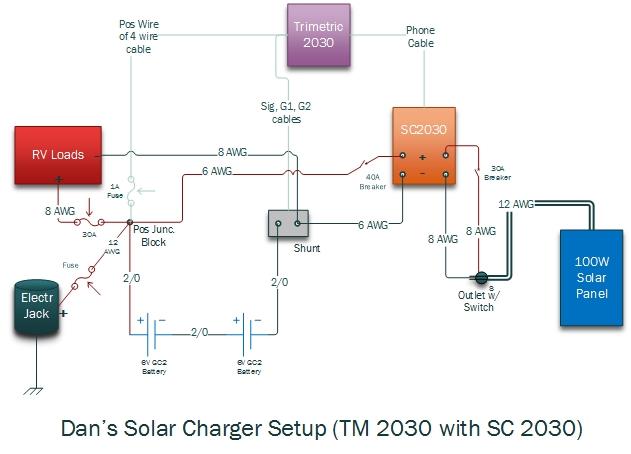
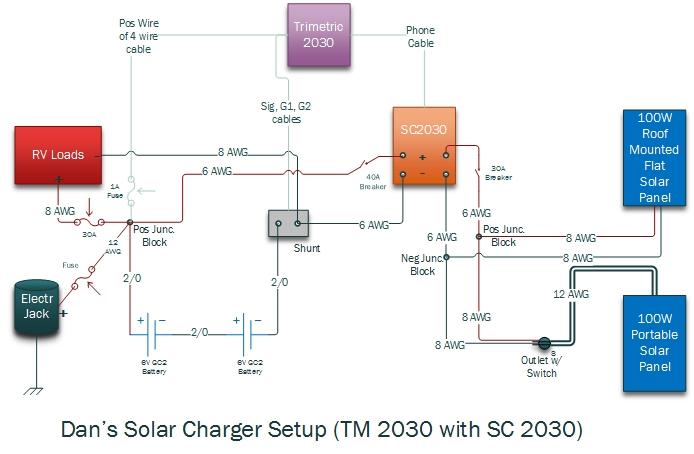
On to the actual setup. Below is the wire diagram for how my system is currently setup. I tried to cover the wire sizes and all the connection points. The RV loads is very nebulous... I just moved the pre-existing connections from the batteries to my junction block and the shunt. The temperature sensor is not shown.
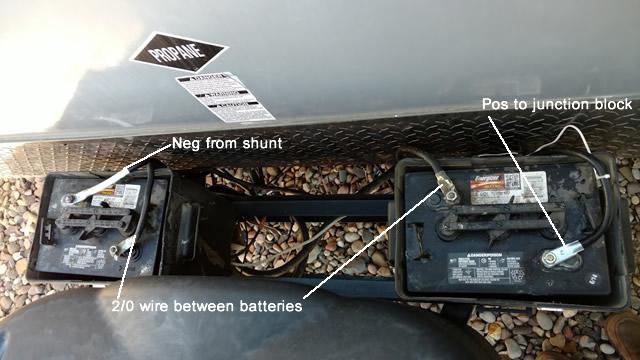
Unlike most people on the forums the small travel trailer doesn't have the batteries in a compartment; they're just chilling outside. When I converted from 1x12V to the 2x6V I created my own extended rack with separate battery boxes for each battery. If you're wondering why they're spaced apart vs being right next to each other that is the perfect amount of space for a 6 gallon water can OR gas can (small SUV fuel capacity). The two batteries are connected by a 2/0 wire.
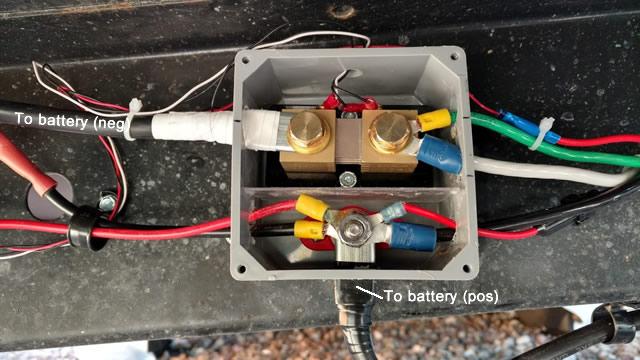
The shunt and positive junction block are mounted in the weatherproof box (not necessarily weatherproof now with all the holes but I don't intend to submerge; just generally protect). There is a plastic piece installed to ensure the positives and negatives cannot touch.
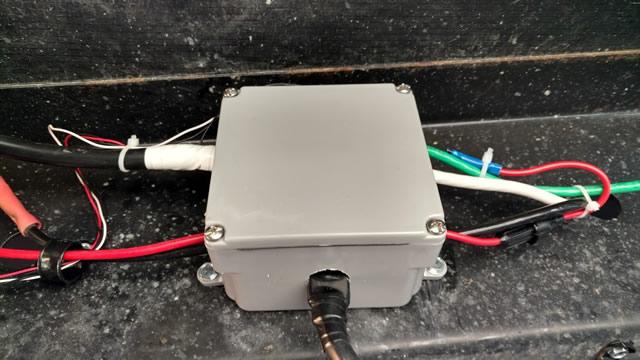
Here it is with the cover on:
From there it was all about running the wires inside. I had learned from the first one that I could use existing holes I just had to punch through and/or remove the foam (then re-foam). In case anyone is running in a similar trailer here are the wires running along then entering:
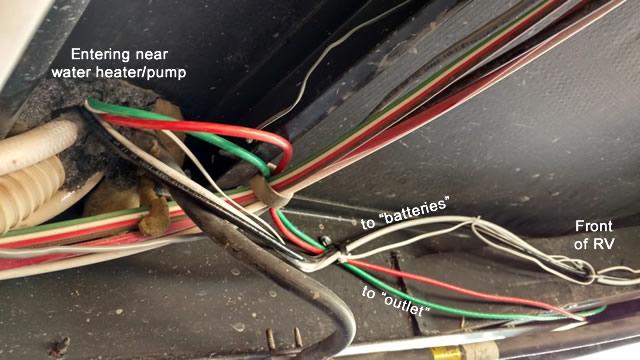
The shunt signal wires run down further and enter under the fridge.
In this picture you can see the wires entering and then running over the "wall" into the basement where the SC2030 is:
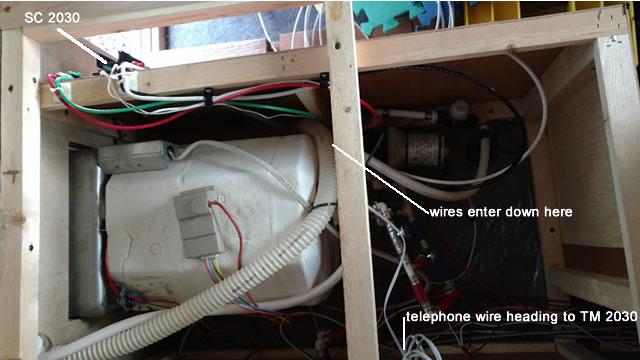
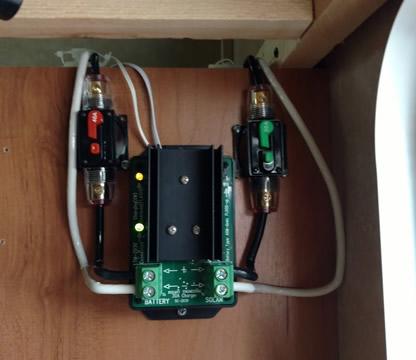
Now to the good stuff; here is my SC 2030 and the circuit breakers. It isn't as pretty as some of here but it seems to do the job and stay out of the way.
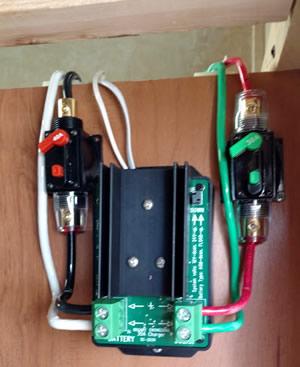
The next fun part was running the shunt signal cable and telephone line across the entire RV and up the wall into the storage area above the closet. I followed existing wire paths under the heater, through the cabinets, under the fridge, under the bathroom sink, under/behind the shower, behind the toilet, up the hollow wall between the bathroom and closet, and then to the final spot. If anyone tries to repeat: a string with some nuts hung from the antenna outlet ended up working better than my electrical snake. I then cut a hole for a sideways double gang box and mounted the box. Note: I had to cut part of the box to allow the TM 2030 to fit. I then hooked everything up and cleaned up. Here is the TM 2030 in its home:
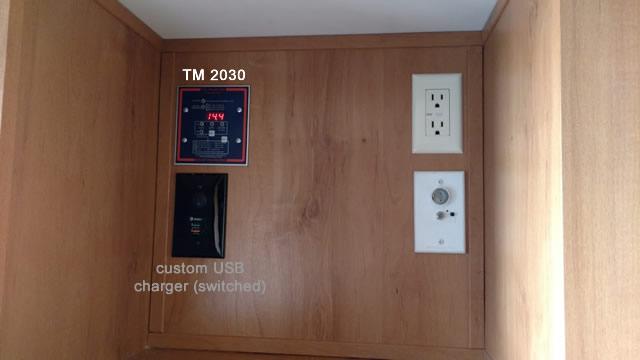
and zoomed in:
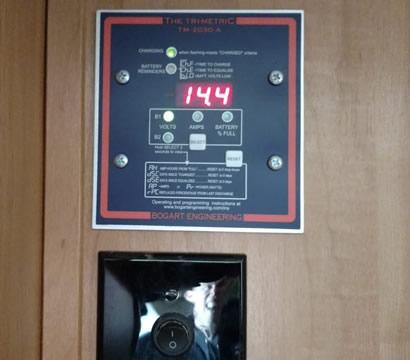
Once I had solar power running I configured the TM2030/SC2030 according to the manual. Since the batteries didn't quite exist I decided to try calling it an interstate battery then changing the capacity to 210 AH (closest to 208 AH). We'll see how that works.
I haven't tried it out in the real world yet (soon enough); however, I have already noticed that being able to analyze draws/loads is already quite nice. It is pretty cool being able to see that I can turn on all my lights (LED) for the amount of power that running one used to take while stock (incandescent).
Another Small Upgrade (April 2016)
I decided to use the existing shattered panel (for now) and put it up on the roof.
- 100W Renogy Solar Panel (shattered :()
- 23ft 8 AWG wire
- Wire loom
- Dicor Self Leveling
- Renogy Z Brackets
- Screws
- 2x Junction Blocks
Here is my new diagram of the system. As you can see I ran thicker wire to the roof panel than the portable panel has. Additionally, the two panels are setup in parallel.
From top to bottom. Here is the panel mounted on the roof. The roof is rather busy since the RV is so small. Although you can see a shading problem here this was taken in the evening so that was to be expected. Additionally, the best spot (near the front) won't work when parked at my house since the house would shade over half the panel. In the future I may relocate the radio antenna but I'm waiting to see historical data on how that works. I am currently using the shattered panel; however I expect the weather to fully kill it during this camping season. I am just watching and waiting for a replacement to go on sale then I'll swap them out. I had assitance from a pro on installing it on the roof but we just used wood screws (2 per bracket) with plenty of Dicor. I did not use the screws included with the Renogy pack since it didn't seem like they had the gripping power (meant for metal).
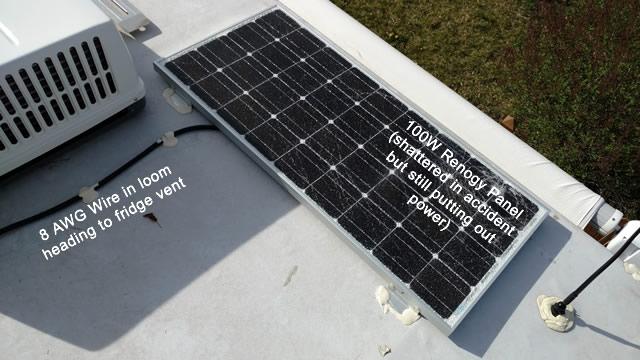
From there I ran the 2x8 AWG wires over to the fridge vent. Once inside I traveled down the side (outside of the insulation) and followed some AC power lines. The wires dropped in under the fridge and traveled the same path as the SC2030 to TM2030 telephone line.
Once in the "maintenance" area I had the roof solar panel wires (white and black) and the portable solar panel wires (green and red (what was I thinking originally?)) and the 6 AWG wires heading to the SC2030. Using junction blocks kept everything neat and organized. I'm going to do some analyzing as I use the system to decide if I need to add a switch to disable the roof panel (worried about that panel being shaded and decreasing the worth of the portable one; not sure that'll be an issue though since its in parallel). Anyway, here is a picture of the junction block area:
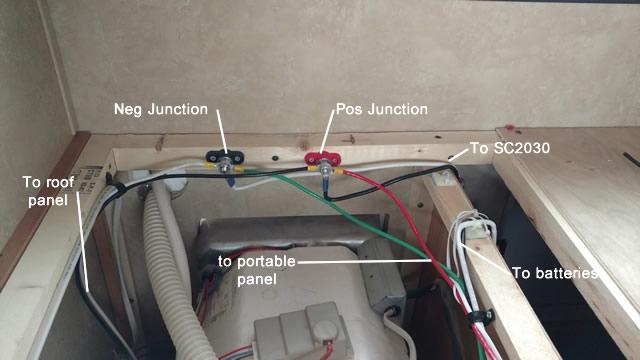
From those two junction blocks I changed out the wires from 8 AWG to 6AWG. They're run to the SC2030.
Limitations:
- Shading from the AC and radio antenna
- Its a shattered panel
- It cannot be tilted (this RV doesn't have a ladder attached so I wouldn't be able to get up there to tilt it while camping anyway)
Future
Completed April 2016 everything in italic. Left here for archival sake. I am deciding whether to try to encapsulate my shattered panel and just throw it on the roof to gain some extra power or buy a new one (and still put it on the roof). I will likely put a panel on the roof because it'll help maintain the batteries when parked (since the solar controller is better than the manufacturer's one for shore power) and then provide extra juice if I'm not fully in the shade. It'll definitely be run in parallel so shading isn't quite as much of an issue.
Next for the future is replacing the shattered panel. That will likely be it for this RV's solar needs. If I ever determine the need for an inverter I'll install that along with a second panel on the roof.
Conclusions
Thanks for looking and I'll update as I make more tweaks. Definitely look forward to hearing from some of the experts on things I could/should tweak or change.
- Mark as New
- Bookmark
- Subscribe
- Mute
- Subscribe to RSS Feed
- Permalink
- Report Inappropriate Content
Jun-19-2017 04:06 AM
We're similar: no generator, trying to extract as much energy from solar as possible.
Have been dreaming about adding a portable system to supplement the stuff on the roof. But hadn't thought about wind issue. Perhaps a stand that can be weighted down with rocks/logs or staked into the ground?
690W Rooftop + 340W Portable Solar,4 GC2s,215Ah@24V
2016 Ram 2500 4x4 RgCab CTD,2507# payload,10.8 mpgUS tow
- Mark as New
- Bookmark
- Subscribe
- Mute
- Subscribe to RSS Feed
- Permalink
- Report Inappropriate Content
Jun-18-2017 11:57 PM
thanks for the update
But I Can Not understand it for you !
....
Connected using T-Mobile Home internet and Visible Phone service
1997 F53 Bounder 36s
- Mark as New
- Bookmark
- Subscribe
- Mute
- Subscribe to RSS Feed
- Permalink
- Report Inappropriate Content
Jun-18-2017 10:58 PM
The roof panel (shattered) still works. I was gone all winter so I couldn't pull the batteries but the roof panel kept them charger (thankfully the snow melted). Then this summer I couldn't keep it plugged in and just the roof panel did plenty to recharge it each day with the fridge running.
Just traveled quite a ways with the RV and did a few trips before then. I really like having the portable panel since I still like to park in the shade. I do this the upgraded controller does a better job keeping the batteries "healthy" than m old cheap controller did. Additionally, the wife really understands "percent battery" versus the 4 "dot lights" which go on/off with the pump draw.
While I still believe the system is over engineered, I have never used a generator and never run out of juice in multiple days of boondocking. Most of the time I'd be back to full batteries before lunch and even on multiple cloudy days never had an issue.
- Mark as New
- Bookmark
- Subscribe
- Mute
- Subscribe to RSS Feed
- Permalink
- Report Inappropriate Content
Apr-23-2016 02:25 PM
This was my first time using Dicor Self Leveling. Pretty easy stuff and with the remains from the panel (of which there was plenty) I just touched up/maintained all the other access points through the roof.
- Mark as New
- Bookmark
- Subscribe
- Mute
- Subscribe to RSS Feed
- Permalink
- Report Inappropriate Content
Apr-12-2016 07:39 PM
I'll be looking for your updates!
- Mark as New
- Bookmark
- Subscribe
- Mute
- Subscribe to RSS Feed
- Permalink
- Report Inappropriate Content
Apr-12-2016 07:32 PM
dewey02 wrote:
Thank you Oz.
That was a very good explanation. Very thorough, step by step, and the photos were excellent. I am thinking of getting started in solar and this was a good education for me. I would probably begin with a simple system somewhat like your first one.
I guess the one question that I have would be the following:
What has your upgrade bought you in terms of benefit? (other than monitoring capability)
You had mentioned that you'd used the original set-up for 2 years with success (no dead battery) but how was it with fully recharging your battery? I realize you didn't have the Bogart 2030 to check battery status in the initial system. Thanks.
Not having the Bogart I didn't do any really advanced measuring but a simple multimeter reading showed 12.6V most times and the charge controller frequently said "full up" by around 2 or 3 pm. It would be around 3pm if it was cold and the heat ran all night. Using the "dummy" readings I only ever got to 2 dots on the battery once but otherwise I'd bounce between 3/4 and 4/4.
I don't actually know the benefit yet because there is still snow in a bunch of my camping spots so it'll be a few weeks. So far the biggest seems to be in the monitoring and "smarter" controller. Hopefully within a few weeks I'll be able to better answer that question.
- Mark as New
- Bookmark
- Subscribe
- Mute
- Subscribe to RSS Feed
- Permalink
- Report Inappropriate Content
Apr-12-2016 09:14 AM
1999 Winnebago Brave 35C F53 Chassis Solar power
Handicap Equipped with Lift & Hospital Bed
1999 Jeep Cherokee Sport
1991 Jeep Wrangler Renegade
- Mark as New
- Bookmark
- Subscribe
- Mute
- Subscribe to RSS Feed
- Permalink
- Report Inappropriate Content
Apr-12-2016 08:18 AM
2013 Toyota Tacoma Off-Road (semi-beefy tires and components)
Our trips -- pix and text
About our trailer
"A journey of a thousand miles begins with a single list."
- Mark as New
- Bookmark
- Subscribe
- Mute
- Subscribe to RSS Feed
- Permalink
- Report Inappropriate Content
Apr-12-2016 06:26 AM
That was a very good explanation. Very thorough, step by step, and the photos were excellent. I am thinking of getting started in solar and this was a good education for me. I would probably begin with a simple system somewhat like your first one.
I guess the one question that I have would be the following:
What has your upgrade bought you in terms of benefit? (other than monitoring capability)
You had mentioned that you'd used the original set-up for 2 years with success (no dead battery) but how was it with fully recharging your battery? I realize you didn't have the Bogart 2030 to check battery status in the initial system. Thanks.
- Mark as New
- Bookmark
- Subscribe
- Mute
- Subscribe to RSS Feed
- Permalink
- Report Inappropriate Content
Apr-12-2016 06:06 AM
- Mark as New
- Bookmark
- Subscribe
- Mute
- Subscribe to RSS Feed
- Permalink
- Report Inappropriate Content
Apr-11-2016 07:37 PM
westend wrote:
I'd add a panel to the roof. That's a lot of hardware for just 100W. Charging the batteries while in storage is the icing on the cake. If you do add a panel or two, you can keep busy by installing more battery capacity. When all that is done, you're now ready for inverting to AC. It's an evil thing, this self-contained power generation. :B
BTW, nice work on the solar installation.
Yea, I actually expected to need an inverter this year to run the microwave but it turns out the toddler doesn't want mashed food anymore so we avoided that requirement (for now). You are probably right about a lot of hardware; the nerd/engineer in me really enjoys all the data though.
ewarnerusa wrote:
Hello -Oz-. Good to see another Montanan on here. I like your solar setup, great job. My opinion is similar to westend's, that is a lot of hardware for a 100 watt system! But you've got a great foundation for expansion.
I'm of the "mount 'em fixed and flat on the roof" mindset, no input required and always charging during daylight. Parking the trailer in the sun has not been as much of an inconvenience as it may seem, it does get hot during the day but we're usually not inside the trailer at that time anyway. I used to fret about not having a nice monitoring system or contemplate purchasing the $100+ remote monitoring panel for my solar charge controller, but now I'm perfectly comfortable with a glance at my digital voltmeter that I've wired up. I know what charging state things are in based on the voltage reading and that is enough info. When I get really curious I just turn my laptop on and interface with the charge controller via RS-232 cable and I have access to everything going on with the solar. I'm running a Morningstar Tristar PWM controller.
Yea, I'm just north of you in Great Falls. That is good to know that the flat roof has been working; I wondered about in real life since we're pretty far north.
It seems that as of today I will definitely be mounting an additional solar panel on the roof (probably in about a week and a half) so I'll have more updates then. I'll probably post beforehand to get your guys' opinion on shading (it will definitely be a problem in this small roof). I'm going to start with the shattered one (at 53% of max efficiency) and then when it dies (probably this summer) I'll just replace it. That should help with the wife wondering where all the money is going since last year it "worked just fine".
smkettner wrote:
Nice work.
I would toss the broken panel and install a new panel on the roof.
I am not real excited about using the 120v outlet as a 12v inlet.
Anderson Powerpole would be better IMO.
https://powerwerx.com/
Sadly I think you're right; I was going to use this encapsulation stuff but with panels being as cheap as they are these days spending 33% with no guarantee of fixing anything it doesn't seem worth the effort/cost.
Those powerpole things are pretty nifty. If I had known about them it would have been a pretty good option that no one could ever confuse.
Thankfully since I have never actually been camped on shore power (or generator) no one expects the 120V outlets to do anything.
- Mark as New
- Bookmark
- Subscribe
- Mute
- Subscribe to RSS Feed
- Permalink
- Report Inappropriate Content
Apr-11-2016 09:23 AM
I would toss the broken panel and install a new panel on the roof.
I am not real excited about using the 120v outlet as a 12v inlet.
Anderson Powerpole would be better IMO.
https://powerwerx.com/
- Mark as New
- Bookmark
- Subscribe
- Mute
- Subscribe to RSS Feed
- Permalink
- Report Inappropriate Content
Apr-11-2016 09:14 AM
I'm of the "mount 'em fixed and flat on the roof" mindset, no input required and always charging during daylight. Parking the trailer in the sun has not been as much of an inconvenience as it may seem, it does get hot during the day but we're usually not inside the trailer at that time anyway. I used to fret about not having a nice monitoring system or contemplate purchasing the $100+ remote monitoring panel for my solar charge controller, but now I'm perfectly comfortable with a glance at my digital voltmeter that I've wired up. I know what charging state things are in based on the voltage reading and that is enough info. When I get really curious I just turn my laptop on and interface with the charge controller via RS-232 cable and I have access to everything going on with the solar. I'm running a Morningstar Tristar PWM controller.
- Mark as New
- Bookmark
- Subscribe
- Mute
- Subscribe to RSS Feed
- Permalink
- Report Inappropriate Content
Apr-11-2016 03:48 AM
BTW, nice work on the solar installation.
'71 Starcraft Wanderstar -- The Cowboy/Hilton


