Turn on suggestions
Auto-suggest helps you quickly narrow down your search results by suggesting possible matches as you type.
Showing results for
- Good Sam Community
- Everything RV
- Technical Issues
- Re: Small Anderson Power Pole Connectors 1, Mex 0
Options
- Subscribe to RSS Feed
- Mark Topic as New
- Mark Topic as Read
- Float this Topic for Current User
- Bookmark
- Subscribe
- Mute
- Printer Friendly Page
Small Anderson Power Pole Connectors 1, Mex 0
Options
- Mark as New
- Bookmark
- Subscribe
- Mute
- Subscribe to RSS Feed
- Permalink
- Report Inappropriate Content
Nov-10-2014 04:03 PM
I am fighting the insertion of assembled connector conductor into plastic base, and I shouldn't have to. I am using a standard peg imprint uninsulated terminal (T&B) crimper. After assembly the terminal simply will not slide into the square plastic housing. I've sought out the factory web site instructions, watched You Tube and they make it look easy.
The peg crimper does not leave the terminal mis-shapen but, too fat top to bottom. Simple filing works but without soldering the joint is weaker than a starved cat. I changed crimping tools, no difference. I had to resort to solder to keep any strength to the termination, and the amount of filing needed is exactly the same with or without solder.
Filing is to the top of the barrel, top meaning the bend on the flat tang is facing down. I must be removing 1/16" or better of material and that is flat ridiculous. So is spending an extra fifteen minutes per termination.
I believe the termination is 45 amp rated and I am using 16-20 gauge wire (sometimes paralleled)
I can assemble 10 Weather Pac terminals in the time it takes me to so a single Anderson Power Pole. The problem lies with me and I would like to solve it. I have a lot of connectors to make up.
Thanks
27 REPLIES 27
Options
- Mark as New
- Bookmark
- Subscribe
- Mute
- Subscribe to RSS Feed
- Permalink
- Report Inappropriate Content
Nov-14-2014 06:31 AM
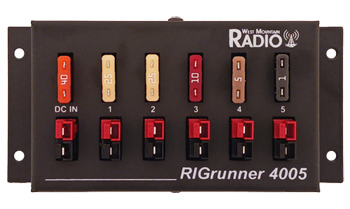
I recently had an application of using a fused 12VDC distribution panel and originally purchased the Rigrunner 4005 like shown here... I also purchased several 12VDC power cables for my different Ham radio units that had the Anderson ends on them... I could never keep the Anderson plugs to stay inserted in the Rigrunners. Everytime I went thru bumpy roads they would fall out it seems.
When one of Radios didn't have power I would open the cabinet door and sure enough one had fell out again. Never spent much time seeing what I needed to do as I think I read somewhere where a small pin could be used to hold them inserted.
My fix was to cut the Anderson ends off the cables and I installed a BLUE SEA 12VDC fused panel like shown here and used crimp-on ring terminals... The BLUE SEA Sub Panels liked my 4AWG DC input cable ring terminals better anyway... Don't have the falling out problem anymore...


Roy Ken
When one of Radios didn't have power I would open the cabinet door and sure enough one had fell out again. Never spent much time seeing what I needed to do as I think I read somewhere where a small pin could be used to hold them inserted.
My fix was to cut the Anderson ends off the cables and I installed a BLUE SEA 12VDC fused panel like shown here and used crimp-on ring terminals... The BLUE SEA Sub Panels liked my 4AWG DC input cable ring terminals better anyway... Don't have the falling out problem anymore...
Roy Ken
My Posts are IMHO based on my experiences - Words in CAPS does not mean I am shouting
Roy - Carolyn
RETIRED DOAF/DON/DOD/CONTR RADIO TECH (42yrs)
K9PHT (Since 1957) 146.52M
2010 F150, 5.4,3:73 Gears,SCab
2008 Starcraft 14RT EU2000i GEN
2005 Flagstaff 8528RESS
Roy - Carolyn
RETIRED DOAF/DON/DOD/CONTR RADIO TECH (42yrs)
K9PHT (Since 1957) 146.52M
2010 F150, 5.4,3:73 Gears,SCab
2008 Starcraft 14RT EU2000i GEN
2005 Flagstaff 8528RESS
Options
- Mark as New
- Bookmark
- Subscribe
- Mute
- Subscribe to RSS Feed
- Permalink
- Report Inappropriate Content
Nov-13-2014 10:07 PM
I greatly appreciate your humor landyacht. It is most certainly not "lost" 🙂
I purchased a new small flat mill file at the ferreteria today. Until I finagle a way to get a reload of connectors down here I am going to be forced to reach for the ball cap that is embroidered with "Patience Is A Virtue".
For some good news, I am certainly not disappointed with the performance of the new 30 watt 36 volt LED chips. They light up a directional area much better than a 150 watt flood light and actually can be compared with a 500 watt quartz floodlight but the LED would not win the contest. Sixty watts worth of chips would dominate the comparison. Too bad the booster input cannot handle the 24 volt bank. 2-1/2 amps on 12 volts (+ booster inefficiency) is still an amazing amount of light for exterior use. I have a different tack for outside lighting in which the lamps are placed well outside the habitation zone which means far fewer insects. If I keep stuffing the Geckos by shining a UV chip on a white board I'm going to have to fit them with lift kits.
Tomorrow the campaign continues...
Options
- Mark as New
- Bookmark
- Subscribe
- Mute
- Subscribe to RSS Feed
- Permalink
- Report Inappropriate Content
Nov-13-2014 07:01 PM
Getting the click can be difficult.
Ive sucessfully gotten 8 awg into 45 amp powerpoles.
And they pass 41 amps without getting hot. Warm perhaps.
To get the satisfying click, after insertion, I grab wire with needlenose vice grips about 3 mm from my plastic, place plastic against some oak and push.
Its either ' whohooo!!!' Upon the click, Or 'gaddang each and every aspect of everything' when wire bends in half and pulls wire from crimp, and I get to.start over. Sometimes tools get thrown.
I think the anderson crimper could be well worth it as with some different available dies, it will do standard crimp connections..
Options
- Mark as New
- Bookmark
- Subscribe
- Mute
- Subscribe to RSS Feed
- Permalink
- Report Inappropriate Content
Nov-13-2014 05:35 PM
I would suggest you get some from West Mountain Radio and see how they compare.
Home was where I park it. but alas the.
2005 Damon Intruder 377 Alas declared a total loss
after a semi "nicked" it. Still have the radios
Kenwood TS-2000, ICOM ID-5100, ID-51A+2, ID-880 REF030C most times
2005 Damon Intruder 377 Alas declared a total loss
after a semi "nicked" it. Still have the radios
Kenwood TS-2000, ICOM ID-5100, ID-51A+2, ID-880 REF030C most times
Options
- Mark as New
- Bookmark
- Subscribe
- Mute
- Subscribe to RSS Feed
- Permalink
- Report Inappropriate Content
Nov-13-2014 03:16 PM
Here's my source for Anderson PPs - DCPwr.com
and a pack of 25 pairs goes for $22.
and a pack of 25 pairs goes for $22.
2016 Forest River Sunseeker 2250SLEC Chevrolet 6.0L
Options
- Mark as New
- Bookmark
- Subscribe
- Mute
- Subscribe to RSS Feed
- Permalink
- Report Inappropriate Content
Nov-13-2014 10:20 AM
Ok. I've decided to try a hundred direct from Anderson unless someone has a better idea. Delphi Weather Pac terminals are weatherproof but have a finite amperage limit.
Thanks Everyone
Thanks Everyone
Options
- Mark as New
- Bookmark
- Subscribe
- Mute
- Subscribe to RSS Feed
- Permalink
- Report Inappropriate Content
Nov-13-2014 09:39 AM
msiminoff wrote:MEXICOWANDERER wrote:
Something is wrong in Hooterville....
Yes, it does indeed sound like something is wrong. I have assembled several hundred Anderson (brand) PowerPole & MultiPole connectors, and I would describe the contact insertion process as 'fairly easy'. Anderson states that it should take 6-8 lbs of force to insert the 15/30/45A contacts.
Perhaps the ones you got from Connectorpros are not genuine Anderson PowerPoles?
-Mark
As mentioned previously I had ones from connectorpros, with the SAME problem. I don't think they are genuine. Threw them away and got genuine ones. The real ones snap in quite easily, probably with a few lbs of force. Never could get the connectpros to engage.
2011 Keystone Outback 295RE
2004 14' bikehauler with full living quarters
2015.5 Denali 4x4 CC/SB Duramax/Allison
2004.5 Silverado 4x4 CC/SB Duramax/Allison passed on to our Son!
2004 14' bikehauler with full living quarters
2015.5 Denali 4x4 CC/SB Duramax/Allison
2004.5 Silverado 4x4 CC/SB Duramax/Allison passed on to our Son!
Options
- Mark as New
- Bookmark
- Subscribe
- Mute
- Subscribe to RSS Feed
- Permalink
- Report Inappropriate Content
Nov-13-2014 09:16 AM
Let's hope so!
I'm not angry, or even frustrated - just sad. Eight pounds of force is not wimpy. I tried it with my digital bathroom scale. Maybe I am just too old and infirm. I hate to say it but that may be the case. Where the heck does one push on a filled connector with a tiny blade instrument to the sum of eight pounds? Does somebody make a hollow thick wall tube screwdriver like gizmo to make this a non-wire eating process?
I'm not angry, or even frustrated - just sad. Eight pounds of force is not wimpy. I tried it with my digital bathroom scale. Maybe I am just too old and infirm. I hate to say it but that may be the case. Where the heck does one push on a filled connector with a tiny blade instrument to the sum of eight pounds? Does somebody make a hollow thick wall tube screwdriver like gizmo to make this a non-wire eating process?
Options
- Mark as New
- Bookmark
- Subscribe
- Mute
- Subscribe to RSS Feed
- Permalink
- Report Inappropriate Content
Nov-13-2014 08:21 AM
MEXICOWANDERER wrote:
Something is wrong in Hooterville....
Yes, it does indeed sound like something is wrong. I have assembled several hundred Anderson (brand) PowerPole & MultiPole connectors, and I would describe the contact insertion process as 'fairly easy'. Anderson states that it should take 6-8 lbs of force to insert the 15/30/45A contacts.
Perhaps the ones you got from Connectorpros are not genuine Anderson PowerPoles?
-Mark
'04 Alpenlite Saratoga 935, 328W of solar, 300Ah Odyssey batt's, Trimetric, Prosine 2.0
05 Ram3500, Cummins,Vision 19.5 w/M729F's, Dynatrac Hubs, RR airbags w/ping tanks, Superhitch, Roadmaster Swaybar, Rancho RS9000XL
The Overlhander Blog
05 Ram3500, Cummins,Vision 19.5 w/M729F's, Dynatrac Hubs, RR airbags w/ping tanks, Superhitch, Roadmaster Swaybar, Rancho RS9000XL
The Overlhander Blog
Options
- Mark as New
- Bookmark
- Subscribe
- Mute
- Subscribe to RSS Feed
- Permalink
- Report Inappropriate Content
Nov-13-2014 07:04 AM
MEXICOWANDERER wrote:
I tried carefully soldering UNcrimped PP conductors. 100.00% of the solder inside. Same result. Here is an AMAZON.COM search link to the connectors that were purchased...
Anderson Powerpole Connectors 20 pair
by Connectorpros
I had to push so hard, the flat blade screwdriver tip evidently cut through part of the wire conductor and they failed instantly under load. Something is wrong in Hooterville, and after crimping more than a million of other types of conductors this has left me scratching my head...
Right now I am sort of spooked...
Those are the same ones and same vendor that I bought from Amazon that wouldn't even insert right out of the box. They weren't made by anderson, bad quality knockoff IMHO
When I went and bought ones made by anderson, not a problem.
2011 Keystone Outback 295RE
2004 14' bikehauler with full living quarters
2015.5 Denali 4x4 CC/SB Duramax/Allison
2004.5 Silverado 4x4 CC/SB Duramax/Allison passed on to our Son!
2004 14' bikehauler with full living quarters
2015.5 Denali 4x4 CC/SB Duramax/Allison
2004.5 Silverado 4x4 CC/SB Duramax/Allison passed on to our Son!
Options
- Mark as New
- Bookmark
- Subscribe
- Mute
- Subscribe to RSS Feed
- Permalink
- Report Inappropriate Content
Nov-13-2014 06:22 AM
I tried carefully soldering UNcrimped PP conductors. 100.00% of the solder inside. Same result. Here is an AMAZON.COM search link to the connectors that were purchased...
Anderson Powerpole Connectors 20 pair
by Connectorpros
I had to push so hard, the flat blade screwdriver tip evidently cut through part of the wire conductor and they failed instantly under load. Something is wrong in Hooterville, and after crimping more than a million of other types of conductors this has left me scratching my head...
Right now I am sort of spooked...
Options
- Mark as New
- Bookmark
- Subscribe
- Mute
- Subscribe to RSS Feed
- Permalink
- Report Inappropriate Content
Nov-12-2014 09:56 AM
The 10 ga wire I used was stiff (but stranded) building wire of some type. It just did not crimp well. I didn't have any better wire at the time for this little pigtail.
So I'm blaming the wire. Couldn't have been me.
🙂
So I'm blaming the wire. Couldn't have been me.
🙂
Currently RV-less but not done yet.
Options
- Mark as New
- Bookmark
- Subscribe
- Mute
- Subscribe to RSS Feed
- Permalink
- Report Inappropriate Content
Nov-11-2014 02:13 PM
I can tell you only this, Have never had a problem assembling the connectors, have put up to 10GA wire in the lug and crimped it.
Using the Professional grad ratchet job from West Mountain (Which is the same as the one sold by Powerex near as I can tell, and a few other sources) the crimp looks very very professional,, I've seen worse factory crimps.
very happy with the results.
Using the Professional grad ratchet job from West Mountain (Which is the same as the one sold by Powerex near as I can tell, and a few other sources) the crimp looks very very professional,, I've seen worse factory crimps.
very happy with the results.
Home was where I park it. but alas the.
2005 Damon Intruder 377 Alas declared a total loss
after a semi "nicked" it. Still have the radios
Kenwood TS-2000, ICOM ID-5100, ID-51A+2, ID-880 REF030C most times
2005 Damon Intruder 377 Alas declared a total loss
after a semi "nicked" it. Still have the radios
Kenwood TS-2000, ICOM ID-5100, ID-51A+2, ID-880 REF030C most times
Options
- Mark as New
- Bookmark
- Subscribe
- Mute
- Subscribe to RSS Feed
- Permalink
- Report Inappropriate Content
Nov-11-2014 08:26 AM
This motivated me to go out and fix the ones I had messed up. One was only a bent spade as shown in my first link above. Once I fixed that, it went easily into the housing. The other one, I had managed to fit 10 ga wire into a 12 ga terminal, and had used the GB-888 crimper. But it didn't crimp down well enough and the wire came out. I re-did it just now. It was probably good to go. But I decided to try the hydraulic crimper on the already crimped terminal. I just picked the dies that put a little more squeeze on it, and now it's very solid.
I do think you could do these with the hydraulic crimper. If you already have one, why not?
I do think you could do these with the hydraulic crimper. If you already have one, why not?
Currently RV-less but not done yet.


