Turn on suggestions
Auto-suggest helps you quickly narrow down your search results by suggesting possible matches as you type.
Showing results for
- Good Sam Community
- Groups
- Travel Trailer Group
- Forum
- Re: Roof Collapse around A/C - Now leaking
Options
- Subscribe to RSS Feed
- Mark Topic as New
- Mark Topic as Read
- Float this Topic for Current User
- Bookmark
- Subscribe
- Mute
- Printer Friendly Page
Roof Collapse around A/C - Now leaking
Options
- Mark as New
- Bookmark
- Subscribe
- Mute
- Subscribe to RSS Feed
- Permalink
- Report Inappropriate Content
Oct-19-2014 01:44 PM
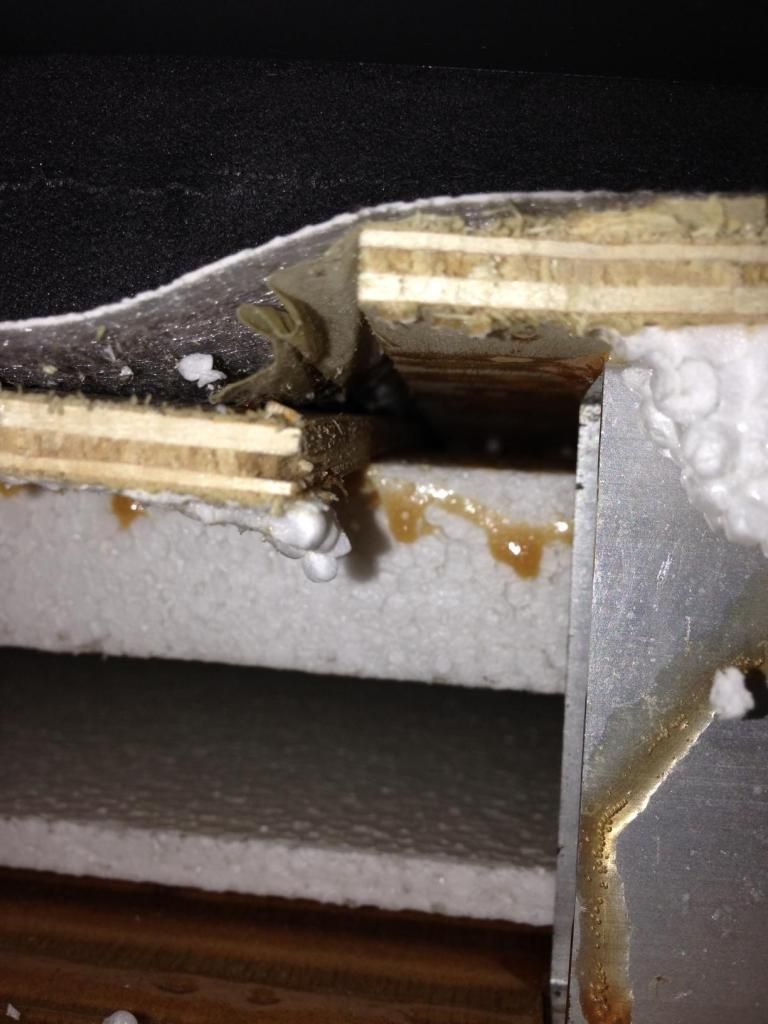
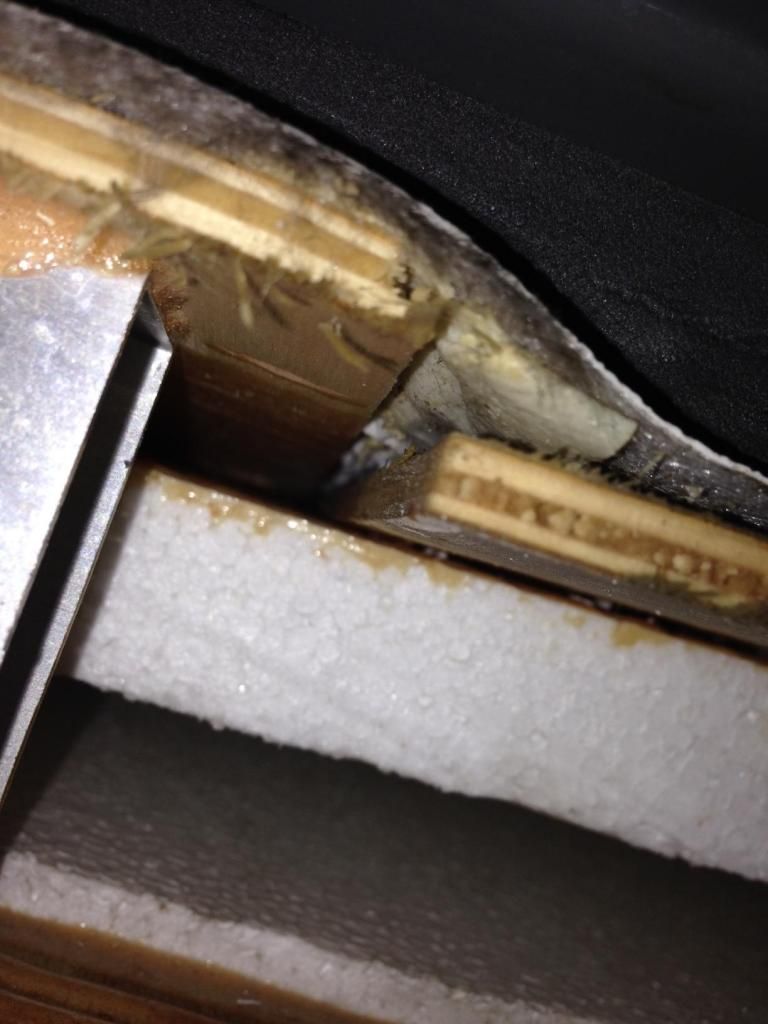
We've purchased our Rockwood TT new 7 years ago. We have been very happy. We were at Halloween campout this weekend in the rain and had a substantial leak at the air conditioner. I took off the cover and found the roof is collapsing on both sides at the joint. I am really scratching my head because I can't figure out what structure was suppose to keep this from happening. It almost seems like this was a manufacturing defect. There is nothing that would hold the joints together between adjacent pieces of plywood. The plywood holding the most weight has given way and now the seal is leaking. This happened on both sides.
Has anyone seen this before? Any idea how to fix it? I am stumped.
Has anyone seen this before? Any idea how to fix it? I am stumped.
'06 Sequoia
Rockwood 2501SS, 5100 lbs dry, 5700 loaded
Primus Brake Controller
Remanufactured Hensley Cub Hitch
Rockwood 2501SS, 5100 lbs dry, 5700 loaded
Primus Brake Controller
Remanufactured Hensley Cub Hitch
32 REPLIES 32
Options
- Mark as New
- Bookmark
- Subscribe
- Mute
- Subscribe to RSS Feed
- Permalink
- Report Inappropriate Content
Oct-27-2014 06:22 PM
Congratulations on finding a original and effective solution.
Your a better engineer then the engineers that built the thing in the first place. lol
Your a better engineer then the engineers that built the thing in the first place. lol
1993 Cobra Sunrise, 20 foot Travel Trailer.
Options
- Mark as New
- Bookmark
- Subscribe
- Mute
- Subscribe to RSS Feed
- Permalink
- Report Inappropriate Content
Oct-26-2014 09:57 AM
That's no good, you'll have to pull it all out and ...just kidding!!
Looks like an effective repair. I'd take the trailer back to the dealer with these pictures and show them how it's done. The Mfg should be embarrassed to send something out like that roof.
Looks like an effective repair. I'd take the trailer back to the dealer with these pictures and show them how it's done. The Mfg should be embarrassed to send something out like that roof.
'03 F-250 4x4 CC
'71 Starcraft Wanderstar -- The Cowboy/Hilton
'71 Starcraft Wanderstar -- The Cowboy/Hilton
Options
- Mark as New
- Bookmark
- Subscribe
- Mute
- Subscribe to RSS Feed
- Permalink
- Report Inappropriate Content
Oct-26-2014 09:29 AM
I find it hard to believe the Dealer said it's not a manufacturers defect. What is it called.....???
Ingenious solution to your problem !!
Ingenious solution to your problem !!
Options
- Mark as New
- Bookmark
- Subscribe
- Mute
- Subscribe to RSS Feed
- Permalink
- Report Inappropriate Content
Oct-26-2014 09:20 AM
Nice repair, I like the spacing to lift the AC above the roof. Wouldn't it be nice if the manufacturers put a similar spacer under the membrane for each roof penetration?
.
2001 Suburban 4x4. 6.0L, 4.10 3/4 ton **** 2005 Jayco Jay Flight 27BH **** 1986 Coleman Columbia Popup
2001 Suburban 4x4. 6.0L, 4.10 3/4 ton **** 2005 Jayco Jay Flight 27BH **** 1986 Coleman Columbia Popup
Options
- Mark as New
- Bookmark
- Subscribe
- Mute
- Subscribe to RSS Feed
- Permalink
- Report Inappropriate Content
Oct-26-2014 09:04 AM
Very good method of repair. I like that you were able to do the repair by sandwiching it in between the roofing material and luan decking.
I know you question how strong the roof can be using that thin luan plywood. Take a look at the floor inside your camper, it's pretty much the same the method of construction using that same thin luan plywood.
I know you question how strong the roof can be using that thin luan plywood. Take a look at the floor inside your camper, it's pretty much the same the method of construction using that same thin luan plywood.
'05 Chevy Tahoe & ’08 Rockwood Roo 23ss
'62 Myself
'62 Camper Honey
'96 Camper Twin Girls
'62 Myself
'62 Camper Honey
'96 Camper Twin Girls
Options
- Mark as New
- Bookmark
- Subscribe
- Mute
- Subscribe to RSS Feed
- Permalink
- Report Inappropriate Content
Oct-26-2014 07:21 AM
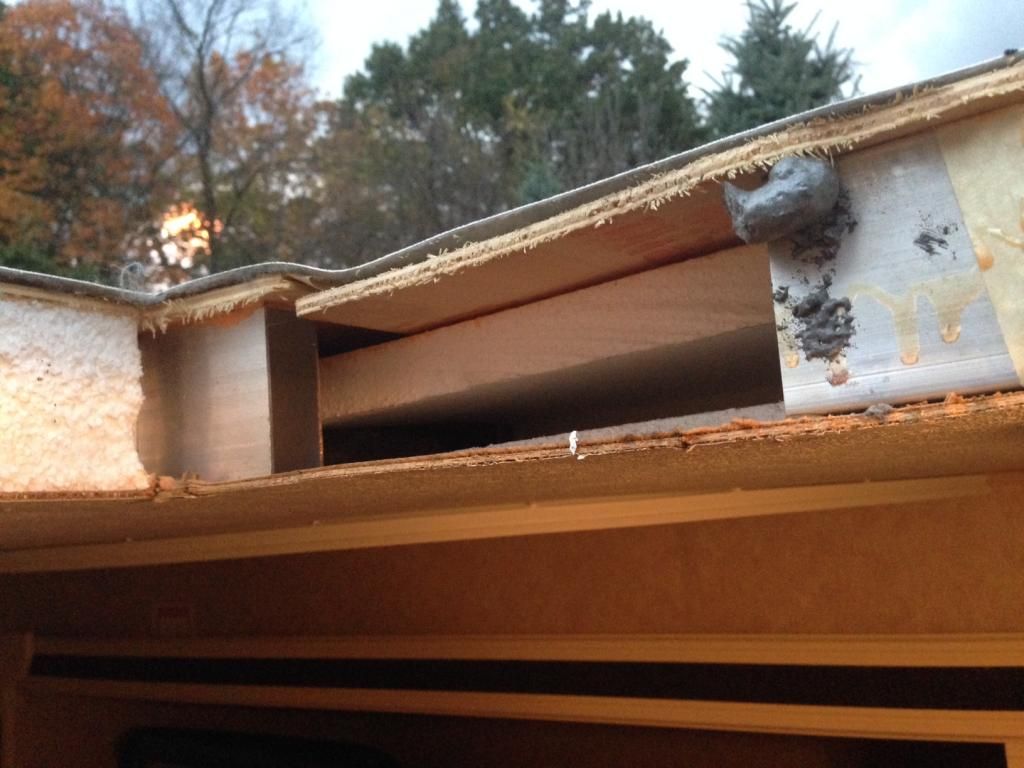
Here are pictures of the fix. I am quite confident the A/C won't leak again for many years to come.
The pictures are not great but what you are seeing is 3" wide plywood placed in between the rubber membrane and the existing wood roof. The outside edges were cut at 45 degree angle. In addition to putting a new seal on the air conditioner I also added extra seal material on the spacer pads that the air conditioner rests on since the unit is now 1/4" higher than it was in the past.
Underneath, I also put in another piece of plywood to sandwich the existing roof. I think this really worked great.
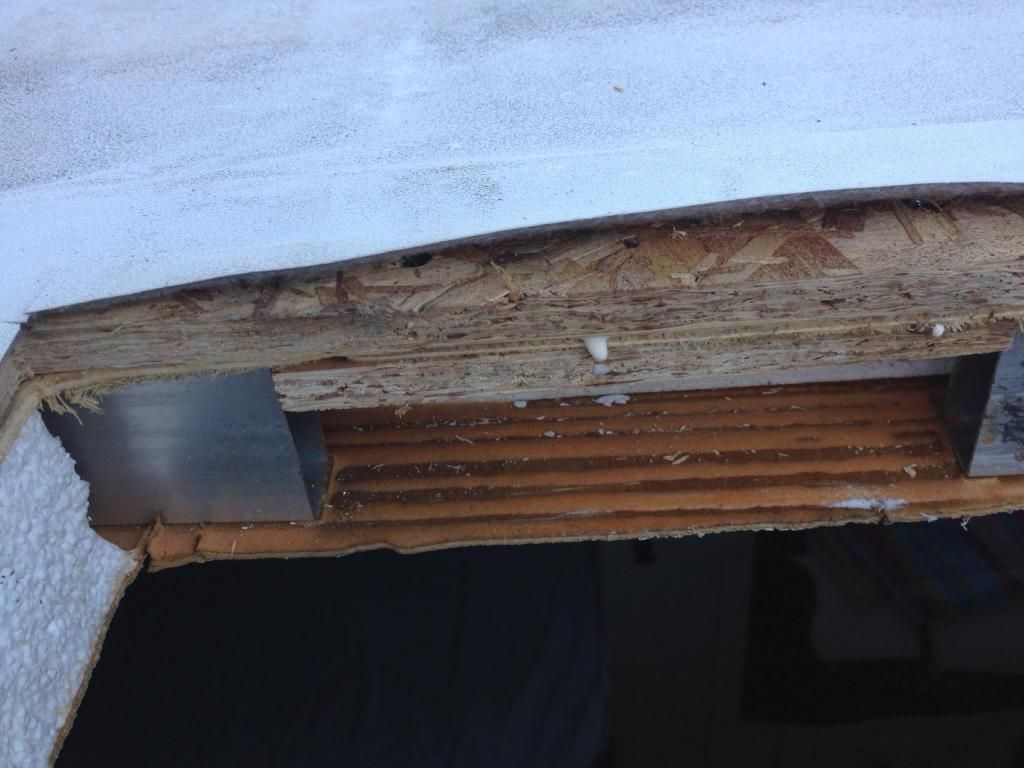
I know when I purchased this trailer, one of the attractive features was how light it was. I better understand how they keep them light now. I am surprised that I can walk on the roof without causing problems considering how thin the plywood is up there. I still think it was a bad design to have the plywood seam line up on the hole for the air conditioner. I sure am happy that I got it fixed. I appreciate all the help.
The pictures are not great but what you are seeing is 3" wide plywood placed in between the rubber membrane and the existing wood roof. The outside edges were cut at 45 degree angle. In addition to putting a new seal on the air conditioner I also added extra seal material on the spacer pads that the air conditioner rests on since the unit is now 1/4" higher than it was in the past.
Underneath, I also put in another piece of plywood to sandwich the existing roof. I think this really worked great.
I know when I purchased this trailer, one of the attractive features was how light it was. I better understand how they keep them light now. I am surprised that I can walk on the roof without causing problems considering how thin the plywood is up there. I still think it was a bad design to have the plywood seam line up on the hole for the air conditioner. I sure am happy that I got it fixed. I appreciate all the help.
'06 Sequoia
Rockwood 2501SS, 5100 lbs dry, 5700 loaded
Primus Brake Controller
Remanufactured Hensley Cub Hitch
Rockwood 2501SS, 5100 lbs dry, 5700 loaded
Primus Brake Controller
Remanufactured Hensley Cub Hitch
Options
- Mark as New
- Bookmark
- Subscribe
- Mute
- Subscribe to RSS Feed
- Permalink
- Report Inappropriate Content
Oct-23-2014 01:32 AM
skskarda wrote:deltamaster wrote:
Did you apply adhesive before setting the new plywood? I would have applied adhesive to the repair patch before sliding it in place for added support and strength.
Do you plan to screw the patch to the roof sheathing from the underside?
I haven't fastened it yet. I do plan to use adhesive. Ideally, I'd like to fasten screws from the bottom but I am a little paranoid about poking through the top and hitting the rubber membrane. I might screw from the top, countersink it just a hair and cover it with some silicone to prevent abrasion with the rubber membrane.
On second thought, the existing roof is so thin that I might have to fasten from the bottom. I don't know that screw threads would hold that material well but certainly the screw head from the bottom would. I'll have some wood glue and clamps on hand as well to make sure it holds long term.
You could alternate the screws, half from the top down and half from underneath up. If you get the right adhesive the screws will merely hold the boards together. Once the adhesive sets that will hold them together. Just make sure your screws are short enough to not go through the wood.
:E [purple]I ride it like I stole it![/purple] :B
2004 Fun Mover with a 1998 Road King and a 2002 Sportster tucked in the garage, Dragging a 2002 "RAM Tough" Dodge Dakota Crew Cab. Ohhh what a haul!
TSgt(Ret.) USAF
.......and I just may have.......
I'm on "CB-13", are you?
2004 Fun Mover with a 1998 Road King and a 2002 Sportster tucked in the garage, Dragging a 2002 "RAM Tough" Dodge Dakota Crew Cab. Ohhh what a haul!
TSgt(Ret.) USAF
Options
- Mark as New
- Bookmark
- Subscribe
- Mute
- Subscribe to RSS Feed
- Permalink
- Report Inappropriate Content
Oct-22-2014 08:20 PM
Looking at the new pictures I like your big square patch. But I would worry that it can sag where the joint is.
At the minimum I would probably get a piece of 2x4 or 2x6 about 3 inches long. Cut, sand and mold one end so that it slides tightly inside the aluminum tube. leaving about 1/2 inch sticking out to hold the roof joint level. Then drive a screw or two through the side of the aluminum rafter and into the wood to hold it in place.
After it's level again you can add your Plywood piece to reinforce it all.
.
2001 Suburban 4x4. 6.0L, 4.10 3/4 ton **** 2005 Jayco Jay Flight 27BH **** 1986 Coleman Columbia Popup
2001 Suburban 4x4. 6.0L, 4.10 3/4 ton **** 2005 Jayco Jay Flight 27BH **** 1986 Coleman Columbia Popup
Options
- Mark as New
- Bookmark
- Subscribe
- Mute
- Subscribe to RSS Feed
- Permalink
- Report Inappropriate Content
Oct-22-2014 03:14 PM
Screw downwards, into the plywood. I would install something under the joint at the AC opening, at a minimum.
'03 F-250 4x4 CC
'71 Starcraft Wanderstar -- The Cowboy/Hilton
'71 Starcraft Wanderstar -- The Cowboy/Hilton
Options
- Mark as New
- Bookmark
- Subscribe
- Mute
- Subscribe to RSS Feed
- Permalink
- Report Inappropriate Content
Oct-22-2014 02:32 PM
deltamaster wrote:
Did you apply adhesive before setting the new plywood? I would have applied adhesive to the repair patch before sliding it in place for added support and strength.
Do you plan to screw the patch to the roof sheathing from the underside?
I haven't fastened it yet. I do plan to use adhesive. Ideally, I'd like to fasten screws from the bottom but I am a little paranoid about poking through the top and hitting the rubber membrane. I might screw from the top, countersink it just a hair and cover it with some silicone to prevent abrasion with the rubber membrane.
On second thought, the existing roof is so thin that I might have to fasten from the bottom. I don't know that screw threads would hold that material well but certainly the screw head from the bottom would. I'll have some wood glue and clamps on hand as well to make sure it holds long term.
'06 Sequoia
Rockwood 2501SS, 5100 lbs dry, 5700 loaded
Primus Brake Controller
Remanufactured Hensley Cub Hitch
Rockwood 2501SS, 5100 lbs dry, 5700 loaded
Primus Brake Controller
Remanufactured Hensley Cub Hitch
Options
- Mark as New
- Bookmark
- Subscribe
- Mute
- Subscribe to RSS Feed
- Permalink
- Report Inappropriate Content
Oct-22-2014 12:32 PM
Under the rubber membrane and over the existing sheathing... good idea. That should make sealing the topside much easier.
Did you apply adhesive before setting the new plywood? I would have applied adhesive to the repair patch before sliding it in place for added support and strength.
Do you plan to screw the patch to the roof sheathing from the underside?
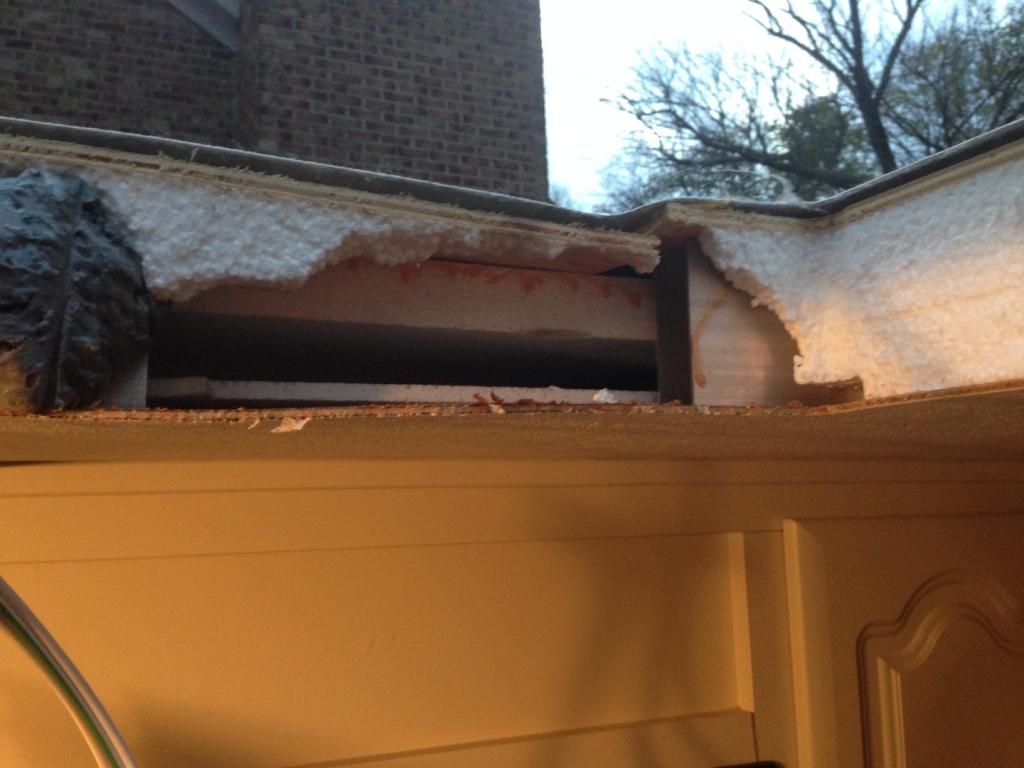
These pictures are much more descriptive of the problem. Had they not cut that lare aluminum brace so far back you likely would not have had this problem. Should have left it overhang the joint a couple inches.
Good luck and I hope it works well for you.
Did you apply adhesive before setting the new plywood? I would have applied adhesive to the repair patch before sliding it in place for added support and strength.
Do you plan to screw the patch to the roof sheathing from the underside?
These pictures are much more descriptive of the problem. Had they not cut that lare aluminum brace so far back you likely would not have had this problem. Should have left it overhang the joint a couple inches.
Good luck and I hope it works well for you.
:E [purple]I ride it like I stole it![/purple] :B
2004 Fun Mover with a 1998 Road King and a 2002 Sportster tucked in the garage, Dragging a 2002 "RAM Tough" Dodge Dakota Crew Cab. Ohhh what a haul!
TSgt(Ret.) USAF
.......and I just may have.......
I'm on "CB-13", are you?
2004 Fun Mover with a 1998 Road King and a 2002 Sportster tucked in the garage, Dragging a 2002 "RAM Tough" Dodge Dakota Crew Cab. Ohhh what a haul!
TSgt(Ret.) USAF
Options
- Mark as New
- Bookmark
- Subscribe
- Mute
- Subscribe to RSS Feed
- Permalink
- Report Inappropriate Content
Oct-22-2014 11:57 AM
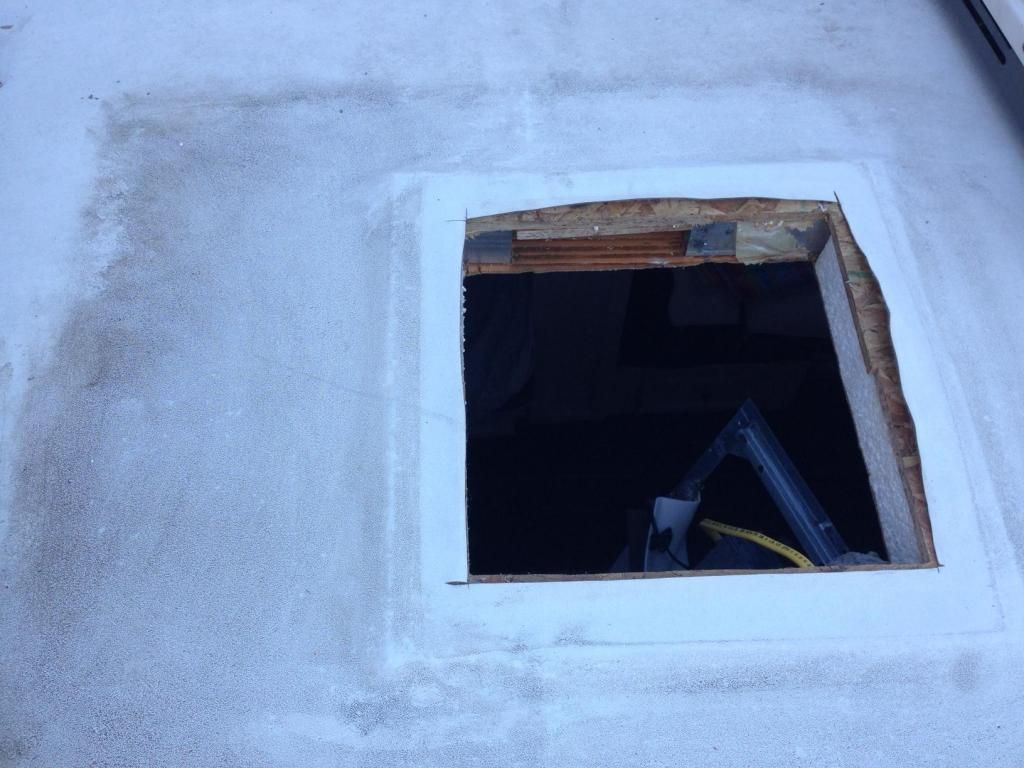
Thanks again for the help. I have decided to go with plywood above the existing wood roof but below the rubber membrane. I cut a piece of plywood 20" x 20". I cut a 14" square hole in the middle and cut a 45 degree angle on all the outside edges and sanded them off a bit. I cut it in half so I was left with 2 U-shaped pieces of plywood. I pulled up the rubber membrane (not an easy task) and slipped the wood in between the membrane and the existing wood roof. This will allow me to level off the roof, provide a solid surface to seal against and as the added bonus of raise the A/C unit 1/4" to prevent any future puddling near the seal. I must say it looks pretty darn good right now. I ran out of daylight. I still need to fasten the plywood to the roof using the advice on this thread. I have a new A/C seal in hand and will set the A/C unit back on soon.
I wish I would have taken a picture of the plywood pieces before I installed them but I will take some pictures before I re-install the A/C unit so others can learn from my (hopefully good) experience.
Here are a couple of extra pictures with the A/C off. I'll share more with the fix in a few days, maybe this weekend.
'06 Sequoia
Rockwood 2501SS, 5100 lbs dry, 5700 loaded
Primus Brake Controller
Remanufactured Hensley Cub Hitch
Rockwood 2501SS, 5100 lbs dry, 5700 loaded
Primus Brake Controller
Remanufactured Hensley Cub Hitch
Options
- Mark as New
- Bookmark
- Subscribe
- Mute
- Subscribe to RSS Feed
- Permalink
- Report Inappropriate Content
Oct-22-2014 11:16 AM
That is why I was thinking to "sleeve" the joint with channel iron that fit tightly to the plywood. The extra layer of plywood around the opening is also a good idea as well. The key is to bring the two free ends of the plywood back up together and make it all one piece.
:E [purple]I ride it like I stole it![/purple] :B
2004 Fun Mover with a 1998 Road King and a 2002 Sportster tucked in the garage, Dragging a 2002 "RAM Tough" Dodge Dakota Crew Cab. Ohhh what a haul!
TSgt(Ret.) USAF
.......and I just may have.......
I'm on "CB-13", are you?
2004 Fun Mover with a 1998 Road King and a 2002 Sportster tucked in the garage, Dragging a 2002 "RAM Tough" Dodge Dakota Crew Cab. Ohhh what a haul!
TSgt(Ret.) USAF
Options
- Mark as New
- Bookmark
- Subscribe
- Mute
- Subscribe to RSS Feed
- Permalink
- Report Inappropriate Content
Oct-22-2014 11:10 AM
westend has a good idea by sneaking in an additional roof rafter, but I'm not sure he'll get the $4490 check in the mail anytime soon.
Figuring the OP's camper roof is built in a similar fashion as ours, it's made up from a laminated construction, much like the walls and floor. Under the roofing material you get some luan plywood, ~ 2" of Styrofoam and then another piece of luan plywood with a finished surface for the interior. You also get some rectangular aluminum tubing that runs side to side, spaced every 16" (I think) on center for structural support. That's about it.
The tubing is surrounded by the Styrofoam, so I don't think the OP will be able to sneak in an additional roof rafter or joist. The open area you see in his pictures stops at about 10" inward (if like ours) and allows for the AC ducted air flow throughout the roof. It's only that open area on each side for air ducting that leaves the plywood joint unsupported, go inboard that 10" and then it's backed/supported by the Styrofoam insulation.
'05 Chevy Tahoe & ’08 Rockwood Roo 23ss
'62 Myself
'62 Camper Honey
'96 Camper Twin Girls
'62 Myself
'62 Camper Honey
'96 Camper Twin Girls


