- Good Sam Community
- Groups
- Truck Camper Group
- Forum
- Avion truck campers - Hundreds of photos
- Subscribe to RSS Feed
- Mark Topic as New
- Mark Topic as Read
- Float this Topic for Current User
- Bookmark
- Subscribe
- Mute
- Printer Friendly Page
Avion truck campers - Hundreds of photos
- Mark as New
- Bookmark
- Subscribe
- Mute
- Subscribe to RSS Feed
- Permalink
- Report Inappropriate Content
May-11-2011 10:33 AM
Our planned trip to Montana in June is called off. heh.
However, I have now convinced my dear Jane that its time to really update the TC. After drying for several days we pulled out the interior. Amazingly the Zolatone paint that I had applied last year is good as new after a cleaning.

Without burdening the TC family overmuch, I'd like to ask some advice other than don't park too near a flood :-).
My DW was overjoyed that I had a plan for the bathroom: a composting toilet developed by Nature's Head http://www.natureshead.net/. Our holding tank was practically unusable and there was no real grey water tank on the 67 Avion. Our plan is to rip out the bathroom and install one of these and converting the blackwater to a greywater tank. Any experience with this?
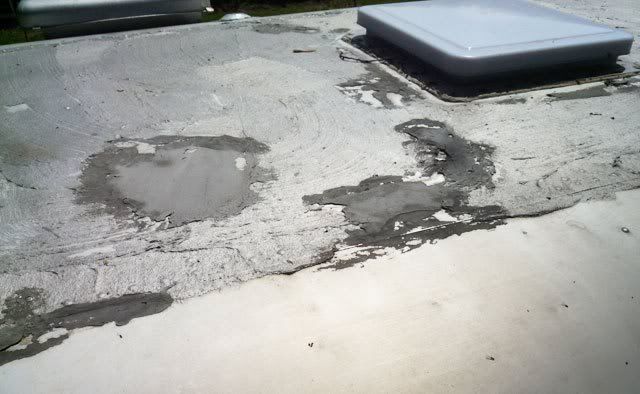
Finally, the roof. I admit that I have not really done the work I should have. Now, I need to remove the various sealants on the roof and repair it. We are also setting up for a solar installation. Any advice as to this?

Here's hoping I have posted the pictures correctly. And many thanks in advance for your advice.
- Labels:
-
Truck Campers
- Mark as New
- Bookmark
- Subscribe
- Mute
- Subscribe to RSS Feed
- Permalink
- Report Inappropriate Content
Jul-10-2015 10:37 AM
Wife + 4 kids
Retired Military Family.... Alway's on the move....
2002 F350 CCSB 5.4 6spd 4x4 in AK
1966 Avion C-10 Truck Camper
- Mark as New
- Bookmark
- Subscribe
- Mute
- Subscribe to RSS Feed
- Permalink
- Report Inappropriate Content
Jul-10-2015 10:13 AM
https://goo.gl/photos/J4uQovTuHP9QMLBR7
D1, yes i am not the happiest camper with the gluevit as far as optics is concerned but it did get it watertight,
unfortunately $ 3000 or anything in this vicinity is out of my range of possibilities
i need to finish the project with about this amount of funds , solar, fridge tie down system , battery. and the funds are gone. So for me it is all about creativity
I am convinced that i can make this work
lets hope the linky will work this time
Cheers
- Mark as New
- Bookmark
- Subscribe
- Mute
- Subscribe to RSS Feed
- Permalink
- Report Inappropriate Content
Jul-10-2015 08:48 AM
BTW, the paint issue is one I'm thinking about. Check out Awlgrip paint bright aluminum. I think it's a great match AND Awlgrip is an absolutely bombproof paint. My body shop guy quoted $3000 to sand, prep, prime and finish coat my rig.
Maybe a vinyl wrap would allow you to do your own artwork and help cover the Gluvit. That stuff is messy! I've used it on the bottom of drift boats and been glad it was on the bottom where it wasn't seen!
Onward!
Dick
- Mark as New
- Bookmark
- Subscribe
- Mute
- Subscribe to RSS Feed
- Permalink
- Report Inappropriate Content
Jul-09-2015 06:07 PM
We'll see.
Forward!
D
- Mark as New
- Bookmark
- Subscribe
- Mute
- Subscribe to RSS Feed
- Permalink
- Report Inappropriate Content
Jul-09-2015 03:41 PM
i am posting a link to my google album dedicated to the build of this Tin Can :B
i could not bring it over me to sell it despite a lot of interest
https://goo.gl/photos/J4uQovTuHP9QMLBR7
since my last post i believe i finished the LED light set up which had quite some hick ups , like the LEDs overheating until i figured out that the LEDs that i had chosen were car LEDs and used the car body as a heat sink , so i went and connected them directly to the ribs by using a metal electrical housing
it will look good once the skin is in
i found the insulation that i like for cheap
closed cell foam mats 2 stacked on top are exactly the thickness of the ribs
no glue needed
i build a light bar that is mounted under the overhang that will Illuminate the movable kitchen if the camper is set up at a camp site
so far with all the lights 2 cell phones and a wireless speaker system charging i use 2.8 Ah
115 volt wiring is in place and checked by a qualified electrician and i plugged it in without zapping myself
4 -15 amp circuits all GFCI protected
Where the old LP gas door/ hatch was is now a sliding window that one can open from the outside to access 115v , 12v outlets and a switch for the light bar. If i ever go with electric jacks or a tilt system for solar the switches will be there.
The kitchen plan is coming along, basically what is going to happen is that the back skirt that was housing all of the plumbing and tank will be to 80 % removable, think fold down wheel set and house the outdoor kitchen with sink , cutting board stove top etc. The plan is to be able to attach a custom screen house to the overhang and create a outdoor living space
the other 20 % will stay stationary and house the shore power cord etc.
The biggest problem i had was to get it water tight
I tried just about everything from Vulkem to Acryl R no satisfying results
I guess since this unit was re-skinned at least 3 times the rivets are the culprits
although i could not find any " loose" ones
SO- last resort was to use Gluevit on the exterior which worked like a charm i feel like i could turn it upside down and go rafting :E
Turtle went through some big and long storms here in NC and it is dry on the inside
But i have to paint it now from the outside for the UV protection , which i have to figure out now what color , this could go from aluminum to white ( for less heat absorption) with red accents ( color of the Avion Logo ) to completely crazy. Hey i am an artist by trade.
Oh- and i had to replace one of the vent covers , the cheapest that i had found was about $ 100.00 and since i am on a tight budget i made one myself by creating a silicone mold and a nice fiberglass layup from materials that i had laying around. Cost about $25 fits great and looks like the one that was on it
I created some fake FAAANTASIC Fans by using 12 volt camping fans that fit almost directly into the hatches 2 speeds and reversible directions cost about $ 30 each. Still got to double screen them build a insulation to fill the gaps and clean them up a bit
Anyway this build is nothing close to what D1 it accomplishing , i really admire his approach to this challenge but it will be a fun and very functional unit that will go wherever the truck that it is on will go...... even considering getting a scrap pontoon slide Turtle on and go lake hopping, not sure yet if this stands a chance but a crazy idea
Next thing is Solar ......Stationary on the roof or a system that could be detached and be portable ??????? Got to get the wires into the wall before insulating etc.
Stay tuned and enjoy the pics
Michael
glad to be back
- Mark as New
- Bookmark
- Subscribe
- Mute
- Subscribe to RSS Feed
- Permalink
- Report Inappropriate Content
Jul-09-2015 10:58 AM
i had to make some drastic decisions in order to get the shell to not leak :M
i will post a few pics and updates soon
- Mark as New
- Bookmark
- Subscribe
- Mute
- Subscribe to RSS Feed
- Permalink
- Report Inappropriate Content
Jul-09-2015 10:47 AM
- Mark as New
- Bookmark
- Subscribe
- Mute
- Subscribe to RSS Feed
- Permalink
- Report Inappropriate Content
Jul-09-2015 10:31 AM
great info on the stripped down weight , this confirms my estimate
The only difference is mine has the plywood box in it, not sure what would be heavier
But this would give me a great starting point since i logged all the stuff that i added or what i am planing to add
currently sitting at 1557 Lb
slowly continuing my build 🙂
Michael
- Mark as New
- Bookmark
- Subscribe
- Mute
- Subscribe to RSS Feed
- Permalink
- Report Inappropriate Content
Jul-08-2015 05:01 PM
More to come
Dick
- Mark as New
- Bookmark
- Subscribe
- Mute
- Subscribe to RSS Feed
- Permalink
- Report Inappropriate Content
Jul-01-2015 02:56 PM
- Mark as New
- Bookmark
- Subscribe
- Mute
- Subscribe to RSS Feed
- Permalink
- Report Inappropriate Content
Jul-01-2015 09:56 AM
Garry, that link you sent me about the guy in Eugene, OR who built a 4WD camper with a ex-Uhaul box body is phenomenal! This guy is an accomplished designer, artist and craftsman. AND he has a wife and two dogs whose needs were accommodated in the design! I've emailed him with a couple of questions. Thanks very much for the link. This will help me resolve a couple of nagging questions in my design and get moving again.
Onward!
Dick
- Mark as New
- Bookmark
- Subscribe
- Mute
- Subscribe to RSS Feed
- Permalink
- Report Inappropriate Content
Jul-01-2015 09:08 AM
69avion wrote:
Just think how well aircraft paint works.
I have gone round and round with the idea of applying paint to the Avion. I can't seem to let go of the idea of OEM even though the exterior finish is subject to staining and mottling. I think that its something that should be tried. I mean, if the Canadian Air Force can do it, why can't we?

- Mark as New
- Bookmark
- Subscribe
- Mute
- Subscribe to RSS Feed
- Permalink
- Report Inappropriate Content
Jun-30-2015 11:42 PM
Started reading through 2 years of a build. This may be good reference for Argo!
Good luck! Garry
Wife + 4 kids
Retired Military Family.... Alway's on the move....
2002 F350 CCSB 5.4 6spd 4x4 in AK
1966 Avion C-10 Truck Camper
- Mark as New
- Bookmark
- Subscribe
- Mute
- Subscribe to RSS Feed
- Permalink
- Report Inappropriate Content
Jun-30-2015 08:05 PM
I'd like to see pics of your pass thru. I'm anxious about cutting up the cab...
Dick
- Mark as New
- Bookmark
- Subscribe
- Mute
- Subscribe to RSS Feed
- Permalink
- Report Inappropriate Content
Jun-30-2015 06:55 PM
cajunavion wrote:
Howdy!
What size passthroughs do y'all have. Mine is 2ft square
open when traveling with a cushion between, I had to center it in the
back wall to match the cab. Have y'all
modified the opening. What uses is it put to?
Happy 300!
Sounds interesting . How about some details and pictures of your pass through ?
'02 GMC DRW D/A flatbed


