Turn on suggestions
Auto-suggest helps you quickly narrow down your search results by suggesting possible matches as you type.
Showing results for
- Good Sam Community
- Everything RV
- DIY Maintenance
- Rubber bumper ends
Options
- Subscribe to RSS Feed
- Mark Topic as New
- Mark Topic as Read
- Float this Topic for Current User
- Bookmark
- Subscribe
- Mute
- Printer Friendly Page
Rubber bumper ends
Options
- Mark as New
- Bookmark
- Subscribe
- Mute
- Subscribe to RSS Feed
- Permalink
- Report Inappropriate Content
Mar-28-2015 10:04 AM
How does everybody keep the rear rubber bumper caps from working them self out? I had a long pin through my last trailer but looking for something a little nicer for the new trailer. I am storing my 4x4 blocks in there. Hate for one to come out going down the road. Thanks
14 REPLIES 14
Options
- Mark as New
- Bookmark
- Subscribe
- Mute
- Subscribe to RSS Feed
- Permalink
- Report Inappropriate Content
Mar-30-2015 02:20 PM
Well here is what I ended up ordering, it should last a lifetime.
http://www.ebay.com/itm/2-TWO-RV-PARTS-SEWER-HOSE-DOORS-4-x-4-RV-Bumper-Door-/261805753348?pt=LH_DefaultDomain_0&hash=item3cf4d6c404
http://www.ebay.com/itm/2-TWO-RV-PARTS-SEWER-HOSE-DOORS-4-x-4-RV-Bumper-Door-/261805753348?pt=LH_DefaultDomain_0&hash=item3cf4d6c404
Options
- Mark as New
- Bookmark
- Subscribe
- Mute
- Subscribe to RSS Feed
- Permalink
- Report Inappropriate Content
Mar-30-2015 08:44 AM
These are the ones that came on our TT from the manufacturer. Every time we went camping, they'd back out by the time we got there. Would push them back in only to find them backed out again when we got home. Not sure why - maybe the weight of the spare tire causing the tubing to flex? Now have a BAL tire carrier so no longer a factor.

Installed these Camco end caps and now they never back out.

There are these hinged/locking end caps:
RV Designer Design For Fun
Installed these Camco end caps and now they never back out.
There are these hinged/locking end caps:
RV Designer
Design For Fun
Options
- Mark as New
- Bookmark
- Subscribe
- Mute
- Subscribe to RSS Feed
- Permalink
- Report Inappropriate Content
Mar-30-2015 02:54 AM
mobeewan wrote:
I use these. You'll need to drill a couple holes at each end of the bumper.
That's the way they were made years ago before cost-cutting became the most important thing. If you use these, be aware that they tend to shrink away from the holes as they age.
Options
- Mark as New
- Bookmark
- Subscribe
- Mute
- Subscribe to RSS Feed
- Permalink
- Report Inappropriate Content
Mar-29-2015 11:48 PM
I use these. You'll need to drill a couple holes at each end of the bumper.
Options
- Mark as New
- Bookmark
- Subscribe
- Mute
- Subscribe to RSS Feed
- Permalink
- Report Inappropriate Content
Mar-29-2015 02:20 PM
rockhillmanor wrote:DutchmenSport wrote:
......
Regarding the cargo carrier in your pix.
a little ot but do the sides of your cargo carrier come down in a position that you could load stuff flat on it too?
And WHERE did you buy it! Tks.
The cage separates from the carrier very easy with just a few screws enabling the carrier to be flat. The carrier and the cage are sold separate, and actually there this a 3rd part, a hinged cage lid. That part was out of stock when I purchased, so just settled on the carrier and cage. The top would have been nice, but really not necessary.
Click here
I added the 2x4 braces at each of the carrier to fit over my bumper. My trailer came with a factory installed hitch, but when I tried using it, the cage was so wobbly, I decided to pull out my old 4 inch square sewer bumper attachment hitch that everyone says "DON'T USE". With my bumper re-inforced by the factory, I could put the receiver on the top of the bumper, leaving "just" enough room to slip those 2x4's under the carrier and on top of the bumper, thus, completely eliminating the rocking back and forth. It works like a champ. I figure if there ever was too much stress at any point (side to side), the 2x4's would break first. But there's never been a hint of problem doing it this way. I painted the 2x4 with black Rustolium (oil based) paint to match the carrier. It works great. But I only use it for carrying hoses, my sewer hoses and water hoses, and occasionally a wet rug.
The good thing is, it wasn't "that" expensive! and works great!
Options
- Mark as New
- Bookmark
- Subscribe
- Mute
- Subscribe to RSS Feed
- Permalink
- Report Inappropriate Content
Mar-29-2015 10:17 AM
I keep my end caps on my work bench. Got tired of replacing them over the years; don't know if folks take them or they fall off, but I don't store anything in my bumper so I really don't need them.
2016 6.7 CTD 2500 BIG HORN MEGA CAB
2013 Forest River 3001W Windjammer
Equilizer Hitch
Honda EU2000
"I have this plan to live forever; so far my plan is working"
2013 Forest River 3001W Windjammer
Equilizer Hitch
Honda EU2000
"I have this plan to live forever; so far my plan is working"
Options
- Mark as New
- Bookmark
- Subscribe
- Mute
- Subscribe to RSS Feed
- Permalink
- Report Inappropriate Content
Mar-28-2015 07:45 PM
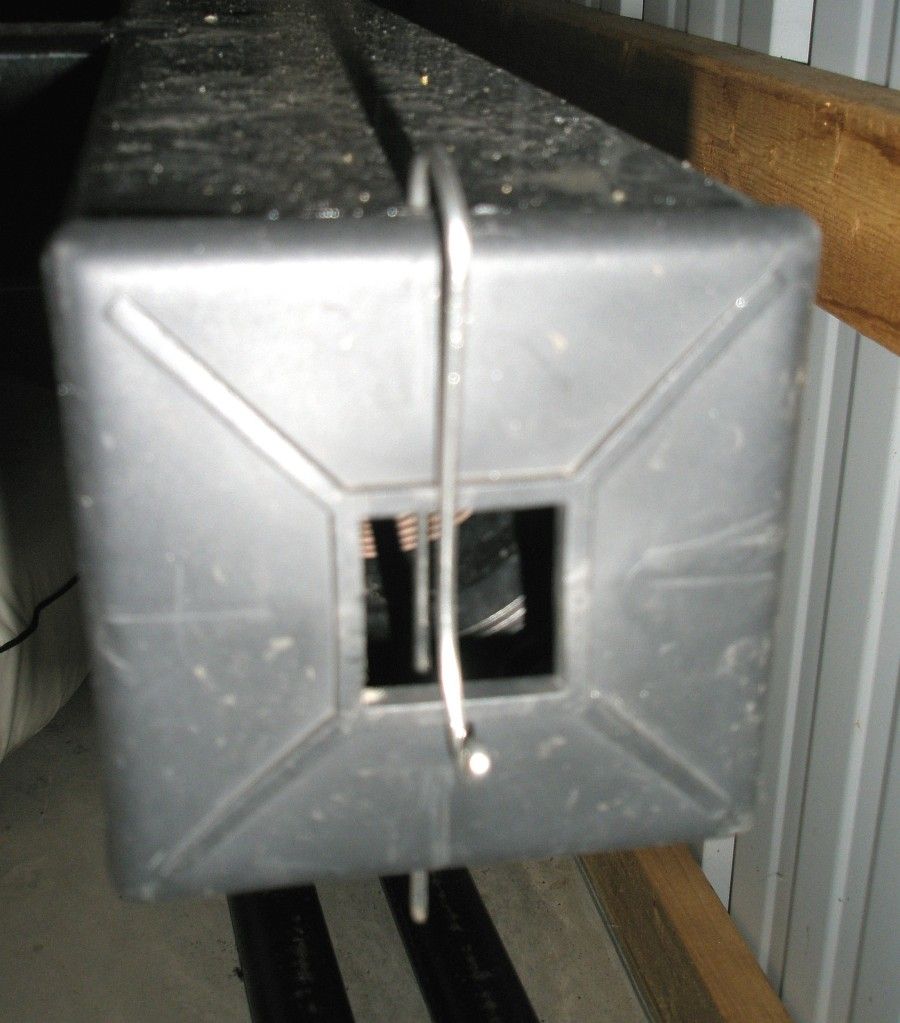
I quit using the caps and just used a piece of metal coat hanger inserted through a hole on the top and bottom.
2003 Silverado 2500HD 4x4 8.1l
2016 Evergreen Amped 28FS
2016 Evergreen Amped 28FS
Options
- Mark as New
- Bookmark
- Subscribe
- Mute
- Subscribe to RSS Feed
- Permalink
- Report Inappropriate Content
Mar-28-2015 06:51 PM
DutchmenSport wrote:
......
Regarding the cargo carrier in your pix.
a little ot but do the sides of your cargo carrier come down in a position that you could load stuff flat on it too?
And WHERE did you buy it! Tks.
We must be willing to get rid of the life we've planned,
so as to have the life that is waiting for us.
Options
- Mark as New
- Bookmark
- Subscribe
- Mute
- Subscribe to RSS Feed
- Permalink
- Report Inappropriate Content
Mar-28-2015 05:13 PM
Options
- Mark as New
- Bookmark
- Subscribe
- Mute
- Subscribe to RSS Feed
- Permalink
- Report Inappropriate Content
Mar-28-2015 12:33 PM
I drilled 1/4" holes through top and bottom and dropped a rod (cut to the length + 1" through the hole.
Also you can drill a hole and pop rivet a chain to the bumper and then to front top of the cap.
Also you can drill a hole and pop rivet a chain to the bumper and then to front top of the cap.
By the time you learn the rules of life
You're to old to play the game
You're to old to play the game
Options
- Mark as New
- Bookmark
- Subscribe
- Mute
- Subscribe to RSS Feed
- Permalink
- Report Inappropriate Content
Mar-28-2015 12:10 PM
I made pins from stainless steel wire.
Options
- Mark as New
- Bookmark
- Subscribe
- Mute
- Subscribe to RSS Feed
- Permalink
- Report Inappropriate Content
Mar-28-2015 11:55 AM
I bought "locking" bumper caps.....basically you put them on and then push in on them and they kinda wedge themselves into place.
Options
- Mark as New
- Bookmark
- Subscribe
- Mute
- Subscribe to RSS Feed
- Permalink
- Report Inappropriate Content
Mar-28-2015 11:49 AM
Back when we had a 4" bumper to cap, I replaced the standard caps with a pair of these insect resistant caps. As well as keeping bees, etc, from nesting in the bumper, they stay in place very well and have to be squeezed to release them.
Dutch
2001 GBM Landau 34' Class A
F53 chassis, Triton V10, TST TPMS
Bigfoot Automatic Leveling System
2011 Toyota RAV4 4WD/Remco pump
ReadyBrute Elite tow bar/Blue Ox baseplate
2001 GBM Landau 34' Class A
F53 chassis, Triton V10, TST TPMS
Bigfoot Automatic Leveling System
2011 Toyota RAV4 4WD/Remco pump
ReadyBrute Elite tow bar/Blue Ox baseplate
Options
- Mark as New
- Bookmark
- Subscribe
- Mute
- Subscribe to RSS Feed
- Permalink
- Report Inappropriate Content
Mar-28-2015 10:48 AM
Here's an easy solution I found. It works very well, doesn't cost much and takes no special modifications on your bumper.
I went to Wall Mart and pick up a bunch of small (the very small) bungie cords. I wrapped one around the bumper inside the front-to-back frame. I then attached two, one on top and one on the bottom to the bungie cord and wrapped around the end of the bumper keeping the cap from ever coming off.
On my previous camper, I lost 3 of those end-camps while traveling. I finally got smart and started doing this. I've never lost another one. The only problem, every year, I need to replace the bungies because they do loose their stretchiness after exposure to heat, sun, rain, and cold. But this works very nice, no modifications, and doesn't cost but a couple dollars for the bungies. Here's about the best photo I could find. Hope this makes sense.
If you use the black bungies, you'll never see them, and put the clips on the side you can't see from behind.


