Turn on suggestions
Auto-suggest helps you quickly narrow down your search results by suggesting possible matches as you type.
Showing results for
- Good Sam Community
- Everything RV
- DIY Maintenance
- Re: Self Adhesive Kitchen Tile Mod 2013
Options
- Subscribe to RSS Feed
- Mark Topic as New
- Mark Topic as Read
- Float this Topic for Current User
- Bookmark
- Subscribe
- Mute
- Printer Friendly Page
Self Adhesive Kitchen Tile Mod 2013
Options
- Mark as New
- Bookmark
- Subscribe
- Mute
- Subscribe to RSS Feed
- Permalink
- Report Inappropriate Content
Feb-27-2013 05:01 PM
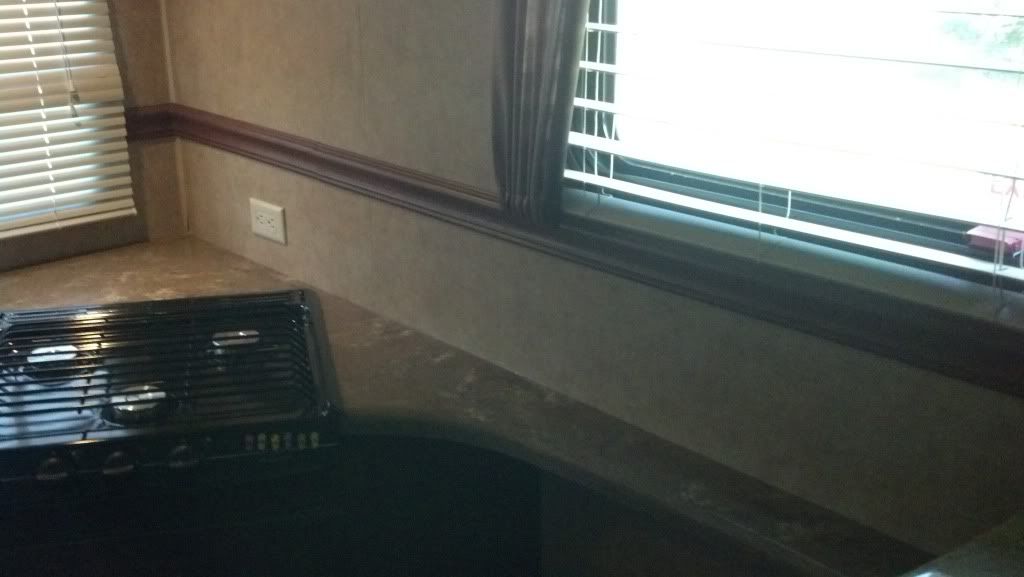
My husband and I do this every year. It's cold outside, we are dying to go camping, but instead we end up at the annual RV show in our area. Just to check out what's new,right? I was actually looking to see what was new with the Big Country, which I really like. As we walked the length and breadth of our local arena, I kept noticing that all the 2013 models had this awesome glass tile in the kitchens. Except it wasn't glass tile at all! It was a self-adhesive gel tile. After examining the product for what seemed like forever, I turned to my husband and gave him "the look". Which in our marriage, is loosely translated as,"Oh, crap, she's going to do another project!"
In all fairness, though, we have been looking for a backsplash for our kitchen for some time now. It's not that I am particularly messy when I cook. But seeing these latest models with this tile product really got me motivated. I found exactly what I wanted at homedepot.com. The product is called Smart Tiles and is sold exclusively by homedepot.com. We chose the "Dune Mosaic", to match the dark brown and neutral tiles in our rig, but they do offer a number of different styles, which would compliment any decor. The items shipped very quickly and I was giddy with anticipation. I almost waited until the next day to start, but that is just not my style!:B
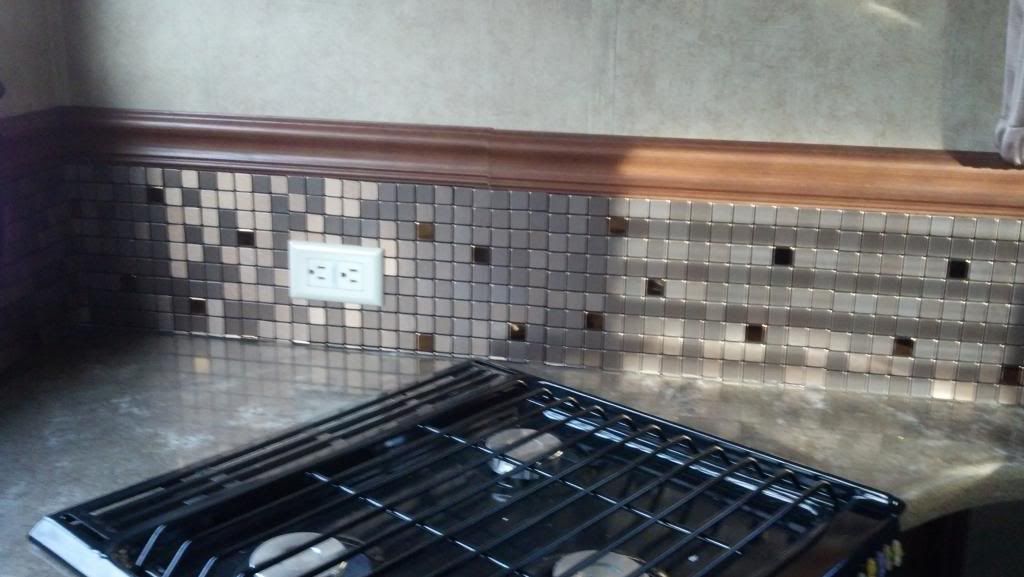
We (I, let's be real here) began by removing the wallpaper border on the wall we were working on. We just wanted the impact of one wall, so we did the wall behind the stove. At $9 a sheet (We purchased 12,whoa), these are not cheap, but the results will astound you. Removing the wall border wasn't difficult, but in older rigs, it might be a problem. I suppose if you couldn't get it off, this product would cover right over the wallpaper, but as you will see, a super-smooth surface is best. Our wallpaper left some adhesive residue, which turned out to be a good thing. The Smart Tiles are peel and stick and do allow for removing and re positioning,if necessary. I worked from left to right, bottom to top, cutting when needed with a sharp pair of scissors. This project probably took all of an hour, but most of that was spent with me just staring at my handiwork like an idiot. So here it is (drum roll, please)

Some words of advice:If you are not particularly handy or crafty,give this project to your wife/girlfriend/daughter. Not to be sexist, but unless you spent the better part of your childhood cutting out Barbie paper dolls, you will suck at this and make an unholy mess of this project. But not to worry, when your significant other sees these little jewels arrive, they will snatch them from your hands anyway.
Seriously, work methodically. I measured twice, then carefully peeled the backing away and when placing the tiles worked them up from the bottom up. Simply pressing them gently was all they needed. They overlap nicely as well. I used my excess to cut half tiles for the ends and top.
All said, I am totally jazzed with this backsplash. It looks very high-end and custom residential. I would love to use this in the RV bathroom around the sink. Truthfully, I want to cover my whole house in these tiles.;)Smart Tiles clean with a damp cloth, come in a range of colors and are the perfect solution for RVs.
Enjoy!
In all fairness, though, we have been looking for a backsplash for our kitchen for some time now. It's not that I am particularly messy when I cook. But seeing these latest models with this tile product really got me motivated. I found exactly what I wanted at homedepot.com. The product is called Smart Tiles and is sold exclusively by homedepot.com. We chose the "Dune Mosaic", to match the dark brown and neutral tiles in our rig, but they do offer a number of different styles, which would compliment any decor. The items shipped very quickly and I was giddy with anticipation. I almost waited until the next day to start, but that is just not my style!:B
We (I, let's be real here) began by removing the wallpaper border on the wall we were working on. We just wanted the impact of one wall, so we did the wall behind the stove. At $9 a sheet (We purchased 12,whoa), these are not cheap, but the results will astound you. Removing the wall border wasn't difficult, but in older rigs, it might be a problem. I suppose if you couldn't get it off, this product would cover right over the wallpaper, but as you will see, a super-smooth surface is best. Our wallpaper left some adhesive residue, which turned out to be a good thing. The Smart Tiles are peel and stick and do allow for removing and re positioning,if necessary. I worked from left to right, bottom to top, cutting when needed with a sharp pair of scissors. This project probably took all of an hour, but most of that was spent with me just staring at my handiwork like an idiot. So here it is (drum roll, please)
Some words of advice:If you are not particularly handy or crafty,give this project to your wife/girlfriend/daughter. Not to be sexist, but unless you spent the better part of your childhood cutting out Barbie paper dolls, you will suck at this and make an unholy mess of this project. But not to worry, when your significant other sees these little jewels arrive, they will snatch them from your hands anyway.
Seriously, work methodically. I measured twice, then carefully peeled the backing away and when placing the tiles worked them up from the bottom up. Simply pressing them gently was all they needed. They overlap nicely as well. I used my excess to cut half tiles for the ends and top.
All said, I am totally jazzed with this backsplash. It looks very high-end and custom residential. I would love to use this in the RV bathroom around the sink. Truthfully, I want to cover my whole house in these tiles.;)Smart Tiles clean with a damp cloth, come in a range of colors and are the perfect solution for RVs.
Enjoy!
137 REPLIES 137
Options
- Mark as New
- Bookmark
- Subscribe
- Mute
- Subscribe to RSS Feed
- Permalink
- Report Inappropriate Content
Sep-23-2013 02:50 PM
That looks sooo sharp! Love it!! Not sure what the manufacturer was thinking but our TT has light colored wallpaper *gasp* around the stove/back splash area (looks identical to yours actually). WHAT WERE THEY THINKING? I lean a couple cookie sheets up against the side/back areas of the stove when I cook to block spatters.
We may have to attend the 2014 RV show when it comes around this year. I'd love to make that area a little more durable and realistic.
Thanks for the inspiration!
.
We may have to attend the 2014 RV show when it comes around this year. I'd love to make that area a little more durable and realistic.
Thanks for the inspiration!
.
~ It's a fine line between hobby and mental illness ~ Dave Barry
Carl, Felicia, Eva & Pip (the fur kids)
Carl, Felicia, Eva & Pip (the fur kids)
Options
- Mark as New
- Bookmark
- Subscribe
- Mute
- Subscribe to RSS Feed
- Permalink
- Report Inappropriate Content
Sep-23-2013 01:05 PM
Sophiethepom wrote:
I love the modifications and especially the Smart Tiles. I used them also, but after looking at yours...I want to go all the way to the vent hood! ChaChing once again. 😉 It seems that the things we want to do to our trailer and its inventory are endless. But, it sure is fun getting it personalized. Here is what I have done so far....my favorite is by far getting rid of the overhead storage cabinet above our bed. Our Modifications
I really like the pleated shades in you dinette. I'm getting the border removed at the dealership, did it leave any marks or residue?
2 DD both grown.
2 GC-loves of my life!
Campground lot in Harrison MI.
looking for good used 5th wheel.
2 GC-loves of my life!
Campground lot in Harrison MI.
looking for good used 5th wheel.
Options
- Mark as New
- Bookmark
- Subscribe
- Mute
- Subscribe to RSS Feed
- Permalink
- Report Inappropriate Content
Sep-23-2013 10:54 AM
Ok. It took a while to get off my duff and get the tiles installed but it is finally finished.
We did both the bathroom and the lower wall of the kitchen. I only have some initial pictures of the kitchen.

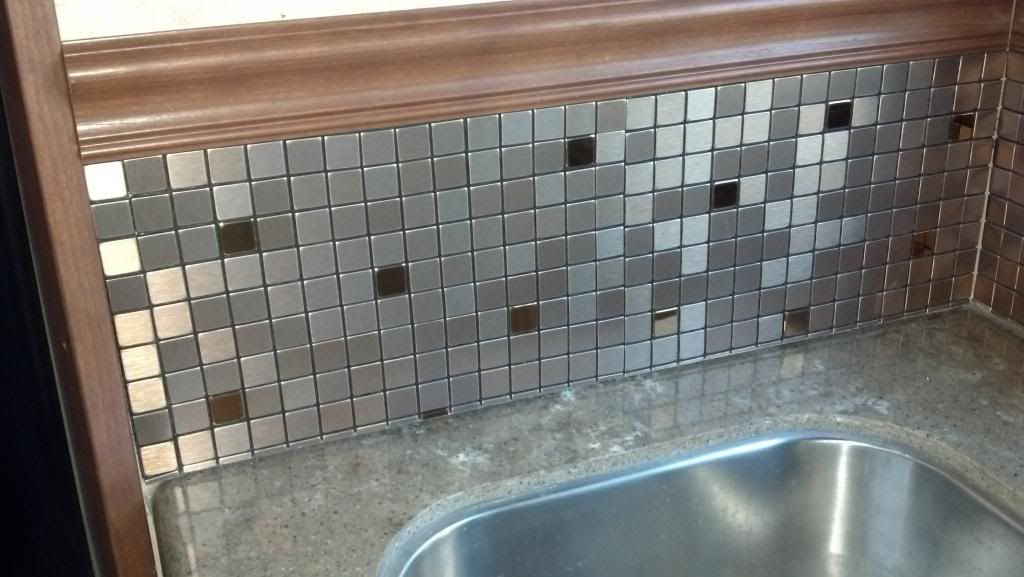
We did both the bathroom and the lower wall of the kitchen. I only have some initial pictures of the kitchen.
Moderator edit to re-size pictures to forum limit of 640px maximum width.
Me, DW, Five Crazy Felines, One RB Angel
2011 Ford F350 SD, PSD 6.7, SRW, CC
2011 Komfort 3230FRK
2011 Ford F350 SD, PSD 6.7, SRW, CC
2011 Komfort 3230FRK
Options
- Mark as New
- Bookmark
- Subscribe
- Mute
- Subscribe to RSS Feed
- Permalink
- Report Inappropriate Content
Aug-03-2013 03:40 PM
I just finished putting them up in our RV. I chose the 'stainless steel'. I was afraid that the glass ones would be just a little too busy. I am quite pleased with them. Will post pictures when I can get hubby to make them for me.
gloriebkj
Options
- Mark as New
- Bookmark
- Subscribe
- Mute
- Subscribe to RSS Feed
- Permalink
- Report Inappropriate Content
Aug-03-2013 02:53 PM
I'll try one more time to post the pic. I'm just not doing too well at this! Sorry!
Options
- Mark as New
- Bookmark
- Subscribe
- Mute
- Subscribe to RSS Feed
- Permalink
- Report Inappropriate Content
Aug-03-2013 02:36 PM
I could not wait for a reply so reviewed everything and ran back to the store to purchase my tiles. I was so surprised to find them in my local Lowes! I thought I could only get the on-line. Jumped right in and got it done and I am thrilled!
Options
- Mark as New
- Bookmark
- Subscribe
- Mute
- Subscribe to RSS Feed
- Permalink
- Report Inappropriate Content
Aug-03-2013 09:39 AM
I am so excited! Just located Smart Tiles in Bellagio that I think will go great in our RV. Before I decide to do it, I need to ask if anyone can tell me how they treat a corner? I was thinking of starting on a small wall just to the left of my range and working to the right behind the range. I am just not sure whether I should start at the left or should I start in the corner and work to the left, then go back and finish the right side on the other side of the corner. Your answers will give me courage to buy it and start to work. Thanks for any suggestions.
Options
- Mark as New
- Bookmark
- Subscribe
- Mute
- Subscribe to RSS Feed
- Permalink
- Report Inappropriate Content
Jul-29-2013 08:13 AM
Bob Vaughn wrote:
Also in the corners there is a corner piece and was wondering if I have to remove that prior to installing the tiles?
We had a piece of wallpaper-covered corner trim in our kitchen. We didn't want the hassle of removing it, especially because we weren't going all the way up the wall, so we would have only removed a portion of it. So, we "tiled" right over it with the stickers. It turned out fine - made the corner look like there was a radius there instead of a 90 degree corner.
You can't really make it out in the photos (and it's not very pronounced in real life, either), but you can click this to see my post/photos earlier in this thread.
2007 Coachmen Freelander 2430DB + 2 dogs
Options
- Mark as New
- Bookmark
- Subscribe
- Mute
- Subscribe to RSS Feed
- Permalink
- Report Inappropriate Content
Jul-28-2013 08:01 PM
OliverMiguel wrote:
Has anybody used glass blacksplash in their kitchen, am planning to do so. I have installed White glazed tiles and now looking to replace them. Check out this article on new kitchen trends, i think its time to replace the traditional tiles with backsplash.
This mod was created using Smart Tiles. The Smart Tiles company offers a range of white subway tiles that can be used in RVs as well as residential applications. See http://www.thesmarttiles.com/en/shop/tiles/by-color/blanc/infinity-blanco/
If you are considering using glass mosaic tiles in an RV kitchen, I would suggest that you check out the RV.net forum posts on glass tiles. There you can find a number of posters who can help you decide if that product will be the best fit for your needs.
Options
- Mark as New
- Bookmark
- Subscribe
- Mute
- Subscribe to RSS Feed
- Permalink
- Report Inappropriate Content
Jul-28-2013 07:47 PM
Bob Vaughn wrote:
We went to HD this morning and looked and looked could not find the 9 sheets that another HD said they had. Finally an associate found where they were as they were not with the other tiles... I bought way too many because I forgot to measure before I went there so I will be returning a lot of sheets....This HD had lots of styles to chose from. My question for those that have installed them is can they be cut with a paper cutter? at least the long straight cuts? at 10 dollars a sheet I do not want to be making a mess with the cutting. Also in the corners there is a corner piece and was wondering if I have to remove that prior to installing the tiles?
Evening Bob!
Glad to see you are going to do this project! I don't think you will be disappointed. "Measure twice,cut once." I think I heard my mother say that. And the guy from "This Old House". For accurate cuts, you can use a strong pair of scissors or a utility knife. Maybe a rolling cutting wheel, if its really sharp and IF you are using a straight edge and cutting on a board! Safety first! When I did this, I was measuring and cutting right there in the RV. The corner piece is up to you. I did not have to contend with one, however, if I did, I would likely remove it, to obtain a more seamless look. The Smart Tiles are flexible. But I wouldn't try to bend it around a corner. Just measure and cut each wall and you should be fine. If you apply the tiles and see that it isn't fitting right, you can gently remove it and try re-positioning them.
Another design tip: Look at the wall you are going to apply the tiles on...where does your eye fall first? Behind the stove? In the corner? Wherever that is for your project, then that is the corner you should start in. For me, it happened to be left to right. Seriously though, HAVE FUN!! Just let us know what color you got and post some pictures of your mod!
Options
- Mark as New
- Bookmark
- Subscribe
- Mute
- Subscribe to RSS Feed
- Permalink
- Report Inappropriate Content
Jul-28-2013 02:58 PM
We went to HD this morning and looked and looked could not find the 9 sheets that another HD said they had. Finally an associate found where they were as they were not with the other tiles... I bought way too many because I forgot to measure before I went there so I will be returning a lot of sheets....This HD had lots of styles to chose from. My question for those that have installed them is can they be cut with a paper cutter? at least the long straight cuts? at 10 dollars a sheet I do not want to be making a mess with the cutting. Also in the corners there is a corner piece and was wondering if I have to remove that prior to installing the tiles?
Options
- Mark as New
- Bookmark
- Subscribe
- Mute
- Subscribe to RSS Feed
- Permalink
- Report Inappropriate Content
Jul-27-2013 05:36 PM
I got the smart tile for 1 1/2 years and I don't have any problem.They look very good.
2017 Ford F350 DRW,2005 Kountry Star 35ft,16750 lb weight on SAILUN tire,6 points LIPPERD Level-up.New Mor/ryde IS suspension install.Full body paint 2022.RV flex roof 2023
Options
- Mark as New
- Bookmark
- Subscribe
- Mute
- Subscribe to RSS Feed
- Permalink
- Report Inappropriate Content
Jul-27-2013 01:38 PM
I am excited to see that someone has used the Smart Tiles with success. I just joined RV net to see what people are up to because we just decided to make some big renovations to our motorhome rather than buy a fancy new one. We plan to get someone to put in vinyl wood plank flooring, reupholster everything, change out the countertops, and of course... add backsplash! I read about Smart Tiles and thought they sounded perfect and ordered some free samples from the company. Looks like they will be a great solution! When we get the reno done I will post pics.
Jill
'04 Four Winds Hurricane
'02 Acura LT toad
Jill
'04 Four Winds Hurricane
'02 Acura LT toad
Jill
'04 Four Winds Hurricane
'02 Acura TL toad
plus a husband and two kids:C
'04 Four Winds Hurricane
'02 Acura TL toad
plus a husband and two kids:C
Options
- Mark as New
- Bookmark
- Subscribe
- Mute
- Subscribe to RSS Feed
- Permalink
- Report Inappropriate Content
Jul-24-2013 12:36 PM
Not to rain on the parade and hate to be a pessimist but "PEEL & STICK" with "HEAT to REMOVE" instructions has implied DO NOT USE in an RV that gets hot and shakes going down the road. If your RV does not get hot or shake then you should be fine. Regardless of what the Smart Tiles web site says...but I am a pessimist by nature.
Options
- Mark as New
- Bookmark
- Subscribe
- Mute
- Subscribe to RSS Feed
- Permalink
- Report Inappropriate Content
Jul-24-2013 05:39 AM
Has anybody used glass blacksplash in their kitchen, am planning to do so. I have installed White glazed tiles and now looking to replace them. Check out this article on new kitchen trends, i think its time to replace the traditional tiles with backsplash.
Related Content
- First 3 months with a new GD Imagine, kind of long story in RV Tips & Tricks
- Room mates Peel and Stick tile_Update_Pictures in DIY Maintenance
- A lesson for RV shoppers in RV Tips & Tricks
- Shurflo pump mystery in Technical Issues
- Building New Beds and Making Lots Of Storage With Pictures in DIY Maintenance


