Turn on suggestions
Auto-suggest helps you quickly narrow down your search results by suggesting possible matches as you type.
Showing results for
- Good Sam Community
- Everything RV
- DIY Maintenance
- Re: Self Adhesive Kitchen Tile Mod 2013
Options
- Subscribe to RSS Feed
- Mark Topic as New
- Mark Topic as Read
- Float this Topic for Current User
- Bookmark
- Subscribe
- Mute
- Printer Friendly Page
Self Adhesive Kitchen Tile Mod 2013
Options
- Mark as New
- Bookmark
- Subscribe
- Mute
- Subscribe to RSS Feed
- Permalink
- Report Inappropriate Content
Feb-27-2013 05:01 PM
My husband and I do this every year. It's cold outside, we are dying to go camping, but instead we end up at the annual RV show in our area. Just to check out what's new,right? I was actually looking to see what was new with the Big Country, which I really like. As we walked the length and breadth of our local arena, I kept noticing that all the 2013 models had this awesome glass tile in the kitchens. Except it wasn't glass tile at all! It was a self-adhesive gel tile. After examining the product for what seemed like forever, I turned to my husband and gave him "the look". Which in our marriage, is loosely translated as,"Oh, crap, she's going to do another project!"
In all fairness, though, we have been looking for a backsplash for our kitchen for some time now. It's not that I am particularly messy when I cook. But seeing these latest models with this tile product really got me motivated. I found exactly what I wanted at homedepot.com. The product is called Smart Tiles and is sold exclusively by homedepot.com. We chose the "Dune Mosaic", to match the dark brown and neutral tiles in our rig, but they do offer a number of different styles, which would compliment any decor. The items shipped very quickly and I was giddy with anticipation. I almost waited until the next day to start, but that is just not my style!:B
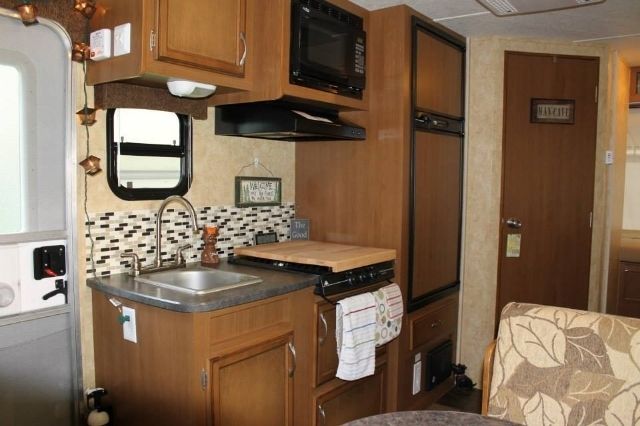
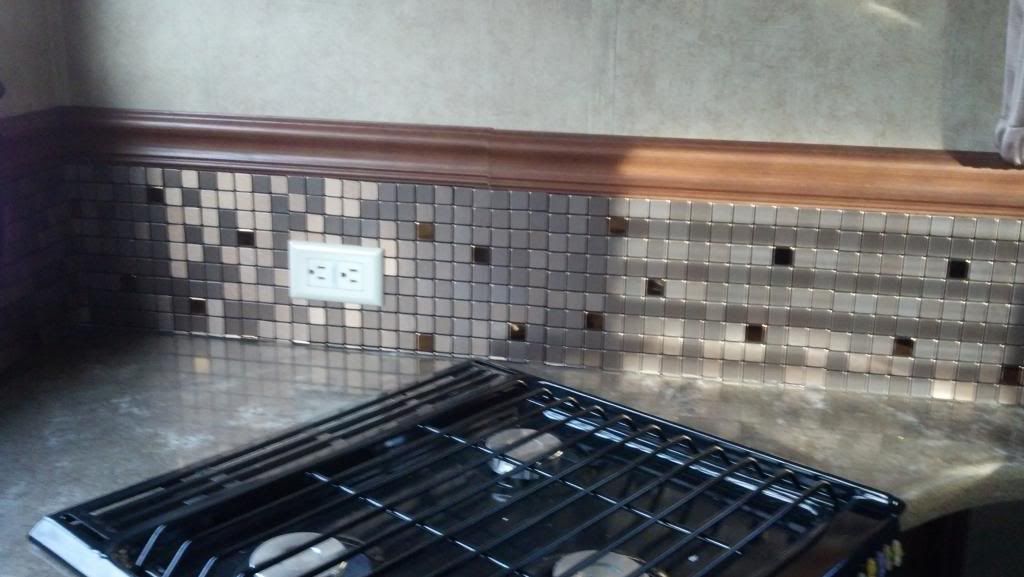
We (I, let's be real here) began by removing the wallpaper border on the wall we were working on. We just wanted the impact of one wall, so we did the wall behind the stove. At $9 a sheet (We purchased 12,whoa), these are not cheap, but the results will astound you. Removing the wall border wasn't difficult, but in older rigs, it might be a problem. I suppose if you couldn't get it off, this product would cover right over the wallpaper, but as you will see, a super-smooth surface is best. Our wallpaper left some adhesive residue, which turned out to be a good thing. The Smart Tiles are peel and stick and do allow for removing and re positioning,if necessary. I worked from left to right, bottom to top, cutting when needed with a sharp pair of scissors. This project probably took all of an hour, but most of that was spent with me just staring at my handiwork like an idiot. So here it is (drum roll, please)

Some words of advice:If you are not particularly handy or crafty,give this project to your wife/girlfriend/daughter. Not to be sexist, but unless you spent the better part of your childhood cutting out Barbie paper dolls, you will suck at this and make an unholy mess of this project. But not to worry, when your significant other sees these little jewels arrive, they will snatch them from your hands anyway.
Seriously, work methodically. I measured twice, then carefully peeled the backing away and when placing the tiles worked them up from the bottom up. Simply pressing them gently was all they needed. They overlap nicely as well. I used my excess to cut half tiles for the ends and top.
All said, I am totally jazzed with this backsplash. It looks very high-end and custom residential. I would love to use this in the RV bathroom around the sink. Truthfully, I want to cover my whole house in these tiles.;)Smart Tiles clean with a damp cloth, come in a range of colors and are the perfect solution for RVs.
Enjoy!
In all fairness, though, we have been looking for a backsplash for our kitchen for some time now. It's not that I am particularly messy when I cook. But seeing these latest models with this tile product really got me motivated. I found exactly what I wanted at homedepot.com. The product is called Smart Tiles and is sold exclusively by homedepot.com. We chose the "Dune Mosaic", to match the dark brown and neutral tiles in our rig, but they do offer a number of different styles, which would compliment any decor. The items shipped very quickly and I was giddy with anticipation. I almost waited until the next day to start, but that is just not my style!:B
We (I, let's be real here) began by removing the wallpaper border on the wall we were working on. We just wanted the impact of one wall, so we did the wall behind the stove. At $9 a sheet (We purchased 12,whoa), these are not cheap, but the results will astound you. Removing the wall border wasn't difficult, but in older rigs, it might be a problem. I suppose if you couldn't get it off, this product would cover right over the wallpaper, but as you will see, a super-smooth surface is best. Our wallpaper left some adhesive residue, which turned out to be a good thing. The Smart Tiles are peel and stick and do allow for removing and re positioning,if necessary. I worked from left to right, bottom to top, cutting when needed with a sharp pair of scissors. This project probably took all of an hour, but most of that was spent with me just staring at my handiwork like an idiot. So here it is (drum roll, please)
Some words of advice:If you are not particularly handy or crafty,give this project to your wife/girlfriend/daughter. Not to be sexist, but unless you spent the better part of your childhood cutting out Barbie paper dolls, you will suck at this and make an unholy mess of this project. But not to worry, when your significant other sees these little jewels arrive, they will snatch them from your hands anyway.
Seriously, work methodically. I measured twice, then carefully peeled the backing away and when placing the tiles worked them up from the bottom up. Simply pressing them gently was all they needed. They overlap nicely as well. I used my excess to cut half tiles for the ends and top.
All said, I am totally jazzed with this backsplash. It looks very high-end and custom residential. I would love to use this in the RV bathroom around the sink. Truthfully, I want to cover my whole house in these tiles.;)Smart Tiles clean with a damp cloth, come in a range of colors and are the perfect solution for RVs.
Enjoy!
137 REPLIES 137
Options
- Mark as New
- Bookmark
- Subscribe
- Mute
- Subscribe to RSS Feed
- Permalink
- Report Inappropriate Content
Jun-28-2015 05:06 PM
We just completed the backsplash mod using peel and stick gel tiles from Lowes for $7.98 a sheet. We used 17. Excuse the mess.


I also painted the fridge with magnetic primer and then black paint. The fridge had the wood grain paper stuff, and I needed somewhere for the magnets from state parks we visit. These were 2 easy mods that made a huge impact. It feels like a new travel trailer! Except for the matchy fabric, wallpaper, and valances. What's a girl to do, while the hubby is at work:@
I also painted the fridge with magnetic primer and then black paint. The fridge had the wood grain paper stuff, and I needed somewhere for the magnets from state parks we visit. These were 2 easy mods that made a huge impact. It feels like a new travel trailer! Except for the matchy fabric, wallpaper, and valances. What's a girl to do, while the hubby is at work:@
Options
- Mark as New
- Bookmark
- Subscribe
- Mute
- Subscribe to RSS Feed
- Permalink
- Report Inappropriate Content
Jun-26-2015 09:43 PM
Instructions show a quick trim of the protruding tiles, every other one, and you have your straight edge. How much easier can it be without a separate item number??
Tahiti16 says it's purpose; to stagger and hide the seams between sheets.
Lay out the project first. You might end up using a trimmed piece at one end to fill in the other without cutting a second sheet for the final sheet of the project.
Tahiti16 says it's purpose; to stagger and hide the seams between sheets.
Lay out the project first. You might end up using a trimmed piece at one end to fill in the other without cutting a second sheet for the final sheet of the project.
Options
- Mark as New
- Bookmark
- Subscribe
- Mute
- Subscribe to RSS Feed
- Permalink
- Report Inappropriate Content
Jun-26-2015 05:56 PM
Bucky Badger wrote:
Looks great, You did a very nice job.
The only thing I wish the company would change is, Make the individual stones go all the way to the end of the sheet (Left side in the pic in the link). You have to start out by cutting one right away, unless you hide one edge
http://www.homedepot.com/p/Smart-Tiles-10-13-in-x-10-in-Peel-and-Stick-Mosaic-Decorative-Wall-Tile-i...
They do that stagger so you don't get straight lines where the tiles butt up to each other. If the pattern was straight, not brick style, then the tiles would all end evenly.
Ray, Cheryl & of course Miss Molly the four-legged child
2006 Dolphin 36' F53 V10 5 speed auto 2 slides 7.5 KW genset
2006 Dolphin 36' F53 V10 5 speed auto 2 slides 7.5 KW genset
Options
- Mark as New
- Bookmark
- Subscribe
- Mute
- Subscribe to RSS Feed
- Permalink
- Report Inappropriate Content
Jun-22-2015 08:04 AM
We put up the adhesive back splash tiles a couple months ago. Recently they have been pulling away from the surface, especially at the corners, along the seams, and where they overlap. Any recommendations for some type of adhesive I could use? Home Depot was no help.
Options
- Mark as New
- Bookmark
- Subscribe
- Mute
- Subscribe to RSS Feed
- Permalink
- Report Inappropriate Content
Mar-28-2015 06:28 PM
Ours have been up for a year now...no issues! Easy mod and totally worth the price!
TV: 2015 RAM 1500 Outdoorsman Crew Cab
5.7L HEMI V8
4x4
TT: 2016 Keystone RV Springdale 260LE
Have Yorkie, will travel.
5.7L HEMI V8
4x4
TT: 2016 Keystone RV Springdale 260LE
Have Yorkie, will travel.
Options
- Mark as New
- Bookmark
- Subscribe
- Mute
- Subscribe to RSS Feed
- Permalink
- Report Inappropriate Content
Mar-26-2015 01:07 PM
RVcircus wrote:
We've had these sitting in the garage since September. Yours turned out great...hopefully ours looks as nice. Now that weather is improving I'd like to get these stuck to the wall.
Same here, have them sitting in the office ready to install.
In case anyone else is looking to do this project, I purchased our smart tiles on E-bay from a seller called oursmarttiles. They have all the patterns and various quantities. Excellent folks to deal with.
Options
- Mark as New
- Bookmark
- Subscribe
- Mute
- Subscribe to RSS Feed
- Permalink
- Report Inappropriate Content
Mar-26-2015 12:33 PM
I would still love to see pictures if you have them. Our vinyl is in great shape of course,but it doesn't have that wood plank look.
Options
- Mark as New
- Bookmark
- Subscribe
- Mute
- Subscribe to RSS Feed
- Permalink
- Report Inappropriate Content
Mar-26-2015 11:44 AM
redkoat64 wrote:
Isn't that always the way,though? Now that spring is slowly starting to creep our way, we have a list a mile long of things we need to do to prep our rig for Spring Break. I am thinking about posting another mod about Self Adhesive Vinyl Wood Plank Flooring. I gave my bathroom a "band aid" make over (its only 42 sq ft. and I don't want to tear out walls), so I used these planks OVER tile! I bought WAY more than I needed so I thought, "What else can I do?" I needed a headboard for our King bed, so I installed them running horizontally on the walls. Because it was drywall,I did have to use nails to secure the planks. I can see these being used in RV applications for floors (my father owned a flooring store and always told me that if the floor was in good condition and level, you could cover it with another vinyl) as well as walls and tight areas, like behind the bed. Why? Well,because they are REALLY adhesive and they cut to fit with nothing more than heavy duty kitchen shears. Plank flooring is really a hot trend in RV and residential design right now. But the look of hardwood is timeless. So if you all have any interest, post here and I'll write it up with pictures! Thanks!
Sounds like a cool project. We did vinyl plank flooring last year when we overhauled our trailer, but bought cheap flooring from Lumber Liquidators. When I was installing it I knew it wasn't going to last, but it's already popping up after just 6 months. I think this will be another project on the list but with better quality flooring the next time around.
2000 KZ Sportsman 2505 (overhauled & upgraded 2014)
2016 Chevy Express 3500 15 passanger van
6 humans, 2 cats, and a dog
Visit our blog at www.ROWLESmade.com
Our trailer re-build thread
2016 Chevy Express 3500 15 passanger van
6 humans, 2 cats, and a dog
Visit our blog at www.ROWLESmade.com
Our trailer re-build thread
Options
- Mark as New
- Bookmark
- Subscribe
- Mute
- Subscribe to RSS Feed
- Permalink
- Report Inappropriate Content
Mar-26-2015 09:35 AM
RVcircus wrote:
We've had these sitting in the warage sinve September. Yours turned out great...hopefully ours looks as nice. Now that weather is improving I'd like to get these stuck to the wall.
Isn't that always the way,though? Now that spring is slowly starting to creep our way, we have a list a mile long of things we need to do to prep our rig for Spring Break. I am thinking about posting another mod about Self Adhesive Vinyl Wood Plank Flooring. I gave my bathroom a "band aid" make over (its only 42 sq ft. and I don't want to tear out walls), so I used these planks OVER tile! I bought WAY more than I needed so I thought, "What else can I do?" I needed a headboard for our King bed, so I installed them running horizontally on the walls. Because it was drywall,I did have to use nails to secure the planks. I can see these being used in RV applications for floors (my father owned a flooring store and always told me that if the floor was in good condition and level, you could cover it with another vinyl) as well as walls and tight areas, like behind the bed. Why? Well,because they are REALLY adhesive and they cut to fit with nothing more than heavy duty kitchen shears. Plank flooring is really a hot trend in RV and residential design right now. But the look of hardwood is timeless. So if you all have any interest, post here and I'll write it up with pictures! Thanks!
Options
- Mark as New
- Bookmark
- Subscribe
- Mute
- Subscribe to RSS Feed
- Permalink
- Report Inappropriate Content
Mar-26-2015 08:07 AM
We've had these sitting in the garage since September. Yours turned out great...hopefully ours looks as nice. Now that weather is improving I'd like to get these stuck to the wall.
2000 KZ Sportsman 2505 (overhauled & upgraded 2014)
2016 Chevy Express 3500 15 passanger van
6 humans, 2 cats, and a dog
Visit our blog at www.ROWLESmade.com
Our trailer re-build thread
2016 Chevy Express 3500 15 passanger van
6 humans, 2 cats, and a dog
Visit our blog at www.ROWLESmade.com
Our trailer re-build thread
Options
- Mark as New
- Bookmark
- Subscribe
- Mute
- Subscribe to RSS Feed
- Permalink
- Report Inappropriate Content
Mar-26-2015 07:30 AM
redkoat64 wrote:
Hi Everyone!! Just thought I would check in with those of you who completed this mod. How is your tile holding up? Ours is hold up exceptionally well,no rips, tears or shifting. I still love my Smart Tiles!!
Ditto. Have had ours up 2 years now (kitchen stove/sink area and bath lav backsplash) and not one single issue. Sticking solidly, easy to clean, DW loves the look. Would certainly do it again!
2004 Winnebago Vectra 40KD
Roadmaster Tow Dolly
Roadmaster Tow Dolly
Options
- Mark as New
- Bookmark
- Subscribe
- Mute
- Subscribe to RSS Feed
- Permalink
- Report Inappropriate Content
Mar-25-2015 02:02 PM
Hi Everyone!! Just thought I would check in with those of you who completed this mod. How is your tile holding up? Ours is hold up exceptionally well,no rips, tears or shifting. I posted this on Pinterest as well. We just went to our local RV dealer and I looked at a big,beautiful new Montana. Lo,and behold,what do they have on the backsplash but a piece of MDF pressed to look like tile. I still love my Smart Tiles!!
Options
- Mark as New
- Bookmark
- Subscribe
- Mute
- Subscribe to RSS Feed
- Permalink
- Report Inappropriate Content
Mar-25-2015 10:42 AM
Hi Everyone!! Just thought I would check in with those of you who completed this mod. How is your tile holding up? Ours is hold up exceptionally well,no rips, tears or shifting. I posted this on Pinterest as well. We just went to our local RV dealer and I looked at a big,beautiful new Montana. Lo,and behold,what do they have on the backsplash but a piece of MDF pressed to look like tile. I still love my Smart Tiles!!
Options
- Mark as New
- Bookmark
- Subscribe
- Mute
- Subscribe to RSS Feed
- Permalink
- Report Inappropriate Content
Sep-23-2013 04:47 PM
LastOfTheBohicans wrote:
Ok. It took a while to get off my duff and get the tiles installed but it is finally finished.
We did both the bathroom and the lower wall of the kitchen. I only have some initial pictures of the kitchen.
Love how this is separated and nicely finished with the wood trim!!
~ Dori ~
Related Content
- First 3 months with a new GD Imagine, kind of long story in RV Tips & Tricks
- Room mates Peel and Stick tile_Update_Pictures in DIY Maintenance
- A lesson for RV shoppers in RV Tips & Tricks
- Shurflo pump mystery in Technical Issues
- Building New Beds and Making Lots Of Storage With Pictures in DIY Maintenance


