Turn on suggestions
Auto-suggest helps you quickly narrow down your search results by suggesting possible matches as you type.
Showing results for
- Good Sam Community
- Groups
- Fifth Wheel Group
- Forum
- Re: Suggestions for repair of rear trailer wall pl...
Options
- Subscribe to RSS Feed
- Mark Topic as New
- Mark Topic as Read
- Float this Topic for Current User
- Bookmark
- Subscribe
- Mute
- Printer Friendly Page
Suggestions for repair of rear trailer wall please-
Options
- Mark as New
- Bookmark
- Subscribe
- Mute
- Subscribe to RSS Feed
- Permalink
- Report Inappropriate Content
Oct-05-2014 01:26 PM
I have a 2007 Wildcat RV with an aluminum frame with laminated Fiberglass (Filon) siding outside and luan w/ vinyl wallpaper on the inside.
My LR corner caulk got a hairline crack and let moisture in and got away from me until I saw delamination.
I opened up the corner, dried it out, and shot "Great Stuff" foam in the sidewall and installed new structural wood in the corner and secured it to the aluminum frame as it was at the factory. The side wall feels and looks good now.
Unfortunately the rear wall is Filon over a wood "framed" structure with fiberglass bat insulation in the middle, and an interior "wall" of luan with wallpaper on the interior side.
The luan on the interior of the back wall next to the wall panel has deteriorated, leaving intact the wallpaper with no "hard-board" luan behind it, making a 1ft X 2ft section of the rear wall at the corner soft (w/out panel board support behind it).
I am not going to completely remove/disassemble the rear wall and build a new wall because the structural integrity of the overall back wall seems sufficient to me to be perfectly safe.
My plan is to fabricate a new interior wall panel that will cover the entire rear wall surface (that is not occupied by cabinets and windows) with a new single piece of thin luan (cut to fit around those cabinets and window) covered by a matching or complementing piece of vinyl wallpaper. I plan to secure the panel to the rear wall framing with sheet metal screws or the like. This should make the "soft" section acceptably rigid, and be functionally almost as good as new, and will appear "normal." I know this is a cosmetic-only "fix," but I am confident the rear wall retains sufficient strength to be safe.
Where does one source such wallpaper, and overall, does the plan sound doable? If not, I am open to any suggestions as an alternate plan.
Thanks,
Bob
15 REPLIES 15
Options
- Mark as New
- Bookmark
- Subscribe
- Mute
- Subscribe to RSS Feed
- Permalink
- Report Inappropriate Content
Oct-10-2014 06:31 PM
Nice job.
Paneling is a close match.
Paneling is a close match.
Options
- Mark as New
- Bookmark
- Subscribe
- Mute
- Subscribe to RSS Feed
- Permalink
- Report Inappropriate Content
Oct-10-2014 02:21 PM
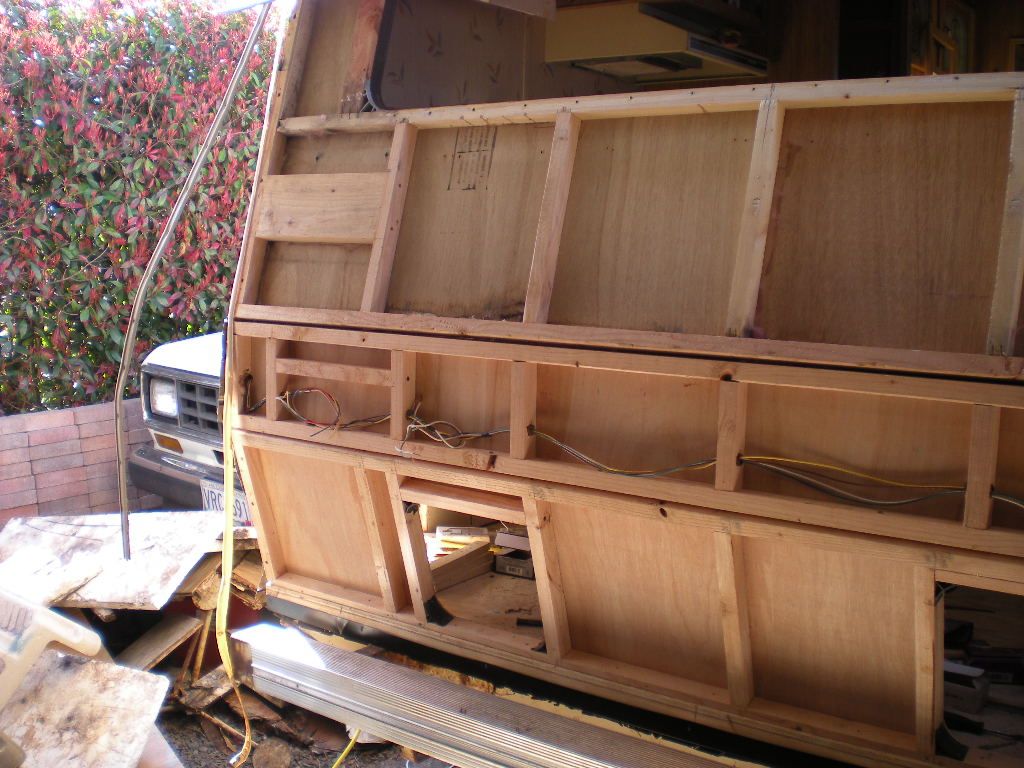
Here are a couple of shots of the 2X4 framing I replaced the 1X2 framing with (and more of them).
They are toe-screwed to the side framing with sheet rock screws, as well as glued. I ran cloth and polyester resin (fiberglass resin) over the dimensional members to the surviving luan attached to the Filon.
The pink foam board is held to the back using water-based construction adhesive, and is sealed with "Great Stuff" in any cracks to make it draft-proof.
I plan to add a vapor barrier under the new paneling before attaching it.
Framing Image: http://screencast.com/t/axPkCS6mZ
Insulated: http://screencast.com/t/QWpZ0gUPx2JE
Essentially finished (still need more tacks to secure edge of lower vertical seam under window). I will use almond caulk in the seam, but it's totally hidden behind the couch.
Picture: http://screencast.com/t/VL2ZJq3JF
Again, this is not a repair for LARGE areas of rot, but if the damage can be isolated, I think a repair like this is reasonable. Not "elegant," but relatively cheap in time and money.
Hopefully it will give those who discover damage an alternate solution to complete replacement if the back wall for limited areas.
Options
- Mark as New
- Bookmark
- Subscribe
- Mute
- Subscribe to RSS Feed
- Permalink
- Report Inappropriate Content
Oct-10-2014 11:43 AM
byrdr1 wrote:
bobinyelm, good job with pictures to show us the damage and rebuild. I have friend who has a Wildcat and he paid to has rear wall and slide out were the back bedroom is rebuilt. He dropped over $8K.
randy
OUCH!!
I know my "repair" is not of the level that he got, or that others have made (I stand in awe), but hopefully my method will hold for the limited area of damage (we'll see).
Here's a picture after I installed 1X2 and 2X4 framing. Originally, only ONE 2X4 was installed to allow the lower ladder brackets to be screwed into.
Picture: http://screencast.com/t/axPkCS6mZ
Today I am using resin and cloth to wrap around the framing to bond them to the back skin (to the luan still firmly stuck to the Filon) just to steady the Filon. It really doesn't add strngth to the overall wall I don't think.
Bob
Options
- Mark as New
- Bookmark
- Subscribe
- Mute
- Subscribe to RSS Feed
- Permalink
- Report Inappropriate Content
Oct-10-2014 06:24 AM
bobinyelm, good job with pictures to show us the damage and rebuild. I have friend who has a Wildcat and he paid to has rear wall and slide out were the back bedroom is rebuilt. He dropped over $8K. I am helping him tomorrow put trusses/rafters on his homebuilt RV garage. This is one big shop to hold his 5er and his outdoor equipment. He and another friend who had water damage on the back wall and slide out on a KZ are the reason I bought an RV PORT with closed on sides.
thank for the updates,
randy
2011 Keystone Cougar 327RES
Happy Campin'
Randy
Piedmont area of NC
thank for the updates,
randy
2014 F-350 SRW CC/LWB 4X4 6.7PSD
2011 Keystone Cougar 327RES
Happy Campin'
Randy
Piedmont area of NC
Options
- Mark as New
- Bookmark
- Subscribe
- Mute
- Subscribe to RSS Feed
- Permalink
- Report Inappropriate Content
Oct-09-2014 10:40 PM
Here's an update on my water damage as I dug into it-
The photo links should open up photos illustrating the damage, or can be copied-and-pasted into a new tab of your browser to be seen.
My Wildcat is a 2007 model that was only used 3 times (health reasons) each about 2 weeks, and has sat in Central Texas in a pretty dry climate, looking essentially like new (except for some fading and edge curling of the decals) and until a couple of weeks ago showed NO DAMAGE in or out. At that point I noticed some small delaminated spots at the LR wall of the RV where it meets the back corner molding.
After tearing at the OUTSIDE corner, and installing a new vertical corner 1X2 I went inside (since the apparent invisible leak had been thoroughly sealed) to take a look. THe back wall on the left side was "soft" to the touch, so I started by cutting the wall paper away, finding decomposed luan behind it, which I removed, including the fiberglass batting.
Picture: http://screencast.com/t/OA32Udsr
With the batting removed, I could see further damage and mold inside.
The horizontal 1X2s and even the 2X4 were completely rotted away and didn't even exist at the outside ends anymore! What was left was spongy wood one could break away with a fingertip. AMAZING none of this showed inside or out until just a week or so ago, when it "blossomed" seemingly all at once. I'd been inspecting the roof and corner caulking pretty much consistently, too, and nothing was obvious, or even slightly noticeable!
Picture: http://screencast.com/t/UmnXmFsq5
Picture: http://screencast.com/t/jWieV4F5MQa
The little "box" holding the power cord and enclosing the fresh water fill port had considerable mold inside on the carpet. The fill tube was bent at installation so water may have dampened the carpeting though the tank was only filled maybe 3 or 4 times since new. The first time I filled the fresh water tank, it let loose from the chassis, and it was sagging through the corrugated plastic belly liner, telling me it was no longer secured in place.
I called a Forrest River dealer, and they said NEVER EVER fill a Wildcat tank and attempt drive with it. It's meant to HOLD water, but not to transport water. Just plan on filling it when arriving at the campground (Who knew?). I built an angle-iron frame UNDER the tank (bolted to the trailer frame) to support it so I could transport water, BTW. The only thing holding the water tank up from the factory is 2 lengths of metal plumber's tape barely able to support the empty tank, so the dealer was RIGHT, BTW, but I digress. I mention it to preclude having a tank drop to the ground on the highway.
Here's a photo of the area inside the power cord/water fill tube box showing the mold: http://screencast.com/t/yNX8fyY37yx
I removed the (former) structural members and cleaned everything down to the luan next to the Filon rear outside covering. The only luan is about 1/16" of the former 6mm thickness.
Picture: http://screencast.com/t/al5UfsHVHbED
Tonight I cut new lengths of 1X2 and 2X4 and glued/screwed them to the "good" wood that was left. Note the new vertical corner 1X2 I'd previously installed from OUTSIDE. It, and the wood near the window are what I secured the new wood to. Thank goodness I hadn't attempted to use my trailer's ladder-the wood under it was GONE. Now it's screwed to a solid 2X4 as originally.
It was too dark to photograph the structural members after installing them tonight.
I plan to brush the remaining luan with polyester resin and a few layers of synthetic cloth and over the new wood to make a "fiberglass" frame with some additional rigidity for the back wall, and the install 1.5" of rigid "pink foam" as insulation between the structural members secured with polyurethane construction adhesive to complete the back wall (should add R-8 plus sturdy-up the area), and then put some panel I found at Home Depot that looks very much like the OEM wall paper.
I might mention that the back wall was poorly constructed and was only 1.5" thick inside, with no vapor barrier, and only some unbacked fiberglass batting in there for token insulation. If I had sustained damage to more than just the one side, I'd have constructed a whole new back, wall, and built it properly. As it is, this should suffice, and I will next Spring re-locate the trailer in the Pacific Northwest and keep it under a large metal carport structure, because it's obvious Wildcats are not built to actually be outside except when actually on camping trips. Until then I will carefully inspect it WEEKLY while it's out-of-doors, and maybe block the gutters far from the corners of the trailer and let the water spill down away from the trailer's vulnerable corners.
Part of the "problem" as I now see it is that the corner moldings are about 1" wide on the back wall, but only wrap around the side walls about 1/4", and micro-gaps in caulk can allow moisture to get into the corner walls and migrate into the rear wall, causing a LOT of damage before being obvious.
When my repairs are done, I plan to again remove the existing molding, and install 1X1 angle aluminum I will have formed from 0.025" or 0.031" aluminum onto the corners with liberal caulk underneath, and re-install the OEM molding to secure the new corners and provide enough overlap to prevent what appeared to happen this time.
More pictures as the work progresses.
I don't pretend that this is the RIGHT way to rebuild the corner, but rather an expedient way. Short of a lot of money, or time and less money, there is no way the trailer will ever be "like new" and given the steep depreciation curve of these units, spending a lot of money cannot be justified IMO.
As a side note, I found my Rockwell "Multi-Tool" invaluable in deconstructing the coach. It's micro-vibrating blades of various types enabled me to cut through wood, staples, and even 2X4s without shaking the structure apart (as a Sawzall would do), and enabled precise cuts down to, but not through, anything I didn't want to. A lot of manufactures make these now, copying the German made Fein Multi-Tool introduced a few years ago. These are GREAT tools, regardless who makes them!
Picture: http://screencast.com/t/llRIUEtQfRnP
Options
- Mark as New
- Bookmark
- Subscribe
- Mute
- Subscribe to RSS Feed
- Permalink
- Report Inappropriate Content
Oct-06-2014 01:22 PM
bobinyelm wrote:
I watched a repair using eternabond around the edge of a RV roof, but the place mine developed a leak was where the side wall joins the rear wall. They use an aluminum corner molding that has a small corner to it to overlap the side wall, but it BARELY reached the wall Filon, and that's where it leaked evidently.
Are you suggesting that I use Eternabond tape to seal the roof to the side wall/back wall? Actually those bonds are perfect and like-new.
The "crack" was between the side wall Filon and the ourside corner vertical molding. There is replaced the (damaged) wood, fastened the Filon to the wood, and replaced the corner molding and applied generous amounts of Dicor non-self-leveling caulk. The corner is 100% water-tight, and now I know the weak-spot, I will simply stay on it more carefully.
A metal supplier should have 90 deg pieces of aluminum in various widths. I would get a wider corner and replace the small factory ones.
Options
- Mark as New
- Bookmark
- Subscribe
- Mute
- Subscribe to RSS Feed
- Permalink
- Report Inappropriate Content
Oct-06-2014 08:26 AM
I rebuilt the entire back wall of my 2006 Wildcat. Water had leaked in over a period of time because the exterior aluminum back corner edging was not wide enought to properly fit the ends. there is a thread on the Wildcat forum about the subject.
I wound up using tembered hardboard 1/8" as the inside cover and painted it a matching color. After the overhead cabinet was reinstalled and the window openings cut out there was very little wall surface to show. I also made baseboard molding for the floor to protect the power cord.
I salvaged the exterior Filon by sanding the inside clean and sealed it with two coats on paint. Patch any bad ageas with aluminum roll flashing glued with epoxy.
If you have any questions PM me.
2004 2500HD XCAB LB 8.1 4.10
2006 Wildcat 29RLBS
2006 Wildcat 29RLBS
Options
- Mark as New
- Bookmark
- Subscribe
- Mute
- Subscribe to RSS Feed
- Permalink
- Report Inappropriate Content
Oct-05-2014 08:30 PM
rhagfo wrote:
I am a member of do it right the first time!
Pull the wall repair all that needs to be repaired, get rid of all bad wood, then put back in place. You will feel better down the road.
Replacing about 80% of the back wall of our 86 King of the Road! It was just too small.
I must say you did it exactly right!
It makes me feel like I am cheating for sure doing less. I'd calculate that maybe 5% of my back wall is damaged, though confess that if I had unlimited time, and a dry place to work, I would prefer to remove the rear Filon and at least replace every member that showed even evidence of moisture contact, rather than just structural members that were damaged.
I am impressed.
What did you do on the interior of the rear wall to make it look like the sidewall wallpaper? I assume the side walls were not compromised?
Options
- Mark as New
- Bookmark
- Subscribe
- Mute
- Subscribe to RSS Feed
- Permalink
- Report Inappropriate Content
Oct-05-2014 08:22 PM
I watched a repair using eternabond around the edge of a RV roof, but the place mine developed a leak was where the side wall joins the rear wall. They use an aluminum corner molding that has a small corner to it to overlap the side wall, but it BARELY reached the wall Filon, and that's where it leaked evidently.
Are you suggesting that I use Eternabond tape to seal the roof to the side wall/back wall? Actually those bonds are perfect and like-new.
The "crack" was between the side wall Filon and the ourside corner vertical molding. There is replaced the (damaged) wood, fastened the Filon to the wood, and replaced the corner molding and applied generous amounts of Dicor non-self-leveling caulk. The corner is 100% water-tight, and now I know the weak-spot, I will simply stay on it more carefully.
Options
- Mark as New
- Bookmark
- Subscribe
- Mute
- Subscribe to RSS Feed
- Permalink
- Report Inappropriate Content
Oct-05-2014 08:20 PM
I am a member of do it right the first time!
Pull the wall repair all that needs to be repaired, get rid of all bad wood, then put back in place. You will feel better down the road.
Replacing about 80% of the back wall of our 86 King of the Road! It was just too small.
Pull the wall repair all that needs to be repaired, get rid of all bad wood, then put back in place. You will feel better down the road.
Replacing about 80% of the back wall of our 86 King of the Road! It was just too small.
Russ & Paula the Beagle Belle.
2016 Ram Laramie 3500 Aisin DRW 4X4 Long bed.
2005 Copper Canyon 293 FWSLS, 32' GVWR 12,360#
"Visit and Enjoy Oregon State Parks"
2016 Ram Laramie 3500 Aisin DRW 4X4 Long bed.
2005 Copper Canyon 293 FWSLS, 32' GVWR 12,360#
"Visit and Enjoy Oregon State Parks"
Options
- Mark as New
- Bookmark
- Subscribe
- Mute
- Subscribe to RSS Feed
- Permalink
- Report Inappropriate Content
Oct-05-2014 05:29 PM
I'd glue your luan panel to the wall with Gorilla Glue. Then cover it and install a chair rail molding around the top edge.
Well this didn't work to well. Look as some "images for chair rail" in the link below.
chair rail
Well this didn't work to well. Look as some "images for chair rail" in the link below.
chair rail
2012 Chevy 3500HD Dually 4X4
Crew Cab long bed 6.0 gasser 4.10
2019 Open Range OF337RLS
Yamaha EF3000iSE
retired gadgetman
Crew Cab long bed 6.0 gasser 4.10
2019 Open Range OF337RLS
Yamaha EF3000iSE
retired gadgetman
Options
- Mark as New
- Bookmark
- Subscribe
- Mute
- Subscribe to RSS Feed
- Permalink
- Report Inappropriate Content
Oct-05-2014 05:28 PM
sounds like a great place to mount a mirror. As for the roof, eternabond that rear seam and forget about it forever
Options
- Mark as New
- Bookmark
- Subscribe
- Mute
- Subscribe to RSS Feed
- Permalink
- Report Inappropriate Content
Oct-05-2014 03:04 PM
NJRVer wrote:
Why not redo the entire wall? You are talking about two 4x8 sheets of paneling.
This would also let you completely inspect the inside of the entire rear wall cavity for any other issues.
I might consider removing my over-couch wall cabinets on the left side (rear) and pulling the luan, but the right side is a floor-to-ceiling wardrobe/clothes closet that takes up 3ft on the "WAY to the good side" of the wall.
I would still need the wallpaper or a substitute panel. Home Depot has bead board and fiberglass-reinforced-panels. Maybe bead board painted a complimentary color would work.
Options
- Mark as New
- Bookmark
- Subscribe
- Mute
- Subscribe to RSS Feed
- Permalink
- Report Inappropriate Content
Oct-05-2014 02:19 PM
Why not redo the entire wall? You are talking about two 4x8 sheets of paneling.
This would also let you completely inspect the inside of the entire rear wall cavity for any other issues.
This would also let you completely inspect the inside of the entire rear wall cavity for any other issues.


