Turn on suggestions
Auto-suggest helps you quickly narrow down your search results by suggesting possible matches as you type.
Showing results for
- Good Sam Community
- Groups
- Motorhome Group
- Forum
- Re: Purchased RV leak over cab, now what?
Options
- Subscribe to RSS Feed
- Mark Topic as New
- Mark Topic as Read
- Float this Topic for Current User
- Bookmark
- Subscribe
- Mute
- Printer Friendly Page
Purchased RV leak over cab, now what?
Options
- Mark as New
- Bookmark
- Subscribe
- Mute
- Subscribe to RSS Feed
- Permalink
- Report Inappropriate Content
Sep-11-2013 12:11 PM
Hi RVers,
Well, we purchased this RV 2 months ago and are now planning a trip for Oct so thought I'd go clean it out and this is where I'm at (see pics). The outside walls are loose and we were told that it's from sitting around the sun which didn't seem to affect it structurally. Yes, we were told there had been leaks but that they were repaired and it did not leak when we bought it (the hose trick). Anyhow, it's still leaking a tiny bit on the rt side of the cab over part. The real problem is all the damage that did occur w/the past leaks. Several questions, is this 'fixable'? I tend to say yes, everything is able to repair but it's gonna cost $$, but how much?. This could get much uglier before it gets better. I'm willing to do this work, of course I'm now roping my husband into it, he thought I was just cleaning the rig :B Any suggestions on where to start. What is the best stuff to use for these seams? My plan... First, seal the leak, I checked out Eterna Bond and that seems awesome but what about marine epoxy? Second, gut the cab over floor and walls? Third, sell it now don't mess with it? Four, do the work but how long will this take? Thanks for any input!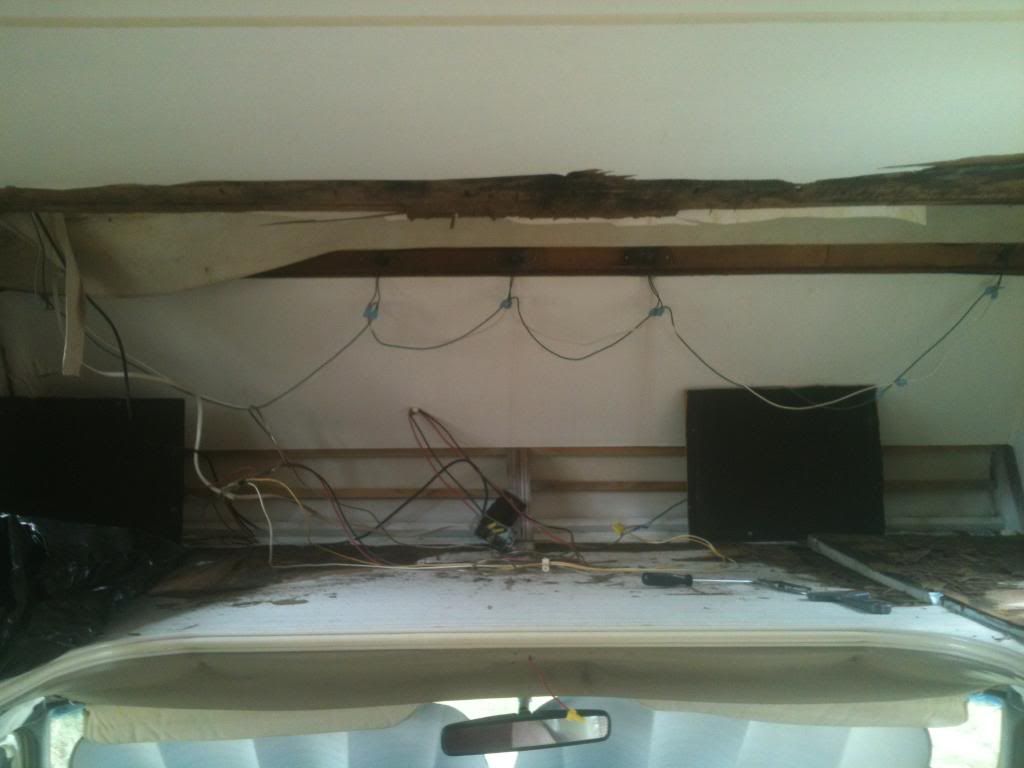
Well, we purchased this RV 2 months ago and are now planning a trip for Oct so thought I'd go clean it out and this is where I'm at (see pics). The outside walls are loose and we were told that it's from sitting around the sun which didn't seem to affect it structurally. Yes, we were told there had been leaks but that they were repaired and it did not leak when we bought it (the hose trick). Anyhow, it's still leaking a tiny bit on the rt side of the cab over part. The real problem is all the damage that did occur w/the past leaks. Several questions, is this 'fixable'? I tend to say yes, everything is able to repair but it's gonna cost $$, but how much?. This could get much uglier before it gets better. I'm willing to do this work, of course I'm now roping my husband into it, he thought I was just cleaning the rig :B Any suggestions on where to start. What is the best stuff to use for these seams? My plan... First, seal the leak, I checked out Eterna Bond and that seems awesome but what about marine epoxy? Second, gut the cab over floor and walls? Third, sell it now don't mess with it? Four, do the work but how long will this take? Thanks for any input!

RV Mom-writer
RV Dad-chef
RV Kid
RV Dog
RV Dad-chef
RV Kid
RV Dog
Labels:
- Labels:
-
Class C
58 REPLIES 58
Options
- Mark as New
- Bookmark
- Subscribe
- Mute
- Subscribe to RSS Feed
- Permalink
- Report Inappropriate Content
Sep-14-2013 04:27 PM
Alex is an acrylic/silicone mix, stays flexible, handles expansion well and is paintable. It is used in homes with vinyl windows and can be sanded/re-applied over itself. The ProFlex is a great product, but the outer bead of sealant on the windows is just an added protection. The butyl tape would be fine on its own. I have no worries using Alex as an extra protection.
Jose
Jose
Options
- Mark as New
- Bookmark
- Subscribe
- Mute
- Subscribe to RSS Feed
- Permalink
- Report Inappropriate Content
Sep-14-2013 06:53 AM
I would recommend ProFlex RV around the window edges. It's made for the job. It's probably 3x the price of the Alex caulk, but one tube goes a long way on an RV. Silicone is considered a no-no on an RV.
Currently RV-less but not done yet.
Options
- Mark as New
- Bookmark
- Subscribe
- Mute
- Subscribe to RSS Feed
- Permalink
- Report Inappropriate Content
Sep-13-2013 07:50 PM
Yes, usagi. Many solvent based contact cements will dissolve the foam. Fastbond 10 is water based and once set it won't re-hydrate.
Remove your windows, remove the old sealant with acetone and re-set the windows with fresh butyl tape. Then use Alex around the outside. That should give you nice, leak free windows.
Finish everything by using some Eternabond around your top seams. That sucker will be well sealed.
If you just want it to last a bit and the structure is sound, then use some kind of elastomeric brush/roll on product to seal the rest of the roof for a few years.
Jose
Options
- Mark as New
- Bookmark
- Subscribe
- Mute
- Subscribe to RSS Feed
- Permalink
- Report Inappropriate Content
Sep-13-2013 07:24 PM
Thank you Jose for your post. I read through it. I do wonder about the contact cement doesn't it dissolve styrofoam? There are some water-based versions that seem to be similar here:
Adhesives
I was thinking of liquid nails foam formula which doesn't dissolve styrofoam.
I also am just ripping out everything in the cab-over area to find the leaks. I don't plan on keeping the R/V long term so all I want is that it be reasonably comfortable and not leak. So I think I'm more inclined toward the sort of repairs that its4mykids is talking about.

The structure consists of aluminum square stock the passenger side has the majority of the leaks. I think it may be leaking around the front window too. The cab-over area will be used purely as storage.
There are leaks further back so in order to make the sort of repair that Jose is doing I'd probably have to rip off the entire roof. I think its would be better to trash the R/V rather than do that.
Adhesives
I was thinking of liquid nails foam formula which doesn't dissolve styrofoam.
I also am just ripping out everything in the cab-over area to find the leaks. I don't plan on keeping the R/V long term so all I want is that it be reasonably comfortable and not leak. So I think I'm more inclined toward the sort of repairs that its4mykids is talking about.
The structure consists of aluminum square stock the passenger side has the majority of the leaks. I think it may be leaking around the front window too. The cab-over area will be used purely as storage.
There are leaks further back so in order to make the sort of repair that Jose is doing I'd probably have to rip off the entire roof. I think its would be better to trash the R/V rather than do that.
Options
- Mark as New
- Bookmark
- Subscribe
- Mute
- Subscribe to RSS Feed
- Permalink
- Report Inappropriate Content
Sep-13-2013 05:20 PM
My leak was the joint between coach and front piece used Ethernabond tape. no more leaks. Also caulked every joint I could find after cleaning with acetone.
Options
- Mark as New
- Bookmark
- Subscribe
- Mute
- Subscribe to RSS Feed
- Permalink
- Report Inappropriate Content
Sep-13-2013 03:24 PM
I totally agree about the frame. If the structure is sound, replace all the skin material and put er' back together. As you can see in the write up, my framing was WAAAAAAAY gone. If the steel framing had been OK, I would have had SO much less to fix.
Jose
Jose
Options
- Mark as New
- Bookmark
- Subscribe
- Mute
- Subscribe to RSS Feed
- Permalink
- Report Inappropriate Content
Sep-13-2013 02:08 PM
Its4mykids wrote:
Bottom line: as long as the framing is structurally sound, a lot can be done for little $$$. Take the inside apart, see what you have, stop the leak, enjoy. Don't be afraid to think "outside the box" when coming up with ideas for the repairs (such as screwing in the delam walls from the exterior side). And - Eternabond is your friend.
Yeah, you're right on the money for me. Thanks to you and Jose I'm not going down with this ship yet. It's structurally great and since it poured last night (I'm in Colorado) I've found 2 more leaks so 4 total. I'm really excited to hit HomeDepot tomorrow. Yipee!!
RV Mom-writer
RV Dad-chef
RV Kid
RV Dog
RV Dad-chef
RV Kid
RV Dog
Options
- Mark as New
- Bookmark
- Subscribe
- Mute
- Subscribe to RSS Feed
- Permalink
- Report Inappropriate Content
Sep-13-2013 01:21 PM
Gale Hawkins wrote:
Strong and dry is the main objective with this old stuff since it does not have much cash/resell value anyway.
My brother's exact line of thinking. I think he paid less than $5k for it seven years ago. Another $500 in water damage repairs and I think he had to work on the front end for another $500. He figured if he had to give it away when he was done with it, who cares. Heck, people lose that in depreciation on new units in one year. LOL
R.D., Kathy, Jonah(16) and Meg(14)
1994 F-350 Crew Cab, Dually, 460 with Banks P/P (50k miles - showroom new!)
1998 Prowler 31 5R
1994 F-350 Crew Cab, Dually, 460 with Banks P/P (50k miles - showroom new!)
1998 Prowler 31 5R
Money you can beg, borrow and steal, but you only have your kids for a season.
Options
- Mark as New
- Bookmark
- Subscribe
- Mute
- Subscribe to RSS Feed
- Permalink
- Report Inappropriate Content
Sep-13-2013 01:13 PM
Its4mykids wrote:
My brother has a 1994 Tioga Class C that he bought knowing there was leaking/rot in the cabover. He got cheap, and it ran good. He wanted to camp in an RV, not drive around in luxury. He camped a couple times before he even touched the roof. Then we tore out the panelling and wet insulation in the bad areas to see what he had. Once we knew the framing was fine, we pulled back the rubber roof to a good area. Pretty much the entire cabover. We replaced the roofing deck with plywood, glued the rubber roof back down, and then sealed all joints/seams with Eternabond. That took a Saturday. Any exterior wall that were pulling away due to delam, etc. we simply screwed to the wall joist from the exterier with stainless screws and washers painted white from the manufacturer. Then he ran fans and a dehumidifer in the unit for a few days. At this point, he camped in it some more. Wasn't pretty inside above the cab, but it worked. Over the next two years, he slowly added paneling, customized the interior cabover the way he wanted, and moved on with life. He used it many times in between his repair days. He has less than $500 in his repairs. It is now dry, and structurally sound. He uses it all the time.
Maybe the big fancy motorhome next to him laughs at his repairs, but my bro' and his family are having just as much fun as the neighbors at a campground.
Bottom line: as long as the framing is structurally sound, a lot can be done for little $$$. Take the inside apart, see what you have, stop the leak, enjoy. Don't be afraid to think "outside the box" when coming up with ideas for the repairs (such as screwing in the delam walls from the exterior side). And - Eternabond is your friend.
Thanks. That is a ton of good pointers. Strong and dry is the main objective with this old stuff since it does not have much cash/resell value anyway.
I could see dealing with delamination where there are cabinets with painted washers/bolt heads and a large washer and nut hidden inside cabinets, etc where there were no studs one could find.
If the chassis is solid on an old MH that is the main thing.
Options
- Mark as New
- Bookmark
- Subscribe
- Mute
- Subscribe to RSS Feed
- Permalink
- Report Inappropriate Content
Sep-13-2013 01:01 PM
My brother has a 1994 Tioga Class C that he bought knowing there was leaking/rot in the cabover. He got cheap, and it ran good. He wanted to camp in an RV, not drive around in luxury. He camped a couple times before he even touched the roof. Then we tore out the panelling and wet insulation in the bad areas to see what he had. Once we knew the framing was fine, we pulled back the rubber roof to a good area. Pretty much the entire cabover. We replaced the roofing deck with plywood, glued the rubber roof back down, and then sealed all joints/seams with Eternabond. That took a Saturday. Any exterior wall that were pulling away due to delam, etc. we simply screwed to the wall joist from the exterier with stainless screws and washers painted white from the manufacturer. Then he ran fans and a dehumidifer in the unit for a few days. At this point, he camped in it some more. Wasn't pretty inside above the cab, but it worked. Over the next two years, he slowly added paneling, customized the interior cabover the way he wanted, and moved on with life. He used it many times in between his repair days. He has less than $500 in his repairs. It is now dry, and structurally sound. He uses it all the time.
Maybe the big fancy motorhome next to him laughs at his repairs, but my bro' and his family are having just as much fun as the neighbors at a campground.
Bottom line: as long as the framing is structurally sound, a lot can be done for little $$$. Take the inside apart, see what you have, stop the leak, enjoy. Don't be afraid to think "outside the box" when coming up with ideas for the repairs (such as screwing in the delam walls from the exterior side). And - Eternabond is your friend.
R.D., Kathy, Jonah(16) and Meg(14)
1994 F-350 Crew Cab, Dually, 460 with Banks P/P (50k miles - showroom new!)
1998 Prowler 31 5R
1994 F-350 Crew Cab, Dually, 460 with Banks P/P (50k miles - showroom new!)
1998 Prowler 31 5R
Money you can beg, borrow and steal, but you only have your kids for a season.
Options
- Mark as New
- Bookmark
- Subscribe
- Mute
- Subscribe to RSS Feed
- Permalink
- Report Inappropriate Content
Sep-13-2013 09:49 AM
Your roof wood is luan (really thin plywood) and the sides are most likely filon (fiber reinforced polyester sheet).
The roof luan can be had from HomeDepot for $10 a sheet. Easy to cut and lightweight. It looks great stained on the smooth side too. Just hit it lightly with some 200 grit paper.
The filon is usually repaired like fiberglass, although in my writeup I show how I used some MarineTex and metal screen that resulted in a great repair for a couple of tears. I have a couple other spots that will get the same fix.
Jose
Options
- Mark as New
- Bookmark
- Subscribe
- Mute
- Subscribe to RSS Feed
- Permalink
- Report Inappropriate Content
Sep-13-2013 09:19 AM
Thanks Jose! Appreciate the link. If you look at the one picture I think it's a piece of plywood on the roof. I'm not near the RV right now so I'll have to check that. My outsides don't feel like aluminum? Maybe it is some sort of aluminum w/a coating? Again, thanks for your help.
RV Mom-writer
RV Dad-chef
RV Kid
RV Dog
RV Dad-chef
RV Kid
RV Dog
Options
- Mark as New
- Bookmark
- Subscribe
- Mute
- Subscribe to RSS Feed
- Permalink
- Report Inappropriate Content
Sep-13-2013 12:55 AM
To fix the roof you should tear out the rotted luan (thin plywood) and replace with luan from the hardware store. Don't use liquid nails. It takes too long to set and you have to hold the material in place. The right product for attaching all the layers of your roof or walls is 3M Fastbond 10 contact cement. It holds like CRAZY when it is applied correctly. The Fastbond 10 is hard to find (easy online) and expensive. For the roof, you can get away with some 3M 90 spray contact cement from a local hardware store because the weight of the aluminum will promote good adhesion.
Many folks have asked when I will post my write up of my rebuild so they can see what I did and learn about the materials required. The write up is not done, but now that the RV is water tight, other projects have to take priority. Here is a link to the not quite complete write-up. I hope its useful to you cbsurfmom. I wish someone had put up something that actually explained what they were doing, why and what materials/supplies were critical to the job.
RV Cabover Rebuild
Jose
Options
- Mark as New
- Bookmark
- Subscribe
- Mute
- Subscribe to RSS Feed
- Permalink
- Report Inappropriate Content
Sep-12-2013 07:21 PM
Usagi wrote:
I paid $3500 for the R/V. I got it with the idea of being able to get close to the coast then walk the docks on coastal areas so I can look for a sailboat to live on. Unfortunately I had no idea that R/V parks charge outrageous amounts of money, in fact far more than my apartment costs. Hence I'll likely be doing a lot of boon-docking until I get my sailboat.
Thoughts?
First thought that came to mind was, lucky you get to buy a sailboat, they seem so much easier to fix than these RV's.
RV Mom-writer
RV Dad-chef
RV Kid
RV Dog
RV Dad-chef
RV Kid
RV Dog


