Turn on suggestions
Auto-suggest helps you quickly narrow down your search results by suggesting possible matches as you type.
Showing results for
- Good Sam Community
- Groups
- Motorhome Group
- Forum
- Repairing a hole in the front cap
Options
- Subscribe to RSS Feed
- Mark Topic as New
- Mark Topic as Read
- Float this Topic for Current User
- Bookmark
- Subscribe
- Mute
- Printer Friendly Page
Repairing a hole in the front cap
Options
- Mark as New
- Bookmark
- Subscribe
- Mute
- Subscribe to RSS Feed
- Permalink
- Report Inappropriate Content
Aug-22-2013 07:38 PM
After a thunderstorm about 2 weeks ago, I discovered a hole in my front cap caused by a falling limb. My insurance has a high deductible, and I didn't want to have the coach in the shop for an extended time, so I tackled the repair myself. Having a good friend that builds/repairs boats means I got a lot of good free advice, which was a big help. I've made a few pictures of the repair process that may help someone else if they have this same problem.
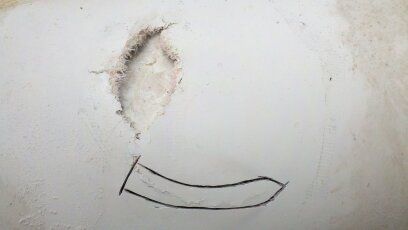
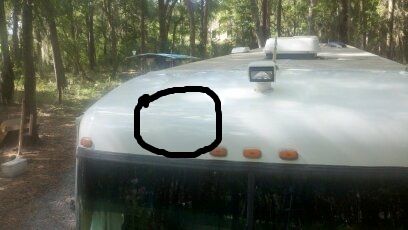
The first picture is of the damage area on the curved area of the front cap. The black line outlines a crack that has to be cut out. (and yes, the coach roof is very dirty in this picture)
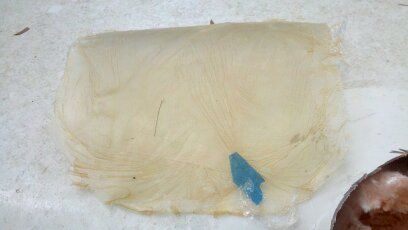
After cutting out the damaged area, I taped some saran wrap onto the outer surface of the curve close to the damaged area, and built up 3 layers of fiberglass. This gave me a backing plate to be inserted into the back side of the hole, with the backing plate having a curve that closely matches what must be achieved in the repair.
This picture shows the 3 layers of fiberglass on the saran wrap, but it has been moved upward from where I made the backing plate.
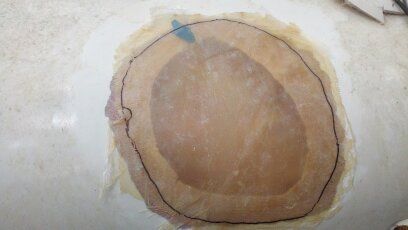
I took the backing plate, placed it over the hole and marked it for trimming to size. I had ground out about 1 1/2 inches around the hole front and back for adhesion, and made the backing plate this size. At only 3 layers thick, the backing plate could be flexed enough to insert into the hole. This picture shows the backing plate being marked for cutting to size.
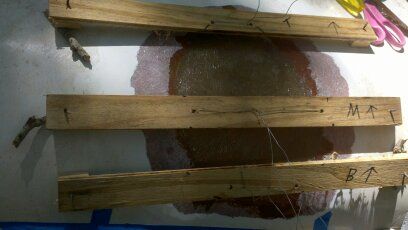
I fabricated some supports to span over the hole to attach support wires. The wires run through holes in the fiberglass backing plate. Before inserting the backing with wires attached, rosin was applied to the inner part of the hole, to the backing plate, and then two layers of fiberglass mat with rosin were added onto the backing plate. The backing plate was then flexed and inserted into the hole, and pulled up tight with the wires. Caution...wear gloves because this is messy. The next picture shows the backing plate wired into place waiting for the rosin to cure.
After the cure was completed, I removed the supports and wires, did some grinding to smooth out minor problems with the backing repair, and then added more layers of fiberglass on the outside. The remainder of the repair was standard auto body type work with applying the fiberglass, grinding/sanding smooth, filling imperfections with bondo and spot putty, primer, etc.
Here's the finished repair after repainting the front cap above the windshield. I had 2 part paint matched to the color of the existing gelcoat. The repaired area is circled.
The only significant costs was the 1/2 gallon of paint at $162.
The repair took about 2 weeks working between thunderstorms as we seem to be having a lot of rain lately.
Fred
The first picture is of the damage area on the curved area of the front cap. The black line outlines a crack that has to be cut out. (and yes, the coach roof is very dirty in this picture)
After cutting out the damaged area, I taped some saran wrap onto the outer surface of the curve close to the damaged area, and built up 3 layers of fiberglass. This gave me a backing plate to be inserted into the back side of the hole, with the backing plate having a curve that closely matches what must be achieved in the repair.
This picture shows the 3 layers of fiberglass on the saran wrap, but it has been moved upward from where I made the backing plate.
I took the backing plate, placed it over the hole and marked it for trimming to size. I had ground out about 1 1/2 inches around the hole front and back for adhesion, and made the backing plate this size. At only 3 layers thick, the backing plate could be flexed enough to insert into the hole. This picture shows the backing plate being marked for cutting to size.
I fabricated some supports to span over the hole to attach support wires. The wires run through holes in the fiberglass backing plate. Before inserting the backing with wires attached, rosin was applied to the inner part of the hole, to the backing plate, and then two layers of fiberglass mat with rosin were added onto the backing plate. The backing plate was then flexed and inserted into the hole, and pulled up tight with the wires. Caution...wear gloves because this is messy. The next picture shows the backing plate wired into place waiting for the rosin to cure.
After the cure was completed, I removed the supports and wires, did some grinding to smooth out minor problems with the backing repair, and then added more layers of fiberglass on the outside. The remainder of the repair was standard auto body type work with applying the fiberglass, grinding/sanding smooth, filling imperfections with bondo and spot putty, primer, etc.
Here's the finished repair after repainting the front cap above the windshield. I had 2 part paint matched to the color of the existing gelcoat. The repaired area is circled.
The only significant costs was the 1/2 gallon of paint at $162.
The repair took about 2 weeks working between thunderstorms as we seem to be having a lot of rain lately.
Fred
Fred & Vicki
St. Augustine, Florida
St. Augustine, Florida
Labels:
- Labels:
-
Class A
24 REPLIES 24
Options
- Mark as New
- Bookmark
- Subscribe
- Mute
- Subscribe to RSS Feed
- Permalink
- Report Inappropriate Content
Nov-15-2015 09:14 PM
fcooper wrote:deandec wrote:
Great educational post. Thank you.
How did you get the gel coat color matched in a 2 part paint?
I have tried the Automotive Paint shop computer measurements, but they did not get an exact match so I could not do a good spot repair.
After I cut out the damaged area, I took the cut out with me to the auto paint shop. It matched well, but I also had the advantage that I could shoot the entire top of the cap back to the beginning of the aluminum roof, and had good break lines on the side where you can not actually compare the new paint to existing faded gelcoat.
Fred
Thanks for the info. That is what I have had to do to get the mismatch to be not noticeable. I keep hoping not to have to do a whole panel on some of my repairs.
Dean
95 CC Magna, Jeep GC
95 CC Magna, Jeep GC
Options
- Mark as New
- Bookmark
- Subscribe
- Mute
- Subscribe to RSS Feed
- Permalink
- Report Inappropriate Content
Nov-15-2015 05:34 PM
deandec wrote:
Great educational post. Thank you.
How did you get the gel coat color matched in a 2 part paint?
I have tried the Automotive Paint shop computer measurements, but they did not get an exact match so I could not do a good spot repair.
After I cut out the damaged area, I took the cut out with me to the auto paint shop. It matched well, but I also had the advantage that I could shoot the entire top of the cap back to the beginning of the aluminum roof, and had good break lines on the side where you can not actually compare the new paint to existing faded gelcoat.
Fred
Fred & Vicki
St. Augustine, Florida
St. Augustine, Florida
Options
- Mark as New
- Bookmark
- Subscribe
- Mute
- Subscribe to RSS Feed
- Permalink
- Report Inappropriate Content
Nov-15-2015 09:23 AM
Great educational post. Thank you.
How did you get the gel coat color matched in a 2 part paint?
I have tried the Automotive Paint shop computer measurements, but they did not get an exact match so I could not do a good spot repair.
How did you get the gel coat color matched in a 2 part paint?
I have tried the Automotive Paint shop computer measurements, but they did not get an exact match so I could not do a good spot repair.
Dean
95 CC Magna, Jeep GC
95 CC Magna, Jeep GC
Options
- Mark as New
- Bookmark
- Subscribe
- Mute
- Subscribe to RSS Feed
- Permalink
- Report Inappropriate Content
Nov-14-2015 01:18 PM
Thanks for your pictures and step by step it helped me a lot and my mirror is back on.
Options
- Mark as New
- Bookmark
- Subscribe
- Mute
- Subscribe to RSS Feed
- Permalink
- Report Inappropriate Content
Feb-18-2015 07:50 AM
Fred, thanks for showing the steps you took, particularly crafting the backing plate. My end caps are fine but you never know when this knowledge may be needed.
Steve
Steve
Options
- Mark as New
- Bookmark
- Subscribe
- Mute
- Subscribe to RSS Feed
- Permalink
- Report Inappropriate Content
Feb-13-2015 07:18 PM
Terrific job! I wish that I had that kind of skill with body work. By the time I would get done with it, I would be better off leaving the hole there! :B
Mark & Cherie
2002 Newmar Dutch Star DP 3872, Cummins 350 ISC, Spartan Chassis
2002 Newmar Dutch Star DP 3872, Cummins 350 ISC, Spartan Chassis
Options
- Mark as New
- Bookmark
- Subscribe
- Mute
- Subscribe to RSS Feed
- Permalink
- Report Inappropriate Content
Feb-13-2015 06:58 PM
10 out of 10 Fred !!! Great job and thank you for sharing.
2006 Revolution LE 40E
2004 Jeep Rubicon Toad/Brake Buddy or
20' Toy Trailer/Quads 'n Dirt Bikes
2004 Jeep Rubicon Toad/Brake Buddy or
20' Toy Trailer/Quads 'n Dirt Bikes
Options
- Mark as New
- Bookmark
- Subscribe
- Mute
- Subscribe to RSS Feed
- Permalink
- Report Inappropriate Content
Feb-13-2015 05:36 PM
fcooper wrote:Cross your toes also. Had a 98 Accord (same transmission) I used as a daily driver and toad. Run it to 212K with about 15K towed. Second gear clutch pack started slipping at 160K and finally gave up at 210K along with other drivability issues. Traded last week for a 2010 Accord but the 05 CRV moved into the toad position. Great vehicle. Never left me on the side road and consistent 28 mpg.
About 150,000 plus about 30,000 towing that does not register on the odometer. Still going strong with the original transmission (fingers crossed).
2006 Hurricane 31D built on a 2006 Ford F53
Options
- Mark as New
- Bookmark
- Subscribe
- Mute
- Subscribe to RSS Feed
- Permalink
- Report Inappropriate Content
Feb-13-2015 03:20 PM
dropaline wrote:
nice job. how many miles you got towing your odseey? i have an 04 i thinking on setting up to tow.
About 150,000 plus about 30,000 towing that does not register on the odometer. Still going strong with the original transmission (fingers crossed). As you probably know, a lot of these 99-04 Odyssey models have transmission failures at about 80,000 miles.
It makes a good toad if you don't want to tow faster than 65 mph. It is heavy however at about 4400 pounds.
Fred
Fred & Vicki
St. Augustine, Florida
St. Augustine, Florida
Options
- Mark as New
- Bookmark
- Subscribe
- Mute
- Subscribe to RSS Feed
- Permalink
- Report Inappropriate Content
Feb-13-2015 03:14 AM
Great job! Those same fiberglass skills can help if you need to repair your AC cover if/when it cracks.
Options
- Mark as New
- Bookmark
- Subscribe
- Mute
- Subscribe to RSS Feed
- Permalink
- Report Inappropriate Content
Feb-13-2015 03:08 AM
nice job. how many miles you got towing your odseey? i have an 04 i thinking on setting up to tow.
Options
- Mark as New
- Bookmark
- Subscribe
- Mute
- Subscribe to RSS Feed
- Permalink
- Report Inappropriate Content
Feb-13-2015 02:18 AM
Up date your resume.
2006 Hurricane 31D built on a 2006 Ford F53
Options
- Mark as New
- Bookmark
- Subscribe
- Mute
- Subscribe to RSS Feed
- Permalink
- Report Inappropriate Content
Feb-12-2015 08:50 PM
Ya done good!
Options
- Mark as New
- Bookmark
- Subscribe
- Mute
- Subscribe to RSS Feed
- Permalink
- Report Inappropriate Content
Feb-12-2015 06:24 PM
Excellent job.


