- Good Sam Community
- Everything RV
- Technical Issues
- Re: 3,500 pound Dexter axle bearing pre-load?
- Subscribe to RSS Feed
- Mark Topic as New
- Mark Topic as Read
- Float this Topic for Current User
- Bookmark
- Subscribe
- Mute
- Printer Friendly Page
3,500 pound Dexter axle bearing pre-load?
- Mark as New
- Bookmark
- Subscribe
- Mute
- Subscribe to RSS Feed
- Permalink
- Report Inappropriate Content
Aug-09-2014 08:54 PM
I've heard about such, but this is my first hands-on experience with a trailer axle, bearings and axle nut. I know you don't get Medieval on the axle nut. It has the EZ-Lube bearing hub (with a zerk fitting), if that matters.
'12 Wolf Creek 850 TC Coleman Polar Cub 9.2k A/C, 90 watt solar, dual propane & batteries, Maggie Rack
- Mark as New
- Bookmark
- Subscribe
- Mute
- Subscribe to RSS Feed
- Permalink
- Report Inappropriate Content
Aug-11-2014 06:14 PM
westend wrote:
...Thanks but you're cheating with that piece of plywood under your parts. ...
A piece of plywood AND a proper sittin' stool. I've come a long way from cardboard and a cinder block. LOL. I'm still working on gravel, though.
Lynnmor wrote:
...
Dexter
Bearing Adjustment and Hub Replacement
If the hub has been removed or bearing adjustment is required,
the following adjustment procedure must be followed:
1.
After placing the hub, bearings, washers, and spindle nut
back on the axle spindle in reverse order as detailed in the
previous section on hub removal, rotate the hub assembly
slowly while tightening the spindle nut to approximately
50
Ft.
Lbs.
(12" wrench or pliers with full hand force.)
2.
Then loosen the spindle nut to remove the torque. Do not
rotate the hub.
3.
Finger tighten the spindle nut until just snug.
4.
Back the spindle nut out slightly until the first castellation
lines up with the cotter key hole and insert the cotter pin.
5.
Bend over the cotter pin legs to secure the nut.
6.
Nut should be free to move with only restraint being the
cotter pin
Since Spring of 2002, Dexter's EZ-Lube 3,500 pound axles come with a "nut retainer", without a cotter pin. I purchased my trailer new in January of 2003. It has the nut retainer system.
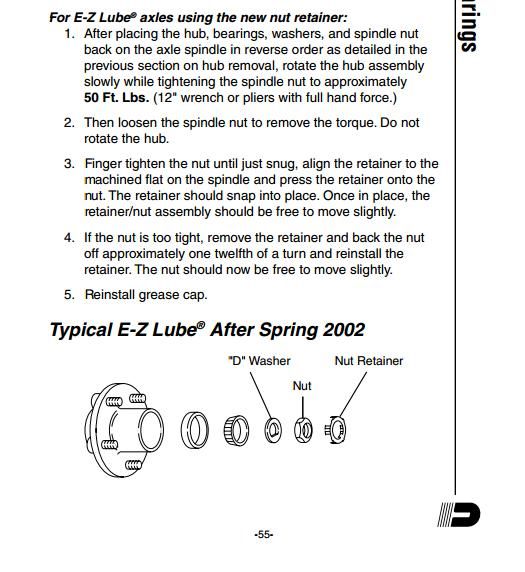
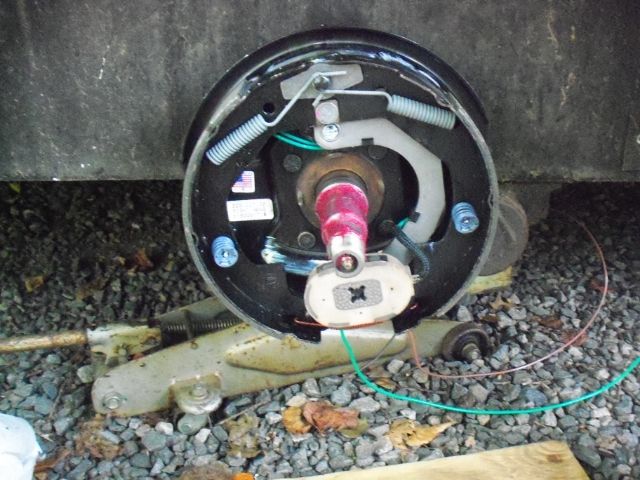
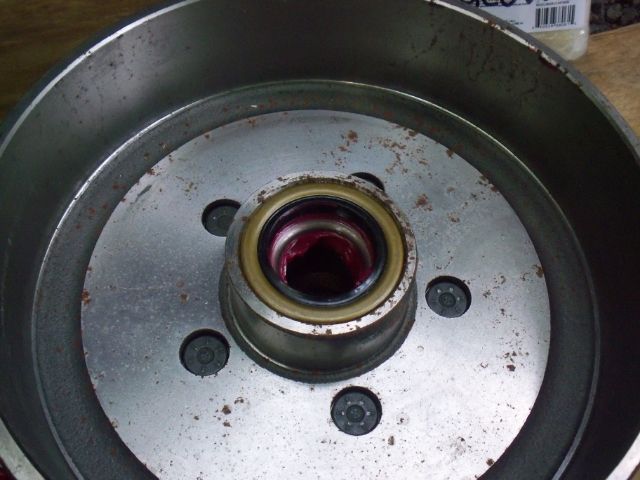
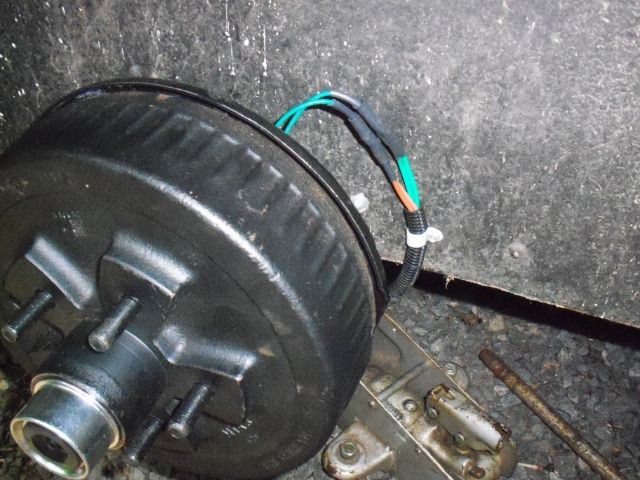
The 1 1/2" socket I have is 3/4" drive. I didn't have an adapter for my 1/2" torque wrench so I used a 3/4" breaker bar, choking up on the handle to mimic a 12" wrench and hand tight, per Dexter's instructions (back nut off, finger tight, back off , etc.). After using the hand method to pack the bearings and throwing a bunch of grease in the hub as I went, I used the EZ-Lube zerk to fill it with grease. The hub was rotated constantly as I pumped the grease and I tried not to use a lot of pressure. I hear the grease seal can blow out the back of the hub. It took a bit of pumping, but grease made its way through the hub, oozing out the front. I need to wrap up the electric (preliminary tests were good) and get a brake spoon to adjust the shoes. Then, I can run it around the block. If I didn't pump the drum full of grease, they should work.
I'll be using a factory Ford brake controller via the factory 7-way plug. I'm adding a fused, constant 12V hot to the trailer, too. Back-up lights will have to wait.
'12 Wolf Creek 850 TC Coleman Polar Cub 9.2k A/C, 90 watt solar, dual propane & batteries, Maggie Rack
- Mark as New
- Bookmark
- Subscribe
- Mute
- Subscribe to RSS Feed
- Permalink
- Report Inappropriate Content
Aug-11-2014 08:59 AM
Lynnmor wrote:
There is nothing with Dexters instructions, you just have to be able to read more than one sentence.
Dexter
Bearing Adjustment and Hub Replacement
If the hub has been removed or bearing adjustment is required,
the following adjustment procedure must be followed:
1.
After placing the hub, bearings, washers, and spindle nut
back on the axle spindle in reverse order as detailed in the
previous section on hub removal, rotate the hub assembly
slowly while tightening the spindle nut to approximately
50
Ft.
Lbs.
(12" wrench or pliers with full hand force.)
2.
Then loosen the spindle nut to remove the torque. Do not
rotate the hub.
3.
Finger tighten the spindle nut until just snug.
4.
Back the spindle nut out slightly until the first castellation
lines up with the cotter key hole and insert the cotter pin.
5.
Bend over the cotter pin legs to secure the nut.
6.
Nut should be free to move with only restraint being the
cotter pin
Isn't that what I've been saying all along? What you posted is how I do it.
2013 Forest River 3001W Windjammer
Equilizer Hitch
Honda EU2000
"I have this plan to live forever; so far my plan is working"
- Mark as New
- Bookmark
- Subscribe
- Mute
- Subscribe to RSS Feed
- Permalink
- Report Inappropriate Content
Aug-11-2014 08:57 AM
RJsfishin wrote:
I'll buy that. I never directly read the instructions myself.
Tightening to 50ft lbs, then back off to the 1st notch, would be WRONG.
Like was more or less said, the ONLY reason to ever torque to 50 lbs, would be to seat a race that had not seated correctly during installation.
That could very well be true. Dexter even says in the same paragraph you can hand tighten with Channel Locks and then back off. I've done it both ways and end up with the cotter pin in the same hole so I think the result is the same. Like you said, if not replacing races, the torque wrench is probably not necessary.
2013 Forest River 3001W Windjammer
Equilizer Hitch
Honda EU2000
"I have this plan to live forever; so far my plan is working"
- Mark as New
- Bookmark
- Subscribe
- Mute
- Subscribe to RSS Feed
- Permalink
- Report Inappropriate Content
Aug-11-2014 08:20 AM
The 50#s is to load the bearing so the excess grease is forced out of the bearing when you rotate the hub. More than one bearing has ended up excessively loose when the grease is not forced out of the bearing during adjustment. Also, if a race is not seated in the hub 50#s of torque is not going to move the race unless the previous bearing had seized, spun the race in the hub and the new race is loose in the hub. If this occurred you are either repairing or replacing the hub.
- Mark as New
- Bookmark
- Subscribe
- Mute
- Subscribe to RSS Feed
- Permalink
- Report Inappropriate Content
Aug-11-2014 08:10 AM
Tightening to 50ft lbs, then back off to the 1st notch, would be WRONG.
Like was more or less said, the ONLY reason to ever torque to 50 lbs, would be to seat a race that had not seated correctly during installation.
'01 31' Rexall Vision, Generac 5.5k, 1000 watt Honda, PD 9245 conv, 300 watts Solar, 150 watt inv, 2 Cos 6v batts, ammeters, led voltmeters all over the place, KD/sat, 2 Oly Cat heaters w/ ox, and towing a 2012 Liberty, Lowe bass boat, or a Kawi Mule.
- Mark as New
- Bookmark
- Subscribe
- Mute
- Subscribe to RSS Feed
- Permalink
- Report Inappropriate Content
Aug-11-2014 07:00 AM
Dexter
Bearing Adjustment and Hub Replacement
If the hub has been removed or bearing adjustment is required,
the following adjustment procedure must be followed:
1.
After placing the hub, bearings, washers, and spindle nut
back on the axle spindle in reverse order as detailed in the
previous section on hub removal, rotate the hub assembly
slowly while tightening the spindle nut to approximately
50
Ft.
Lbs.
(12" wrench or pliers with full hand force.)
2.
Then loosen the spindle nut to remove the torque. Do not
rotate the hub.
3.
Finger tighten the spindle nut until just snug.
4.
Back the spindle nut out slightly until the first castellation
lines up with the cotter key hole and insert the cotter pin.
5.
Bend over the cotter pin legs to secure the nut.
6.
Nut should be free to move with only restraint being the
cotter pin
- Mark as New
- Bookmark
- Subscribe
- Mute
- Subscribe to RSS Feed
- Permalink
- Report Inappropriate Content
Aug-11-2014 05:46 AM
RJsfishin wrote:Lynnmor wrote:
Using a torque wrench to tighten the nut to 50 ft. lbs. is only required if the bearing races were replaced. Following the instructions will cover all situations. Hand tightening with Channelocks is fine if parts were not replaced.
Quote
Wrong again, this will result in a pre-load condition.
Wrong? Then Dexter's instructions are wrong. Take it up with the factory! The bearings are supposed to be preloaded btw.
-------------------------------------------------------------------
Yes, the Dexter instructions are WRONG !
Torqueing to 50 ft lbs, then backing off 1 notch will more than likely cause a preload condition !
All Lynnmor's Posts here are spot on correct.
Who am I ?
Just an ex student of General Motor Training Center, San Leandro, CA back in the 60's when the change was made from ball bearings to tapered roller bearings in all front wheels. Nothing has changed w/ front wheel bearings since that time.
BTW, the slight amount of bearing end play is for grease clearance, more so than heat expansion. If there is no space for grease, such as in a preload condition, a bearing is proned to a shorter life. The only bearing that calls for a preload, is one that is running in oil, such as rear axle pinion bearings.
RJ, now that's an answer I'll accept; Dexter's instructions are wrong. That's a Dexter problem then.
BTW, even with the preload, you still are backing the nut off to the first hole and the bearing ends up a little loose for grease and expansion like you say. At this setting, you can still "rock" the wheel very slightly so once you back the nut off, there is no way it can be too tight IMO.
I agree with you that you do not want a preload condition on the bearings as a final result, but the bearings end up without preload when you back the nut off.
2013 Forest River 3001W Windjammer
Equilizer Hitch
Honda EU2000
"I have this plan to live forever; so far my plan is working"
- Mark as New
- Bookmark
- Subscribe
- Mute
- Subscribe to RSS Feed
- Permalink
- Report Inappropriate Content
Aug-11-2014 05:45 AM
- Mark as New
- Bookmark
- Subscribe
- Mute
- Subscribe to RSS Feed
- Permalink
- Report Inappropriate Content
Aug-11-2014 05:43 AM
Lynnmor wrote:Ron3rd wrote:Lynnmor wrote:Ron3rd wrote:Ranger Smith wrote:
From what I remember when doing mine it was torque axle nuts to 50 ft. lbs and then back nut off to next cotter pin slot.It is a little more involved than "hand snug" as everyones idea of hand snug is different
That is correct, and I don't remember the exact torque required but it's in the Dexter instructions available for download. Basically, you torque the bearing to the spec and rotate the wheel to seat the bearing and then back off to the first cotter pin hole. My old trailer had Dexter 3500 lb axles and I did this several times, easy process.
BTW, most techs I've watched don't use a torque wrench; they tighten the nut down with a large Crescent wrench or Channel Locks, rotate the wheel and then back off the nut. Probably close enough but I prefer to go by the book as it's no harder.
Wrong again, this will result in a pre-load condition.
Wrong? Then Dexter's instructions are wrong. Take it up with the factory! The bearings are supposed to be preloaded btw.
Nope! Just checked Dexter's instructions. There is no pre-load. You should not be giving incorrect information.
Nope, you're wrong (again). Don't know what instructions you checked, but they're not for 3500 lb axles. Quote from Dexters instructions:
"After placing the hub, bearings, washers, and spindle nut
back on the axle spindle in reverse order as detailed in the
previous section on hub removal, rotate the hub assembly
slowly while tightening the spindle nut to approximately
50 Ft Lbs. (12" wrench or pliers with full hand force.)"
SCROLL DOWN TO PAGE 54
2013 Forest River 3001W Windjammer
Equilizer Hitch
Honda EU2000
"I have this plan to live forever; so far my plan is working"
- Mark as New
- Bookmark
- Subscribe
- Mute
- Subscribe to RSS Feed
- Permalink
- Report Inappropriate Content
Aug-11-2014 05:18 AM
Lynnmor wrote:
Using a torque wrench to tighten the nut to 50 ft. lbs. is only required if the bearing races were replaced. Following the instructions will cover all situations. Hand tightening with Channelocks is fine if parts were not replaced.
Quote
Wrong again, this will result in a pre-load condition.
Wrong? Then Dexter's instructions are wrong. Take it up with the factory! The bearings are supposed to be preloaded btw.
-------------------------------------------------------------------
Yes, the Dexter instructions are WRONG !
Torqueing to 50 ft lbs, then backing off 1 notch will more than likely cause a preload condition !
All Lynnmor's Posts here are spot on correct.
Who am I ?
Just an ex student of General Motor Training Center, San Leandro, CA back in the 60's when the change was made from ball bearings to tapered roller bearings in all front wheels. Nothing has changed w/ front wheel bearings since that time.
BTW, the slight amount of bearing end play is for grease clearance, more so than heat expansion. If there is no space for grease, such as in a preload condition, a bearing is proned to a shorter life. The only bearing that calls for a preload, is one that is running in oil, such as rear axle pinion bearings.
'01 31' Rexall Vision, Generac 5.5k, 1000 watt Honda, PD 9245 conv, 300 watts Solar, 150 watt inv, 2 Cos 6v batts, ammeters, led voltmeters all over the place, KD/sat, 2 Oly Cat heaters w/ ox, and towing a 2012 Liberty, Lowe bass boat, or a Kawi Mule.
- Mark as New
- Bookmark
- Subscribe
- Mute
- Subscribe to RSS Feed
- Permalink
- Report Inappropriate Content
Aug-11-2014 05:03 AM
westend - I'm a Yes. Owned cars and pickups with serviceable front bearings, also a Land Cruiser, also farm machines. Also did many working as a lube rack "technician".
- Mark as New
- Bookmark
- Subscribe
- Mute
- Subscribe to RSS Feed
- Permalink
- Report Inappropriate Content
Aug-11-2014 01:53 AM
- Mark as New
- Bookmark
- Subscribe
- Mute
- Subscribe to RSS Feed
- Permalink
- Report Inappropriate Content
Aug-10-2014 10:06 PM
Carb Cleaner wrote:Thanks but you're cheating with that piece of plywood under your parts. Isn't it all supposed to be lying in a pile in the gravel? :B
Fellow forum members, thanks for all your efforts to make my life easier. Some of the responses are spot-on and some are leaning towards the right direction, but for whatever reason, go askew. It's the internet's fault.
If you want to see the Dexter web page, with bearing lube and replacement procedures, see my post from earlier today at 2:05 PM. Here it is again. Go to page 56:
Clicky
Copy and paste address and/or clicky:
http://www.dexteraxle.com/i/u/6149609/f/600-8K_Service_Manual/Hubs_Drums_and_Bearings.pdf
http://www.dexteraxle.com/i/u/6149609/f/600-8K_Service_Manual/Hubs_Drums_and_Bearings.pdf
The 1 7/16" nor the 1 1/2" sockets I picked up at Sears would function on the spindle nut (axle nut) due to the bevel on both the socket and the nut. As the nut gets closer to the hub, the two bevels will not permit the socket and nut to come in contact. I wound up using a giant pair of Channel Locks on the first, and so far only, assembly I've installed. In my accumulated frustration from various events of the day, I resorted to using the Channel Locks. I'll be grinding the bevel off of the appropriate socket tomorrow. This will permit an interface between the socket and spindle nut, and I'll be able to properly torque the bearings to 50 ft/lbs. I'm doing a champion job on the break-away switch wiring, though (soldered and double shrink wrapped with wire loom). It'll look much better when it's all wrapped up:
FWIW, as I was reading the thread, I realized I've been packing bearings the "Dexter" way for a long time. I don't use a torque wrench unless it's something really special, though ( A TT doesn't qualify). How many guys here have had a car or truck with serviceable front axle bearings?
'71 Starcraft Wanderstar -- The Cowboy/Hilton
- Mark as New
- Bookmark
- Subscribe
- Mute
- Subscribe to RSS Feed
- Permalink
- Report Inappropriate Content
Aug-10-2014 07:49 PM
If you want to see the Dexter web page, with bearing lube and replacement procedures, see my post from earlier today at 2:05 PM. Here it is again. Go to page 56:
Clicky
Copy and paste address and/or clicky:
http://www.dexteraxle.com/i/u/6149609/f/600-8K_Service_Manual/Hubs_Drums_and_Bearings.pdf
http://www.dexteraxle.com/i/u/6149609/f/600-8K_Service_Manual/Hubs_Drums_and_Bearings.pdf
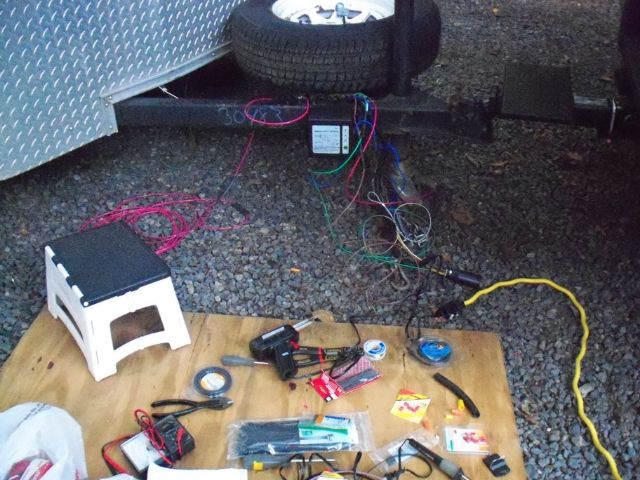
The 1 7/16" nor the 1 1/2" sockets I picked up at Sears would function on the spindle nut (axle nut) due to the bevel on both the socket and the nut. As the nut gets closer to the hub, the two bevels will not permit the socket and nut to come in contact. I wound up using a giant pair of Channel Locks on the first, and so far only, assembly I've installed. In my accumulated frustration from various events of the day, I resorted to using the Channel Locks. I'll be grinding the bevel off of the appropriate socket tomorrow. This will permit an interface between the socket and spindle nut, and I'll be able to properly torque the bearings to 50 ft/lbs. I'm doing a champion job on the break-away switch wiring, though (soldered and double shrink wrapped with wire loom). It'll look much better when it's all wrapped up:
'12 Wolf Creek 850 TC Coleman Polar Cub 9.2k A/C, 90 watt solar, dual propane & batteries, Maggie Rack


