Turn on suggestions
Auto-suggest helps you quickly narrow down your search results by suggesting possible matches as you type.
Showing results for
- Good Sam Community
- Groups
- Travel Trailer Group
- Forum
- Blue Sea Systems 12v Outlet Installations
Options
- Subscribe to RSS Feed
- Mark Topic as New
- Mark Topic as Read
- Float this Topic for Current User
- Bookmark
- Subscribe
- Mute
- Printer Friendly Page
Blue Sea Systems 12v Outlet Installations
Options
- Mark as New
- Bookmark
- Subscribe
- Mute
- Subscribe to RSS Feed
- Permalink
- Report Inappropriate Content
May-14-2014 07:08 AM
In today's electronic age you can never have enough USB charging ports and electrical outlets in your RV. This is especially true for those of us who work while on the road. My office is actually located at home, but when I travel or I'm on vacation, I often take my work with me. Such was the case last month when I took a combined business and vacation trip to Salt Lake City and southern Utah in the truck camper. With all the laptops, iPads, and iPhones we brought along with us, a single 110 volt AC outlet didn't come close to supplying all of our power needs. More was needed.
Most of the electronic devices we use recharge on USB ports. At home we use the little USB Dock Chargers that came with our iPhones and iPads, but each takes up a single AC outlet. Making matters worse, when we're camping off-the-grid, which is most of the time, we have only one 110 volt AC outlet (this runs off of our 300 watt Morningstar pure sine wave inverter). Using the USB Dock Chargers filled up this outlet, so during the trip we picked up an AC outlet adapter equipped with three AC outlets and two USB ports for $15. This was a big help for us on this business trip, but more USB charging ports were still needed.

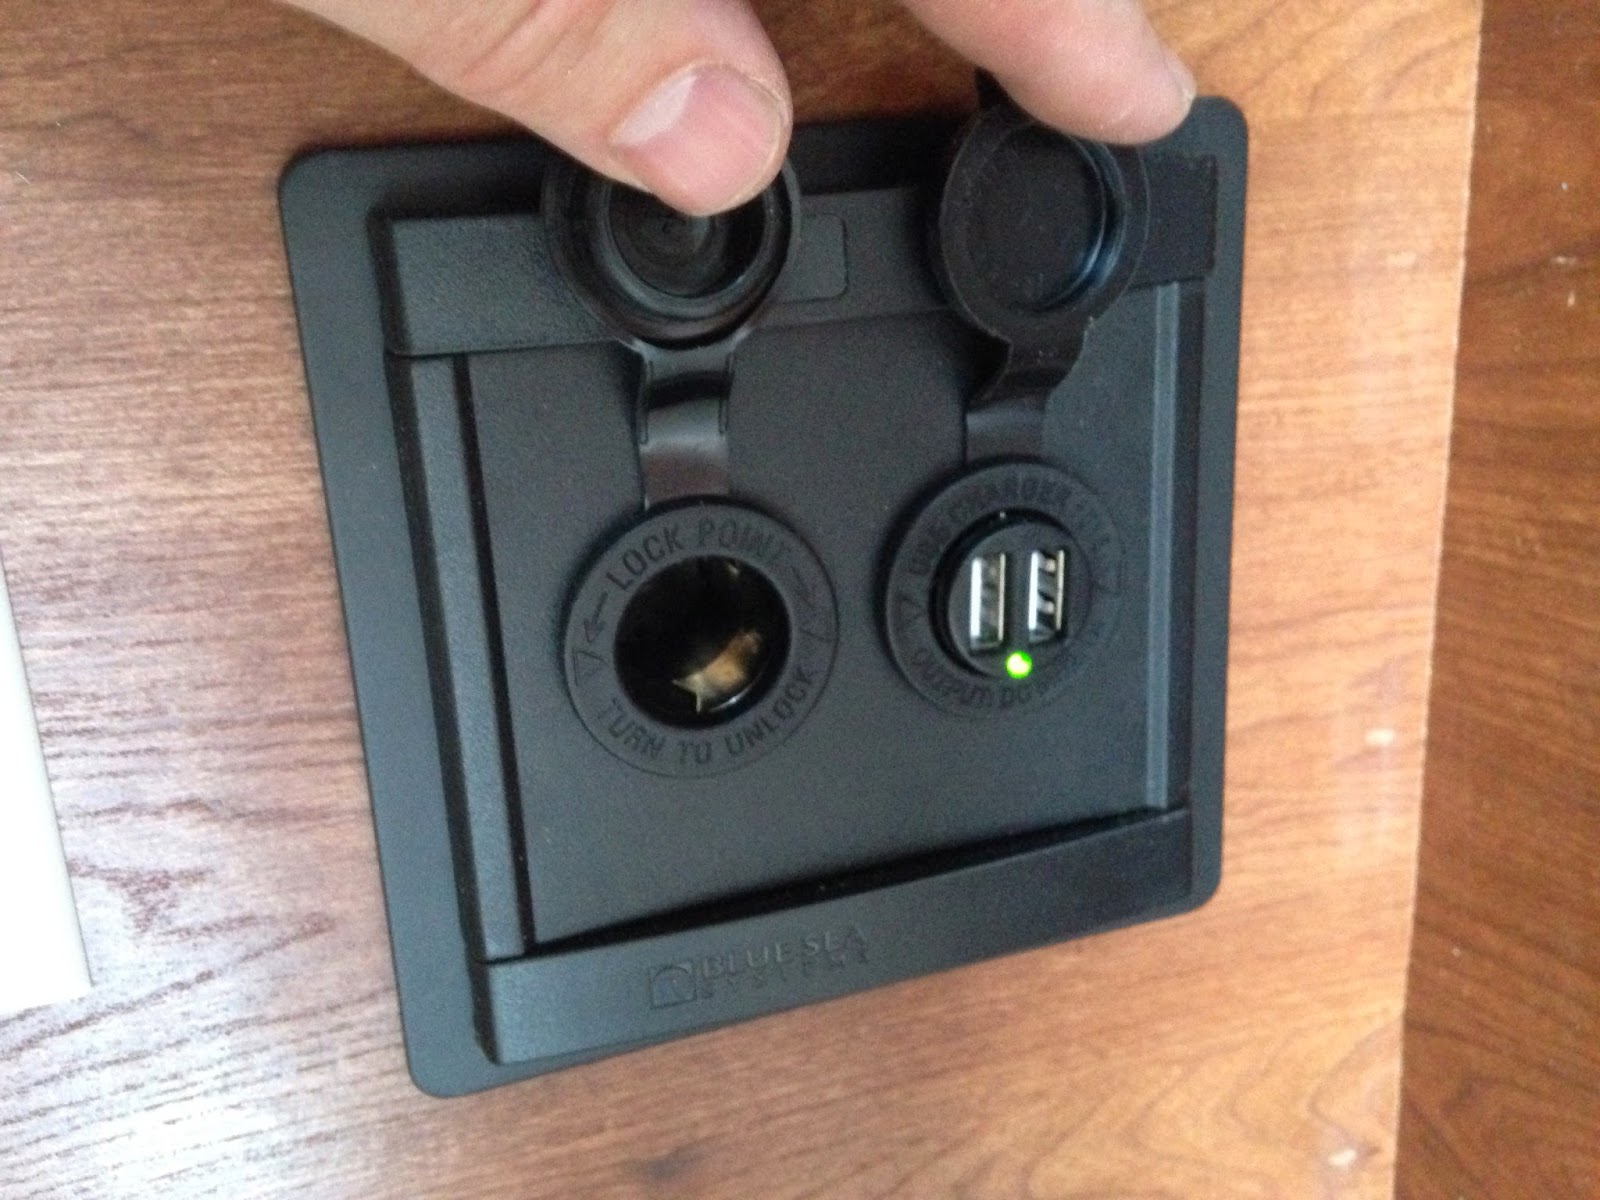
Fortunately, I had recently ordered several DC outlets and USB charging ports from Blue Sea Systems. This shipment included what Blue Sea calls a "360 Panel," a modular, integrated unit that has a 12 volt outlet on one side and a dual USB charging port on the other. Yes, Blue Sea's stuff is spendy, but their products are extremely well made, have a lifetime warranty, and have higher than normal operating specs. For instance, most 12 volt outlets on the market are rated for 5 amps, but Blue Sea's marine quality outlets are rated for a whopping 15 amps (each USB port has a rated output of 2.1 amps). A great feature about this Blue Sea panel is that the components are removable and interchangeable. If you want another dual USB charging port all you have to do is remove the 12 volt outlet and install a USB port instead.
Installing the panel itself wasn't too difficult, though a little planning was required. The most difficult part was looking for a suitable location that could easily be reached and had access to 12 volt wiring. A low point in the dinette area was the obvious place to mount this panel, but no 12 volt wiring existed where we wanted to put it. Fortunately, the large dinette cubby already had a hole drilled in the floor to pass 110 volt AC romex, so I wouldn't need to drill another one. All I'd need to do was pass two new 12 volt wires through the existing hole and fish the wire in the void between the floor underneath and the fresh water tank. It sounds difficult, but it wasn't too bad with the help of a mirror, flashlight, and a clothes hanger fashioned into a large hook to grab hold of the two wires.

Before running the wires underneath the floor, I first had to prep them for connecting to the panel. Unlike most 12 volt outlets and ports, the Blue Sea panel has four electrical blade connections on the backside, two positive and two negative. Rather than run four sets of separate wires, I decided to run two heavy 12 AWG wires and splice two short wires into these main wires. I spliced the wires by stripping 1/2" of insulation, creating a small gap in the copper strands, inserting another wire into the gap, then twisting the wires together. To make the T-shaped splices permanent I soldered them then wrapped the soldered joint with insulation tape (I prefer shrink tube insulation for soldered connections, but I still haven't figured out a good way to do it for T-shaped soldered joints).

Installing the panel itself was pretty easy. The installation kit comes with a template that makes cutting the panel cutout easy. The panel wood is pretty thin and didn't take much effort to cut a good sized hole with the small hand saw I used. The black aluminum panel looks great with the plastic framing on the top and bottom which covers the mounting screws. The photos below show the front and backside of the mounted panel. Note that the 12 volt wiring behind the panel is now covered with black conduit to further protect the wires.

Fortunately, the 12 volt fuse panel was located nearby and had two open slots for expansion. Since I used 12 AWG wire for this project I protected the circuit with a 20 amp fuse. Like I said earlier, the maximum output ratings for the panel are 15 amps for the outlet and 2.1 amps for each USB port, so the 20 amp fuse gives me a little room to play with. As for the 12 volt negative wire, I simply tapped into the negative fuse block near the power converter.
After installing the 360 Panel, I turned my attention to the 12 volt outlet I installed a couple years ago in the dinette area. This outlet worked fine, but with the 360 Panel now installed nearby, I had no need for two DC outlets practically next to each other, so I swapped out the outlet for a Blue Sea dual USB port. If you think that this charging port looks familiar, you're right. It's identical to the one found in the 360 Panel.
Installing this dual USB outlet was easy with the wiring previously run, but there were a few small challenges. First, the paneling there was very thin with nothing really substantial to screw into. So I cut myself a piece of thin wood and drill the required size hole to pass the outlet through. With this piece of wood in place the screws and outlet had something to bite into. The outlet is now rock solid. Devising a solution for the last obstacle was simple, but was more difficult to execute. The connections for the outlet are a good 1/2" long and with the outlet mounted would extend past the bottom of the storage cabinet. The obvious solution was the bend these connections, but these are brittle and can be broken if you're not careful. Fortunately, I was able to do this without breaking them and I was able to make the two connections.


Lastly, a dual USB charging port was needed in the cabover area so we could charge our cell phones while we slept. The perfect location was the passenger side nightstand, but with no 12 volt wiring there I needed to tap into a 12 volt source nearby. After exploring several options, I decided to tap into the bedside reading light fixture on the driver side. This was the closest location, and fortunately, the best option because this location turned out to be where the 12 volt junction box for the entire cabover was located.
Running the 12 volt wiring from the junction box to the other side of the bed proved to be the biggest headache. Placing the wires behind the wall like the existing 110 volt AC wires was preferable, but there was no way do it with the camper assembled. The only real option I had was to run the wires along the bottom of the headboard beneath the mattress. This I did protecting the wires with small 1/2" conduit.
Mounting the new charging port was the easiest part of the project. I used a small hole saw attached to my Ryobi to cut the circular hole into the side of the nightstand for the mount. The hole size turned out to be absolutely perfect. The mounted USB charging port looks pretty professional if I do say so myself. Like the 360 Panel wiring, I used female quick disconnects to attach the positive and negative wires to the backside of the charging port. Now we have a bedside location where we can charge our phones while we sleep.

Most of the electronic devices we use recharge on USB ports. At home we use the little USB Dock Chargers that came with our iPhones and iPads, but each takes up a single AC outlet. Making matters worse, when we're camping off-the-grid, which is most of the time, we have only one 110 volt AC outlet (this runs off of our 300 watt Morningstar pure sine wave inverter). Using the USB Dock Chargers filled up this outlet, so during the trip we picked up an AC outlet adapter equipped with three AC outlets and two USB ports for $15. This was a big help for us on this business trip, but more USB charging ports were still needed.
Fortunately, I had recently ordered several DC outlets and USB charging ports from Blue Sea Systems. This shipment included what Blue Sea calls a "360 Panel," a modular, integrated unit that has a 12 volt outlet on one side and a dual USB charging port on the other. Yes, Blue Sea's stuff is spendy, but their products are extremely well made, have a lifetime warranty, and have higher than normal operating specs. For instance, most 12 volt outlets on the market are rated for 5 amps, but Blue Sea's marine quality outlets are rated for a whopping 15 amps (each USB port has a rated output of 2.1 amps). A great feature about this Blue Sea panel is that the components are removable and interchangeable. If you want another dual USB charging port all you have to do is remove the 12 volt outlet and install a USB port instead.
Installing the panel itself wasn't too difficult, though a little planning was required. The most difficult part was looking for a suitable location that could easily be reached and had access to 12 volt wiring. A low point in the dinette area was the obvious place to mount this panel, but no 12 volt wiring existed where we wanted to put it. Fortunately, the large dinette cubby already had a hole drilled in the floor to pass 110 volt AC romex, so I wouldn't need to drill another one. All I'd need to do was pass two new 12 volt wires through the existing hole and fish the wire in the void between the floor underneath and the fresh water tank. It sounds difficult, but it wasn't too bad with the help of a mirror, flashlight, and a clothes hanger fashioned into a large hook to grab hold of the two wires.
Before running the wires underneath the floor, I first had to prep them for connecting to the panel. Unlike most 12 volt outlets and ports, the Blue Sea panel has four electrical blade connections on the backside, two positive and two negative. Rather than run four sets of separate wires, I decided to run two heavy 12 AWG wires and splice two short wires into these main wires. I spliced the wires by stripping 1/2" of insulation, creating a small gap in the copper strands, inserting another wire into the gap, then twisting the wires together. To make the T-shaped splices permanent I soldered them then wrapped the soldered joint with insulation tape (I prefer shrink tube insulation for soldered connections, but I still haven't figured out a good way to do it for T-shaped soldered joints).
Installing the panel itself was pretty easy. The installation kit comes with a template that makes cutting the panel cutout easy. The panel wood is pretty thin and didn't take much effort to cut a good sized hole with the small hand saw I used. The black aluminum panel looks great with the plastic framing on the top and bottom which covers the mounting screws. The photos below show the front and backside of the mounted panel. Note that the 12 volt wiring behind the panel is now covered with black conduit to further protect the wires.
Fortunately, the 12 volt fuse panel was located nearby and had two open slots for expansion. Since I used 12 AWG wire for this project I protected the circuit with a 20 amp fuse. Like I said earlier, the maximum output ratings for the panel are 15 amps for the outlet and 2.1 amps for each USB port, so the 20 amp fuse gives me a little room to play with. As for the 12 volt negative wire, I simply tapped into the negative fuse block near the power converter.
After installing the 360 Panel, I turned my attention to the 12 volt outlet I installed a couple years ago in the dinette area. This outlet worked fine, but with the 360 Panel now installed nearby, I had no need for two DC outlets practically next to each other, so I swapped out the outlet for a Blue Sea dual USB port. If you think that this charging port looks familiar, you're right. It's identical to the one found in the 360 Panel.
Installing this dual USB outlet was easy with the wiring previously run, but there were a few small challenges. First, the paneling there was very thin with nothing really substantial to screw into. So I cut myself a piece of thin wood and drill the required size hole to pass the outlet through. With this piece of wood in place the screws and outlet had something to bite into. The outlet is now rock solid. Devising a solution for the last obstacle was simple, but was more difficult to execute. The connections for the outlet are a good 1/2" long and with the outlet mounted would extend past the bottom of the storage cabinet. The obvious solution was the bend these connections, but these are brittle and can be broken if you're not careful. Fortunately, I was able to do this without breaking them and I was able to make the two connections.
Lastly, a dual USB charging port was needed in the cabover area so we could charge our cell phones while we slept. The perfect location was the passenger side nightstand, but with no 12 volt wiring there I needed to tap into a 12 volt source nearby. After exploring several options, I decided to tap into the bedside reading light fixture on the driver side. This was the closest location, and fortunately, the best option because this location turned out to be where the 12 volt junction box for the entire cabover was located.
Running the 12 volt wiring from the junction box to the other side of the bed proved to be the biggest headache. Placing the wires behind the wall like the existing 110 volt AC wires was preferable, but there was no way do it with the camper assembled. The only real option I had was to run the wires along the bottom of the headboard beneath the mattress. This I did protecting the wires with small 1/2" conduit.
Mounting the new charging port was the easiest part of the project. I used a small hole saw attached to my Ryobi to cut the circular hole into the side of the nightstand for the mount. The hole size turned out to be absolutely perfect. The mounted USB charging port looks pretty professional if I do say so myself. Like the 360 Panel wiring, I used female quick disconnects to attach the positive and negative wires to the backside of the charging port. Now we have a bedside location where we can charge our phones while we sleep.
2016 Northstar Laredo SC/240w Solar/2-6v Lifeline AGMs/Dometic CR110 DC Compressor Fridge
2013 Ram 3500 4x4/6.7L Cummins TD/3.42/Buckstop Bumper with Warn 16.5ti Winch/Big Wig Rear Sway Bar/Talons w/SS Fastguns
My Rig
1998 Jeep Wrangler
US Navy Ret.
2013 Ram 3500 4x4/6.7L Cummins TD/3.42/Buckstop Bumper with Warn 16.5ti Winch/Big Wig Rear Sway Bar/Talons w/SS Fastguns
My Rig
1998 Jeep Wrangler
US Navy Ret.
Labels:
- Labels:
-
Truck Campers
38 REPLIES 38
Options
- Mark as New
- Bookmark
- Subscribe
- Mute
- Subscribe to RSS Feed
- Permalink
- Report Inappropriate Content
Aug-13-2016 04:24 AM
smkettner wrote:
I use these multiple wire connectors. Just a sealed, insulated and permanent as any heat shrink butt connector.

I like those. I will have to order some.
Options
- Mark as New
- Bookmark
- Subscribe
- Mute
- Subscribe to RSS Feed
- Permalink
- Report Inappropriate Content
Aug-12-2016 09:50 AM
Silveradomike wrote:
I just purchased one of the marine grade 12v usb ports. Has anyone installed something like this on the outside of their trailer?
Hmm....I like the idea of an outside port.
2009 Silverado 3500HD Dually, D/A, CCLB 4x4 (bought new 8/30/09)
2018 Arctic Fox 992 with an Onan 2500i "quiet" model generator
2018 Arctic Fox 992 with an Onan 2500i "quiet" model generator
Options
- Mark as New
- Bookmark
- Subscribe
- Mute
- Subscribe to RSS Feed
- Permalink
- Report Inappropriate Content
Aug-11-2016 03:16 PM
I just purchased one of the marine grade 12v usb ports. Has anyone installed something like this on the outside of their trailer?
2005 2500HD Duramax/Allison,Air-lift Bags,CST 4" Lift,Nitto 297/75/16
Reese 16k/4way Pivot,BlueOxe Bed Protector
2004 Northwood ArcticFox 27-5L,Honda 3000U Generator
Reese 16k/4way Pivot,BlueOxe Bed Protector
2004 Northwood ArcticFox 27-5L,Honda 3000U Generator
Options
- Mark as New
- Bookmark
- Subscribe
- Mute
- Subscribe to RSS Feed
- Permalink
- Report Inappropriate Content
May-29-2014 10:37 PM
retireclose wrote:
I'm in the process of running (2) 12v cables for a usb port and a 12v fan. I have two empty spots on the converter(15a) that I tapped into. Where should i put the 15a inline fuse, closer to the converter(source) or closer to the usb/fan port. The run is about 10 ft. and i used number 10 wire.
Any help would be appreciated.
I'm kind of as a loss as to why you used #10 wire for your run to a USB port and a fan. A USB port normally supplies no more than 2.1 amps and most 12 volt fans only draw 3 or at most 5 amps.
The voltage drop for 5.5 amps in a ten foot run of #14 wire is only .285 volts. For #10 it is .113 volts. Seems to be a bit of overkill using #10 or have I missed something.
"I travel not to go anywhere, but to go. I travel for travel's sake. The great affair is to go". R. L. Stevenson
David Bishop
2002 Winnebago Adventurer 32V
2009 GMC Canyon
Roadmaster 5000
BrakeBuddy Classic II
David Bishop
2002 Winnebago Adventurer 32V
2009 GMC Canyon
Roadmaster 5000
BrakeBuddy Classic II
Options
- Mark as New
- Bookmark
- Subscribe
- Mute
- Subscribe to RSS Feed
- Permalink
- Report Inappropriate Content
May-29-2014 09:45 PM
I ordered just the USB plug, not the style with the "360 plate".
I might get around to installing it next week.
I might get around to installing it next week.
2009 Silverado 3500HD Dually, D/A, CCLB 4x4 (bought new 8/30/09)
2018 Arctic Fox 992 with an Onan 2500i "quiet" model generator
2018 Arctic Fox 992 with an Onan 2500i "quiet" model generator
Options
- Mark as New
- Bookmark
- Subscribe
- Mute
- Subscribe to RSS Feed
- Permalink
- Report Inappropriate Content
May-29-2014 07:38 PM
Just thought I'd add a comment in case anyone else wants to disable the led lights in the USB plugs. The end with the terminals pops off with a little help of a screwdriver and then the entire thing slides out backwards. You can then split it apart and cut one of the legs of the led light.
I didn't think to take pics but if I do another one I'll get some pictures.
I didn't think to take pics but if I do another one I'll get some pictures.
2017 F350 Platinum DRW
2013 Adventurer 89RB
2013 Adventurer 89RB
Options
- Mark as New
- Bookmark
- Subscribe
- Mute
- Subscribe to RSS Feed
- Permalink
- Report Inappropriate Content
May-27-2014 09:39 PM
It is threads/post like this one that initially sparked my interest in RV.NET.For me, if I want one liners, I go to the news media. The responses to this thread are informative, and in my opinion encourage others to make similar posts/threads.
Wayne
Wayne
2004.5 Ram SLT LB 3500 DRW Quad Cab 4x4
1988 Bigfoot (C11.5) TC (1900# w/standard equip. per decal), 130 watts solar, 100 AH AGM, Polar Cub A/C, EU2000i Honda
Toad: 91 Zuke
Options
- Mark as New
- Bookmark
- Subscribe
- Mute
- Subscribe to RSS Feed
- Permalink
- Report Inappropriate Content
May-27-2014 08:39 PM
They look great, Hedge.
2016 Northstar Laredo SC/240w Solar/2-6v Lifeline AGMs/Dometic CR110 DC Compressor Fridge
2013 Ram 3500 4x4/6.7L Cummins TD/3.42/Buckstop Bumper with Warn 16.5ti Winch/Big Wig Rear Sway Bar/Talons w/SS Fastguns
My Rig
1998 Jeep Wrangler
US Navy Ret.
2013 Ram 3500 4x4/6.7L Cummins TD/3.42/Buckstop Bumper with Warn 16.5ti Winch/Big Wig Rear Sway Bar/Talons w/SS Fastguns
My Rig
1998 Jeep Wrangler
US Navy Ret.
Options
- Mark as New
- Bookmark
- Subscribe
- Mute
- Subscribe to RSS Feed
- Permalink
- Report Inappropriate Content
May-27-2014 08:10 PM
I got mine installed on sunday. I mounted the '360' plate in the kitchen wall. There was an AC plug there already so I was hoping I could fish my wires through the same hole... but no such luck. I had to drill my own hole from the upper gun cabinet down into the undersink area. Wow was I nervous drilling that hole... I had visions of it coming out through the outside of the camper. Things like that happen to me.
I then decided I couldn't make the big square hole because of the framing for the cabinet behind the plug so I just drilled the holes for the actual plugs. This worked pretty well other than I also had to drill countersink holes so that the plate would sit flush against the wall. Here's a shot showing the holes drilled.
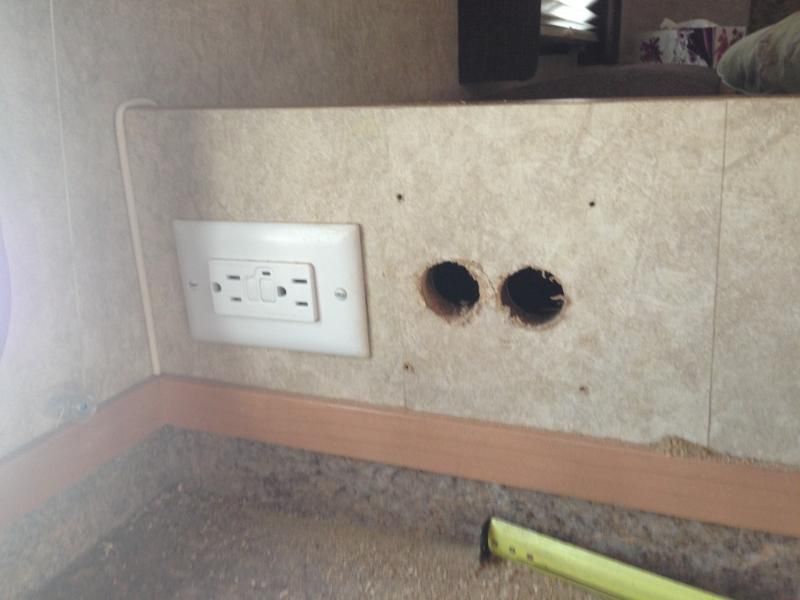
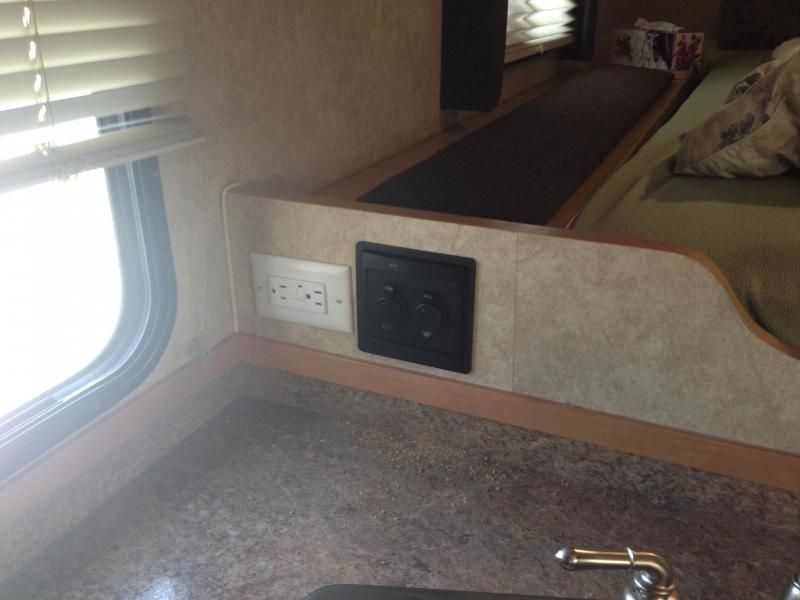
This is a shot with the plate mounted. It looks a bit crooked but it's actually the AC plug that's installed crooked, I'll have to fix that. It doesn't look as bad in reality.
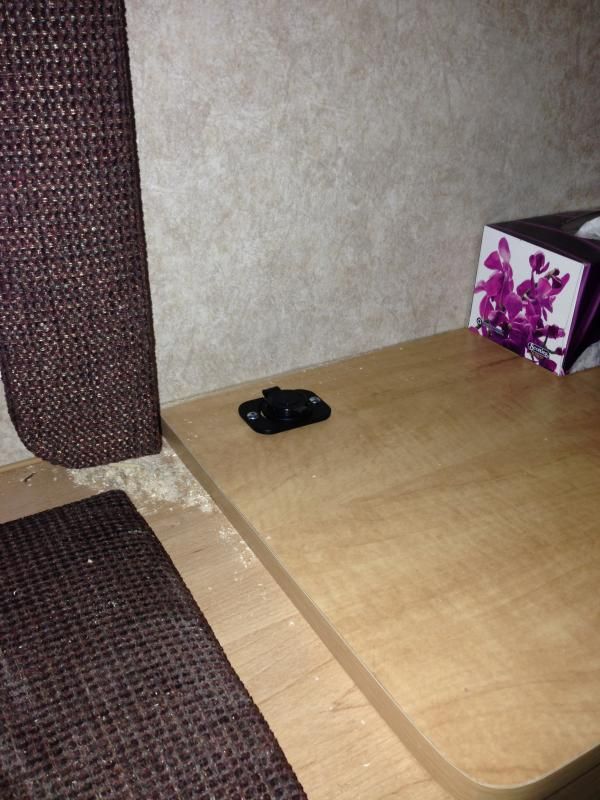
I also installed a plug beside the bed, I couldn't see anywhere clever to put it so I just top mounted it. It was handy because I could run the wire inside the same cabinet.
To feed it I tapped into an unused pigtail wire feed off of my converter. The ground went to the grounding block.
I like the plugs but I'll probably take them apart to disable the LED, especially the bedside one, I think the light will drive me nuts.
I have a couple more of the small plugs and I'll probably run a line behind the fridge and the wardrobe over to my wife's side of the bed. Somehow I ended up ordering 2 of the 360 plates, not sure where the other one's going to go.
I then decided I couldn't make the big square hole because of the framing for the cabinet behind the plug so I just drilled the holes for the actual plugs. This worked pretty well other than I also had to drill countersink holes so that the plate would sit flush against the wall. Here's a shot showing the holes drilled.

This is a shot with the plate mounted. It looks a bit crooked but it's actually the AC plug that's installed crooked, I'll have to fix that. It doesn't look as bad in reality.

I also installed a plug beside the bed, I couldn't see anywhere clever to put it so I just top mounted it. It was handy because I could run the wire inside the same cabinet.

To feed it I tapped into an unused pigtail wire feed off of my converter. The ground went to the grounding block.
I like the plugs but I'll probably take them apart to disable the LED, especially the bedside one, I think the light will drive me nuts.
I have a couple more of the small plugs and I'll probably run a line behind the fridge and the wardrobe over to my wife's side of the bed. Somehow I ended up ordering 2 of the 360 plates, not sure where the other one's going to go.
2017 F350 Platinum DRW
2013 Adventurer 89RB
2013 Adventurer 89RB
Options
- Mark as New
- Bookmark
- Subscribe
- Mute
- Subscribe to RSS Feed
- Permalink
- Report Inappropriate Content
May-15-2014 12:04 PM
Appreciate everyones response.
2016 22' Rockwood 2104s Mini-Lite
2014 Chevy Silverado 1500
2014 Chevy Silverado 1500
Options
- Mark as New
- Bookmark
- Subscribe
- Mute
- Subscribe to RSS Feed
- Permalink
- Report Inappropriate Content
May-15-2014 11:12 AM
Yes, generally only time to use inline fuse on otherwise 'fused' circuit is where the end device requires a smaller fuse for self protection. Or where you want a branch line(s) able to blow but not take down the whole circuit, requires smaller fuse downstream. Otherwise tapping power from a non fused source an inline fuse would be located at the source.
Nice install Mike. The only thing I would have done different is not loading the pic of the functional (granted ugly) tape job 🙂
But then we wouldn't have anything to critique. Does seem to have fired up some thought and motivation. Myriad ways could be split. Given the same materials and soldering splice, heat shrinked the splice-have the 2 wires coming out end of tube. Single jumper usually use piggy back connectors and make jumper wires, or solder jumper wire to common end of line connector. 'sanitizing' wiring can be a project in-itself.
Question on the 12v power receptacle, noted it says turn to lock. Will these accept standard male power plugs?
01 Ford F250 4x4 DRW Diesel, 01 Elkhorn 9U
Our camper projects page http://www.ourelkhorn.itgo.com
Our camper projects page http://www.ourelkhorn.itgo.com
Options
- Mark as New
- Bookmark
- Subscribe
- Mute
- Subscribe to RSS Feed
- Permalink
- Report Inappropriate Content
May-15-2014 10:27 AM
I have a similar situation, I think I'm going to run 1 larger wire from the converter to a fuse block and then smaller wires to the 12v plugs. The fuse in the converter protects the wire up to the fuse block and then appropriately sized fuses in the fuse box protect the wire to the 12v outlets. You then don't use both of your spare slots on your converter.
This is how we used to do it in my car audio days. Too bad I can't make use of some of the heavy duty stuff I have, but I think 2gauge wire is a bit overkill lol
This is how we used to do it in my car audio days. Too bad I can't make use of some of the heavy duty stuff I have, but I think 2gauge wire is a bit overkill lol
2017 F350 Platinum DRW
2013 Adventurer 89RB
2013 Adventurer 89RB
Options
- Mark as New
- Bookmark
- Subscribe
- Mute
- Subscribe to RSS Feed
- Permalink
- Report Inappropriate Content
May-15-2014 10:03 AM
retireclose wrote:
You're correct I will be using two open slots on the converter with 15a fuses. I was told I also need the inline fuses, it didn't make sense to me. That's why I posted here.
Thanks,
Yeah, that's overkill. One fuse per circuit is good enough.
Now if you were wired directly to the battery then I would use an inline fuse.
2016 Northstar Laredo SC/240w Solar/2-6v Lifeline AGMs/Dometic CR110 DC Compressor Fridge
2013 Ram 3500 4x4/6.7L Cummins TD/3.42/Buckstop Bumper with Warn 16.5ti Winch/Big Wig Rear Sway Bar/Talons w/SS Fastguns
My Rig
1998 Jeep Wrangler
US Navy Ret.
2013 Ram 3500 4x4/6.7L Cummins TD/3.42/Buckstop Bumper with Warn 16.5ti Winch/Big Wig Rear Sway Bar/Talons w/SS Fastguns
My Rig
1998 Jeep Wrangler
US Navy Ret.
Options
- Mark as New
- Bookmark
- Subscribe
- Mute
- Subscribe to RSS Feed
- Permalink
- Report Inappropriate Content
May-15-2014 09:55 AM
You're correct I will be using two open slots on the converter with 15a fuses. I was told I also need the inline fuses, it didn't make sense to me. That's why I posted here.
Thanks,
Thanks,
2016 22' Rockwood 2104s Mini-Lite
2014 Chevy Silverado 1500
2014 Chevy Silverado 1500


