Turn on suggestions
Auto-suggest helps you quickly narrow down your search results by suggesting possible matches as you type.
Showing results for
- Good Sam Community
- Groups
- Travel Trailer Group
- Forum
- Blue Sea Systems 12v Outlet Installations
Options
- Subscribe to RSS Feed
- Mark Topic as New
- Mark Topic as Read
- Float this Topic for Current User
- Bookmark
- Subscribe
- Mute
- Printer Friendly Page
Blue Sea Systems 12v Outlet Installations
Options
- Mark as New
- Bookmark
- Subscribe
- Mute
- Subscribe to RSS Feed
- Permalink
- Report Inappropriate Content
May-14-2014 07:08 AM
In today's electronic age you can never have enough USB charging ports and electrical outlets in your RV. This is especially true for those of us who work while on the road. My office is actually located at home, but when I travel or I'm on vacation, I often take my work with me. Such was the case last month when I took a combined business and vacation trip to Salt Lake City and southern Utah in the truck camper. With all the laptops, iPads, and iPhones we brought along with us, a single 110 volt AC outlet didn't come close to supplying all of our power needs. More was needed.
Most of the electronic devices we use recharge on USB ports. At home we use the little USB Dock Chargers that came with our iPhones and iPads, but each takes up a single AC outlet. Making matters worse, when we're camping off-the-grid, which is most of the time, we have only one 110 volt AC outlet (this runs off of our 300 watt Morningstar pure sine wave inverter). Using the USB Dock Chargers filled up this outlet, so during the trip we picked up an AC outlet adapter equipped with three AC outlets and two USB ports for $15. This was a big help for us on this business trip, but more USB charging ports were still needed.

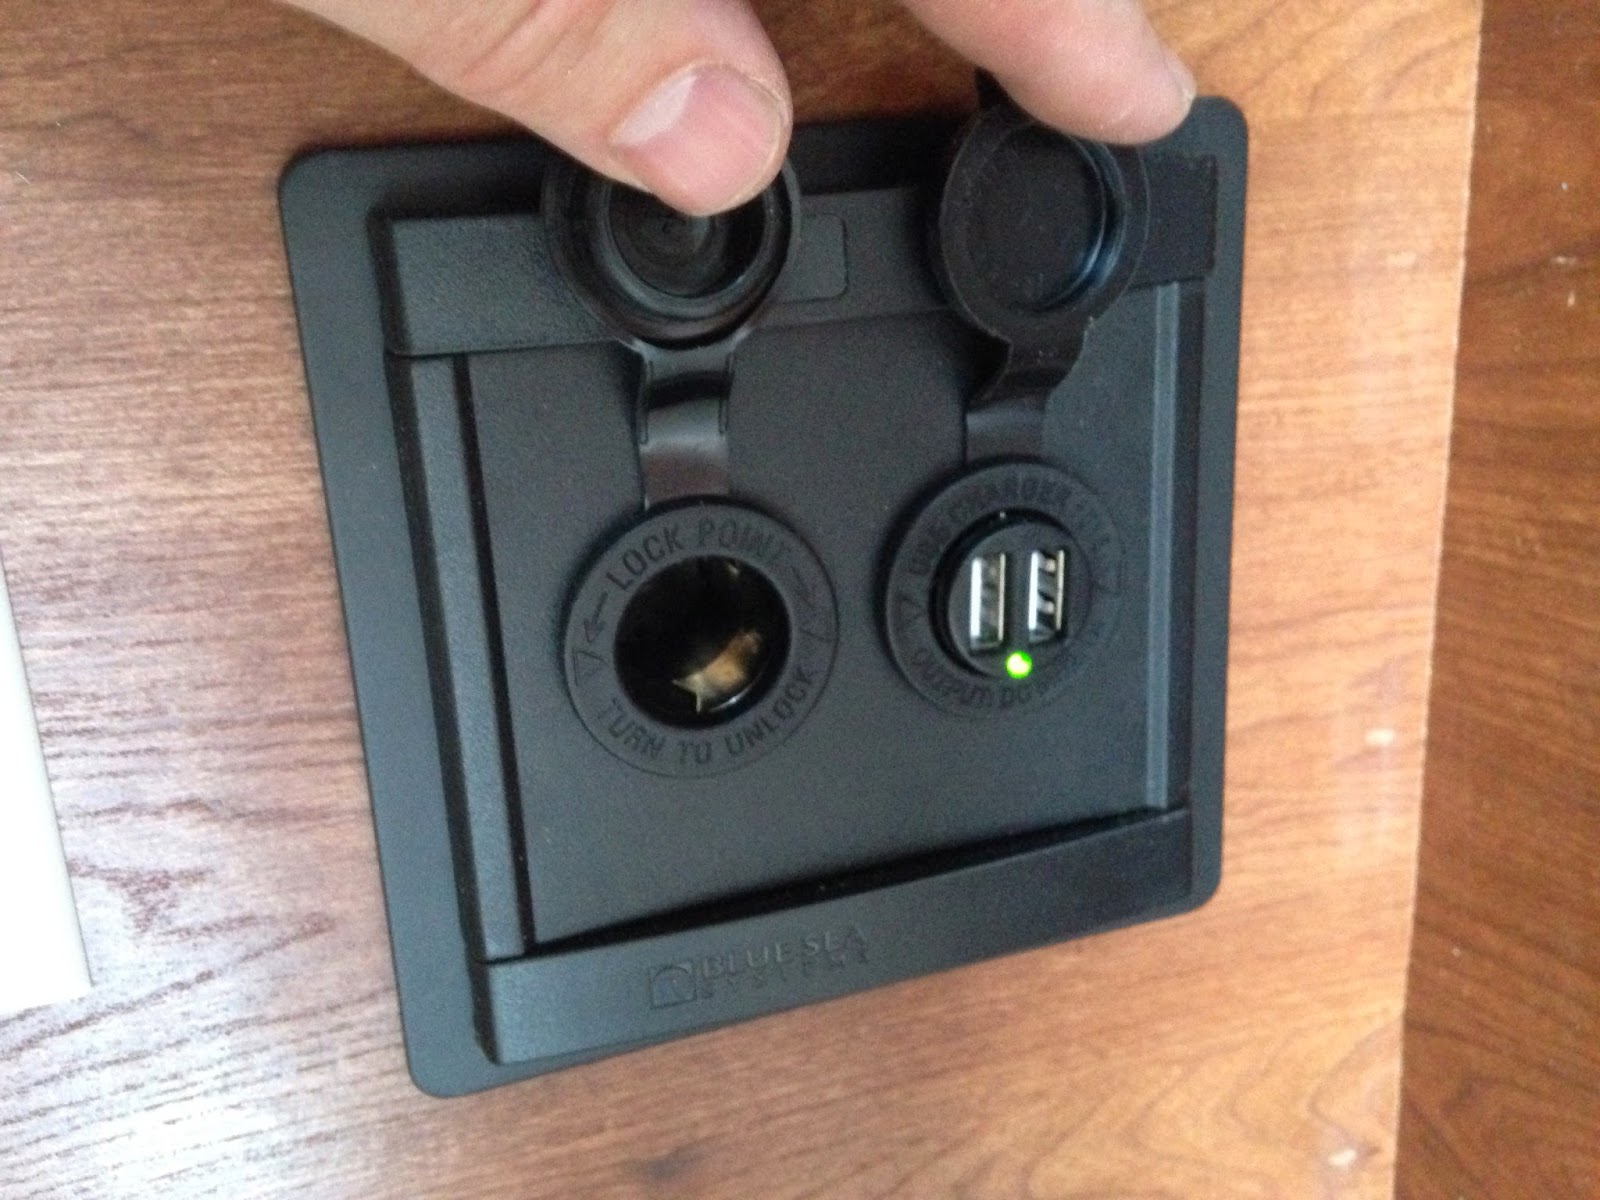
Fortunately, I had recently ordered several DC outlets and USB charging ports from Blue Sea Systems. This shipment included what Blue Sea calls a "360 Panel," a modular, integrated unit that has a 12 volt outlet on one side and a dual USB charging port on the other. Yes, Blue Sea's stuff is spendy, but their products are extremely well made, have a lifetime warranty, and have higher than normal operating specs. For instance, most 12 volt outlets on the market are rated for 5 amps, but Blue Sea's marine quality outlets are rated for a whopping 15 amps (each USB port has a rated output of 2.1 amps). A great feature about this Blue Sea panel is that the components are removable and interchangeable. If you want another dual USB charging port all you have to do is remove the 12 volt outlet and install a USB port instead.
Installing the panel itself wasn't too difficult, though a little planning was required. The most difficult part was looking for a suitable location that could easily be reached and had access to 12 volt wiring. A low point in the dinette area was the obvious place to mount this panel, but no 12 volt wiring existed where we wanted to put it. Fortunately, the large dinette cubby already had a hole drilled in the floor to pass 110 volt AC romex, so I wouldn't need to drill another one. All I'd need to do was pass two new 12 volt wires through the existing hole and fish the wire in the void between the floor underneath and the fresh water tank. It sounds difficult, but it wasn't too bad with the help of a mirror, flashlight, and a clothes hanger fashioned into a large hook to grab hold of the two wires.

Before running the wires underneath the floor, I first had to prep them for connecting to the panel. Unlike most 12 volt outlets and ports, the Blue Sea panel has four electrical blade connections on the backside, two positive and two negative. Rather than run four sets of separate wires, I decided to run two heavy 12 AWG wires and splice two short wires into these main wires. I spliced the wires by stripping 1/2" of insulation, creating a small gap in the copper strands, inserting another wire into the gap, then twisting the wires together. To make the T-shaped splices permanent I soldered them then wrapped the soldered joint with insulation tape (I prefer shrink tube insulation for soldered connections, but I still haven't figured out a good way to do it for T-shaped soldered joints).

Installing the panel itself was pretty easy. The installation kit comes with a template that makes cutting the panel cutout easy. The panel wood is pretty thin and didn't take much effort to cut a good sized hole with the small hand saw I used. The black aluminum panel looks great with the plastic framing on the top and bottom which covers the mounting screws. The photos below show the front and backside of the mounted panel. Note that the 12 volt wiring behind the panel is now covered with black conduit to further protect the wires.

Fortunately, the 12 volt fuse panel was located nearby and had two open slots for expansion. Since I used 12 AWG wire for this project I protected the circuit with a 20 amp fuse. Like I said earlier, the maximum output ratings for the panel are 15 amps for the outlet and 2.1 amps for each USB port, so the 20 amp fuse gives me a little room to play with. As for the 12 volt negative wire, I simply tapped into the negative fuse block near the power converter.
After installing the 360 Panel, I turned my attention to the 12 volt outlet I installed a couple years ago in the dinette area. This outlet worked fine, but with the 360 Panel now installed nearby, I had no need for two DC outlets practically next to each other, so I swapped out the outlet for a Blue Sea dual USB port. If you think that this charging port looks familiar, you're right. It's identical to the one found in the 360 Panel.
Installing this dual USB outlet was easy with the wiring previously run, but there were a few small challenges. First, the paneling there was very thin with nothing really substantial to screw into. So I cut myself a piece of thin wood and drill the required size hole to pass the outlet through. With this piece of wood in place the screws and outlet had something to bite into. The outlet is now rock solid. Devising a solution for the last obstacle was simple, but was more difficult to execute. The connections for the outlet are a good 1/2" long and with the outlet mounted would extend past the bottom of the storage cabinet. The obvious solution was the bend these connections, but these are brittle and can be broken if you're not careful. Fortunately, I was able to do this without breaking them and I was able to make the two connections.


Lastly, a dual USB charging port was needed in the cabover area so we could charge our cell phones while we slept. The perfect location was the passenger side nightstand, but with no 12 volt wiring there I needed to tap into a 12 volt source nearby. After exploring several options, I decided to tap into the bedside reading light fixture on the driver side. This was the closest location, and fortunately, the best option because this location turned out to be where the 12 volt junction box for the entire cabover was located.
Running the 12 volt wiring from the junction box to the other side of the bed proved to be the biggest headache. Placing the wires behind the wall like the existing 110 volt AC wires was preferable, but there was no way do it with the camper assembled. The only real option I had was to run the wires along the bottom of the headboard beneath the mattress. This I did protecting the wires with small 1/2" conduit.
Mounting the new charging port was the easiest part of the project. I used a small hole saw attached to my Ryobi to cut the circular hole into the side of the nightstand for the mount. The hole size turned out to be absolutely perfect. The mounted USB charging port looks pretty professional if I do say so myself. Like the 360 Panel wiring, I used female quick disconnects to attach the positive and negative wires to the backside of the charging port. Now we have a bedside location where we can charge our phones while we sleep.

Most of the electronic devices we use recharge on USB ports. At home we use the little USB Dock Chargers that came with our iPhones and iPads, but each takes up a single AC outlet. Making matters worse, when we're camping off-the-grid, which is most of the time, we have only one 110 volt AC outlet (this runs off of our 300 watt Morningstar pure sine wave inverter). Using the USB Dock Chargers filled up this outlet, so during the trip we picked up an AC outlet adapter equipped with three AC outlets and two USB ports for $15. This was a big help for us on this business trip, but more USB charging ports were still needed.
Fortunately, I had recently ordered several DC outlets and USB charging ports from Blue Sea Systems. This shipment included what Blue Sea calls a "360 Panel," a modular, integrated unit that has a 12 volt outlet on one side and a dual USB charging port on the other. Yes, Blue Sea's stuff is spendy, but their products are extremely well made, have a lifetime warranty, and have higher than normal operating specs. For instance, most 12 volt outlets on the market are rated for 5 amps, but Blue Sea's marine quality outlets are rated for a whopping 15 amps (each USB port has a rated output of 2.1 amps). A great feature about this Blue Sea panel is that the components are removable and interchangeable. If you want another dual USB charging port all you have to do is remove the 12 volt outlet and install a USB port instead.
Installing the panel itself wasn't too difficult, though a little planning was required. The most difficult part was looking for a suitable location that could easily be reached and had access to 12 volt wiring. A low point in the dinette area was the obvious place to mount this panel, but no 12 volt wiring existed where we wanted to put it. Fortunately, the large dinette cubby already had a hole drilled in the floor to pass 110 volt AC romex, so I wouldn't need to drill another one. All I'd need to do was pass two new 12 volt wires through the existing hole and fish the wire in the void between the floor underneath and the fresh water tank. It sounds difficult, but it wasn't too bad with the help of a mirror, flashlight, and a clothes hanger fashioned into a large hook to grab hold of the two wires.
Before running the wires underneath the floor, I first had to prep them for connecting to the panel. Unlike most 12 volt outlets and ports, the Blue Sea panel has four electrical blade connections on the backside, two positive and two negative. Rather than run four sets of separate wires, I decided to run two heavy 12 AWG wires and splice two short wires into these main wires. I spliced the wires by stripping 1/2" of insulation, creating a small gap in the copper strands, inserting another wire into the gap, then twisting the wires together. To make the T-shaped splices permanent I soldered them then wrapped the soldered joint with insulation tape (I prefer shrink tube insulation for soldered connections, but I still haven't figured out a good way to do it for T-shaped soldered joints).
Installing the panel itself was pretty easy. The installation kit comes with a template that makes cutting the panel cutout easy. The panel wood is pretty thin and didn't take much effort to cut a good sized hole with the small hand saw I used. The black aluminum panel looks great with the plastic framing on the top and bottom which covers the mounting screws. The photos below show the front and backside of the mounted panel. Note that the 12 volt wiring behind the panel is now covered with black conduit to further protect the wires.
Fortunately, the 12 volt fuse panel was located nearby and had two open slots for expansion. Since I used 12 AWG wire for this project I protected the circuit with a 20 amp fuse. Like I said earlier, the maximum output ratings for the panel are 15 amps for the outlet and 2.1 amps for each USB port, so the 20 amp fuse gives me a little room to play with. As for the 12 volt negative wire, I simply tapped into the negative fuse block near the power converter.
After installing the 360 Panel, I turned my attention to the 12 volt outlet I installed a couple years ago in the dinette area. This outlet worked fine, but with the 360 Panel now installed nearby, I had no need for two DC outlets practically next to each other, so I swapped out the outlet for a Blue Sea dual USB port. If you think that this charging port looks familiar, you're right. It's identical to the one found in the 360 Panel.
Installing this dual USB outlet was easy with the wiring previously run, but there were a few small challenges. First, the paneling there was very thin with nothing really substantial to screw into. So I cut myself a piece of thin wood and drill the required size hole to pass the outlet through. With this piece of wood in place the screws and outlet had something to bite into. The outlet is now rock solid. Devising a solution for the last obstacle was simple, but was more difficult to execute. The connections for the outlet are a good 1/2" long and with the outlet mounted would extend past the bottom of the storage cabinet. The obvious solution was the bend these connections, but these are brittle and can be broken if you're not careful. Fortunately, I was able to do this without breaking them and I was able to make the two connections.
Lastly, a dual USB charging port was needed in the cabover area so we could charge our cell phones while we slept. The perfect location was the passenger side nightstand, but with no 12 volt wiring there I needed to tap into a 12 volt source nearby. After exploring several options, I decided to tap into the bedside reading light fixture on the driver side. This was the closest location, and fortunately, the best option because this location turned out to be where the 12 volt junction box for the entire cabover was located.
Running the 12 volt wiring from the junction box to the other side of the bed proved to be the biggest headache. Placing the wires behind the wall like the existing 110 volt AC wires was preferable, but there was no way do it with the camper assembled. The only real option I had was to run the wires along the bottom of the headboard beneath the mattress. This I did protecting the wires with small 1/2" conduit.
Mounting the new charging port was the easiest part of the project. I used a small hole saw attached to my Ryobi to cut the circular hole into the side of the nightstand for the mount. The hole size turned out to be absolutely perfect. The mounted USB charging port looks pretty professional if I do say so myself. Like the 360 Panel wiring, I used female quick disconnects to attach the positive and negative wires to the backside of the charging port. Now we have a bedside location where we can charge our phones while we sleep.
2016 Northstar Laredo SC/240w Solar/2-6v Lifeline AGMs/Dometic CR110 DC Compressor Fridge
2013 Ram 3500 4x4/6.7L Cummins TD/3.42/Buckstop Bumper with Warn 16.5ti Winch/Big Wig Rear Sway Bar/Talons w/SS Fastguns
My Rig
1998 Jeep Wrangler
US Navy Ret.
2013 Ram 3500 4x4/6.7L Cummins TD/3.42/Buckstop Bumper with Warn 16.5ti Winch/Big Wig Rear Sway Bar/Talons w/SS Fastguns
My Rig
1998 Jeep Wrangler
US Navy Ret.
Labels:
- Labels:
-
Truck Campers
38 REPLIES 38
Options
- Mark as New
- Bookmark
- Subscribe
- Mute
- Subscribe to RSS Feed
- Permalink
- Report Inappropriate Content
May-14-2014 08:22 AM
Nice writeup. While most RVs are of the same construction, I have found things to be a bit more tighter with our TCs. We typically have fewer places to install things, and running wires and such can be much more of a challenge.
There are several things I have used that are Blue Sea products, and the USB charging ports and electrical outlets is one. From what I have seen, you can buy low amp poorly made junk or high quality overpriced (my opinion) Blue Sea. You grit your teeth and go with the Blue Sea. My personal preference is the twin electrical outlets. They are more versatile. I use outlet to USB adaptors for the USB stuff.
Wayne
2004.5 Ram SLT LB 3500 DRW Quad Cab 4x4
1988 Bigfoot (C11.5) TC (1900# w/standard equip. per decal), 130 watts solar, 100 AH AGM, Polar Cub A/C, EU2000i Honda
Toad: 91 Zuke
Options
- Mark as New
- Bookmark
- Subscribe
- Mute
- Subscribe to RSS Feed
- Permalink
- Report Inappropriate Content
May-14-2014 08:10 AM
What happens when you are boon docking and the battery voltage drops to 12.3 or 12.4 volts? In my experience my iPad quits charging unless I run it thru an inverter.
'09 Pacific Coachworks Tango 276RBS
95 Lance 880 Truck Camper
'91 F350 Dually 2WD CC 7.5L (76K Original miles!)
AirLift Bags, Reese Titan hitch, Rancho 9000X
95 Lance 880 Truck Camper
'91 F350 Dually 2WD CC 7.5L (76K Original miles!)
AirLift Bags, Reese Titan hitch, Rancho 9000X
Options
- Mark as New
- Bookmark
- Subscribe
- Mute
- Subscribe to RSS Feed
- Permalink
- Report Inappropriate Content
May-14-2014 08:09 AM
Great job Mike!!
Options
- Mark as New
- Bookmark
- Subscribe
- Mute
- Subscribe to RSS Feed
- Permalink
- Report Inappropriate Content
May-14-2014 08:08 AM
Where'd ya get those?
'15 F450, 30k Superhitch, 48" Supertruss, 19.5's, Torklift Fast Guns
'12 Eagle Cap 1160, 800watts solar, Tristar MPPT, Magnum Hybrid 3k Inverter
'15 Wells Cargo 24' Race Trailer, 600 watts Solar, TriStar MPPT, Xantrex 2kw inverter
'17 Can Am X3 XDS Turbo
'12 Eagle Cap 1160, 800watts solar, Tristar MPPT, Magnum Hybrid 3k Inverter
'15 Wells Cargo 24' Race Trailer, 600 watts Solar, TriStar MPPT, Xantrex 2kw inverter
'17 Can Am X3 XDS Turbo
Options
- Mark as New
- Bookmark
- Subscribe
- Mute
- Subscribe to RSS Feed
- Permalink
- Report Inappropriate Content
May-14-2014 08:07 AM
I need some of those.
There must be a cleaner way to make a wire connection to both of them though. That wire junction looks sketchy.
There must be a cleaner way to make a wire connection to both of them though. That wire junction looks sketchy.
Bob
Options
- Mark as New
- Bookmark
- Subscribe
- Mute
- Subscribe to RSS Feed
- Permalink
- Report Inappropriate Content
May-14-2014 08:04 AM
Hi Mike,
The only thing I might have done differently was use #10 wire because of voltage drop from the DC current. Nice job!
The only thing I might have done differently was use #10 wire because of voltage drop from the DC current. Nice job!
Regards, Don
My ride is a 28 foot Class C, 256 watts solar, 556 amp-hours of Telcom jars, 3000 watt Magnum hybrid inverter, Sola Basic Autoformer, Microair Easy Start.
My ride is a 28 foot Class C, 256 watts solar, 556 amp-hours of Telcom jars, 3000 watt Magnum hybrid inverter, Sola Basic Autoformer, Microair Easy Start.
Options
- Mark as New
- Bookmark
- Subscribe
- Mute
- Subscribe to RSS Feed
- Permalink
- Report Inappropriate Content
May-14-2014 07:59 AM
Nice looking work, well thought out and done. Tough to beat Blue Sea products, yes they're expensive but well worth it IMHO. I use them in my boats and my camper as well. You get what you pay for when it comes to electrical.
2000 F350 Lariat LE V10 CC LB 4WD DRW
2005 Eagle Cap 850 Camper
1993 Robalo 2440 twin '07 Merc Optimax 150's
1978 Glasply 28' with twin 310hp V8's
2005 Eagle Cap 850 Camper
1993 Robalo 2440 twin '07 Merc Optimax 150's
1978 Glasply 28' with twin 310hp V8's
Options
- Mark as New
- Bookmark
- Subscribe
- Mute
- Subscribe to RSS Feed
- Permalink
- Report Inappropriate Content
May-14-2014 07:51 AM
Seriously, can you come an wire my rig? I will pay you for your trip...LOL
As always a plethora of welcomed information. Thanks!
As always a plethora of welcomed information. Thanks!
Options
- Mark as New
- Bookmark
- Subscribe
- Mute
- Subscribe to RSS Feed
- Permalink
- Report Inappropriate Content
May-14-2014 07:40 AM
Nice job Mike!
Bill
Bill


