Turn on suggestions
Auto-suggest helps you quickly narrow down your search results by suggesting possible matches as you type.
Showing results for
- Good Sam Community
- Groups
- Travel Trailer Group
- Forum
- Re: Cool Mods - Thread restored 10/18/2012
Options
- Subscribe to RSS Feed
- Mark Topic as New
- Mark Topic as Read
- Float this Topic for Current User
- Bookmark
- Subscribe
- Mute
- Printer Friendly Page
Cool Mods - Thread restored 10/18/2012
Options
- Mark as New
- Bookmark
- Subscribe
- Mute
- Subscribe to RSS Feed
- Permalink
- Report Inappropriate Content
Jun-03-2007 01:48 PM
My daughter was getting a little warm in her bunk during our last camping trip, so I decided to put her a fan in to keep the air flowing.
I had been wanting to add a 12-volt fan to the main living area anyway, so I decided to tackle both jobs today. A trip to Wal-Mart for two fans($8.48 each) and we're halfway there.
She picked the spot, and I got to work -
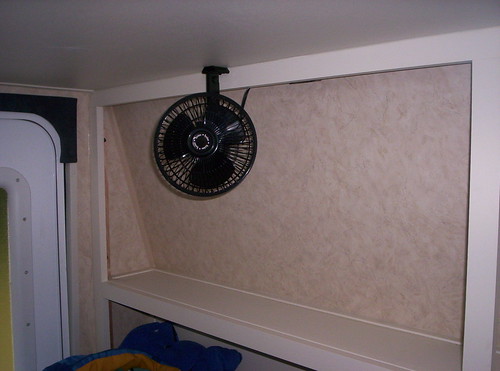
I picked up the power from her overhead light. All I have left is to install a short piece of wire cover and I'm done -
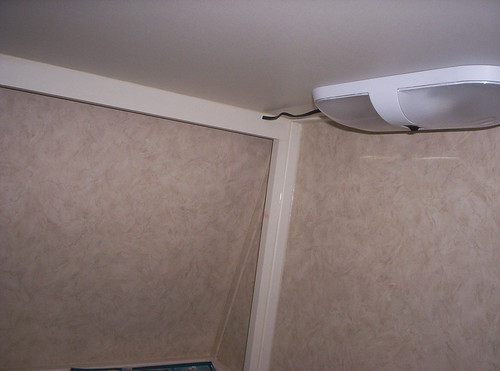
I added one in the main area -
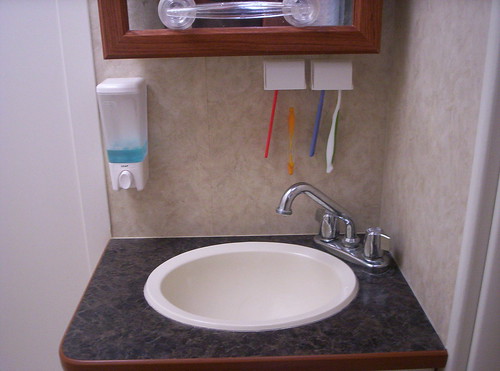
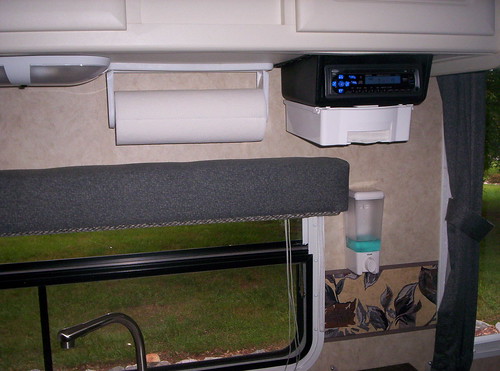
I dropped by Lowe's and found this cool soap dispenser. I also just installed these Pop-a-Toothbrush holders -
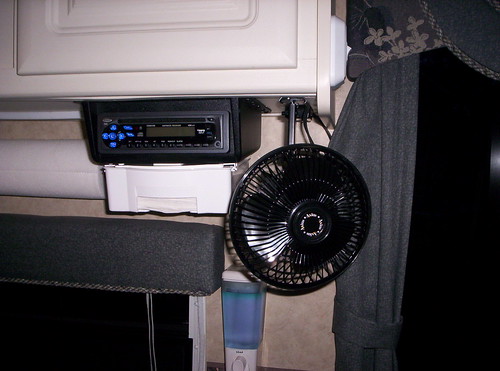
I added a sopa dispenser to the kitchen area as well. I also installed a Pop-a-Napkin under the radio -
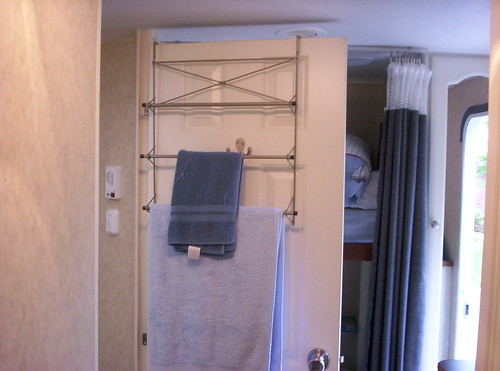
Here's an easy mod. I found this over the door towel rack at Walmart and it works great -
I had been wanting to add a 12-volt fan to the main living area anyway, so I decided to tackle both jobs today. A trip to Wal-Mart for two fans($8.48 each) and we're halfway there.
She picked the spot, and I got to work -
I picked up the power from her overhead light. All I have left is to install a short piece of wire cover and I'm done -
I added one in the main area -
I dropped by Lowe's and found this cool soap dispenser. I also just installed these Pop-a-Toothbrush holders -
I added a sopa dispenser to the kitchen area as well. I also installed a Pop-a-Napkin under the radio -
Here's an easy mod. I found this over the door towel rack at Walmart and it works great -
Chris
2005 Rockwood 2516G (sold)
2005 Max-Lite 24RS (sold)
2019 Rockwood 2608BS (sold)
2020 Grand Design 337RLS
2018 Chevy 2500HD
2005 Rockwood 2516G (sold)
2005 Max-Lite 24RS (sold)
2019 Rockwood 2608BS (sold)
2020 Grand Design 337RLS
2018 Chevy 2500HD
2,727 REPLIES 2,727
Options
- Mark as New
- Bookmark
- Subscribe
- Mute
- Subscribe to RSS Feed
- Permalink
- Report Inappropriate Content
Jan-26-2009 06:24 PM
Mike, you don't have screening on your 'fridge vents! Shame on you.
COPD and LVRS
On the Road Again
My Home - 2002 Glendale Titanium, 32/37DS with a basement slide.
Our Home's Leader - Dodge Ram 3500 Cummins Turbo Diesel Dually
Our Leaders - Sam(Bird), Chirp(Bird), Nellie(FAT cat), Lucy(Kitten), Willie(Dog) & Daisy(Dog)
On the Road Again
My Home - 2002 Glendale Titanium, 32/37DS with a basement slide.
Our Home's Leader - Dodge Ram 3500 Cummins Turbo Diesel Dually
Our Leaders - Sam(Bird), Chirp(Bird), Nellie(FAT cat), Lucy(Kitten), Willie(Dog) & Daisy(Dog)
Options
- Mark as New
- Bookmark
- Subscribe
- Mute
- Subscribe to RSS Feed
- Permalink
- Report Inappropriate Content
Jan-26-2009 06:15 PM
Just did another mod. I wanted to have power under the awning to run lights or a 12v lantern while dry camping. I have an outlet I installed on the battery box but that's a long way away.
I did some thinking and decided that I could put an outlet on the refrigerator access panel/vent (versus drilling a hole through the side of the trailer) and grab power from the fridge 12v supply.


It works great. I can still get in there to work and the outlet is fuse protected.
Mike
I did some thinking and decided that I could put an outlet on the refrigerator access panel/vent (versus drilling a hole through the side of the trailer) and grab power from the fridge 12v supply.
It works great. I can still get in there to work and the outlet is fuse protected.
Mike
2006 Damon Daybreak 3276 37' bunkhouse
Options
- Mark as New
- Bookmark
- Subscribe
- Mute
- Subscribe to RSS Feed
- Permalink
- Report Inappropriate Content
Jan-26-2009 05:57 AM
85AllegroSam wrote:MissouriCouple wrote:
85AllegroSam.....what did u use to round off the corners on your Lexan project? and do u have an estimation as to the total cost for your door project?
OOP's --- did not notice this post when it hit so I am a little late. There are all sorts of ways to get the corners to the right radius, --- the right ways --- and my way. I hunted up a dish cover that was the same curvature as my windows. I looked a little stupid rummmaging through our store of dishes, jar tops etc but eventually found the two curvatures I needed. When I told DW what I was doing she started helping me find something so she could make sure I did not saw her good dishes. My reassurances that I was not going to saw her dish weren't worth much. A couple of smooches and she was ready to sacrifice a dish. I then traced the corner with a felt tipped Sharpie pen and cut with the Sabre saw. The dish is living happily everafter:)
I have not done my door yet but that is next. I would have ordered enough plastic to do it all if I had been confident in working with the material. After experience the ease of this project using Lexan, the door will be a piece of cake. I am going to do mine in 3 pieces so as to be able to take down sections.
OOP's again --- Forgot to include the answer to the other part of your question. It was around $200 to cover all my windows including the door windows. I got my plastic pieces all precut from Here - same place a privious poster mentioned. Measure carefully and save yourself a lot of work.
2008 Dutchmen Kodiak 27CDSL,-94Dodg4x4Cummins- Mods:Auto switchover Honda EU3000IS gen cabeled to gen in truck.-Propride 3P hitch:)-Cold weather mods:Valves/tanks heated-insulated, storm windows, plumbing drains to low point. Barker 24" tongue jack
Options
- Mark as New
- Bookmark
- Subscribe
- Mute
- Subscribe to RSS Feed
- Permalink
- Report Inappropriate Content
Jan-26-2009 05:48 AM
MissouriCouple wrote:
85AllegroSam.....what did u use to round off the corners on your Lexan project? and do u have an estimation as to the total cost for your door project?
OOP's --- did not notice this post when it hit so I am a little late. There are all sorts of ways to get the corners to the right radius, --- the right ways --- and my way. I hunted up a dish cover that was the same curvature as my windows. I looked a little stupid rummmaging through our store of dishes, jar tops etc but eventually found the two curvatures I needed. When I told DW what I was doing she started helping me find something so she could make sure I did not saw her good dishes. My reassurances that I was not going to saw her dish weren't worth much. A couple of smooches and she was ready to sacrifice a dish. I then traced the corner with a felt tipped Sharpie pen and cut with the Sabre saw. The dish is living happily everafter:)
I have not done my door yet but that is next. I would have ordered enough plastic to do it all if I had been confident in working with the material. After experience the ease of this project using Lexan, the door will be a piece of cake. I am going to do mine in 3 pieces so as to be able to take down sections.
2008 Dutchmen Kodiak 27CDSL,-94Dodg4x4Cummins- Mods:Auto switchover Honda EU3000IS gen cabeled to gen in truck.-Propride 3P hitch:)-Cold weather mods:Valves/tanks heated-insulated, storm windows, plumbing drains to low point. Barker 24" tongue jack
Options
- Mark as New
- Bookmark
- Subscribe
- Mute
- Subscribe to RSS Feed
- Permalink
- Report Inappropriate Content
Jan-25-2009 10:10 PM
Wow, I got some of the BEST ideas off here! Hopefully I'll be posting my own mods soon.......
Tamri
5 kids
2 dogs
2013 Dutchmen Denali 311BHS
2004 Suburban 2500 8.1L
ProPride hitch
5 kids
2 dogs
2013 Dutchmen Denali 311BHS
2004 Suburban 2500 8.1L
ProPride hitch
Options
- Mark as New
- Bookmark
- Subscribe
- Mute
- Subscribe to RSS Feed
- Permalink
- Report Inappropriate Content
Jan-25-2009 07:38 PM
Mike Schriber wrote:
I finally got around to installing my backup camera this weekend. I've been putting it off for months. I was going to run the wire through the ceiling but even with a fishtape it was too much trouble. I ended up going out the bottom of a cabinet (behind a set of drawers) and then under the trailer and along the frame.
I had to put the camera above my clearance lights (since that was where the open space was above the ceiling) so I ended up making two Lucite spacers to make room for the camera to point down and to eliminate glare from the center clearance light.
After drilling the holes (gasp) and getting the bolts, it was just a matter of attaching the camera (along with a generous helping of silicone).
It works great and I can't wait to use it on our next trip.
Mike
VERY nice, good clean install. Well done.
2017 F150 Lariat 3.5EB
2016 Acura MDX SWD
2013 Yamaha Golf Cart
10 year old Quarter Horse, "Shadow"
2019 Jayco White Hawk 28BH
2016 Acura MDX SWD
2013 Yamaha Golf Cart
10 year old Quarter Horse, "Shadow"
2019 Jayco White Hawk 28BH
Options
- Mark as New
- Bookmark
- Subscribe
- Mute
- Subscribe to RSS Feed
- Permalink
- Report Inappropriate Content
Jan-25-2009 07:31 PM
That is a great mod!
Sir Buffalo!
2006 Zinger by Crossroads 27BHS
2010 Toyota Tundra Crew Max 5.7
2006 Zinger by Crossroads 27BHS
2010 Toyota Tundra Crew Max 5.7
Options
- Mark as New
- Bookmark
- Subscribe
- Mute
- Subscribe to RSS Feed
- Permalink
- Report Inappropriate Content
Jan-25-2009 07:05 PM
I finally got around to installing my backup camera this weekend. I've been putting it off for months. I was going to run the wire through the ceiling but even with a fishtape it was too much trouble. I ended up going out the bottom of a cabinet (behind a set of drawers) and then under the trailer and along the frame.
I had to put the camera above my clearance lights (since that was where the open space was above the ceiling) so I ended up making two Lucite spacers to make room for the camera to point down and to eliminate glare from the center clearance light.
After drilling the holes (gasp) and getting the bolts, it was just a matter of attaching the camera (along with a generous helping of silicone).


It works great and I can't wait to use it on our next trip.
Mike
I had to put the camera above my clearance lights (since that was where the open space was above the ceiling) so I ended up making two Lucite spacers to make room for the camera to point down and to eliminate glare from the center clearance light.
After drilling the holes (gasp) and getting the bolts, it was just a matter of attaching the camera (along with a generous helping of silicone).
It works great and I can't wait to use it on our next trip.
Mike
2006 Damon Daybreak 3276 37' bunkhouse
Options
- Mark as New
- Bookmark
- Subscribe
- Mute
- Subscribe to RSS Feed
- Permalink
- Report Inappropriate Content
Jan-24-2009 04:03 PM
Well I guess I should put THIS LINK here for those who have not seen it. Its pictures of mods I have done to my rv.
The link is the same as the one in my signature.
Enjoy.
Jeff
The link is the same as the one in my signature.
Enjoy.
Jeff
97 Sandpiper, 14' slide
MY MARTIN TRUEX FORUM
MY MARTIN TRUEX FORUM
Options
- Mark as New
- Bookmark
- Subscribe
- Mute
- Subscribe to RSS Feed
- Permalink
- Report Inappropriate Content
Jan-20-2009 06:50 AM
When I did my project it cost me $6.50 a square foot, cut to size,tax and delivered ready to install. The link from Camping World is only for the slide opening section (Less that 2 square feet or less than $13 for my slide pieces). A 2'x6' door or 12 square feet times $6.50 = $ 78.00. I did all the installation myself so I did not add in an hourly rate which would probably tripple the cost.:B The hardest pannel to install was the bottom one at around 45 minutes. I did not remove the door from the camper to do it. Just pulled the center cross frame pieces one section at a time to keep the door from warping.
Bonefish
Bonefish
Options
- Mark as New
- Bookmark
- Subscribe
- Mute
- Subscribe to RSS Feed
- Permalink
- Report Inappropriate Content
Jan-15-2009 04:20 PM
You can cut polycarbonate (Lexan or any other brand) with a jig saw.
Options
- Mark as New
- Bookmark
- Subscribe
- Mute
- Subscribe to RSS Feed
- Permalink
- Report Inappropriate Content
Jan-15-2009 02:56 PM
85AllegroSam wrote:
Just make sure your plexiglass is Lexan brand and you will have some tough stuff. There are other brands of Plexiglass that work too, just be sure it is polycarbonate as was said earlier. Some manufacturers of plexiglass do their best to confuse us. Polycarbonate whatever the brand seems to do the job as far as I know. I paid a little more to get Lexan brand just to avoid getting sucked in. .....
FYI-Plexiglas is a brand of acrylic sheeting. Lexan is a brand of polycarbonate sheeting.
Like you I would always choose polycarbonate over acrylic as it is tougher, doesn't chip out like acrylic and resists yellowing better/ longer.
Steve Webber
2013 RAM 3500 Dually, 6.7 Cummins and all the bells and whistles
2009 Jayco Eagle 324BHDS "CramalotInn III",Reese DCHP, Atwood 3500, BAL Deluxe Chocks, Weber Baby Q & Q200, Champion 2000W Inverter & 4000W gennie's
My Camping Pic's
2013 RAM 3500 Dually, 6.7 Cummins and all the bells and whistles
2009 Jayco Eagle 324BHDS "CramalotInn III",Reese DCHP, Atwood 3500, BAL Deluxe Chocks, Weber Baby Q & Q200, Champion 2000W Inverter & 4000W gennie's
My Camping Pic's
Options
- Mark as New
- Bookmark
- Subscribe
- Mute
- Subscribe to RSS Feed
- Permalink
- Report Inappropriate Content
Jan-15-2009 12:07 PM
85AllegroSam.....what did u use to round off the corners on your Lexan project? and do u have an estimation as to the total cost for your door project?
Options
- Mark as New
- Bookmark
- Subscribe
- Mute
- Subscribe to RSS Feed
- Permalink
- Report Inappropriate Content
Jan-15-2009 11:17 AM
Let's try it this way:
Where I got my plastic sheeting
Okay, that worked.
Where I got my plastic sheeting
Okay, that worked.
COPD and LVRS
On the Road Again
My Home - 2002 Glendale Titanium, 32/37DS with a basement slide.
Our Home's Leader - Dodge Ram 3500 Cummins Turbo Diesel Dually
Our Leaders - Sam(Bird), Chirp(Bird), Nellie(FAT cat), Lucy(Kitten), Willie(Dog) & Daisy(Dog)
On the Road Again
My Home - 2002 Glendale Titanium, 32/37DS with a basement slide.
Our Home's Leader - Dodge Ram 3500 Cummins Turbo Diesel Dually
Our Leaders - Sam(Bird), Chirp(Bird), Nellie(FAT cat), Lucy(Kitten), Willie(Dog) & Daisy(Dog)
Options
- Mark as New
- Bookmark
- Subscribe
- Mute
- Subscribe to RSS Feed
- Permalink
- Report Inappropriate Content
Jan-15-2009 07:35 AM
I got my Lexan from this site. http://www.eplastics.com/Plastic/Lexan_Clear_Polycarbonate_Sheet I laid out my sizes on paper to scale to get maximum yield so I could figure out what size sheet to buy and sent them the sizes and cut instructions. The cut the pieces perfectly and shipped them really fast. All I had to do was round the corners. Slickest project I have done in quite a while. I am not sure why the above Web address did not turn into a link. Can anyone help me on that?
2008 Dutchmen Kodiak 27CDSL,-94Dodg4x4Cummins- Mods:Auto switchover Honda EU3000IS gen cabeled to gen in truck.-Propride 3P hitch:)-Cold weather mods:Valves/tanks heated-insulated, storm windows, plumbing drains to low point. Barker 24" tongue jack


