Turn on suggestions
Auto-suggest helps you quickly narrow down your search results by suggesting possible matches as you type.
Showing results for
- Good Sam Community
- Groups
- Travel Trailer Group
- Forum
- Cool Mods - Thread restored 10/18/2012
Options
- Subscribe to RSS Feed
- Mark Topic as New
- Mark Topic as Read
- Float this Topic for Current User
- Bookmark
- Subscribe
- Mute
- Printer Friendly Page
Cool Mods - Thread restored 10/18/2012
Options
- Mark as New
- Bookmark
- Subscribe
- Mute
- Subscribe to RSS Feed
- Permalink
- Report Inappropriate Content
Jun-03-2007 01:48 PM
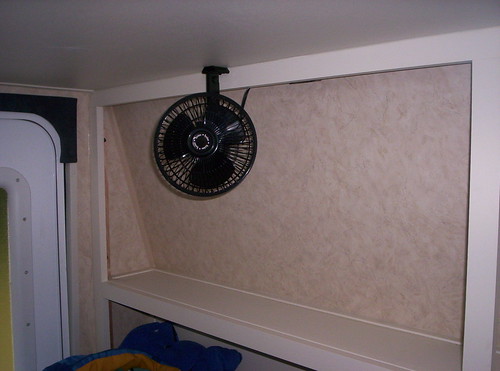
My daughter was getting a little warm in her bunk during our last camping trip, so I decided to put her a fan in to keep the air flowing.
I had been wanting to add a 12-volt fan to the main living area anyway, so I decided to tackle both jobs today. A trip to Wal-Mart for two fans($8.48 each) and we're halfway there.
She picked the spot, and I got to work -
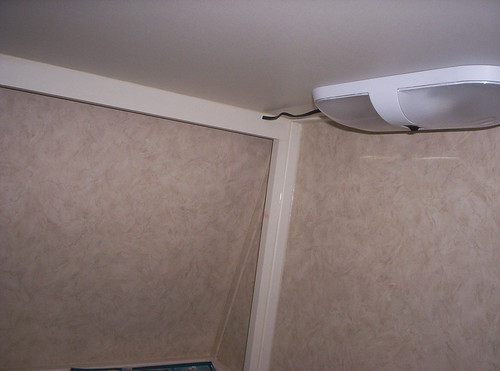
I picked up the power from her overhead light. All I have left is to install a short piece of wire cover and I'm done -
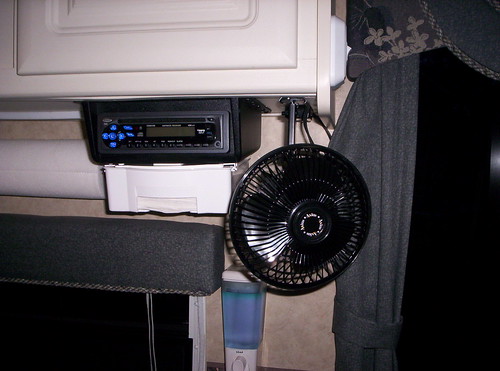
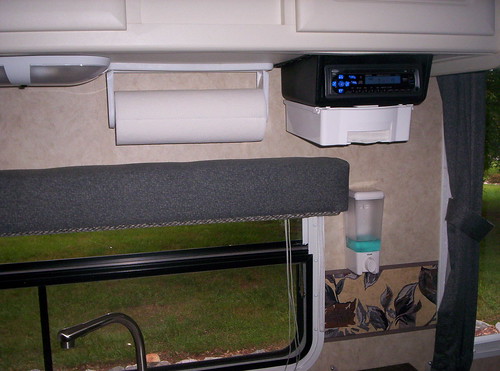
I added one in the main area -
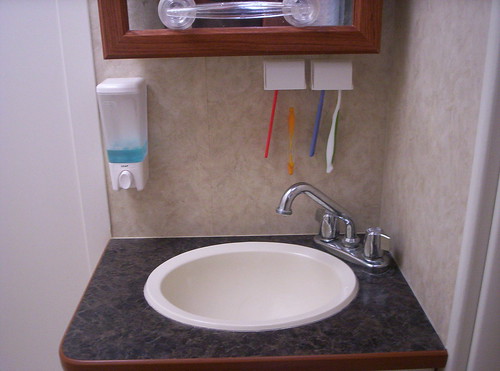
I dropped by Lowe's and found this cool soap dispenser. I also just installed these Pop-a-Toothbrush holders -
I added a sopa dispenser to the kitchen area as well. I also installed a Pop-a-Napkin under the radio -
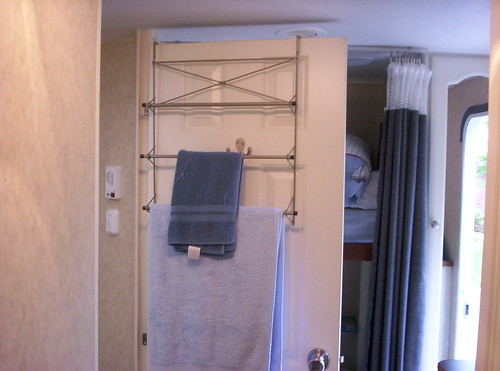
Here's an easy mod. I found this over the door towel rack at Walmart and it works great -
I had been wanting to add a 12-volt fan to the main living area anyway, so I decided to tackle both jobs today. A trip to Wal-Mart for two fans($8.48 each) and we're halfway there.
She picked the spot, and I got to work -
I picked up the power from her overhead light. All I have left is to install a short piece of wire cover and I'm done -
I added one in the main area -
I dropped by Lowe's and found this cool soap dispenser. I also just installed these Pop-a-Toothbrush holders -
I added a sopa dispenser to the kitchen area as well. I also installed a Pop-a-Napkin under the radio -
Here's an easy mod. I found this over the door towel rack at Walmart and it works great -
Chris
2005 Rockwood 2516G (sold)
2005 Max-Lite 24RS (sold)
2019 Rockwood 2608BS (sold)
2020 Grand Design 337RLS
2018 Chevy 2500HD
2005 Rockwood 2516G (sold)
2005 Max-Lite 24RS (sold)
2019 Rockwood 2608BS (sold)
2020 Grand Design 337RLS
2018 Chevy 2500HD
2,727 REPLIES 2,727
Options
- Mark as New
- Bookmark
- Subscribe
- Mute
- Subscribe to RSS Feed
- Permalink
- Report Inappropriate Content
Sep-24-2011 12:39 PM
And they are on the trailer and the TPMS works great!!

2017 Ram Big Horn, DRW Long Box, 4x4, Cummins, Aisin, 3.73
2022 Jayco Pinnacle 32RLTS, Onan 5500, Disc Brakes, 17.5" tires
B&W Ram Companion
2022 Jayco Pinnacle 32RLTS, Onan 5500, Disc Brakes, 17.5" tires
B&W Ram Companion
Options
- Mark as New
- Bookmark
- Subscribe
- Mute
- Subscribe to RSS Feed
- Permalink
- Report Inappropriate Content
Sep-23-2011 05:17 PM
An RV-Compatible Windspeed Meter
For years I have been wanting to put together something portable to measure windspeed while we’re out camping. I can report here on a successful project.
Parts list:
Pole-mount anemometer
12V 2-pin waterproof connector
1-inch stainless hose clamps
Package of “broom clips”
Aircraft hardware: 2 #10 roundhead screws and self-lock nuts
3/4-inch PVC (at least 10 feet, cut into manageable pieces)
3/4-inch PVC unions (as many as you need)
Folger’s coffee container
The most expensive part of the measurement system is the anemometer, and I found one on Amazon. Do a search for “Pole Mount Anemometer, by Windspeed Vortex,” and you’ll be directed to one of the least expensive (about $75) reliable anemometers on the web. Part of their secret for keeping the cost down is to use a bicycle speedometer. The display isn’t huge but watch-sized is enough to do the job, and for us in RVs, it saves space on the wall. It also records peak and average speeds – a bonus. I’ll throw in a photo here…

The anemometer comes with bare-wire to bare-wire connections. I used plain-Jane two-pin 12V automotive connectors for it because they’re positive, waterproof, CHEAP, and good for about a thousand connect-disconnect cycles. Here’s a photo of the connector type.

The mounting pole was the biggest challenge. You can't use EMT because it will rust eventually, and if you're carrying it inside the RV, then... yuck. Next best thing is 3/4-inch Schedule 80 PVC. I bought a standard 10-foot length at the hardware store and had them cut it into 3-foot, 4-inch (equal) pieces. I got a couple of unions so that I wouldn’t have to glue anything and I could knock it down into reasonable-length pieces. Get the longest length unions you can, so that there’s more structural integrity. Here's a photo of what I'm talking about.
Once we have the mast taken care of, a knockdown mount for the anemometer is simple. A couple of stainless 1-inch worm-drive hose clamps do the trick. Feed the cable down through the PVC and tighten down the clamps. Running the cable through the inside of the pipe instead of the outside keeps it from slapping and banging in the wind. Here’s a look at how the head goes together.

So the next thing is how to clip it to the trailer’s ladder. I got some “broom clips” during that same trip to the hardware store and a bit of ‘aircraft hardware’ (self-locking) to hold the clips back-to-back so that I can snap the clip over the ladder and then push the pole into the clip. Here’s a photo.

Here's a look at the finished and working result.

Because of the amount of flex in the PVC pipe, it works best if the top clip is as high up on the ladder as possible. I moved the clip after I shot this photo.
I bet you’re waiting for me to get around to the Folger’s container. It was the only thing around that had about the right amount of volume and was about the right size to keep the sending head from getting damaged. I cut a slit in the lid to allow the mounting post to stick out, but keep everything inside and organized. Here’s a shot of how it looks (click to enlarge), all packed up and ready for the lid to go on. Sorry about the fuzzy shot; sun was going down…

One note on the cable. Coil the cable up in under-over fashion, not around-and-around. The conductors are about 36 gauge and could be broken by this kind of improper handling. The cable does a good job of protecting the conductors, but if you coil it up around-and-around style, like over your hand for instance, you force the conductors to flex and twist excessively - and eventually they will break from the twisting. Remembering to coil the cable under-over is an acceptable compromise for a low-cost anemometer.
Hope you enjoyed this; I’m enjoying using my windspeed meter!
More details (and better photos), GO Here - CLICKY
For years I have been wanting to put together something portable to measure windspeed while we’re out camping. I can report here on a successful project.
Parts list:
Pole-mount anemometer
12V 2-pin waterproof connector
1-inch stainless hose clamps
Package of “broom clips”
Aircraft hardware: 2 #10 roundhead screws and self-lock nuts
3/4-inch PVC (at least 10 feet, cut into manageable pieces)
3/4-inch PVC unions (as many as you need)
Folger’s coffee container
The most expensive part of the measurement system is the anemometer, and I found one on Amazon. Do a search for “Pole Mount Anemometer, by Windspeed Vortex,” and you’ll be directed to one of the least expensive (about $75) reliable anemometers on the web. Part of their secret for keeping the cost down is to use a bicycle speedometer. The display isn’t huge but watch-sized is enough to do the job, and for us in RVs, it saves space on the wall. It also records peak and average speeds – a bonus. I’ll throw in a photo here…
The anemometer comes with bare-wire to bare-wire connections. I used plain-Jane two-pin 12V automotive connectors for it because they’re positive, waterproof, CHEAP, and good for about a thousand connect-disconnect cycles. Here’s a photo of the connector type.
The mounting pole was the biggest challenge. You can't use EMT because it will rust eventually, and if you're carrying it inside the RV, then... yuck. Next best thing is 3/4-inch Schedule 80 PVC. I bought a standard 10-foot length at the hardware store and had them cut it into 3-foot, 4-inch (equal) pieces. I got a couple of unions so that I wouldn’t have to glue anything and I could knock it down into reasonable-length pieces. Get the longest length unions you can, so that there’s more structural integrity. Here's a photo of what I'm talking about.
Once we have the mast taken care of, a knockdown mount for the anemometer is simple. A couple of stainless 1-inch worm-drive hose clamps do the trick. Feed the cable down through the PVC and tighten down the clamps. Running the cable through the inside of the pipe instead of the outside keeps it from slapping and banging in the wind. Here’s a look at how the head goes together.
So the next thing is how to clip it to the trailer’s ladder. I got some “broom clips” during that same trip to the hardware store and a bit of ‘aircraft hardware’ (self-locking) to hold the clips back-to-back so that I can snap the clip over the ladder and then push the pole into the clip. Here’s a photo.
Here's a look at the finished and working result.
Because of the amount of flex in the PVC pipe, it works best if the top clip is as high up on the ladder as possible. I moved the clip after I shot this photo.
I bet you’re waiting for me to get around to the Folger’s container. It was the only thing around that had about the right amount of volume and was about the right size to keep the sending head from getting damaged. I cut a slit in the lid to allow the mounting post to stick out, but keep everything inside and organized. Here’s a shot of how it looks (click to enlarge), all packed up and ready for the lid to go on. Sorry about the fuzzy shot; sun was going down…
One note on the cable. Coil the cable up in under-over fashion, not around-and-around. The conductors are about 36 gauge and could be broken by this kind of improper handling. The cable does a good job of protecting the conductors, but if you coil it up around-and-around style, like over your hand for instance, you force the conductors to flex and twist excessively - and eventually they will break from the twisting. Remembering to coil the cable under-over is an acceptable compromise for a low-cost anemometer.
Hope you enjoyed this; I’m enjoying using my windspeed meter!
More details (and better photos), GO Here - CLICKY
Options
- Mark as New
- Bookmark
- Subscribe
- Mute
- Subscribe to RSS Feed
- Permalink
- Report Inappropriate Content
Sep-19-2011 07:23 PM
THedges wrote:
I have been hauling a Honda 2000 in a box on my bumper for years without issue. The one thing you will want to do is to take measures to prevent twisting of the bumper, there is a lot of torque when you put weight behind the bumper. I took the bounce out of my setup by installing a large turnbuckle between the back of my box and the back of the trailer, now there is no movement at all.
Lucky you!
Couple years back I was inspired to add a little more carrying capacity to my TT. So I added a frame mounted hitch to tote my gen and a couple bikes. Paid lots of attention so as to avoid bounce. Somewhere on I-10 east of Pensacola, FL something happened, a horn tooted, fingers pointed, and I found I was dragging stuff semi connected to my rig. The gen (a Champion) was battered and brused but still put out. My bikes were another matter. Running repairs "fixed" the failed weld. $1200 fixed(replaced)the bikes with almost as good equipment.
Fast forward a couple months, while coming up the Natchez Trace my bike carrier failed. Lucky me! I only scuffed a couple wheels although the DW was livid because she expected a different riding experience. I complained to the carrier manufacturer who directed my attention to the bold print disclaiming hitch liability when mounted on the TT rear. There's a lot of bad vibes and bounce back there, and like shooting craps ya win some and you lose some. It's your call.
Traveling companion
Options
- Mark as New
- Bookmark
- Subscribe
- Mute
- Subscribe to RSS Feed
- Permalink
- Report Inappropriate Content
Sep-19-2011 05:22 PM
I have been hauling a Honda 2000 in a box on my bumper for years without issue. The one thing you will want to do is to take measures to prevent twisting of the bumper, there is a lot of torque when you put weight behind the bumper. I took the bounce out of my setup by installing a large turnbuckle between the back of my box and the back of the trailer, now there is no movement at all.
AZ T&T
2012 Jayco Eagle Super Lite 29.5RKS
2011 Chevy 2500 HD 4x4 Duramax
B&W Companion Hitch - Firestone Ride-Rite Air Bags
Honda EU2000i Generator
2012 Jayco Eagle Super Lite 29.5RKS
2011 Chevy 2500 HD 4x4 Duramax
B&W Companion Hitch - Firestone Ride-Rite Air Bags
Honda EU2000i Generator
Options
- Mark as New
- Bookmark
- Subscribe
- Mute
- Subscribe to RSS Feed
- Permalink
- Report Inappropriate Content
Sep-19-2011 05:13 PM
Flashman,
If you aren't going to be towing anything, there are platforms that fit into the hitch such as this one (holds up to 500lbs).
Update: Whoops, I forgot this was the trailer forum--I was thinking Class C.
If you aren't going to be towing anything, there are platforms that fit into the hitch such as this one (holds up to 500lbs).
Update: Whoops, I forgot this was the trailer forum--I was thinking Class C.
Options
- Mark as New
- Bookmark
- Subscribe
- Mute
- Subscribe to RSS Feed
- Permalink
- Report Inappropriate Content
Sep-19-2011 04:55 PM
dupreet wrote:Wife'nHubby wrote:
Could you post your source for these lights?
Looks neat, tidy & classy.
I got mine from this guy on eBay. The ones in the link are short sections...they, or other sellers in China, sell 25' rolls. Make sure you get the waterproof ones. There are some cheaper, but they are not encased I plastic.
Todd
Link
Love this forum - WILL not be adding that genny box - also checked the manual and it stated only 100lbs - and don't add anything or void warrenty.
Options
- Mark as New
- Bookmark
- Subscribe
- Mute
- Subscribe to RSS Feed
- Permalink
- Report Inappropriate Content
Sep-19-2011 04:23 PM
Flashman wrote:
Want to add a plywood/metal box to my rear bummper on my Jayflight 22FB to hold 2 Honda 2000s. Sales man said bumper was good for 200 lbs - does any think I will have a problem?
The Hondas are ~ 40 lbs each and the box will be less than 20 lbs. Will use 4 inch u bolts.
Overloaded rear TT bumper fails...
Also, PM Fisherguy, he also had a bumper tear like paper and would never suggest adding weight to it. I am sure you will get responses that you will be okay, but...you make the call.
"Sales man said bumper was good for 200 lbs " Tell you what, build a platform and ask your salesman to sit on it as you travel down the road and see his response.
I love me some land yachting
Options
- Mark as New
- Bookmark
- Subscribe
- Mute
- Subscribe to RSS Feed
- Permalink
- Report Inappropriate Content
Sep-19-2011 04:14 PM
Want to add a plywood/metal box to my rear bummper on my Jayflight 22FB to hold 2 Honda 2000s. Sales man said bumper was good for 200 lbs - does any think I will have a problem?
The Hondas are ~ 40 lbs each and the box will be less than 20 lbs. Will use 4 inch u bolts.
The Hondas are ~ 40 lbs each and the box will be less than 20 lbs. Will use 4 inch u bolts.
Options
- Mark as New
- Bookmark
- Subscribe
- Mute
- Subscribe to RSS Feed
- Permalink
- Report Inappropriate Content
Sep-14-2011 12:51 PM
Wife'nHubby wrote:
Could you post your source for these lights?
Looks neat, tidy & classy.
I got mine from this guy on eBay. The ones in the link are short sections...they, or other sellers in China, sell 25' rolls. Make sure you get the waterproof ones. There are some cheaper, but they are not encased I plastic.
Todd
Link
Todd
1993 Ford E-350 pushed by a 1988 Wilderness 24' TT
1993 Ford E-350 pushed by a 1988 Wilderness 24' TT
Options
- Mark as New
- Bookmark
- Subscribe
- Mute
- Subscribe to RSS Feed
- Permalink
- Report Inappropriate Content
Sep-14-2011 12:44 PM
Could you post your source for these lights?
Looks neat, tidy & classy!
Shari
Looks neat, tidy & classy!
Shari
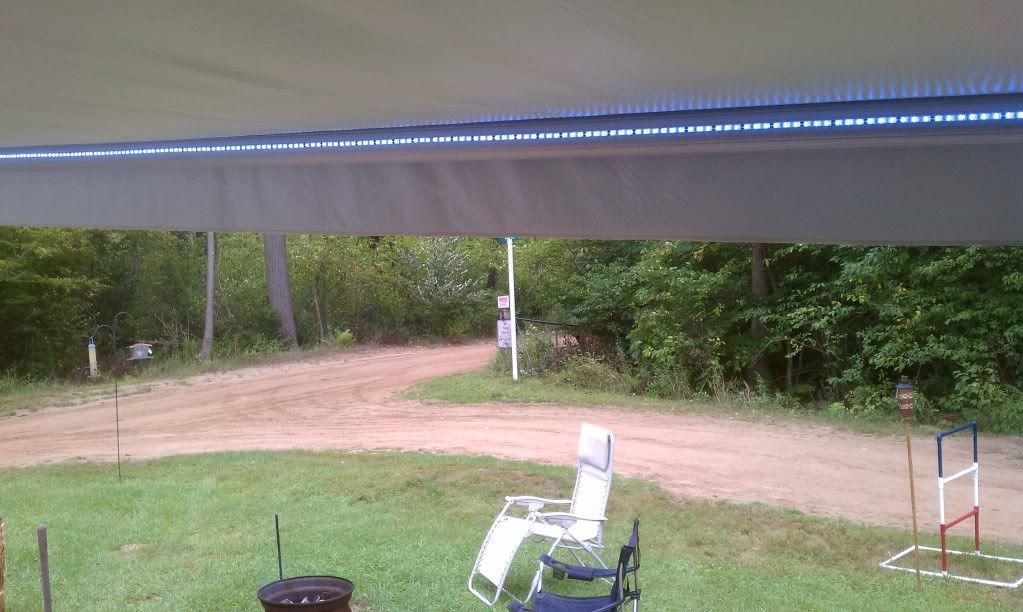
Rob8484 wrote:
I installed LED strip light on my awning, they work great, it sticks with 3M tape. I wired it up to a switch in the trailer. I just unplug them at the awning roller tube, and they roll right up in the awning, gives off a nice light!
Wisconsin - the best place to be!
Options
- Mark as New
- Bookmark
- Subscribe
- Mute
- Subscribe to RSS Feed
- Permalink
- Report Inappropriate Content
Sep-13-2011 07:28 AM
I would not be without my TPMS. Doesn't have to be screwed to the dash, can mount it anywhere.
Options
- Mark as New
- Bookmark
- Subscribe
- Mute
- Subscribe to RSS Feed
- Permalink
- Report Inappropriate Content
Sep-12-2011 06:57 PM
I like the idea of knowing what's going on back there buy not if it means something like that screwed to the dash.
It would be cool as part of a factory Nav, back up camera, entertainment system, TPMS though etc though, all stuff my 06 doesn't have... :h
It would be cool as part of a factory Nav, back up camera, entertainment system, TPMS though etc though, all stuff my 06 doesn't have... :h
06 Dodge Ram 3500 Cummins 6 spd std with a few goodies.
2007 Komfort 274TS, 480 watts solar, Trimetric 2025RV, PD9280, Honda EU2000i, Xantrex SW600
2019 Timber Ridge 24RLS, 600 watts solar, 3-100Ah Lithiums, 12volt Norcold Fridge
2007 Komfort 274TS, 480 watts solar, Trimetric 2025RV, PD9280, Honda EU2000i, Xantrex SW600
2019 Timber Ridge 24RLS, 600 watts solar, 3-100Ah Lithiums, 12volt Norcold Fridge
Options
- Mark as New
- Bookmark
- Subscribe
- Mute
- Subscribe to RSS Feed
- Permalink
- Report Inappropriate Content
Sep-12-2011 06:07 PM
SabreCanuck wrote:
I'm not sure the $65.00 price included the TPMS.. LOL
nice option though!!
No, the Dill TPMS is $266. not cheap and it better work well 😉
2017 Ram Big Horn, DRW Long Box, 4x4, Cummins, Aisin, 3.73
2022 Jayco Pinnacle 32RLTS, Onan 5500, Disc Brakes, 17.5" tires
B&W Ram Companion
2022 Jayco Pinnacle 32RLTS, Onan 5500, Disc Brakes, 17.5" tires
B&W Ram Companion
Options
- Mark as New
- Bookmark
- Subscribe
- Mute
- Subscribe to RSS Feed
- Permalink
- Report Inappropriate Content
Sep-12-2011 05:59 PM
I'm not sure the $65.00 price included the TPMS.. LOL
nice option though!!
nice option though!!
2011 GMC 2500 D-Max Denali
2015 Palomino Columbus 325RL
Our kids have 4 legs. 🙂
2015 Palomino Columbus 325RL
Our kids have 4 legs. 🙂
Options
- Mark as New
- Bookmark
- Subscribe
- Mute
- Subscribe to RSS Feed
- Permalink
- Report Inappropriate Content
Sep-12-2011 05:39 PM
TPMS = remote tire air pressure monitoring hootie 😉
06 Dodge Ram 3500 Cummins 6 spd std with a few goodies.
2007 Komfort 274TS, 480 watts solar, Trimetric 2025RV, PD9280, Honda EU2000i, Xantrex SW600
2019 Timber Ridge 24RLS, 600 watts solar, 3-100Ah Lithiums, 12volt Norcold Fridge
2007 Komfort 274TS, 480 watts solar, Trimetric 2025RV, PD9280, Honda EU2000i, Xantrex SW600
2019 Timber Ridge 24RLS, 600 watts solar, 3-100Ah Lithiums, 12volt Norcold Fridge


